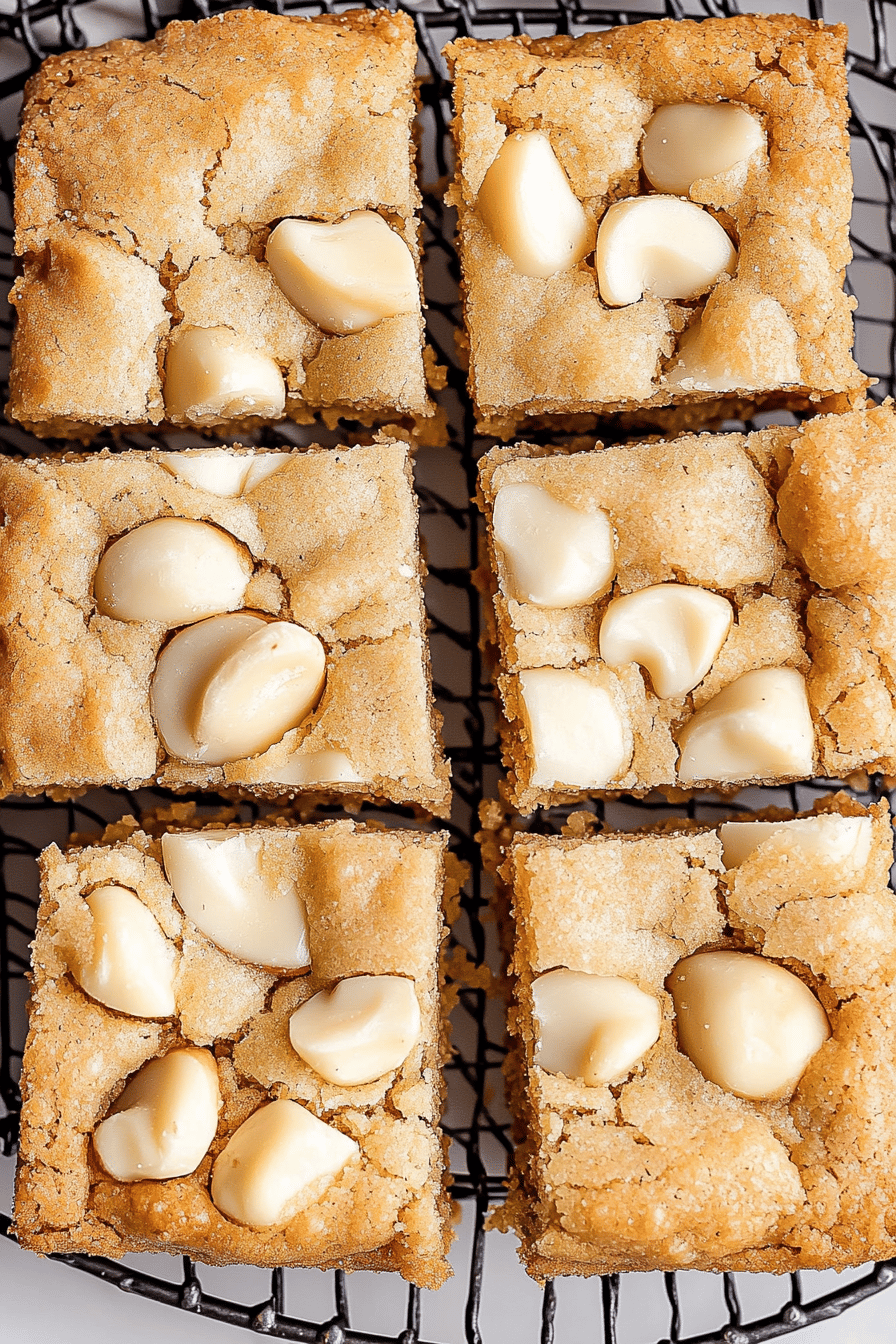
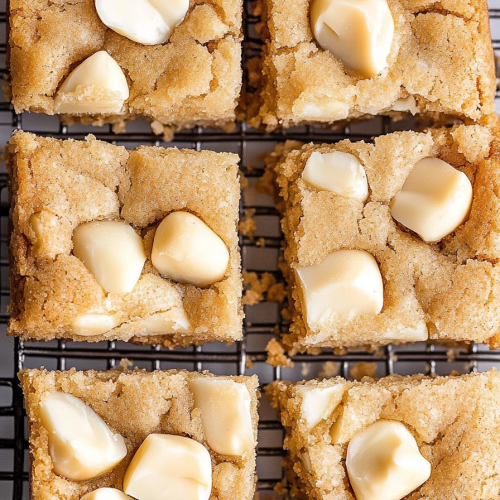
Oh, my goodness, where do I even begin with these White Chocolate Macadamia Cookie Bars? If there’s one treat that consistently brings smiles to faces in my house, it’s these. They’re like a warm hug in bar form, perfect for those moments when you’re craving something sweet but don’t have the energy (or, let’s be honest, the patience) to scoop and bake a whole batch of cookies. Honestly, they remind me of the incredible cookies my grandma used to make, but in this super convenient bar format. I remember begging her for them after school, and now my own kids do the same! They’re so incredibly satisfying, a perfect balance of chewy, gooey, and crunchy, with those pops of creamy white chocolate and the subtle, buttery crunch of macadamia nuts. If you’re a fan of classic Chocolate Chip Cookies, you’re going to absolutely adore these white chocolate macadamia cookie bars. They take all that beloved cookie goodness and make it even easier to share (or not share, I won’t judge!).
What is White Chocolate Macadamia Cookie Bar?
So, what exactly are these magical things? Think of them as your favorite chewy chocolate chip cookie, but instead of individual cookies, we bake it all together in one pan and cut it into bars. It’s essentially a baked Cookie Dough that’s been intensified with chunks of sweet white chocolate and the lovely crunch of toasted macadamia nuts. It’s the best of both worlds: the rich, buttery flavor of a classic cookie, the melt-in-your-mouth sweetness of white chocolate, and the satisfying texture of nuts, all in a portable, easy-to-serve bar. They’re less fussy than cookies because you don’t have to worry about rolling dough balls or uneven baking. You just press it into a pan, bake, and slice. Simple, right? They’re the ultimate convenience treat for anyone who loves that classic cookie taste but wants something a little more straightforward to whip up.
Why you’ll love this recipe?
Honestly, the list of reasons to love these White Chocolate Macadamia Cookie Bars is practically endless! First off, the FLAVOR. Oh, the flavor! You get that wonderful buttery base, but then the white chocolate melts into these gooey pockets of pure joy, and the macadamia nuts add this delightful, almost toffee-like crunch. It’s a flavor combination that’s hard to beat. Then there’s the SIMPLICITY. Seriously, this recipe is a lifesaver on busy weeknights or when unexpected guests pop over. You can whip up the batter in under 15 minutes, and the baking is all done in one pan. No more fussing with cookie sheets! And let’s talk about COST-EFFICIENCY. While white chocolate and macadamia nuts can sometimes feel a bit luxurious, when you buy them in bulk or on sale, they’re surprisingly affordable, especially when you consider how many servings you get from one pan. Compared to buying a dozen gourmet cookies, this is way more budget-friendly. Plus, they are incredibly VERSATILE. I mean, they’re perfect on their own, but you can also drizzle them with a little extra chocolate, sprinkle them with sea salt, or even add a swirl of raspberry jam for a different twist. What I love most about these is that they satisfy that cookie craving without any of the usual cookie-baking drama. It’s a win-win-win!
How do I make white chocolate macadamia cookie bars?
Quick Overview
This recipe is all about transforming your favorite cookie dough into an easy-to-bake bar. We’ll start by creaming butter and sugars, incorporating eggs and vanilla, then gently folding in the dry ingredients, White Chocolate chips, and macadamia nuts. The dough gets pressed into a prepared pan and baked until golden brown and slightly chewy. Once cooled, it’s ready to be sliced and enjoyed. It’s truly a straightforward process that yields incredible results every time, making it perfect for beginners and seasoned bakers alike.
Ingredients
For the Main Batter:
I always start with good quality butter, softened but not melted. It makes a world of difference in the texture. Make sure your eggs are at room temperature too; they incorporate much better that way. For the sugar, a mix of brown sugar and granulated sugar is key for that perfect chewy-yet-crisp cookie texture. The brown sugar adds moisture and that lovely caramel note. For the flour, all-purpose is perfect here. And don’t skimp on the vanilla extract – it really makes the flavors sing!
- 1 cup (2 sticks) unsalted butter, softened
- 1 cup packed light brown sugar
- 1/2 cup granulated sugar
- 2 large eggs, room temperature
- 2 teaspoons pure vanilla extract
- 2 1/4 cups all-purpose flour
- 1 teaspoon baking soda
- 1/2 teaspoon salt
- 1 1/2 cups (about 9 oz) white chocolate chips
- 1 cup (about 5 oz) chopped macadamia nuts, lightly toasted (optional, but highly recommended!)
For the Filling:
This recipe doesn’t really have a separate “filling” in the traditional sense, as the white chocolate and macadamia nuts are mixed directly into the batter. However, for an extra decadent touch, sometimes I like to reserve a small handful of white chocolate chips and nuts to sprinkle on top just before baking. It creates little pockets of extra goodness and makes the bars look even more appealing.
For the Glaze (Optional, but Recommended!):
A simple glaze takes these bars to the next level. It adds a touch of extra sweetness and a beautiful finish. You can make it super basic with just powdered sugar and a liquid, or get a little fancier. The consistency is key here – you want it thick enough to coat but thin enough to drizzle easily.
- 1 cup powdered sugar
- 2-3 tablespoons milk (or cream for richer glaze)
- 1/2 teaspoon vanilla extract (optional)
Step-by-Step Instructions
Step 1: Preheat & Prep Pan
First things first, get your oven preheated to 350°F (175°C). This is crucial for even baking. Then, grab an 8×8 inch or 9×9 inch baking pan. I highly recommend lining it with parchment paper, leaving some overhang on the sides. This makes lifting the baked bars out of the pan SO much easier, and cleanup is a breeze. Just lightly grease the pan before you lay the parchment down, or use parchment that has a baking spray coating. Make sure the parchment covers the bottom and comes up the sides a bit – you’ll thank me later when you’re trying to get these beauties out!
Step 2: Mix Dry Ingredients
In a medium bowl, whisk together the all-purpose flour, baking soda, and salt. Whisking them thoroughly at this stage ensures that the leavening agent (baking soda) and salt are evenly distributed throughout the batter. This is a small step, but it really helps prevent dense spots or salty pockets in your finished bars. You want a nice, uniform mixture. Set this aside for now.
Step 3: Mix Wet Ingredients
In a large bowl, cream together the softened butter, light brown sugar, and granulated sugar until light and fluffy. This usually takes about 3-5 minutes with an electric mixer (handheld or stand mixer works great here). You want to make sure the sugars are well incorporated into the butter. Next, beat in the eggs, one at a time, until fully combined. Then, stir in the vanilla extract. The mixture should be smooth and creamy. If your butter isn’t soft enough, it can lead to a greasy batter, so make sure it’s at that perfect pliable stage.
Step 4: Combine
Gradually add the dry ingredients to the wet ingredients, mixing on low speed or by hand until just combined. Be careful not to overmix here! Overmixing can develop the gluten in the flour too much, leading to tougher bars. We want them chewy and tender, not tough. Once the flour is *just* incorporated, stop mixing. It’s okay if there are still a few streaks of flour; they’ll disappear when you add the mix-ins.
Step 5: Prepare Filling
Now for the fun part! Gently fold in the white chocolate chips and the chopped, lightly toasted macadamia nuts into the cookie dough batter. I like to toast my nuts for a few minutes in a dry skillet over medium heat or in the oven until they’re fragrant and slightly golden. It really brings out their flavor. Again, fold these in gently until they’re evenly distributed. If you reserved some chips and nuts for topping, set those aside now.
Step 6: Layer & Swirl
Spoon the cookie dough into your prepared baking pan. Using slightly damp hands or a spatula, press the dough evenly into the bottom of the pan. You want a nice, uniform layer so that the bars bake evenly. If you reserved some white chocolate chips and macadamia nuts, sprinkle them over the top now. For a little extra visual appeal, you can gently press them into the surface. You can even do a very light “swirl” with a toothpick if you want to create some texture on top, but it’s not essential for these bars.
Step 7: Bake
Bake in your preheated oven for 25-35 minutes, or until the edges are golden brown and the center looks set but still slightly soft. The exact baking time will depend on your oven and the size of your pan. I always recommend starting to check around the 25-minute mark. A toothpick inserted into the center should come out with moist crumbs attached, not wet batter. You don’t want to overbake them, or they’ll become dry and crumbly instead of perfectly chewy.
Step 8: Cool & Glaze
This step is critical for getting clean slices! Let the bars cool *completely* in the pan on a wire rack. I know it’s tempting to dig in while they’re warm, but trust me, letting them cool allows them to set up properly. This is also the time to make your glaze if you’re using one. In a small bowl, whisk together the powdered sugar, 2 tablespoons of milk, and vanilla extract until smooth. Add more milk, a teaspoon at a time, if needed to reach a drizzle-able consistency. Once the bars are completely cool, drizzle the glaze over the top. Let the glaze set for about 15-20 minutes before slicing.
Step 9: Slice & Serve
Once everything has cooled and the glaze (if used) has set, use the parchment paper overhang to lift the entire block out of the pan onto a cutting board. Use a sharp knife to cut them into squares or rectangles. For the cleanest cuts, wipe the knife clean between slices, especially if the bars are a little soft. Serve them at room temperature for the best texture. They’re fantastic on their own, with a cup of coffee, or a tall glass of milk!
What to Serve It With
These White Chocolate Macadamia Cookie Bars are so wonderfully versatile, they fit into almost any occasion! For a lovely morning treat, I love pairing them with a strong, freshly brewed cup of coffee or a creamy latte. They’re a step up from a plain muffin and feel a bit more special. At a weekend brunch, I’ll often cut them into smaller, elegant squares and arrange them on a tiered serving stand alongside fruit salad and maybe some mini quiches. They add a touch of sweetness and festivity. For dessert, these are a dream! Serve them slightly warm (you can pop a slice in the microwave for 10-15 seconds) with a scoop of vanilla bean ice cream. The contrast of the warm bar and cold ice cream is divine. And on those cozy evenings when you just need a little something sweet, they’re perfect for a casual snack. My kids love them after school with a glass of cold milk – it’s their absolute favorite. Another family tradition is to serve them with a dollop of whipped cream and a few fresh raspberries for a pop of color and tartness.
Top Tips for Perfecting Your White Chocolate Macadamia Cookie Bars
Over the years, I’ve learned a few tricks that really help elevate these bars. For the macadamia nuts, toasting them really makes a difference. Just a few minutes in a dry skillet over medium heat, stirring constantly, until they’re fragrant and lightly golden, will unlock so much more flavor. It prevents them from tasting bland and adds a lovely crunch. When it comes to mixing the batter, my biggest advice is: do NOT overmix after adding the flour. Seriously, once you see the flour streaks disappearing, stop! Overmixing is the number one culprit for tough baked goods, and we want these to be wonderfully tender and chewy. I’ve learned this the hard way after a few batches that were just a bit too firm. For ingredient swaps, if you can’t find macadamia nuts, pecans or even almonds work well, though they’ll change the flavor profile slightly. And if you’re not a huge fan of white chocolate, you could absolutely substitute milk chocolate or dark chocolate chips, or even a mix! When it comes to baking, every oven is a little different. I tend to bake these in the center rack of my oven. If your oven tends to run hot, consider lowering the temperature by 25 degrees F or shortening the baking time slightly. You’re looking for that golden edge and a center that’s set but still has a slight give. For the glaze, the consistency is key. If it’s too thick, it’ll be hard to drizzle. If it’s too thin, it’ll just run off. Start with 2 tablespoons of milk and add more teaspoon by teaspoon until it’s just right. A tiny pinch of sea salt sprinkled on top of the glaze while it’s wet is also a fantastic way to balance the sweetness!
Storing and Reheating Tips
These bars are quite forgiving when it comes to storage. At room temperature, I find they stay wonderfully fresh for about 3-4 days, as long as they’re stored in an airtight container. I usually just keep them in the pan they were baked in, covered tightly with plastic wrap or foil. If I’ve already cut them, I’ll transfer them to a container with a tight-fitting lid. If you live in a warm climate, or if your kitchen is particularly warm, you might want to store them in the refrigerator. They’ll last for up to a week in the fridge, and the refrigeration actually makes them even chewier, which some people really love! Just be sure to let them come back to room temperature for about 15-20 minutes before serving for the best texture. For longer storage, freezing is absolutely an option. I like to cut the bars into individual portions and wrap each one tightly in plastic wrap, then place them in a freezer-safe bag or container. They’ll keep well in the freezer for up to 2-3 months. To thaw, just unwrap them and let them sit at room temperature for an hour or two. If you decide to glaze your bars, it’s best to do that *after* thawing or right before serving, as the glaze can sometimes become sticky or lose its sheen when frozen and thawed. For reheating, if they’ve been refrigerated or frozen, a quick 10-15 second zap in the microwave is usually enough to warm them up slightly and make them extra gooey and delicious.
Frequently Asked Questions
Final Thoughts
I really hope you give these White Chocolate Macadamia Cookie Bars a try. They’re more than just a recipe to me; they’re a little slice of happiness that I love sharing. They embody that perfect blend of comfort food and elegant treat that’s so hard to find. The way the white chocolate melts into gooey pockets, the satisfying crunch of the macadamia nuts, all wrapped up in that classic buttery cookie flavor – it’s just magical. If you love these, you might also enjoy my recipes for [Link to another related recipe, e.g., Chewy Chocolate Chip Cookies] or my [Link to another related recipe, e.g., No-Bake Oatmeal Bites] for more easy and delicious treats. Don’t be afraid to experiment a little and make them your own! I can’t wait to hear how yours turn out and what variations you come up with. Happy baking, and enjoy every delicious bite!
White Chocolate Macadamia Cookie Bars
Ingredients
Main Ingredients
- 0.5 cup unsalted butter softened
- 1 cup granulated sugar
- 0.5 cup light brown sugar packed
- 2 large eggs
- 1 teaspoon vanilla extract
- 2 cups all-purpose flour
- 0.5 teaspoon baking soda
- 0.5 teaspoon salt
- 1.5 cups white chocolate chips
- 1 cup macadamia nuts chopped
Instructions
Preparation Steps
- Preheat your oven to 350°F (175°C). Grease and flour a 9x13 inch baking pan.
- In a large bowl, cream together the softened butter, granulated sugar, and brown sugar until light and fluffy.
- Beat in the eggs one at a time, then stir in the vanilla extract.
- In a separate medium bowl, whisk together the flour, baking soda, and salt.
- Gradually add the dry ingredients to the wet ingredients, mixing until just combined.
- Stir in the white chocolate chips and chopped macadamia nuts.
- Spread the dough evenly into the prepared baking pan.
- Bake for 20-25 minutes, or until the edges are golden brown and the center is set.
- Let the bars cool completely in the pan before cutting into squares.