Oh, you guys, I am SO excited to finally share this recipe with you! It feels like ages since I first whipped this up, and every single time I make it, it’s like a little burst of pure joy. You know those classic fast-food milkshakes that come out every spring, the ones with the bright green hue and that unmistakable minty-vanilla flavor? Well, imagine that, but in PIE form. Yes, you heard me right. A creamy, dreamy, no-bake pie that tastes exactly like your favorite Shamrock Shake, but with a delightful Pie Crust to hold all that deliciousness. I’ve been perfecting this shamrock shake pie recipe for a while now, trying to capture that perfect balance of creamy texture and that iconic minty freshness. It’s honestly a lifesaver for those days when you’re craving something sweet and festive but don’t want to spend hours in the kitchen. Think of it as the ultimate treat that brings a little bit of St. Patrick’s Day magic right into your home, no matter the season. My family devours this, and honestly, I’m usually sneaking a slice after everyone else has gone to bed. It’s THAT good.
What is a Shamrock Shake Pie?
So, what exactly is this magical creation? At its heart, a shamrock shake pie recipe is a no-bake dessert that mimics the flavor and texture of that beloved mint-vanilla milkshake. It’s typically built on a simple, buttery cookie crust (graham cracker or shortbread is my favorite!) and then filled with a rich, creamy, mint-infused filling. The “shake” aspect comes from using ingredients that give it that signature smooth, milkshake-like consistency – think CREAM CHEESE, whipped cream, and a touch of condensed milk for sweetness and body. The “Shamrock” part? That’s the vibrant green color and, of course, that delightful hint of mint that makes it so distinctive. It’s essentially taking all the best parts of a classic spring treat and transforming it into an elegant (but still super easy!) dessert that you can slice and serve. No oven required, which, let’s be honest, is a huge win in my book, especially when it’s warm out or I’m just feeling a little bit lazy but still want something impressive.
Why you’ll love this recipe?
Honestly, there are so many reasons why this shamrock shake pie recipe has become an absolute staple in my rotation. First and foremost, the FLAVOR is just out of this world. It truly captures that authentic Shamrock Shake taste – that perfect blend of creamy vanilla with a refreshing burst of mint. It’s sweet, but not cloyingly so, and that minty kick is just *chef’s kiss*. What I love most about this recipe is its sheer SIMPLICITY. It’s a no-bake pie, which means no fussing with ovens, no worrying about over or under-baking, and it comes together surprisingly quickly. Even if you’re not a seasoned baker, you can totally nail this. Plus, it’s incredibly COST-EFFECTIVE. Most of the ingredients are pantry staples, and the few special items you might need are usually quite affordable. This pie is also surprisingly VERSATILE. While it’s a natural fit for St. Patrick’s Day, it’s fantastic for Easter, spring birthdays, or just when you need a bright, refreshing dessert. You can even play around with the crust – I’ve tried chocolate cookie crumbs, and they were delicious too! Compared to a traditional Ice Cream pie or a baked custard, this is so much less work and often yields just as many, if not more, smiles. It’s the kind of dessert that makes people ask, “How did you make this?!” and then they’re shocked to hear how easy it was. It’s also a fantastic way to use up any leftover cream cheese or heavy cream you might have lying around!
How do you make a shamrock shake
Quick Overview
Making this shamrock shake pie is wonderfully straightforward. You’ll start by creating a simple, crumbly pie crust, then mix up a luscious, mint-infused filling until it’s smooth and creamy. The magic happens when you pour that filling into the prepared crust and let it chill until it’s perfectly set. It’s a no-bake marvel that relies on the chilling process to firm everything up, making it super forgiving and incredibly easy to achieve a beautiful, sliceable dessert every time. It’s the kind of recipe that makes you feel like a baking genius with minimal effort.
Ingredients
For the Crust:
2 cups graham cracker crumbs (
1/4 cup granulated sugar
1/2 cup (1 stick) unsalted butter, melted
For the Filling:
8 ounces cream cheese, softened to room temperature
1 (14 ounce) can sweetened condensed milk
1/4 cup milk (whole milk works best for creaminess, but 2% is fine too)
1 teaspoon pure vanilla extract
1/2 teaspoon peppermint extract (start with this, you can add a tiny bit more if you like it stronger)
Green food coloring (gel coloring is best for vibrant color without adding too much liquid)
For the Glaze (Optional, but highly recommended!):
1 cup powdered sugar, sifted
2-3 tablespoons milk
1/4 teaspoon peppermint extract
Green food coloring (a tiny drop to tint)
Step-by-Step Instructions
Step 1: Preheat & Prep Pan
Okay, first things first! Even though this is a no-bake pie, we still need our crust ready. Grab a 9-inch pie plate. For the crust, I like to use the back of a spoon or a flat-bottomed glass to really press the crumbs firmly into the bottom and up the sides of the pie plate. This is key to a crust that doesn’t crumble apart when you slice it. Once it’s packed in nice and tight, pop the pie plate into the freezer for about 10-15 minutes. This helps it firm up beautifully before we even think about the filling.
Step 2: Mix Dry Ingredients
In a medium bowl, combine your graham cracker crumbs and granulated sugar. Give them a good whisk to make sure everything is evenly distributed. This might seem like a small step, but it ensures your crust has consistent sweetness and texture throughout. I always find that using a whisk helps break up any little clumps of sugar that might be hiding in there.
Step 3: Mix Wet Ingredients
Now, for the filling! In a large mixing bowl (preferably with an electric mixer, either stand or hand-held, because it makes things SO much smoother), beat the softened cream cheese until it’s wonderfully smooth and creamy. You want absolutely no lumps here – that’s the secret to a super silky filling. Then, gradually add the sweetened condensed milk, mixing until it’s well combined and looks pale and fluffy. Next, pour in the milk, vanilla extract, and peppermint extract. Mix again until everything is perfectly blended. This is where the creamy base for our shamrock shake pie really comes to life!
Step 4: Combine
This is where the magic starts to happen! Once your cream cheese mixture is smooth and lovely, it’s time to add the color. Add a few drops of green food coloring. I always recommend starting with a little and adding more until you reach that perfect, vibrant Shamrock Shake green. Gel food coloring is your best friend here, as it gives you intense color without thinning out the filling too much. Mix it in thoroughly until the color is uniform. You’re aiming for that iconic shade! Be careful not to overmix once the color is in, just enough to get it evenly distributed.
Step 5: Prepare Filling
Actually, step 4 *was* preparing the filling! That’s how easy this is. The filling is already made and beautifully colored. Just make sure to scrape down the sides of the bowl a couple of times to ensure everything is incorporated. The texture should be thick and luscious, almost like a soft-serve ice cream. This is the base that will set up into that wonderful pie consistency.
Step 6: Layer & Swirl
Take your chilled pie crust out of the freezer. Gently pour the green filling into the crust. Use a spatula to spread it evenly. For an extra touch of fun, you can even add a few swirls of plain white filling (a little of the cream cheese mixture before you added the food coloring) or some dollops of whipped cream swirled in, but honestly, the vibrant green is usually enough! Smooth the top so it’s nice and even.
Step 7: Bake
Wait, bake? Nope! Remember, this is a no-bake pie! So, no baking required at all. That’s the beauty of it! Just pop the pie into the refrigerator to chill. This is the most important part for getting that firm, sliceable texture. Let it chill for at least 4-6 hours, or preferably overnight. The longer it chills, the firmer it will get. I usually make mine the day before I plan to serve it, just to be safe. It’s worth the wait, trust me!
Step 8: Cool & Glaze
Once your pie is firmly set and chilled, it’s time for the finishing touches. If you’re making the optional glaze (and I highly recommend it for that extra pizazz!), whisk together the sifted powdered sugar, milk, peppermint extract, and a tiny drop of green food coloring until smooth. You’re looking for a drizzle-able consistency – thick enough to hold its shape a bit, but thin enough to pour. Drizzle this glaze over the top of your chilled pie. It adds a lovely sweetness and a little visual flair. Let the glaze set for about 15-20 minutes before slicing.
Step 9: Slice & Serve
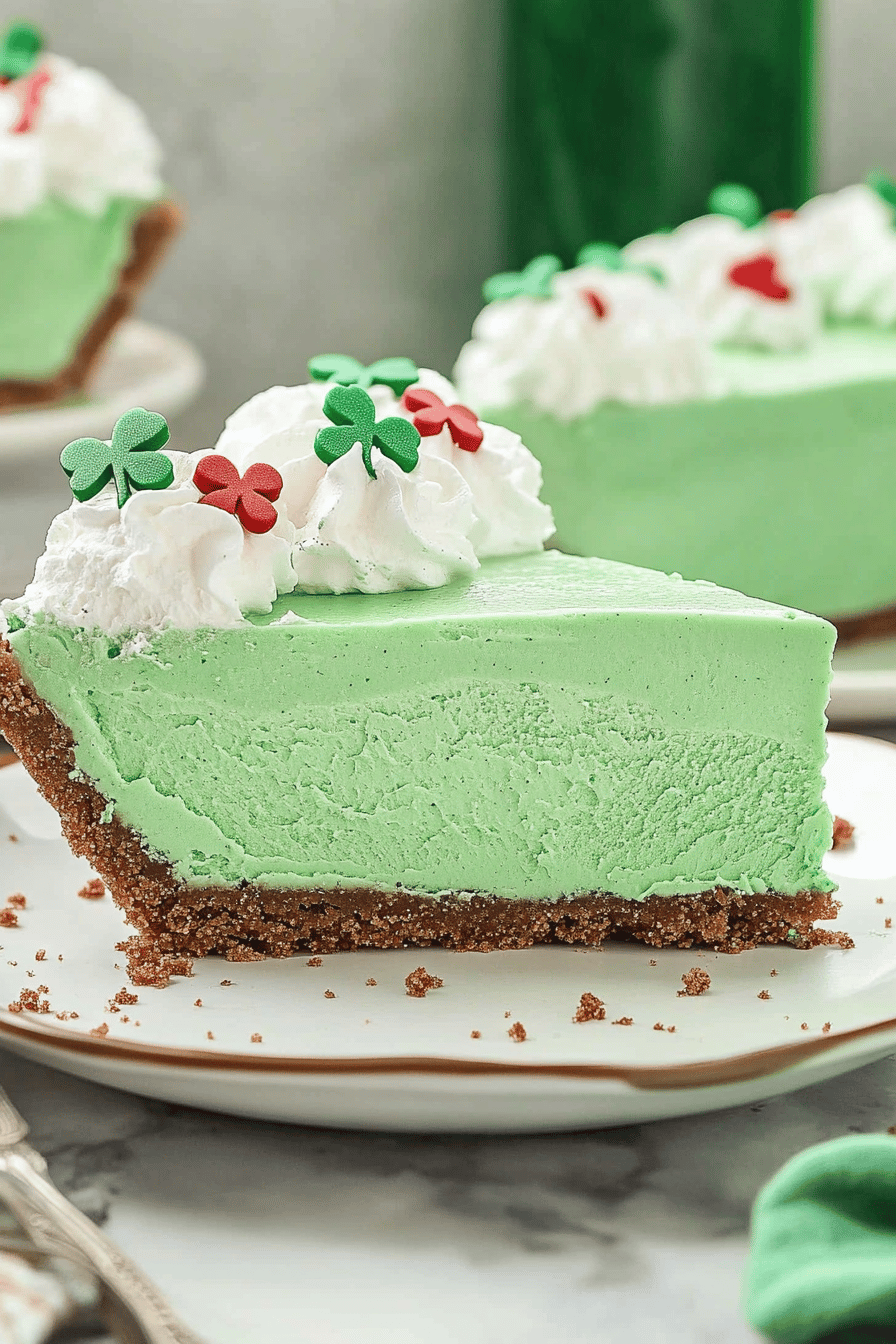
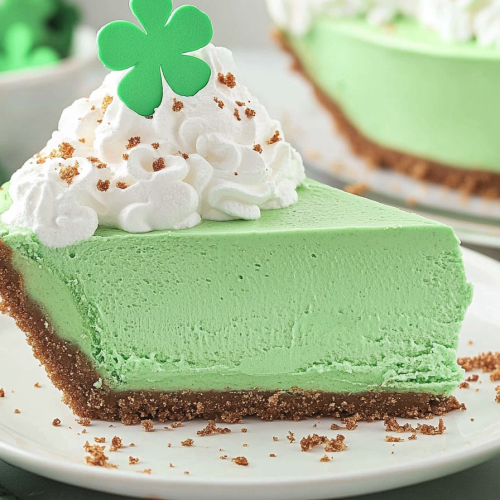
Now for the best part! Carefully slice your shamrock shake pie into wedges. I find using a sharp knife dipped in hot water and wiped dry between slices helps get cleaner cuts. Serve it chilled, maybe with a dollop of whipped cream and a cherry on top if you’re feeling fancy. The texture should be smooth, creamy, and utterly delightful. It’s perfect for any occasion, but especially fun around St. Patrick’s Day!
What to Serve It With
This shamrock shake pie is so versatile, it can be the star of the show or a delightful accompaniment. For BREAKFAST, though I know it sounds decadent, a small slice alongside a strong cup of coffee is surprisingly divine. The minty freshness cuts through the richness of the coffee beautifully. For BRUNCH, it’s a showstopper. Serve it alongside some fresh fruit salad, maybe some mini quiches, or even some Fluffy Pancakes. The vibrant green color adds a festive touch that’s perfect for spring gatherings. AS DESSERT, it’s a winner every time. It’s lighter than a heavy chocolate cake, making it a great palate cleanser after a rich meal. Pair it with some fresh berries or a drizzle of chocolate sauce for an extra indulgence. And for COZY SNACKS? Absolutely! Cut it into small squares for an afternoon pick-me-up or a sweet treat to enjoy with a good book and a glass of milk. My kids also love it crumbled up a bit and served in small glasses with whipped cream and sprinkles as “dessert parfaits.” It’s a fun twist that feels extra special to them. Honestly, any time you’re craving something sweet, refreshing, and a little bit fun, this pie delivers!
Top Tips for Perfecting Your Shamrock Shake Pie
I’ve made this shamrock shake pie recipe more times than I can count, and over the years, I’ve picked up a few little tricks that I think really elevate it. For the CRUST, make sure your graham cracker crumbs are really fine. A food processor is your best friend here, or you can use a zip-top bag and a rolling pin – just get them as pulverized as possible! When you mix the crumbs with the melted butter, it should feel like wet sand; this ensures the crust holds together. Pressing it firmly into the pan is NON-NEGOTIABLE. I cannot stress this enough! For the MIXING ADVICE, when you’re beating the cream cheese, make sure it’s truly softened. Cold cream cheese will lead to lumps, and nobody wants a lumpy shamrock shake pie. Take your time and beat it until it’s super smooth before adding anything else. When it comes to the mint flavor, START SMALL. Peppermint extract can be potent! You can always add a little more, but you can’t take it away. A little goes a long way, and you want that subtle, refreshing hint, not an overpowering toothpaste flavor. For SWIRL CUSTOMIZATION, if you want to do a swirl, take out about 1/4 cup of the cream cheese mixture *before* you add the food coloring. Then, color the rest of the main batch green. Dollop spoonfuls of the white and green mixtures into the pie crust and use a toothpick or a knife to gently swirl them together. Don’t over-swirl, or you’ll lose the definition! For INGREDIENT SWAPS, while graham crackers are my go-to, I’ve found that shortbread cookie crumbs or even vanilla wafer crumbs work beautifully for the crust, offering slightly different flavor profiles. For the milk, whole milk really does give you the richest, creamiest texture, but if you’re out, any milk will do in a pinch. I haven’t experimented with non-dairy versions much, but I suspect a full-fat coconut milk might work for the filling, though it might alter the flavor slightly. For BAKING TIPS (or in this case, CHILLING TIPS!), patience is key. Seriously, let it chill for the full time. I know it’s tempting to dig in early, but the pie needs that time to set properly. If it’s still a bit soft, pop it back in the fridge. For GLAZE VARIATIONS, if you don’t want a glaze, a dusting of powdered sugar or some whipped cream is perfectly lovely. You can also add a tiny pinch of sea salt to the glaze for a sweet and salty contrast that is surprisingly delicious!
Storing and Reheating Tips
Okay, so let’s talk about leftovers, though honestly, they’re rare in my house! If you happen to have any shamrock shake pie left, storage is pretty simple. At ROOM TEMPERATURE, this pie is best eaten relatively quickly. I wouldn’t leave it out for more than an hour or two, especially if it’s warm where you are, because of the cream cheese and dairy. It’s really meant to be a chilled dessert. For REFRIGERATOR STORAGE, this is your best bet. Once the pie is fully set, cover it tightly with plastic wrap or transfer it to an airtight container. It will keep well in the fridge for about 3-4 days. The texture might change slightly over time, becoming a little firmer, but it’s still delicious. I find it’s best when eaten within the first two days. For FREEZER INSTRUCTIONS, you *can* freeze this pie, but the texture might be a little different when thawed. If you choose to freeze it, make sure it’s completely set and chilled first. Wrap it very tightly in a double layer of plastic wrap, then in aluminum foil or an airtight freezer container. It should last for about 1-2 months. To thaw, transfer the frozen pie to the refrigerator overnight. You might want to add a fresh swirl of whipped cream or a bit of glaze after thawing if the original topping looks a little imperfect. My GLAZE TIMING ADVICE is to only add the glaze right before you plan to serve it, especially if you’re going to be storing it for more than a day or have any chance of leftovers. If you glaze it and then store it, the glaze can sometimes become a bit sticky or gooey. It’s always best to glaze a fresh slice or glaze the entire pie just before serving for the prettiest presentation.
Frequently Asked Questions
Final Thoughts
There you have it – my absolute favorite shamrock shake pie recipe! I really hope you give this a try. It’s more than just a dessert; it’s a little slice of springtime happiness that’s incredibly easy to whip up. The blend of creamy texture and that refreshing mint flavor is just unbeatable, and the fact that it’s no-bake makes it a lifesaver for busy schedules or when you just don’t feel like turning on the oven. It’s the kind of recipe that brings smiles and requests for seconds, proving that you don’t need complicated steps to create something truly special. If you love this, you might also enjoy my recipe for a No-Bake Mint Chocolate Chip Cheesecake – it has a similar creamy, cool vibe! I can’t wait to hear how your shamrock shake pie turns out! Please drop a comment below with your thoughts, any variations you tried, or even just to say hello. And if you share a photo, be sure to tag me! Happy baking (or in this case, happy chilling)!
Shamrock Shake Pie Recipe
Ingredients
Crust
- 1.5 cups Oreo cookie crumbs
- 0.25 cup Butter, melted
Filling
- 1 quart Vanilla ice cream, softened
- 0.5 cup Milk
- 1 teaspoon Peppermint extract
- 6 drops Green food coloring
Toppings
- 1 cup Whipped cream
- 0.25 cup Mini chocolate chips
Instructions
Preparation Steps
- For the crust: In a medium bowl, combine the Oreo cookie crumbs and melted butter. Press the mixture evenly into the bottom and up the sides of a 9-inch pie plate.
- For the filling: In a blender, combine the softened vanilla ice cream, milk, peppermint extract, and green food coloring. Blend until smooth and creamy.
- Pour the filling into the prepared crust and spread evenly.
- Cover the pie and freeze for at least 4 hours, or until firm.
- Before serving, top the pie with whipped cream and mini chocolate chips.
![Vanilla French Beignets [120 Minutes]](https://www.recipesharinghub.com/wp-content/uploads/2026/01/auto-1f4192040def1962e5266df2da80b42e-768x1152.png)