Oh, where do I even begin with these Sesame Garlic Ribs? They’re more than just a recipe to me; they’re a gateway to memories, a symphony of flavors that transports me straight back to my childhood kitchen. I remember my mom making a version of these when we were kids, and even though hers were a bit simpler, that sticky, savory, garlicky sauce clinging to tender pork ribs was pure magic. This recipe is my grown-up, slightly more sophisticated take on that beloved classic. If you’re looking for a dish that’s impressive enough for company but surprisingly easy for a weeknight treat, you’ve stumbled upon a real gem. These ribs are what I whip up when I want something that feels a little special, a little indulgent, but doesn’t require me to spend all day slaving away. They’re that perfect balance of sweet, savory, and that wonderful garlicky punch that just makes your taste buds sing. Honestly, they’re like my personal comfort food, elevated.
What are Sesame Garlic Ribs?
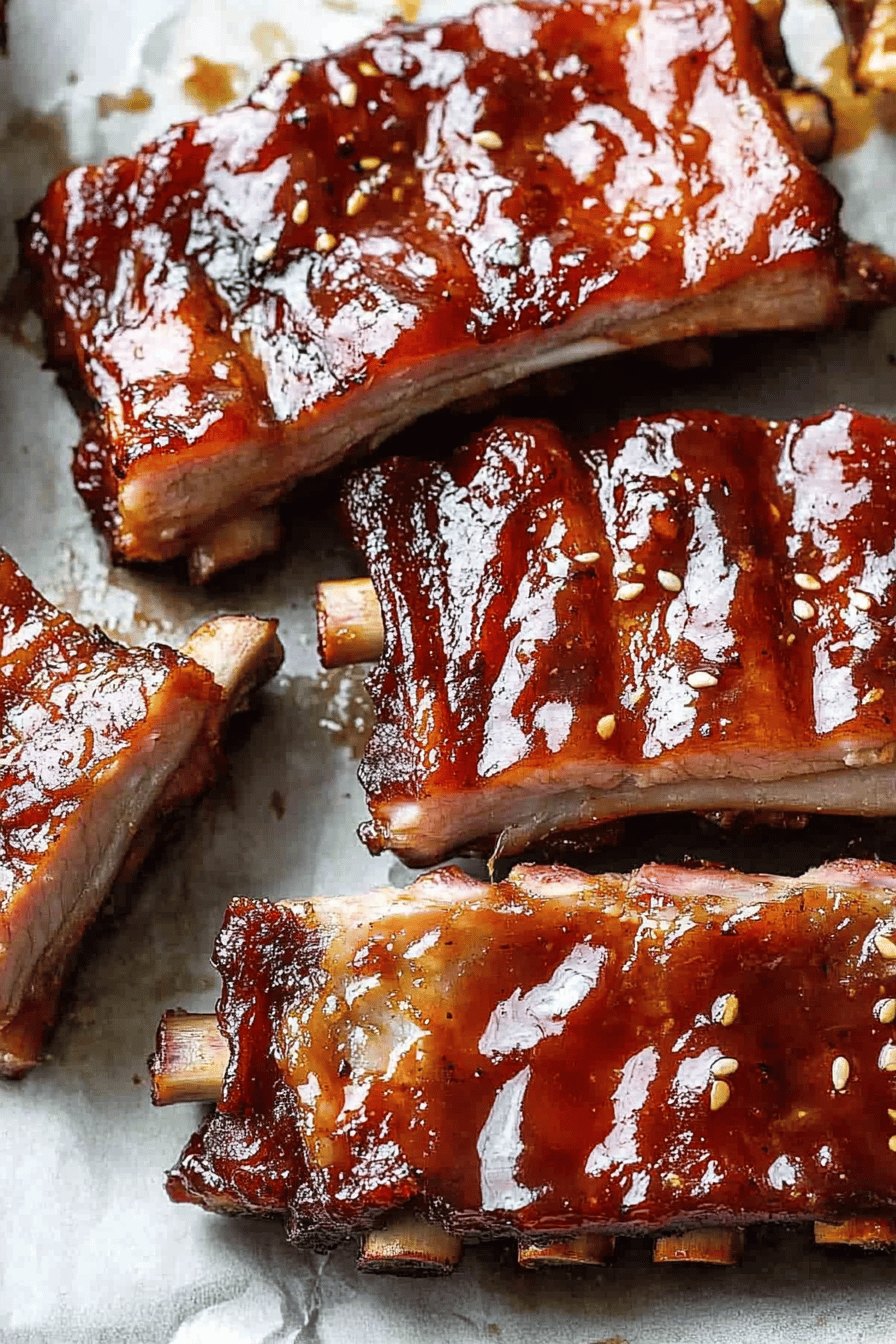
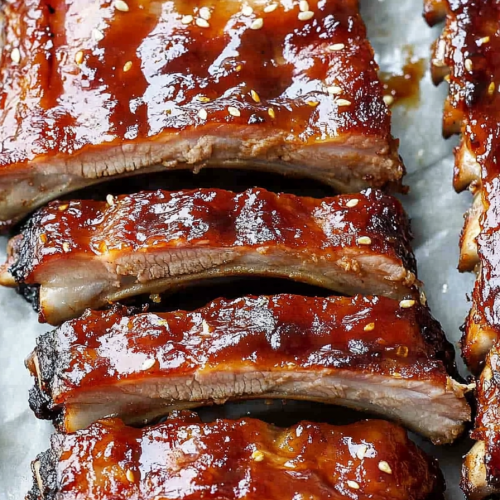
So, what exactly are these glorious Sesame Garlic Ribs? Think of them as your favorite fall-off-the-bone pork ribs, but coated in this absolutely divine, sticky, sweet, and savory glaze that’s loaded with toasted sesame oil and heaps of fresh garlic. It’s not just a sauce; it’s a flavor bomb that gets caramelized onto the ribs as they bake, creating these irresistible crispy bits and incredibly tender meat. The “sesame garlic” part of the name? It’s all about those star players! The toasted sesame oil gives it this wonderful nutty aroma and depth, while the garlic, well, it’s garlic! We use plenty of it, and when it melds with the other ingredients in that sticky glaze, it becomes this beautifully fragrant, savory cornerstone. It’s not overly complicated, but the result is so much more than the sum of its parts. It’s essentially a hug in rib form, if you can imagine that!
Why you’ll love this recipe?
Let me tell you, this recipe for Sesame Garlic Ribs has earned a permanent spot in my recipe rotation, and I’m pretty sure it’ll become a favorite of yours too. First off, the FLAVOR! Oh. My. Goodness. That sticky glaze is a masterpiece. You get the sweetness from honey or brown sugar, the salty umami from soy sauce, that unmistakable nutty fragrance of toasted sesame oil, and then the punchy, aromatic goodness of fresh garlic. It’s a flavor combination that’s just utterly addictive. And here’s the best part: SIMPLICITY. I know ribs can sometimes sound intimidating, but these are surprisingly straightforward. You’re basically making a quick glaze, tossing the ribs in it, and letting the oven do the heavy lifting. No complicated marinades, no hours of tending a grill. Plus, they’re incredibly COST-EFFECTIVE. Ribs can often be bought on sale, and the glaze ingredients are pantry staples for most of us. You get a restaurant-quality dish without the hefty price tag. And let’s talk VERSATILITY. Serve these as a showstopper for a BBQ, a delightful appetizer for game night, or even as a main course with some steamed rice and greens. They’re amazing as is, but you can also tweak the glaze to your liking – maybe a little sriracha for heat or a splash of rice vinegar for tang. What I love most about this recipe is that it hits all the right notes: it’s incredibly delicious, relatively easy to pull off, and always gets rave reviews. It’s the kind of dish that makes you feel like a culinary superhero without breaking a sweat.
How do I make garlic ribs?
Quick Overview
The magic behind these Sesame Garlic Ribs lies in their simplicity. You’ll start by prepping your ribs, then whisking together a quick, flavorful glaze. The ribs get coated, then baked until they’re perfectly tender and caramelized. It’s a straightforward process that results in incredibly succulent ribs with a sticky, savory coating. The key is letting the oven do its work, allowing the flavors to meld and the glaze to turn beautifully sticky and irresistible. Trust me, this method is a lifesaver on busy nights when you want something impressive without all the fuss.
Ingredients
For the Ribs:
2 racks (about 3-4 lbs total) pork Baby Back Ribs or spareribs.
1 tablespoon olive oil
Salt and freshly ground black pepper, to taste
For the Sesame Garlic Glaze:
1/2 cup soy sauce (low sodium is fine if you prefer)
1/4 cup honey (or brown sugar for a deeper, molasses note)
3 tablespoons rice vinegar (or apple cider vinegar)
2 tablespoons toasted sesame oil (this is key for that nutty aroma!)
4-6 cloves garlic, minced (don’t be shy with the garlic here!)
1 teaspoon grated fresh ginger (optional, but adds a lovely zing)
1/4 teaspoon red pepper flakes (optional, for a little warmth)
For Garnish (Optional):
Toasted sesame seeds
Thinly sliced green onions
Step-by-Step Instructions
Step 1: Preheat & Prep Pan
First things first, preheat your oven to 325°F (160°C). This lower temperature helps the ribs cook gently and become super tender without drying out. Now, grab a large baking sheet. If you want to make cleanup a breeze (and trust me, you do!), line it with aluminum foil or parchment paper. Then, place the ribs on the prepared baking sheet. I like to remove the tough membrane from the back of the ribs if it’s still there – you can usually get a knife under it and peel it off with a paper towel. It makes the ribs more tender. Rub the ribs all over with a little olive oil, then season them generously with salt and freshly ground Black Pepper. Don’t go overboard with the salt, as the soy sauce in the glaze is quite salty.
Step 2: Mix Dry Ingredients
In a medium bowl, whisk together the soy sauce, honey (or brown sugar), rice vinegar, and toasted sesame oil. This is the base of our incredible glaze. Whisk it until the honey or sugar is fully dissolved into the liquids. If you’re using brown sugar, it might take a little longer to dissolve, so just keep whisking until it’s smooth.
Step 3: Mix Wet Ingredients
To that beautiful base mixture, add your minced garlic, grated ginger (if using), and red pepper flakes (if you like a little heat). Give it another good whisk to combine everything thoroughly. The aroma at this stage is already amazing – that fragrant garlic and ginger with the sweet and savory notes? It’s a preview of deliciousness to come!
Step 4: Combine
Now for the glorious part! Pour about half of the glaze mixture evenly over the seasoned ribs on the baking sheet. Use a brush or the back of a spoon to make sure the ribs are well-coated on all sides. We’re saving the other half of the glaze for later. This initial coating helps infuse the ribs with flavor right from the start.
Step 5: Prepare Filling
This step is more about the glaze coming together during baking, so just ensure your glaze mixture is ready to go. The beauty of this recipe is that the “filling” is already in the glaze, and it’s going to get wonderfully concentrated as it bakes.
Step 6: Layer & Swirl
We’re not really layering or swirling in the traditional sense here, but we are going to ensure an even coating. Lay the ribs in a single layer on the baking sheet. If your ribs are particularly large, you might need two baking sheets to avoid overcrowding, which helps them cook evenly.
Step 7: Bake
Cover the baking sheet tightly with aluminum foil. This creates a steamy environment that helps tenderize the ribs. Pop it into your preheated oven and bake for about 1.5 to 2 hours, or until the ribs are tender when pierced with a fork. The exact time will depend on the thickness of your ribs. After that initial covered bake, remove the foil. Now, brush the remaining glaze generously over the top of the ribs. Increase the oven temperature to 375°F (190°C) and bake for another 20-30 minutes, uncovered, or until the glaze is bubbly, sticky, and beautifully caramelized. Keep an eye on them during this last stage to prevent the sugars from burning. You want them caramelized, not charred!
Step 8: Cool & Glaze
Once they’re done and gorgeously sticky, carefully remove the baking sheet from the oven. Let the ribs rest for about 5-10 minutes before slicing. This allows the juices to redistribute, making them even more tender and flavorful. While they’re resting, if any of that extra glaze in the pan looks particularly delicious, you can spoon a little bit more over the top right before serving.
Step 9: Slice & Serve
Now for the best part – slicing and devouring! Cut the ribs into individual portions or serving-sized pieces. Arrange them on a platter. For that extra flair, sprinkle with toasted sesame seeds and some fresh, thinly sliced green onions. The crunch of the sesame seeds and the fresh bite of the green onions really complement the rich, sticky ribs perfectly. Serve them warm and watch them disappear!
What to Serve It With
These Sesame Garlic Ribs are so versatile, they fit into almost any meal plan. For a simple BREAKFAST (yes, breakfast!), I sometimes serve them with scrambled eggs and a side of crispy fried potatoes. It’s a bit of a decadent start to the day, but totally worth it. When it’s time for BRUNCH, they’re fantastic alongside a fresh green salad, some fluffy rice, or even with some corn on the cob if it’s in season. For a more elegant presentation, arrange them on a nice platter with a drizzle of extra glaze and a scattering of green onions. They also make a wonderful main course for DINNER. My go-to is always a big bowl of steamed jasmine rice to soak up all that glorious glaze, and a side of steamed or stir-fried Asian greens like bok choy or gai lan. The freshness of the greens cuts through the richness of the ribs beautifully. And for COZY SNACKS, especially during movie nights or game days, they’re just perfect. Serve them with some extra napkins and maybe some extra dipping sauce on the side. My kids actually request these as a “special treat” snack, and they never last long!
Top Tips for Perfecting Your Sesame Garlic Ribs
Over the years of making these Sesame Garlic Ribs, I’ve picked up a few tricks that I think really make a difference. When it comes to the RIBS THEMSELVES, always opt for good quality ones if you can. Baby back ribs are a bit leaner and more tender, while spareribs have a bit more fat and flavor. Whichever you choose, making sure to remove that tough silverskin from the back is a game-changer for tenderness. For the GLAZE, the quality of your soy sauce and toasted sesame oil matters. A good toasted sesame oil has a much deeper, nuttier flavor than regular sesame oil, and it’s worth seeking out. Don’t be afraid to use plenty of garlic! The flavor mellows and sweetens as it cooks, and that fresh garlic punch is what makes these ribs so special. I’ve found that MINCING the garlic very finely, or even grating it, helps it distribute more evenly into the glaze. If you’re not a fan of ginger, you can skip it, but I find it adds a really lovely, subtle warmth that complements the other flavors. When it comes to BAKING, the low and slow method with the foil cover is crucial for tender ribs. Don’t rush this part! The second stage, uncovered, is where you get that gorgeous caramelization. Watch them closely during this phase; ovens vary, and you don’t want them to burn. If your glaze seems a little too thin at the end, you can always mix a teaspoon of cornstarch with a tablespoon of water and whisk it into the glaze in the pan for the last 10 minutes of baking to help it thicken up. For my family, the optional red pepper flakes are a must, but if you’re sensitive to spice, definitely leave them out or use just a pinch. And a final tip: don’t be afraid to experiment with your GLUTEN-FREE needs. I’ve used tamari instead of soy sauce with great success, and you can achieve a similar sticky texture using gluten-free brown rice syrup or even maple syrup in place of honey if needed. The key is that sticky, sweet-savory balance!
Storing and Reheating Tips
These Sesame Garlic Ribs are so good, you’ll likely want to enjoy every last bit, but if you happen to have leftovers (which is rare in my house!), here’s how to store and reheat them properly to keep them tasting fantastic. For ROOM TEMPERATURE storage, it’s best to get them into the fridge within two hours of cooking. They’ll keep well in an airtight container in the refrigerator for up to 3-4 days. I usually let them cool down a bit on the counter before packing them away. When it comes to REFRIGERATOR STORAGE, an airtight container is your best friend. This prevents them from drying out. They’ll remain delicious for about 3-4 days. If you’re thinking about FREEZER INSTRUCTIONS, these ribs freeze surprisingly well! Let them cool completely, then wrap them tightly, first in plastic wrap and then in a layer of aluminum foil, or place them in a freezer-safe bag, squeezing out as much air as possible. They can stay frozen for up to 2-3 months. To THAW them, the best method is to transfer them from the freezer to the refrigerator overnight. For reheating, I find the oven is the best way to bring them back to their former glory. Place the ribs in an oven-safe dish and add a tablespoon or two of water or a little extra glaze (if you have some leftover) to help them steam and stay moist. Cover with foil and reheat at around 300°F (150°C) for 15-20 minutes, or until heated through. If you like them a little crispier, you can remove the foil for the last 5 minutes. Microwaving is faster but can sometimes make them a bit tougher, so use it if you’re in a real hurry, but be sure to cover them loosely while heating. The GLADE TIMING ADVICE is simple: the glaze is already on the ribs, so no need to add more unless you want an extra sticky coating after reheating. If you’re freezing them, the glaze will already be nicely caramelized.
Frequently Asked Questions
Final Thoughts
There you have it – my recipe for Sesame Garlic Ribs, a dish that’s brought so much joy to my table. It’s a recipe that proves you don’t need to be a gourmet chef to create something truly spectacular. The balance of sweet, savory, garlicky, and nutty flavors is just divine, and the tender, fall-off-the-bone texture is pure bliss. I really hope you give these a try. They’re perfect for those nights when you want to impress without the stress, or just when you’re craving something incredibly satisfying. If you love these ribs, you might also enjoy my [Sticky Honey Sriracha Chicken Wings] or my [Garlic Soy Braised Beef Short Ribs] – they have a similar flavor profile and comforting deliciousness! I can’t wait to hear what you think! Please leave a comment below and let me know how your Sesame Garlic Ribs turned out, or if you tried any fun variations. Happy cooking, everyone!
Sesame Garlic Ribs
Ingredients
Main Ingredients
- 1.5 pounds Pork spare ribs
- 0.25 cup Soy sauce
- 0.25 cup Honey
- 3 tablespoons Rice vinegar
- 2 tablespoons Sesame oil
- 4 cloves Garlic minced
- 1 teaspoon Ginger grated
- 0.5 teaspoon Red pepper flakes optional
- 2 tablespoons Sesame seeds toasted, for garnish
Instructions
Preparation Steps
- Preheat your oven to 375°F (190°C). Line a baking sheet with foil.
- Cut the ribs into individual ribs or manageable sections.
- In a small bowl, whisk together soy sauce, honey, rice vinegar, sesame oil, minced garlic, grated ginger, and red pepper flakes (if using).1.5 pounds Pork spare ribs
- Place the ribs on the prepared baking sheet. Pour half of the sauce over the ribs, ensuring they are well coated.1.5 pounds Pork spare ribs
- Bake for 30 minutes.
- Remove the ribs from the oven, brush with the remaining sauce, and bake for another 15 minutes, or until tender and caramelized.
- Garnish with toasted sesame seeds and chopped green onions before serving.1.5 pounds Pork spare ribs