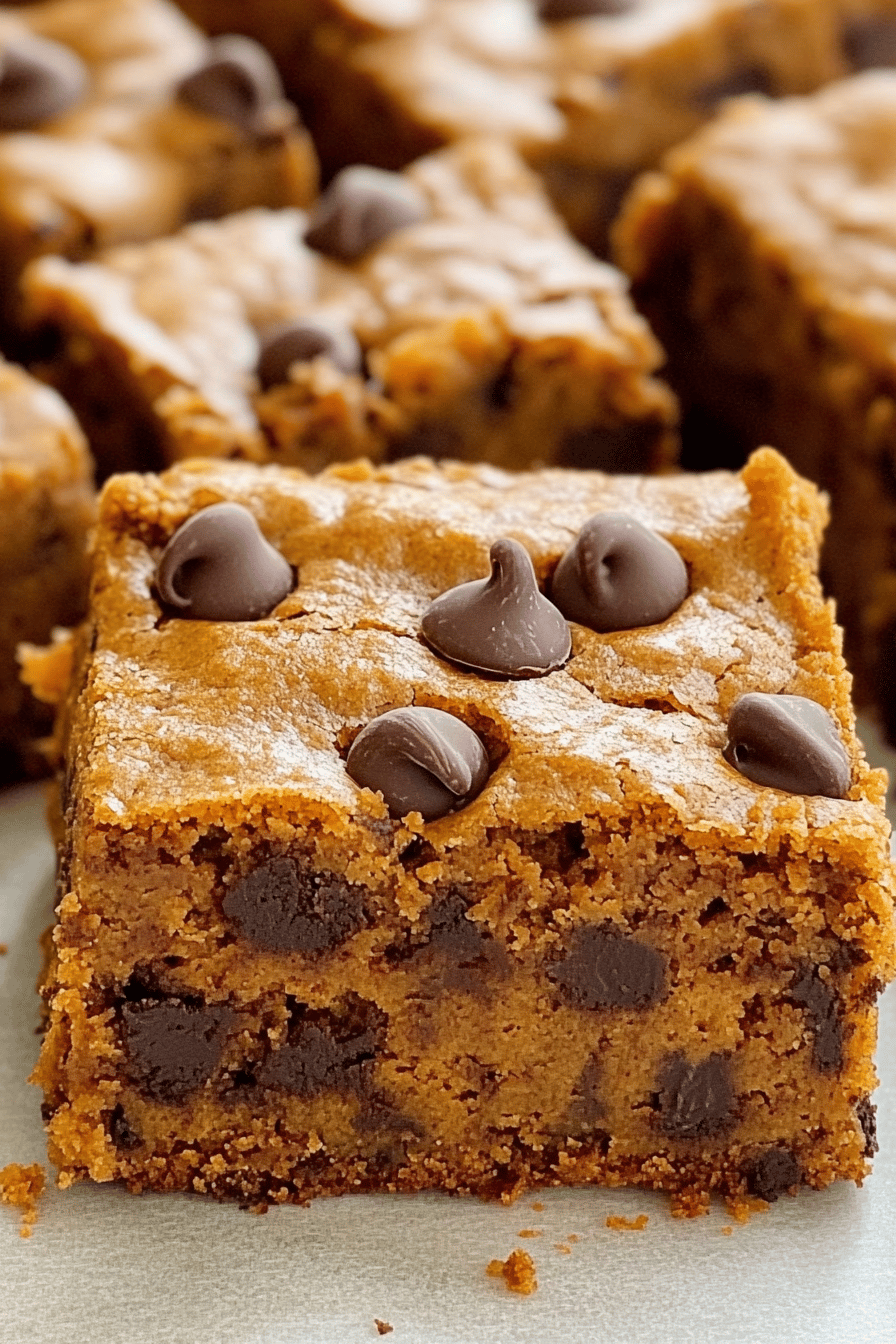
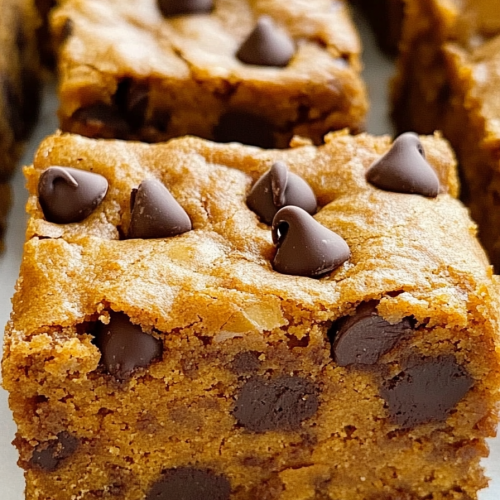
You know those days? The ones where the air gets that crisp, cool bite, and all you want is something warm, comforting, and just a little bit decadent? That’s precisely when I find myself reaching for the pumpkin puree and the chocolate chips, because it means one thing: Pumpkin Chocolate Chip Bars are happening! This recipe isn’t just a dessert; it’s like a cozy hug in bar form. They’re the perfect hybrid between a dense, moist cake and a rich, fudgy brownie, all swirled together with pockets of melted chocolate. Honestly, if you’ve ever loved a good pumpkin bread or a classic chocolate chip cookie, these bars are going to be your new obsession. They’re way easier than making a whole pie, but they deliver all that festive, autumnal flavor you’re craving. I swear, the smell alone as they bake is enough to make the whole house feel like a warm bakery. My kids go absolutely bonkers for these, and frankly, so do I. They’re just the perfect treat for after school, a lazy weekend afternoon, or honestly, just because.
What are pumpkin chocolate chip bars?
So, what exactly are we talking about when I say “Pumpkin Chocolate Chip Bars”? Think of them as the best parts of fall baking mashed into one incredibly delicious, easy-to-make treat. It’s essentially a Super Moist, tender pumpkin cake batter studded with melty chocolate chips, and then we swirl in an extra layer of gooey, rich pumpkin goodness. It’s not quite a cake, not quite a cookie, and definitely not a brownie, but it takes the best qualities from all of them and creates something truly magical. The “pumpkin” part gives it that lovely moistness and a subtle, earthy sweetness that pairs perfectly with the chocolate. It’s that classic fall flavor profile everyone adores, but in a convenient, shareable bar form. They’re fantastic because they’re so forgiving – even if you’re not a seasoned baker, you can whip these up and feel like a pro. It’s my go-to when I need a sweet fix that feels a little more special than your average cookie.
Why you’ll love this recipe?
Okay, let me tell you why these Pumpkin Chocolate Chip Bars are about to become a staple in your kitchen, just like they are in mine. First off, the flavor! Oh my goodness, the flavor. You get that warm, comforting taste of pumpkin spice – cinnamon, nutmeg, cloves – all mingled with the sweet richness of chocolate. It’s like autumn in every single bite, but without being overly sweet. Then there’s the texture: they are unbelievably moist and tender thanks to the pumpkin puree, and those little pockets of melted chocolate? Pure bliss. What I really adore, though, is how ridiculously simple they are to make. You don’t need any fancy equipment or complicated techniques. It’s mostly just whisking and folding, which means less time fussing and more time enjoying. Plus, they’re incredibly budget-friendly! Canned pumpkin, flour, sugar, eggs – all pantry staples, right? This makes them a lifesaver when you want something homemade and delicious without breaking the bank. And they are so versatile! Serve them warm with a scoop of vanilla Ice Cream for dessert, or enjoy them at room temperature with a cup of coffee for a perfect afternoon pick-me-up. They’re even great for a quick breakfast on the go if you’re in a rush (I won’t tell!). They’re so much easier than a whole pie, yet they offer that same satisfying fall flavor. I’ve even sent these to friends who aren’t big bakers, and they’ve raved about how easy and delicious they were. It’s a recipe that truly brings smiles to everyone’s faces.
How do I make pumpkin chocolate chip bars?
Quick Overview
The beauty of these Pumpkin Chocolate Chip Bars lies in their simplicity. You’ll essentially make a thick, cake-like batter, fold in chocolate chips, and then swirl in a luscious pumpkin filling right before baking. It’s a two-part process that results in layers of incredible flavor and texture. We’ll combine dry ingredients, mix wet ingredients, bring them together, and then create that beautiful swirled effect. It sounds fancy, but trust me, it’s totally doable, even for beginners. The result is a dense, moist, and utterly irresistible treat that’s ready in under an hour of active time!
Ingredients
For the Main Batter:
We’re starting with the base that gives these bars their fantastic texture and flavor. I always opt for all-purpose flour because it’s readily available and works perfectly here. Make sure your butter is softened – not melted, but soft enough to cream easily with the sugar. This is key for a tender crumb! And for the pumpkin, always use 100% pure pumpkin puree, NOT pumpkin pie filling. The pie filling has added sugar and spices, which will throw off the flavor balance. I tend to use a medium-sized can, about 15 ounces. For the chocolate chips, semi-sweet is my go-to because it balances the sweetness of the pumpkin and the batter, but feel free to use milk chocolate or even dark chocolate if that’s your preference!
- 1 ½ cups all-purpose flour
- 1 teaspoon baking soda
- ½ teaspoon salt
- 1 teaspoon ground cinnamon
- ½ teaspoon ground nutmeg
- ¼ teaspoon ground cloves
- ½ cup (1 stick) unsalted butter, softened
- 1 cup granulated sugar
- ½ cup packed light brown sugar
- 2 large eggs
- 1 teaspoon vanilla extract
- 1 cup pumpkin puree (from a 15-ounce can, NOT pumpkin pie filling)
- ½ cup semi-sweet chocolate chips (plus more for sprinkling, optional)
For the Filling:
This is where we amplify that wonderful pumpkin flavor and add a bit of extra gooeyness. It’s super simple, just a few ingredients whisked together until smooth. It’s also where you can really play with the spice level if you like things extra warm and cozy. I sometimes add a tiny pinch more cinnamon or nutmeg to this layer for an extra punch. The cornstarch is important here; it helps thicken the filling just enough so it doesn’t run everywhere when you swirl it.
- ½ cup pumpkin puree (from a 15-ounce can, NOT pumpkin pie filling)
- ¼ cup packed light brown sugar
- 1 tablespoon cornstarch
- 1 teaspoon vanilla extract
- ½ teaspoon ground cinnamon
For the Glaze:
This glaze is completely optional but highly recommended if you want that extra touch of sweetness and a pretty finish. It’s just a simple powdered sugar glaze. You want it thick enough to coat the back of a spoon, but pourable. If it’s too thick, add a tiny bit more milk or water, a teaspoon at a time. If it’s too thin, add a bit more powdered sugar. You can also play with adding a pinch of cinnamon or a splash of vanilla to this too!
- 1 cup powdered sugar
- 2-3 tablespoons milk or water
- ½ teaspoon vanilla extract (optional)
Step-by-Step Instructions
Step 1: Preheat & Prep Pan
Alright, first things first, let’s get our oven fired up and our pan ready. Preheat your oven to 350°F (175°C). I always use a standard 9×13 inch baking pan for these bars. To make sure they don’t stick, I like to grease it really well with butter or cooking spray, and then I’ll line it with parchment paper, leaving a little overhang on the sides. This parchment sling is a lifesaver for lifting the bars out easily once they’re baked and cooled. Make sure the parchment goes all the way to the edges of the pan; this will help give you nice, clean edges on your bars.
Step 2: Mix Dry Ingredients
In a medium-sized bowl, whisk together your flour, baking soda, salt, cinnamon, nutmeg, and cloves. Whisking them together thoroughly ensures that the leavening agents and spices are evenly distributed throughout the batter. This means no clumps of baking soda or spice pockets, just uniform deliciousness in every bite. Make sure you get all those spices well incorporated!
Step 3: Mix Wet Ingredients
Now, in a larger bowl, we’re going to cream together the softened butter and both the granulated and brown sugars. Beat them with an electric mixer (or a sturdy whisk and some arm power!) until the mixture is light and fluffy. This process incorporates air, which helps make the bars tender. Next, beat in the eggs, one at a time, ensuring each is fully incorporated before adding the next. Then, stir in the vanilla extract. Finally, add the pumpkin puree and mix until everything is just combined. Don’t overmix at this stage!
Step 4: Combine
Gradually add the dry ingredients to the wet ingredients. Mix on low speed (or with a spatula) until just combined. It’s really important not to overmix the batter at this point. Overmixing develops the gluten in the flour, which can lead to tougher bars. We want them to be tender and cake-like, so stop mixing as soon as you no longer see streaks of flour. Fold in the ½ cup of chocolate chips.
Step 5: Prepare Filling
While the batter is resting for a moment, let’s whip up that simple filling. In a small bowl, whisk together the pumpkin puree, packed light brown sugar, cornstarch, vanilla extract, and cinnamon until smooth and well combined. The cornstarch will help thicken it slightly as it bakes, making it a beautiful, rich layer.
Step 6: Layer & Swirl
Now for the fun part! Spread about two-thirds of the pumpkin batter evenly into your prepared 9×13 inch pan. Don’t worry about making it perfectly smooth; a rustic look is great! Then, dollop spoonfuls of the pumpkin filling mixture evenly over the batter. Don’t worry about getting it perfect; we’ll swirl it. Now, take the remaining one-third of the pumpkin batter and dollop it over the filling. Using a butter knife or a skewer, gently swirl the batters together. You want to create streaks and marbled patterns, not completely mix them. Just a few passes through the pan are perfect. Be careful not to swirl too much, or you’ll lose that beautiful definition.
Step 7: Bake
Place the pan in the preheated oven. Bake for 30-35 minutes, or until a toothpick inserted into the center (avoiding a chocolate chip!) comes out with moist crumbs attached, but no wet batter. The edges should be lightly golden brown and slightly set. Keep an eye on them, as ovens can vary. If the top starts to get too brown before it’s cooked through, you can loosely tent it with foil.
Step 8: Cool & Glaze
Once baked, remove the pan from the oven and let the bars cool completely in the pan on a wire rack. This is crucial for them to set properly. Trying to cut them while they’re hot will result in a crumbly mess. Once they’re completely cool, you can prepare the glaze. In a small bowl, whisk together the powdered sugar, 2 tablespoons of milk (or water), and the vanilla extract (if using) until smooth. Add more liquid or powdered sugar as needed to reach your desired drizzling consistency. Drizzle the glaze over the cooled bars. Let the glaze set for about 15-20 minutes before slicing.
Step 9: Slice & Serve
Once the glaze has set, use the parchment paper overhang to carefully lift the entire slab out of the pan onto a cutting board. Use a sharp knife to slice into bars. For clean cuts, wipe your knife clean between slices. I usually aim for about 24 bars, but you can cut them bigger or smaller depending on your preference. Serve them at room temperature, or gently warm them up if you prefer. They are absolutely divine!
What to Serve It With
These Pumpkin Chocolate Chip Bars are wonderfully versatile, which is another reason I love them so much. They truly fit into any occasion or craving. For a cozy breakfast, imagine slicing one up and pairing it with a hot, steaming mug of coffee or a creamy latte. The warmth of the spices and chocolate is just the perfect way to start the day. You can even add a dollop of Greek yogurt on the side for a little extra protein. For a more elegant brunch setting, I like to cut them into smaller, more delicate squares and arrange them on a pretty platter. They pair beautifully with a bubbly mimosa or a sparkling cider. And as a dessert? Oh, this is where they truly shine! Serve a warm bar with a scoop of good quality vanilla bean ice cream – the contrast of warm and cold, plus the melty chocolate, is divine. A drizzle of caramel sauce or a dusting of powdered sugar is also never a bad idea. For those moments when you just need a comforting snack, they’re perfect on their own with a glass of cold milk. My family loves them as an after-school treat, and they’re always gone in a flash!
Top Tips for Perfecting Your Pumpkin Chocolate Chip Bars
Over the years, I’ve learned a few tricks that take these bars from great to absolutely spectacular. First, about the pumpkin: always, always, always use canned pure pumpkin puree and *not* pumpkin pie filling. The pie filling has extra sugar and spices that will make your bars too sweet and off-balance. For the moistest bars, make sure you don’t overbake them. I’ve found that a toothpick with a few moist crumbs is the perfect doneness indicator; a completely clean toothpick can mean they’re already starting to dry out. When it comes to mixing, it’s all about not overdoing it, especially after you add the flour. Just mix until the flour disappears. Overmixing is the enemy of tender baked goods, and we want these to be melt-in-your-mouth soft! For that beautiful swirl effect, don’t go crazy. Gentle swirls are best. Think artistic marbling, not a muddy mess. It creates lovely pockets of filling and batter. If you’re thinking about ingredient swaps, I’ve tested this with a dairy-free butter alternative, and it worked beautifully! For the chocolate chips, feel free to mix it up. I’ve used dark chocolate chunks, milk chocolate chips, and even White Chocolate chips, and each time they bring a slightly different deliciousness to the party. Some people love adding chopped pecans or walnuts to the batter for extra crunch; I’ve tried it, and it’s a wonderful addition if you enjoy nuts in your baked goods. Remember that oven temperatures can vary, so getting to know your oven is key. If your oven tends to run hot, you might need to reduce the temperature slightly or shorten the baking time. And for the glaze, patience is a virtue! Let those bars cool *completely* before you attempt to glaze them. Rushing this step is a recipe for a melted mess. If your glaze is too thick, a tiny bit of milk or water will loosen it right up; too thin? A bit more powdered sugar will do the trick. Experiment and find what works best for your taste and texture preferences!
Storing and Reheating Tips
One of the best things about these Pumpkin Chocolate Chip Bars is how well they store, making them perfect for making ahead. If you’ve got leftovers (which I doubt you will, but just in case!), you can store them at room temperature for up to 3 days. Just make sure they are in an airtight container or well-wrapped in plastic wrap. This keeps them from drying out and maintains that lovely moistness. If you’ve glazed them, I tend to lean towards refrigerating them if they’re going to be out for more than a day, just to ensure the glaze stays nice. In the refrigerator, they’ll keep beautifully for about a week, still in an airtight container. When you’re ready to enjoy one from the fridge, I find they are delicious cold, but you can also gently warm them up. Pop a bar in the microwave for about 10-15 seconds – just enough to soften the chocolate and make it wonderfully gooey again. If you want to keep these long-term, freezing is an excellent option. Wrap individual bars (or slices) tightly in plastic wrap, then place them in a freezer-safe bag or container. They’ll stay good in the freezer for up to 2-3 months. When you’re ready to eat them, you can thaw them overnight in the refrigerator, or if you’re in a hurry, you can microwave them for a bit longer, being careful not to overheat them. For the glaze, if you’re planning to freeze un-glazed bars, it’s best to add the glaze *after* thawing. If you do glaze them before freezing, just be aware that sometimes the glaze can become a little soft or slightly uneven upon thawing. But honestly, no matter how you store them, they’re always a welcome treat!
Frequently Asked Questions
Final Thoughts
So there you have it – my beloved Pumpkin Chocolate Chip Bars! These are more than just a recipe to me; they’re a memory maker, a comfort provider, and a guaranteed crowd-pleaser. They embody that feeling of cozy autumn days, warm kitchens, and happy moments shared with loved ones. The combination of tender pumpkin cake, melty chocolate, and that hint of spice is just unbeatable, and the fact that they’re so simple to whip up makes them a true weeknight warrior. If you’re a fan of pumpkin or just love a good chocolate chip treat, you simply have to give these a try. They’re proof that delicious doesn’t have to be complicated. For more cozy bakes, you might also want to check out my Double Chocolate Zucchini Bread or my Easy Apple Crumble – they’re other family favorites that bring the same kind of comfort and joy. I can’t wait to hear what you think of these bars! Please leave a comment below to let me know how yours turned out, and feel free to share any variations you tried. Happy baking!
Pumpkin Chocolate Chip Bars
Ingredients
Main Ingredients
- 0.5 cup unsalted butter, melted
- 1 cup granulated sugar
- 0.5 cup packed light brown sugar
- 2 large eggs
- 1 teaspoon vanilla extract
- 1 cup pumpkin puree (not pumpkin pie filling)
- 1.5 cups all-purpose flour
- 1 teaspoon baking soda
- 0.5 teaspoon salt
- 1 teaspoon ground cinnamon
- 0.5 teaspoon ground nutmeg
- 0.25 teaspoon ground ginger
- 0.25 teaspoon ground cloves
- 1 cup chocolate chips (semi-sweet or milk chocolate)
Instructions
Preparation Steps
- Preheat your oven to 350°F (175°C). Grease and flour a 9x13 inch baking pan.
- In a large bowl, whisk together the melted butter, granulated sugar, and brown sugar until well combined.
- Beat in the eggs one at a time, then stir in the vanilla extract and pumpkin puree until smooth.
- In a separate medium bowl, whisk together the flour, baking soda, salt, cinnamon, nutmeg, ginger, and cloves.
- Gradually add the dry ingredients to the wet ingredients, mixing until just combined. Do not overmix.
- Fold in the chocolate chips.
- Spread the batter evenly into the prepared baking pan.
- Bake for 25-30 minutes, or until a toothpick inserted into the center comes out clean.
- Let the bars cool in the pan for at least 15 minutes before cutting into squares.