Okay, so confession time: I have a serious weakness for anything chewy, chocolatey, and with a hint of Peanut Butter. Like, a *serious* weakness. And if you’re anything like me, you probably remember those classic Scotcheroos from childhood – that sweet, crispy, almost fudge-like bar that was just pure happiness. Well, I’ve been tinkering in the kitchen, as you know I love to do, and I’ve managed to create a version that’s not only just as delicious, but it’s also packed with a good dose of protein. Yep, you heard me right – we’re talking protein scotcheroos! These are honestly a lifesaver on busy mornings, or for that late-night craving that hits when you *really* don’t want to bake a whole cake. My kids ask for these all the time, and the best part? They have no idea they’re getting extra protein. It’s like a little culinary magic trick that makes everyone happy.
What is protein scotcheroo?
So, what exactly are these protein scotcheroos we’re whipping up? Think of them as the slightly more virtuous cousin of the classic Rice Krispie treat, but with a few crucial upgrades. Traditionally, Scotcheroos are made with a Peanut Butter and butter mixture, topped with a chocolate and butterscotch glaze, all poured over crispy rice cereal. It’s a delightful combination of textures and flavors – that satisfying crunch from the cereal, the creamy, slightly salty peanut butter layer, and then the decadent, sweet glaze. My protein scotcheroos take that beloved base and smartly incorporate ingredients that give it a protein boost without sacrificing that incredible taste and texture. It’s essentially a no-bake bar that’s quick, easy, and incredibly satisfying, perfect for anyone looking for a tasty treat that also helps fuel their day. It’s not complicated, just smart ingredient swaps that make a big difference!
Why you’ll love this recipe?
Honestly, there are so many reasons why I think you’re going to fall head over heels for these protein scotcheroos. First and foremost, the flavor is just out of this world. You get that classic combination of rich Peanut Butter and sweet chocolate, with that hint of butterscotch that just makes it sing. It’s nostalgic, it’s comforting, and it’s downright delicious. But it’s not just about the taste, oh no. The simplicity of this recipe is a game-changer. We’re talking about a no-bake treat that comes together in mere minutes. Seriously, you can have these ready to set in about 15 minutes flat, and then it’s just a matter of letting them chill. What I love most about this is that it feels indulgent without being overly complicated or time-consuming. And let’s talk about the cost-efficiency! Most of the ingredients are pantry staples you probably already have on hand, making this an incredibly budget-friendly way to satisfy a sweet tooth. Plus, the protein addition makes them way more filling and satisfying than their traditional counterparts, so you’re not tempted to eat the whole pan in one sitting (though, I won’t judge if you do!). They’re also wonderfully versatile; you can easily tweak the glaze, add in some nuts, or even use different types of cereals. It’s a recipe that’s kind to your wallet, your busy schedule, and your taste buds!
How do I make Scotcheroos?
Quick Overview
This recipe is designed for maximum deliciousness with minimal effort. We’ll be creating a chewy Peanut Butter base, mixing in some protein-rich ingredients for that added goodness, and then topping it all off with a dreamy chocolate and butterscotch glaze. The best part? No oven required! It’s a simple, no-fuss process that yields incredibly satisfying results. You’ll be amazed at how quickly these come together, making them perfect for last-minute sweet cravings or for prepping ahead for the week.
Ingredients
For the Main Batter:
You’ll need 3 cups of crispy rice cereal. Now, I know some people are super picky about cereal brands, but honestly, any good quality crispy rice cereal will do the trick here. The key is that satisfying crunch! I’ve also found that generic store brands work just as well, so don’t feel like you need to splurge. For the peanut butter, we’re using 1 cup of creamy peanut butter. Natural peanut butter is great, but make sure it’s well-stirred so the oil doesn’t separate too much. If you’re using a more natural, less processed version, you might need to mix it a bit more vigorously. Then, we’ll add 1/2 cup of honey. Honey gives it that perfect chewy texture and a lovely sweetness. You can also use maple syrup if you prefer, though honey tends to give it a bit more chew. And for the protein power, we’re adding 1/2 cup of unflavored or vanilla-flavored protein powder. I usually go for a whey or plant-based protein powder that dissolves easily. Vanilla adds a nice subtle flavor that complements everything else. Make sure it’s unflavored or vanilla, otherwise, you might get some weird taste surprises!
For the Filling:
This is where we add a little extra creaminess and binder. We’ll use 1/4 cup of softened butter or coconut oil for a dairy-free option. This helps everything come together smoothly. Then, we’re adding 1/4 cup of milk – any kind will work, from dairy milk to almond or oat milk. I’ve tested this with almond milk and it actually made it even creamier! Lastly, we’ll need 1 teaspoon of vanilla extract to enhance all those lovely flavors.
For the Glaze:
For the irresistible topping, we’re going to melt together 1 cup of semi-sweet chocolate chips and 1/2 cup of butterscotch chips. I love using a combination because the butterscotch adds that signature Scotcheroo flavor, while the chocolate provides richness. You can find these in any baking aisle. If you want to make it a bit healthier, you can certainly use dark chocolate chips, but the butterscotch is pretty classic here. For a smoother glaze, I also add 1 tablespoon of coconut oil or butter. This helps it spread beautifully and gives it a nice sheen. You can adjust this slightly depending on how thick or thin you like your glaze.
Step-by-Step Instructions
Step 1: Preheat & Prep Pan
First things first, grab an 8×8 inch baking pan. You want to line it with parchment paper, leaving some overhang on the sides. This is my secret weapon for easy removal! Trust me on this one; it makes getting the bars out a breeze. Lightly grease the parchment paper with a little cooking spray or a tiny bit of butter. This ensures your bars won’t stick at all. Set this prepared pan aside.
Step 2: Mix Dry Ingredients
In a large bowl, combine your 3 cups of crispy rice cereal. Now, we’re going to gently fold in the 1/2 cup of protein powder. You want to do this gently to avoid crushing the cereal too much. Just a few stirs to distribute the protein powder evenly. This step helps ensure the protein powder is mixed in well so you don’t get any clumps later on. It’s also a good idea to give the cereal a quick check for any stale bits – though that’s rare!
Step 3: Mix Wet Ingredients
In a medium saucepan over low heat, melt the 1/4 cup of butter (or coconut oil). Once melted, whisk in the 1/4 cup of milk and the 1 teaspoon of vanilla extract. Keep the heat very low; you just want to warm it through and combine everything. We’re not looking to boil this, just to create a smooth, liquid base for our peanut butter mixture.
Step 4: Combine
Pour the warm milk mixture into the bowl with the peanut butter and honey. Stir everything together until it’s well combined and smooth. It might look a little oily at first, but keep stirring! Now, gently fold this peanut butter mixture into the bowl with the cereal and protein powder. Use a spatula and fold it carefully, making sure every bit of cereal is coated. You don’t want to overmix and crush the cereal, but you do want it all nicely bound together. The mixture should be sticky and clumpy.
Step 5: Prepare Filling
This step is actually incorporated into Step 4 with the peanut butter mixture, as the butter/oil, milk, and vanilla are combined with the peanut butter and honey to create the binder for the cereal. So, consider this a confirmation that your “filling” (which is really the binder for the cereal) is ready when your peanut butter mixture is smooth and well-combined!
Step 6: Layer & Swirl
Transfer the cereal mixture into your prepared 8×8 inch pan. Use the back of a greased spatula or your hands (lightly greased works well too!) to press the mixture evenly into the pan. You want a nice, compact layer so your bars hold together. Don’t press too hard, though; we still want some airiness.
Step 7: Bake
This recipe is no-bake! So, we’re skipping the oven entirely. Pop the pan into the refrigerator for at least 30 minutes to allow the bars to set up firmly. This is crucial for them to hold their shape when you cut them. You want them to be nice and firm before adding the glaze.
Step 8: Cool & Glaze
While the bars are chilling, make the glaze. In a microwave-safe bowl, combine the 1 cup of semi-sweet chocolate chips, 1/2 cup of butterscotch chips, and 1 tablespoon of coconut oil (or butter). Microwave in 30-second intervals, stirring well after each interval, until the chips are completely melted and smooth. Be careful not to overheat! Once the bars are firm, pour the melted glaze over the top. Use an offset spatula or a butter knife to spread the glaze evenly over the entire surface. Get it right to the edges!
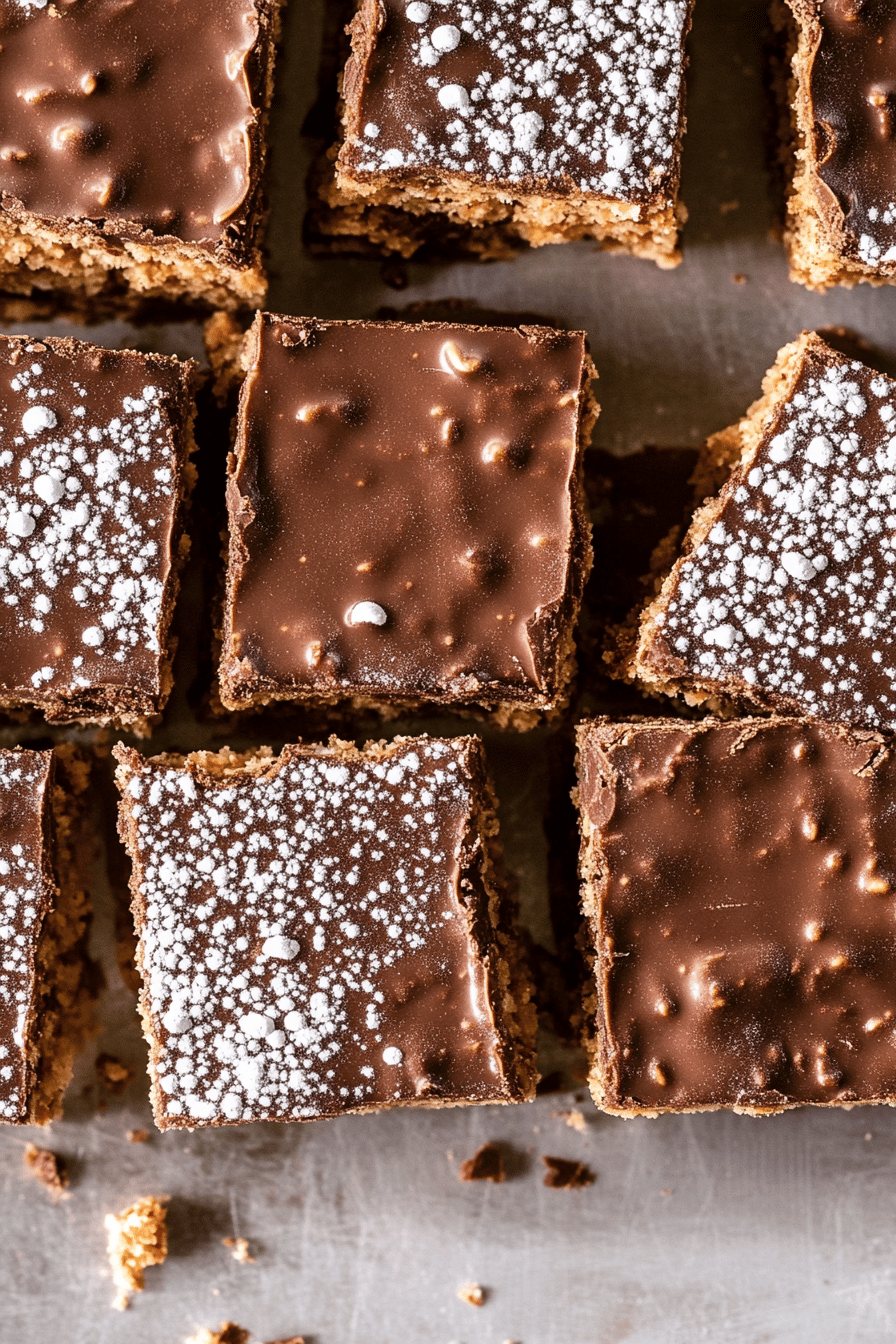
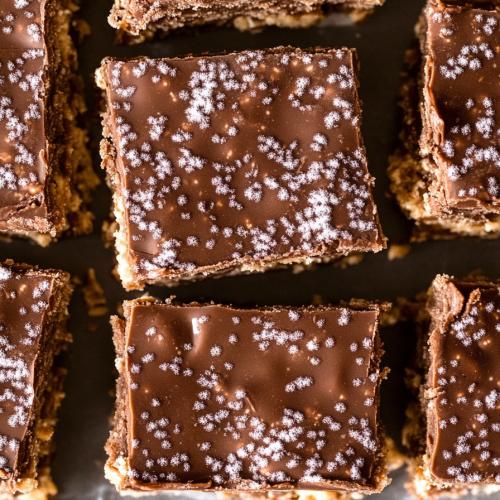
Step 9: Slice & Serve
Once the glaze is spread, immediately place the pan back into the refrigerator for at least another 15-20 minutes, or until the glaze is completely set. This is important – don’t try to cut them before the glaze is firm, or it will just smudge! Once set, lift the bars out of the pan using the parchment paper overhang. Place them on a cutting board and slice into squares. I usually cut mine into 12 or 16 bars, depending on how big I want them. They’re best served chilled or at room temperature.
What to Serve It With
These protein scotcheroos are so versatile, you can totally get creative with how you serve them! For a quick and satisfying breakfast, I love pairing them with a hot cup of coffee or a cold glass of milk. They’re like a little treat to start your day that actually keeps you full. For a more leisurely brunch spread, you could cut them into smaller, bite-sized pieces and arrange them on a pretty platter alongside some fresh fruit, yogurt parfaits, or mini quiches. They add a fun, sweet element to brunch without being too heavy. As a dessert, these are absolute winners! Serve them after dinner, perhaps with a scoop of vanilla ice cream or a dollop of whipped cream for an extra decadent touch. My personal favorite is just having one (or two!) with a glass of cold milk for a cozy snack on a chilly afternoon. They’re perfect for movie nights, post-workout fuel, or just when you need a little pick-me-up. My family also loves them as a lunchbox treat, and they’re always a hit at potlucks and school events. They travel well and are always the first thing to disappear!
Top Tips for Perfecting Your Protein Scotcheroos
Over the years, I’ve made these protein scotcheroos more times than I can count, and I’ve picked up a few tricks that I think are worth sharing! When it comes to the crispy rice cereal, make sure it’s fresh. Stale cereal can lead to a less satisfying texture, so if your cereal box has been open for a while, give it a sniff test. For the peanut butter mixture, I’ve found that gently warming the honey and peanut butter together for just a few seconds in the microwave (if they’re very stiff) can make them easier to combine with the liquid ingredients. Just a few seconds, you don’t want it to get hot, just slightly more pliable. When you’re mixing the wet and dry ingredients, resist the urge to overmix! Overmixing can break down the cereal and result in a denser, less chewy bar. You want just enough mixing to coat everything evenly. For the glaze, always melt the chocolate and butterscotch chips slowly. Microwaving in short intervals and stirring thoroughly is the best way to prevent scorching. If the glaze seems too thick, you can always stir in another tiny bit of coconut oil or butter until it reaches your desired consistency for spreading. And here’s a little secret I learned: if your glaze isn’t spreading as smoothly as you’d like, just pop the bowl back into the microwave for another 10 seconds, stir, and it should loosen right up. When it comes to ingredient swaps, I’ve experimented with different nut butters, and almond butter works beautifully, though it will change the flavor profile slightly. If you’re looking for a dairy-free option, using coconut oil instead of butter in both the batter and the glaze works wonderfully. For an extra crunch and flavor, you can always add about 1/4 cup of chopped peanuts or even some mini chocolate chips directly into the cereal mixture before pressing it into the pan. Just remember to account for the extra ingredients potentially affecting how the bars hold together. Baking is not part of this process, but chilling is key! Make sure your bars are *firm* before you attempt to add the glaze, and make sure the glaze is fully set before slicing. Patience here will be rewarded with perfectly cut bars!
Storing and Reheating Tips
Properly storing these protein scotcheroos is key to keeping them tasting fresh and delicious. I usually find that they’re best stored at room temperature, especially if you plan to eat them within a couple of days. Just keep them in an airtight container with a lid, or wrap the pan tightly with plastic wrap. At room temperature, they’ll stay good for about 3-4 days. If your kitchen is particularly warm, or if you live in a humid climate, you might find they get a little too soft at room temperature. In that case, refrigerator storage is your best bet. Pop them into an airtight container and they’ll last for up to a week in the fridge. The texture will be a bit firmer when they’re cold, which some people actually prefer! If you’re looking to stash these away for longer, freezing is a great option. I like to cut them into individual portions and wrap each one tightly in plastic wrap, then place them in a freezer-safe bag or container. They can stay frozen for up to 2-3 months. To thaw, just take them out of the freezer and let them come to room temperature. If you’re freezing them with the glaze on, the glaze might develop a slight bloom when thawed, but it won’t affect the taste. For the glaze itself, it’s best to add it *after* the bars have set from chilling in the fridge and *before* you store them long-term. If you’re planning on freezing them, I’d recommend glazing them just before you plan to eat them or after they’ve thawed, if you want the absolute best texture. Otherwise, the glaze can sometimes get a bit brittle when frozen. But honestly, they disappear so fast in my house, I rarely have to worry about long-term storage!
Frequently Asked Questions
Final Thoughts
So there you have it, my friends – the ultimate protein scotcheroos recipe! I genuinely hope you give these a try. They’re such a fun twist on a classic, and the added protein makes them feel like a guilt-free indulgence. They’re the perfect blend of chewy, crunchy, chocolatey, and peanut buttery goodness, and the fact that they’re no-bake just makes them that much more appealing, right? What I love most is that they’re incredibly adaptable, and I’m always so excited to hear about the variations you come up with. If you’re a fan of these, you might also want to check out my recipe for peanut butter energy balls or my no-bake chocolate oat bars – they’re in a similar vein of easy, satisfying treats. I can’t wait to hear how your protein scotcheroos turn out! Let me know in the comments below if you try them, and share any of your own tips or twists. Happy baking (or should I say, happy no-baking)!
Protein Scotcheroos
Ingredients
Base Layer
- 0.5 cup Peanut Butter
- 0.5 cup Honey
- 0.5 cup Protein Powder (vanilla or unflavored)
- 2 cups Rolled Oats
Topping
- 0.5 cup Chocolate Chips
- 1 tablespoon Peanut Butter
Instructions
Preparation Steps
- Line a 9x13 inch baking pan with parchment paper.
- In a medium saucepan over low heat, combine the peanut butter and honey. Stir until smooth and well combined.0.5 cup Peanut Butter
- Remove from heat and stir in the protein powder until fully incorporated. The mixture will thicken.0.5 cup Peanut Butter
- Add the rolled oats to the mixture and stir until evenly coated.0.5 cup Peanut Butter
- Press the mixture evenly into the prepared baking pan.
- In a small microwave-safe bowl, combine the chocolate chips and the remaining peanut butter. Microwave in 30-second intervals, stirring in between, until smooth and melted.0.5 cup Peanut Butter
- Spread the melted chocolate mixture evenly over the oat layer.
- Refrigerate for at least 30 minutes, or until firm.
- Cut into squares and enjoy!