Oh, you guys! I’m so excited to share this with you today. This isn’t just any dessert; it’s a slice of pure sunshine and happiness. Whenever I talk about my go-to pineapple dessert, my mind immediately goes back to my Grandma Elsie’s kitchen, the air thick with the sweet, tropical aroma. This recipe is like a warm hug, a sweet memory, and a guaranteed crowd-pleaser all rolled into one. It’s got that perfect balance of tangy pineapple and a tender, moist cake that just melts in your mouth. Honestly, compared to a fussy Pineapple Upside-Down Cake or a complicated layered trifle, this is the laid-back, incredibly delicious cousin that everyone adores. It’s the kind of dish that makes you feel like a baking superhero, even if you’re just starting out.
What is my irresistible Pineapple Dessert Dream
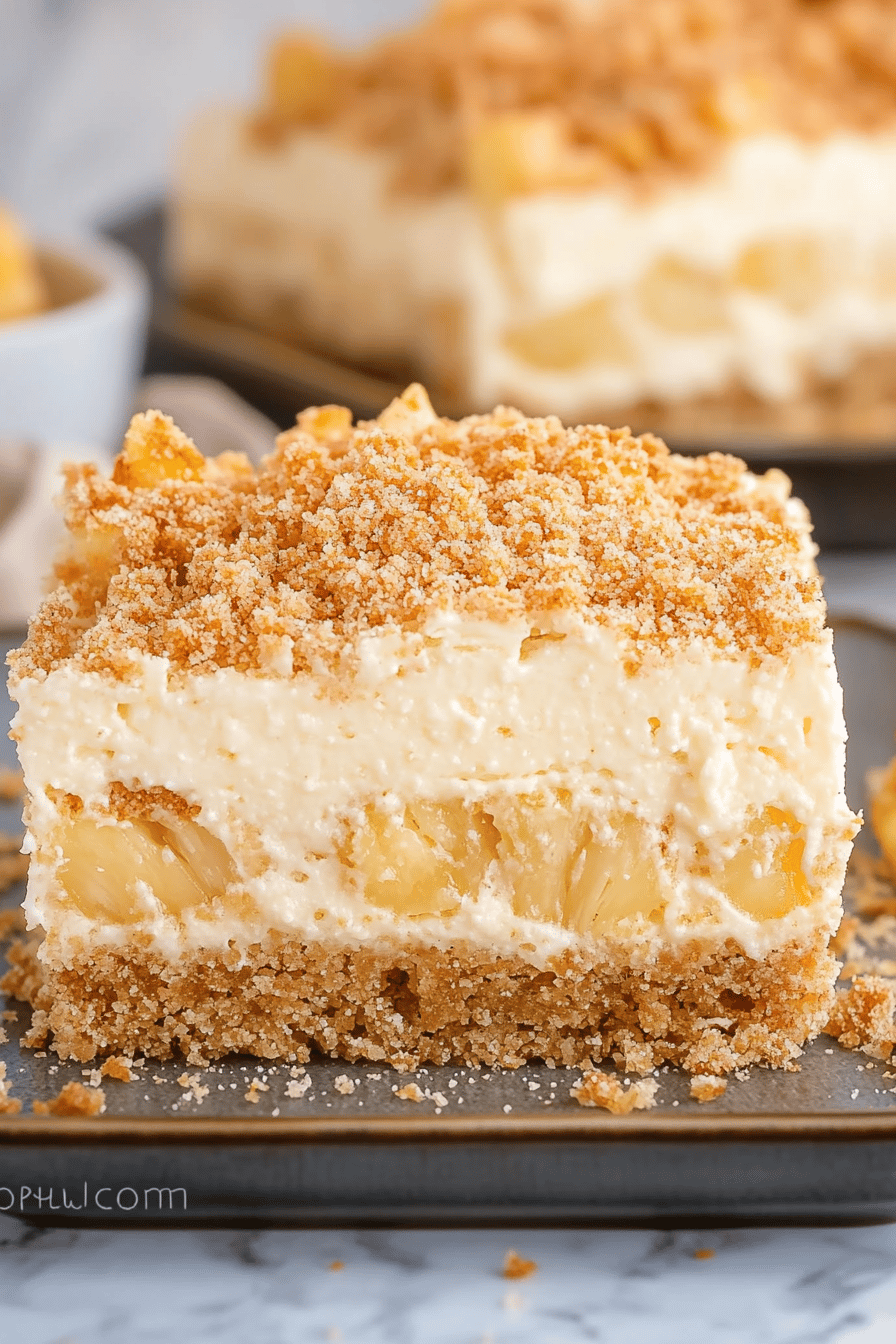
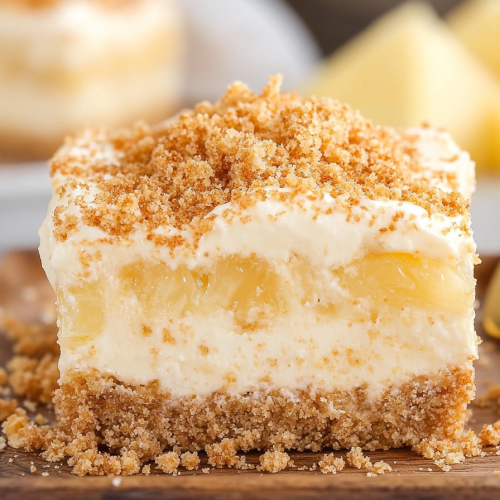
So, what exactly is this magical creation? Think of it as a Super Moist, incredibly flavorful pineapple cake with a luscious, caramelized pineapple topping that forms right in the pan as it bakes. It’s not quite a cake, not quite a pudding, but something wonderfully in between. We call it the “Dream” because it’s just that — a dream come true for any pineapple lover! The name came about because the first time I made it, my littlest one took a bite and her eyes went wide, and she whispered, “Mommy, it’s a dream!” And it stuck! It’s essentially a one-bowl wonder, with the most amazing pineapple flavor that’s not cloying or overly sweet, just bright and delightful. It’s the perfect antidote to a long day or a spontaneous craving for something truly special.
Why you’ll love this recipe?
Let me tell you why this pineapple dessert is an absolute staple in my kitchen. First off, the flavor is just out of this world! The pineapple, when baked, develops this incredible caramelization, and it’s perfectly balanced by the soft, tender cake. It’s sweet, yes, but with a lovely tang that keeps it from being too heavy. And the simplicity? Oh my goodness, it’s a lifesaver! I’ve made this on nights when I’ve had guests unexpectedly drop by, and it’s always ready with minimal fuss. You literally just mix everything up and bake it. No fancy techniques, no separating eggs, just pure, unadulterated deliciousness. Plus, it’s surprisingly budget-friendly. Canned pineapple is usually quite affordable, and the other ingredients are pantry staples for most home bakers. And the versatility! You can serve this warm with a scoop of vanilla Ice Cream, a dollop of whipped cream, or even just on its own. It’s fantastic for breakfast, brunch, dessert, or even a mid-afternoon treat with a cup of coffee. What I love most about this is that it feels so decadent and special, but it’s genuinely easy to whip up. It’s the kind of recipe that becomes a go-to, the one you can always count on to impress without stressing yourself out.
How do I make a Pineapple Dessert Dream?
Quick Overview
This dessert is all about simplicity and big flavor. We’ll start by creating a quick, caramelized pineapple base right in our baking dish. Then, we’ll whip up a simple, moist batter that gets poured right over the top. Into the oven it goes, and magic happens! The result is a tender cake baked right into the luscious pineapple, creating a stunning, individual-serving-like dessert when you cut into it. It’s so forgiving, even if you’re a little new to baking, you’re going to nail this one. It’s the ultimate easy pineapple dessert that looks and tastes far more complicated than it is.
Ingredients
For the Luscious Pineapple Base:
1 can (20 ounces) crushed pineapple, undrained – make sure it’s the regular kind, not “light” or “in juice” for the best caramelization. I always opt for the good stuff here.
1/2 cup packed light brown sugar – this is key for that beautiful caramel color and flavor.
1/4 cup unsalted butter, melted – don’t skimp on the butter; it adds richness!
1 teaspoon vanilla extract – just a touch to enhance those sweet flavors.
For the Moist Cake Batter:
1 1/2 cups all-purpose flour – I’ve tested this with a gluten-free blend, and it works, but traditional flour gives the best texture here.
1 teaspoon baking soda – our leavening agent to make it nice and fluffy.
1/4 teaspoon salt – it balances all the sweetness.
1/2 cup granulated sugar – for that classic cake sweetness.
1/4 cup unsalted butter, softened – make sure it’s properly softened, not melted, for the best creaming.
1 large egg – brings everything together.
1/2 cup buttermilk – this is my secret for ultimate moisture! If you don’t have buttermilk, you can make your own by adding 1/2 tablespoon of lemon juice or white vinegar to 1/2 cup of milk and letting it sit for 5-10 minutes.
For the Optional Drizzle (if you want extra pizzazz!):
1/4 cup powdered sugar
1-2 tablespoons milk or pineapple juice – just enough to get a pourable consistency. You can also use coconut milk for a tropical twist!
Step-by-Step Instructions
Step 1: Preheat & Prep Pan
First things first, get that oven preheating to 350°F (175°C). Grab an 8×8 inch baking dish. No need to grease it; the butter and pineapple juice will create a non-stick layer. I like to use my trusty Pyrex dish for this.
Step 2: Mix Dry Ingredients
In a medium bowl, whisk together the flour, baking soda, and salt. This ensures everything is evenly distributed, so you don’t end up with pockets of baking soda. Give it a good whisking, like you’re fluffing clouds!
Step 3: Mix Wet Ingredients
In a separate, larger bowl, cream together the softened butter and granulated sugar until it’s light and fluffy. This is where you want to get some good air into the batter! Then, beat in the egg until it’s well combined. Pour in the buttermilk and vanilla extract, and mix until just combined. Don’t worry if it looks a little separated; it will come together.
Step 4: Combine
Now, gradually add the dry ingredients to the wet ingredients, mixing on low speed or by hand until just combined. Be careful not to overmix here! Overmixing can lead to a tough cake, and we want this to be super tender. A few streaks of flour are okay; they’ll disappear as it bakes.
Step 5: Prepare Filling
In your chosen baking dish, pour in the melted butter. Sprinkle the brown sugar evenly over the butter. Then, spread the crushed pineapple (don’t drain it, the juice is important!) evenly over the brown sugar and butter mixture. This creates the base for our delicious topping.
Step 6: Layer & Swirl
Spoon the cake batter evenly over the pineapple mixture in the baking dish. Gently spread it out with a spatula to cover the pineapple as much as possible, but don’t worry if some of the pineapple peeks through – that’s part of its charm!
Step 7: Bake
Place the dish in the preheated oven. Bake for 35-45 minutes, or until a toothpick inserted into the center of the cake comes out clean. The edges should be golden brown and pulling away slightly from the sides of the dish. The smell that fills your kitchen during this time is just divine – pure tropical bliss!
Step 8: Cool & Glaze
Once baked, remove the dish from the oven and let it cool in the pan for at least 15-20 minutes. This is crucial for the topping to set properly. If you’re adding the glaze, whisk together the powdered sugar and milk (or pineapple juice) until smooth and pourable. Drizzle this over the warm dessert. It adds a little extra sweetness and visual appeal.
Step 9: Slice & Serve
Now for the best part! Carefully invert the dessert onto a serving platter or slice it directly from the dish. I usually serve it warm, right out of the oven, with a scoop of vanilla ice cream or a dollop of whipped cream. The contrast of the warm, caramelized pineapple and the cool, creamy topping is just heavenly. Trust me, this is the moment everyone waits for!
What to Serve It With
This pineapple dessert is so wonderfully versatile, it fits into almost any meal or occasion. For breakfast, it’s simply divine with a strong cup of coffee. A small slice, perhaps with a light dusting of powdered sugar, feels like such a luxurious way to start the day. For brunch, I love to serve it alongside some crispy bacon and fresh fruit salad. It adds a sweet, tropical note that really brightens up the table. Presentation-wise, I sometimes cut it into small squares and arrange them on a platter, or serve it family-style directly from the baking dish. As a dessert, it’s a showstopper! It’s perfect after a hearty meal, especially if you’ve had something savory. I often serve it warm with a generous scoop of good quality vanilla bean ice cream – the cold ice cream melting into the warm, gooey pineapple is pure bliss. A little swirl of whipped cream on top is always a welcome addition. For those cozy snack moments, when you just need a little something sweet and comforting, this is my go-to. It’s delicious on its own, maybe with a cup of herbal tea. My family has a tradition of having this for our “dessert movie night” – we just cut big wedges and dig in!
Top Tips for Perfecting Your My Absolutely Irresistible Pineapple Dessert Dream
Over the years, I’ve learned a few little tricks that make this pineapple dessert even better. When it comes to the pineapple, using canned crushed pineapple is honestly best for this particular recipe. It has the right amount of juice and sweetness, and it caramelizes beautifully. If you absolutely must use fresh, make sure it’s very ripe and you’ll likely need to add a little extra sugar and cook it down a bit first to get that same gooey texture. For the cake batter, the key is absolutely *not* to overmix. As soon as the flour is incorporated, stop mixing. A few little lumps are perfectly fine! Overmixing develops the gluten too much, making the cake tough, and we want it tender and melt-in-your-mouth. When it comes to the swirl, don’t stress about making it perfectly even. The beauty of this dessert is its slightly rustic look. The caramelized pineapple will bubble up and swirl on its own as it bakes, creating a unique pattern every time. If you want to get adventurous with flavor, try adding a pinch of cinnamon or nutmeg to the dry ingredients, or a teaspoon of rum extract to the wet ingredients for a grown-up twist. For baking, every oven is different, so keep an eye on it. The toothpick test is your best friend. If the top starts browning too quickly before the inside is cooked, you can loosely tent it with foil. For the glaze, the consistency is crucial. You want it thin enough to drizzle but thick enough to coat. If it’s too thick, add a tiny bit more liquid; if it’s too thin, add a touch more powdered sugar. Sometimes, I skip the glaze altogether and just dust it with powdered sugar for a lighter touch, which is also lovely!
Storing and Reheating Tips
This pineapple dessert is usually gobbled up pretty quickly in my house, but if you happen to have any leftovers (which is rare!), here’s how I store and reheat it. At room temperature, it’s best to cover it tightly with plastic wrap or foil and it should be fine for about 2 days. However, I usually prefer to store any leftovers in the refrigerator. Pop it into an airtight container and it will keep well for about 4-5 days. The texture might change slightly, becoming a bit denser, but it’s still delicious. If you want to freeze it, this dessert actually freezes surprisingly well! Let it cool completely, then wrap it tightly in plastic wrap and then in aluminum foil. You can keep it in the freezer for up to 2-3 months. To thaw, just take it out of the freezer and let it defrost in the refrigerator overnight. Reheating is simple: for a warm treat, pop a slice in the microwave for about 20-30 seconds, or until warmed through. If you want that just-baked texture, you can gently warm it in a low oven (around 300°F or 150°C) for about 10-15 minutes. If you’ve kept the glaze separate or haven’t glazed it yet, I’d recommend adding the glaze *after* reheating for the best texture. If you’ve already glazed it and are reheating, it should be fine, but the glaze might become a little softer.
Frequently Asked Questions
Final Thoughts
So there you have it, my friends! My absolutely irresistible pineapple dessert dream. It’s a recipe that’s brought so much joy to my table, and I truly hope it does the same for yours. It’s more than just a dessert; it’s a reminder of simple pleasures, sweet moments, and the magic that happens when you combine a few basic ingredients with a little bit of love. If you’re looking for a pineapple dessert that’s easy, forgiving, and bursting with tropical flavor, you’ve found your winner. It’s the perfect way to end any meal, or even to start your day if you’re feeling a little indulgent! I hope you try it and that it becomes a beloved recipe in your home too. If you make it, please come back and leave a comment, I’d love to hear how it turned out and what you thought! And if you have your own wonderful variations, do share them! Happy baking!
Tropical Pineapple Delight
Ingredients
Main Ingredients
- 1 can crushed pineapple drained
- 1 can sweetened condensed milk
- 0.5 cup whipping cream heavy
- 0.5 cup chopped walnuts optional
- 0.5 cup maraschino cherries halved, for garnish
Instructions
Preparation Steps
- In a large bowl, combine the drained crushed pineapple and sweetened condensed milk. Stir well.
- In a separate bowl, whip the heavy cream until stiff peaks form.
- Gently fold the whipped cream into the pineapple mixture.
- If using, stir in the chopped walnuts.
- Spoon the mixture into a serving dish.
- Chill for at least 2 hours before serving. Garnish with maraschino cherries.