You know that feeling, right? The crisp air starts to bite, leaves turn those glorious shades of red and gold, and suddenly, all you can think about is pumpkin spice everything. For me, it means one thing: pie. But let’s be real, sometimes you just don’t have the oven space, or the patience, or frankly, the energy to deal with a full-on bake. That’s where my absolute, hands-down, favorite no-bake pumpkin pie comes in. It’s the culinary equivalent of a cozy hug on a chilly afternoon, and honestly, it’s a lifesaver during the crazy holiday season when every appliance in the house is already in use. Forget the fuss of crusts that shrink or fillings that curdle; this no-bake wonder delivers all the comforting, spiced pumpkin goodness you crave, with a fraction of the effort. It’s so ridiculously simple, yet it tastes like it came from a fancy bakery. My kids, who are notoriously picky, devour this in minutes. Seriously, if you’re looking for a showstopper that requires zero baking, you’ve landed in the right place. This isn’t just a recipe; it’s my little slice of autumnal happiness, and I can’t wait to share it with you.
What is no bake pumpkin pie?
So, what exactly makes this a “no-bake” pumpkin pie? Think of it as all the deliciousness of a traditional pumpkin pie, but magically condensed into a no-fuss, no-oven-required treat. Instead of a classic pastry crust, we’re talking about a delightful, crumbly base that sets up beautifully in the fridge. The filling? It’s a luscious, creamy concoction that mimics the texture and flavor of baked pumpkin pie filling perfectly, but without ever needing to see the inside of an oven. It’s essentially a genius shortcut that gives you all the classic fall flavors – that warm cinnamon, nutmeg, and clove symphony, paired with the sweet, earthy notes of pumpkin – in a format that’s ridiculously forgiving and incredibly satisfying. It’s a dessert that’s ready when you are, making it the ultimate crowd-pleaser for potlucks, last-minute gatherings, or just a Tuesday night craving.
Why you’ll love this recipe?
Honestly, where do I even begin with why this no-bake pumpkin pie is a kitchen staple for me? First off, the FLAVOR. It’s just… spectacular. You get that authentic pumpkin pie taste, rich and warmly spiced, but with an extra creamy, almost cheesecake-like texture that’s just divine. It’s not too sweet, letting the natural flavors of the pumpkin and spices really shine through. Then there’s the SIMPLICITY. I’m talking about a recipe that you can whip up in less than 20 minutes of active time. No rolling dough, no blind baking, no stress about cracks or soggy bottoms. It’s a true testament to how delicious simple can be. It’s also incredibly COST-EFFECTIVE. The ingredients are pantry staples for most of us, especially during fall, meaning you don’t need to break the bank to create something truly special. And the VERSATILITY is a huge bonus! While it’s amazing on its own, I love that you can dress it up or down. Serve it chilled for a lighter feel, or let it soften slightly for an even more decadent, melt-in-your-mouth experience. What I love most about this is that it’s practically foolproof. I’ve made this countless times, even when I’m completely exhausted, and it turns out perfectly every single time. It’s the kind of dessert that makes people ooh and aah, and you get to nonchalantly say, “Oh, this old thing? I just threw it together.” It’s also a fantastic option if your oven is already occupied with a Thanksgiving turkey or a Christmas roast. You get that signature fall flavor profile without adding to the oven chaos. Trust me, once you try this, you’ll understand why it’s a permanent fixture in my fall dessert rotation.
How do I make no bake pumpkin pie?
Quick Overview
This no-bake pumpkin pie is all about effortless assembly. We’ll create a simple, buttery cookie crust that requires no baking, just chilling. Then, we’ll whip up a smooth, spiced pumpkin filling that sets up beautifully in the refrigerator. The final touch is an optional, but highly recommended, drizzle of a sweet glaze that adds just the right amount of decadence. It’s truly as easy as mixing, chilling, and serving. The beauty of this recipe is its forgiving nature; it’s designed to be made quickly without sacrificing flavor or texture.
Ingredients
For the Crust:
Here’s what you’ll need to create that perfect foundation. I always opt for graham crackers because their slightly sweet, toasty flavor is unbeatable with pumpkin. You’ll want about 2 cups of finely crushed graham cracker crumbs. This usually means about 1 ½ sleeves of crackers. Make sure they’re finely crushed – no one likes biting into a big chunk! If you can’t find graham crackers, gingersnaps or even Digestive Biscuits would work beautifully, adding a slightly different, but equally delicious, spicy note. To bind it all together, we need melted unsalted butter. About 6 tablespoons should do the trick. Don’t skimp on the butter; it’s what gives the crust that lovely crisp texture even when chilled. A little bit of granulated sugar, just a couple of tablespoons, adds a touch of sweetness and helps it firm up nicely.
For the Filling:
This is where all the magic happens! The star, of course, is pumpkin puree. Make sure you’re using pure pumpkin puree, NOT pumpkin pie filling, as that already has spices and sweeteners added. You’ll need one 15-ounce can. For that incredibly smooth, creamy texture that sets up just right, we’ll use CREAM CHEESE. Let it soften at room temperature for at least 30 minutes; this is crucial to avoid lumps. You’ll need 8 ounces of softened cream cheese. Sweetness comes from powdered sugar, about 1 cup, which also contributes to the silky texture. For that classic pumpkin pie flavor, we’ll add a generous amount of pumpkin pie spice – usually 1 to 2 teaspoons, depending on how spicy you like it. A touch of vanilla extract (about 1 teaspoon) enhances all the flavors. And the secret ingredient that makes it truly set? Evaporated milk. Just half a cup of this rich, concentrated milk is perfect. It adds a wonderful creaminess without making it too thin.
For the Glaze (Optional, but highly recommended!):
This is the crowning glory, folks! It adds a lovely sheen and an extra layer of flavor. You’ll need about ½ cup of powdered sugar. To get the right consistency, we’ll add a tablespoon or two of milk (any kind will do – dairy, almond, oat). You want it pourable but not watery. A tiny splash of vanilla extract ties in beautifully with the filling.
Step-by-Step Instructions
Step 1: Preheat & Prep Pan
First things first, grab a 9-inch pie plate. It doesn’t need to be greased, as the butter in the crust usually prevents sticking. I like to line mine with a little parchment paper on the bottom if I’m feeling fancy, just to make sure it slides out perfectly, but it’s usually not necessary. Press the crust mixture firmly and evenly into the bottom and up the sides of the pie plate. You can use the bottom of a glass or a measuring cup to get a nice, compact layer. Then, pop that pie plate into the freezer for about 15-20 minutes while you whip up the filling. This helps the crust firm up beautifully.
Step 2: Mix Dry Ingredients
In a medium bowl, combine your finely crushed graham cracker crumbs, granulated sugar, and pumpkin pie spice if you’re adding it to the crust itself. Give it a good whisk to make sure everything is evenly distributed. This simple step ensures that every bite of the crust is perfectly seasoned and slightly sweet.
Step 3: Mix Wet Ingredients
In a separate, larger bowl, combine the softened cream cheese and powdered sugar. Using an electric mixer (a hand mixer works great!), beat them together until the mixture is completely smooth and creamy, with no lumps of cream cheese remaining. This is super important for a silky smooth filling. Then, add your pumpkin puree, vanilla extract, and evaporated milk. Beat again until everything is just combined and looks like a luscious, uniform pumpkin mixture.
Step 4: Combine
This is where the magic truly happens! Take your chilled Pie Crust out of the freezer. Pour the pumpkin filling evenly into the crust. Gently smooth the top with a spatula to make it look neat and tidy. You want a nice, even layer so it sets up uniformly.
Step 5: Prepare Filling
Wait, what? Didn’t we just do that? Oh, right! This is a little confusing in the flow, isn’t it? Let’s rephrase this! The *filling* was actually prepared in Step 3. The “Prepare Filling” step is technically done. My apologies, sometimes my brain gets ahead of my fingers! So, yes, the filling is ready to go into the crust as described in Step 4.
Step 6: Layer & Swirl
This step is about getting the filling into the crust! As mentioned in Step 4, pour the luscious pumpkin filling into the chilled, prepared crust. Use a spatula to gently spread it into an even layer, making sure it reaches all the way to the edges of the crust. You want a smooth, inviting surface ready for chilling.
Step 7: Bake
This is the best part: there’s no baking required! Once the filling is in the crust, your no-bake pumpkin pie is ready to chill. Cover the pie loosely with plastic wrap or foil and place it in the refrigerator. It needs at least 4-6 hours to set properly, but I always recommend chilling it overnight for the best texture and flavor. The cold will firm up the cream cheese and evaporated milk beautifully, giving you that perfect pie consistency without ever turning on the oven.
Step 8: Cool & Glaze
After chilling for at least 4-6 hours (or ideally overnight), your pie should be wonderfully firm. To make the glaze, whisk together the powdered sugar and milk in a small bowl until smooth. Add more milk a teaspoon at a time if it’s too thick, or more powdered sugar if it’s too thin. You’re looking for a drizzly consistency. Once the pie is firm, drizzle the glaze over the top in a decorative pattern. This adds a touch of sweetness and visual appeal. Let the glaze set for about 15-20 minutes before slicing.
Step 9: Slice & Serve
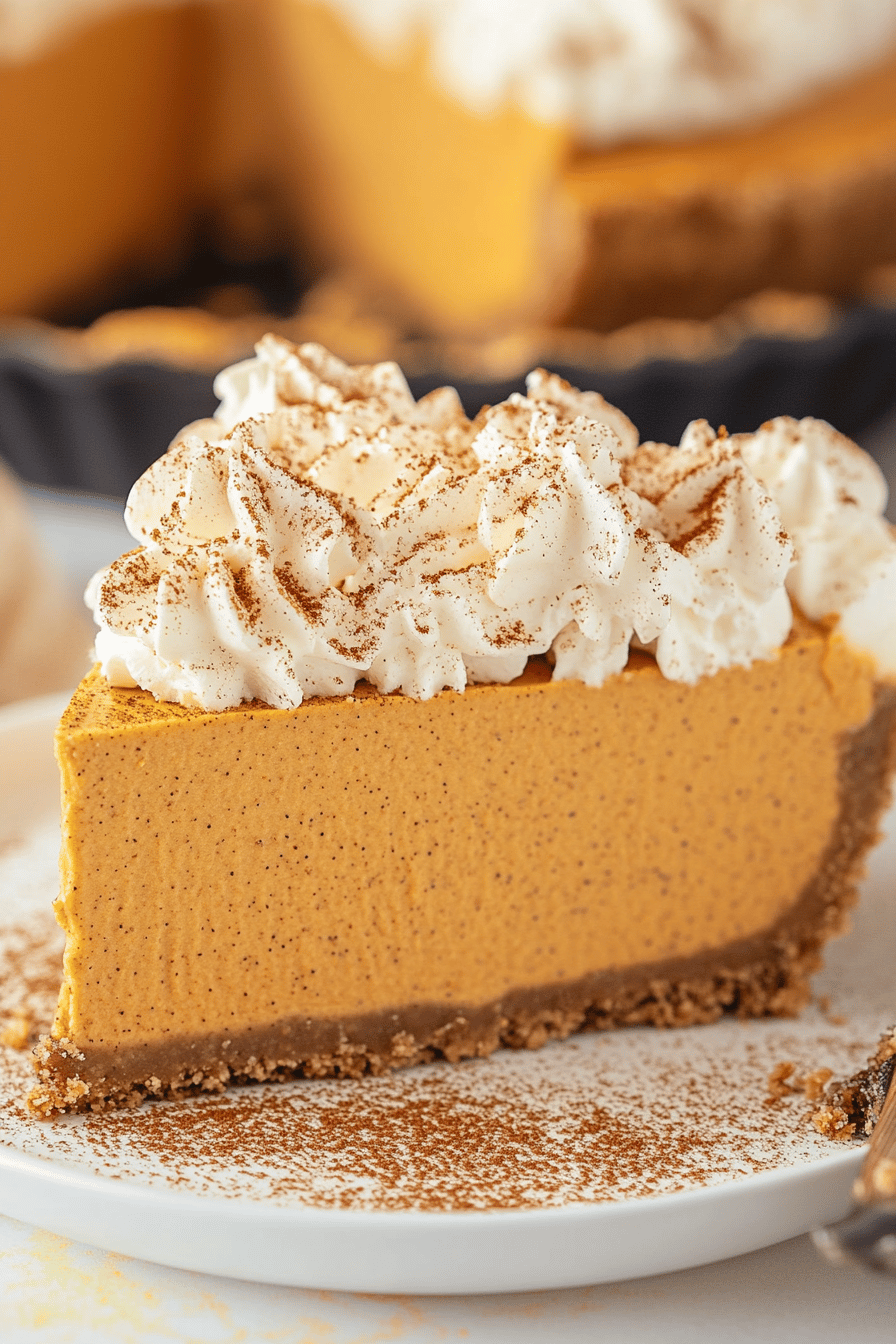
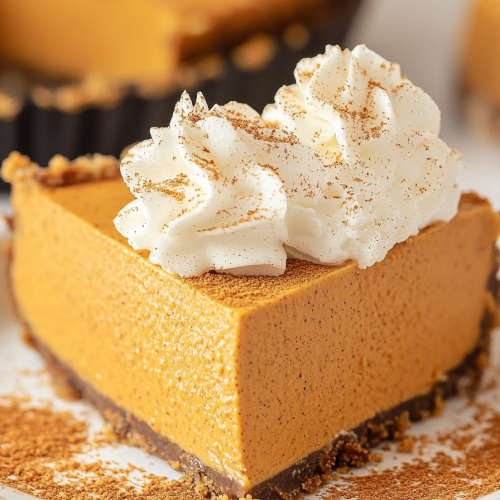
Once the glaze has set (or if you skipped it!), your no-bake pumpkin pie is ready to be enjoyed! Use a sharp knife to slice it into wedges. I find it helps to wipe the knife clean between each slice for neat cuts. Serve chilled. It’s absolutely divine on its own, but a dollop of whipped cream or a sprinkle of cinnamon is always a welcome addition!
What to Serve It With
This no-bake pumpkin pie is so versatile, it’s fantastic for pretty much any occasion. For BREAKFAST, imagine a slice with your morning coffee. It’s rich and satisfying, making it feel like a decadent treat to start your day. I love serving it slightly softened, so it’s almost spreadable on a fork. For BRUNCH, it’s a real showstopper. Garnish with a swirl of whipped cream, some toasted pecans, and maybe a dusting of cinnamon. It pairs beautifully with sparkling cider or a light mimosa. It feels elegant but is still so easy to serve. As DESSERT, it’s a dream. It’s the perfect after-dinner indulgence, especially when you’ve already got a hearty meal. It’s so satisfying on its own, but if you want to go all out, a scoop of vanilla bean Ice Cream is heavenly. For COZY SNACKS, this is my go-to when a sweet craving hits late at night. It’s comforting, quick, and feels so special. My family tradition is to have a slice with a tall glass of cold milk – pure comfort! I’ve also found it’s a huge hit at neighborhood potlucks; it always disappears first, and everyone asks for the recipe. It’s a guaranteed crowd-pleaser, no matter the setting.
Top Tips for Perfecting Your No-Bake Pumpkin Pie
Making a fantastic no-bake pumpkin pie is all about a few key techniques and understanding the ingredients. For the CRUST, I can’t stress enough how important it is to crush those crackers *really* finely. I usually pulse them in a food processor until they resemble coarse sand. This ensures a cohesive crust that holds its shape. Packing it down firmly into the pie plate is also key; use the bottom of a glass or measuring cup to get it nice and dense. Then, that quick chill in the freezer is a game-changer for firmness. When it comes to the FILLING, the MOST important thing is to make sure your cream cheese is truly softened. If it’s even a little cold, you’ll end up with lumpy filling, and no one wants that! Beat the cream cheese and powdered sugar until perfectly smooth *before* adding the other ingredients. And don’t overmix once the pumpkin and milk are in; just mix until combined. For the GLAZE, consistency is everything. Start with the recommended amount of milk and add more *very* gradually until you reach a drizzly texture. Too much liquid, and it’ll just run off. Too little, and it’ll be hard to spread. If you want to get fancy with the swirl, you can add a drop of food coloring to a small portion of the glaze and swirl it on top of the white glaze with a toothpick for a decorative effect. A tip I learned after a few tries: if your filling seems a *tiny* bit soft before chilling, don’t worry too much. The longer it chills, the firmer it will get. Overnight is truly the magic number for the best texture. If you’re looking for INGREDIENT SWAPS, for a dairy-free version, you can try using vegan cream cheese and a plant-based milk for the glaze. I haven’t personally tested it for the evaporated milk in the filling, but a rich, unsweetened coconut milk *might* work, though the texture could be slightly different. For a richer crust, try using finely crushed gingersnap cookies instead of graham crackers – it adds a lovely spicy kick! And if you’re sensitive to spice, start with a little less pumpkin pie spice and taste your filling before pouring it into the crust. You can always add more!
Storing and Reheating Tips
One of the best things about this no-bake pumpkin pie is how well it stores. If you have any leftovers (which is rare in my house!), you can keep it at ROOM TEMPERATURE for a couple of hours if necessary, but it’s best to refrigerate it promptly. For REFRIGERATOR STORAGE, cover the pie loosely with plastic wrap or foil. It will stay fresh and delicious for about 3 to 4 days. The texture remains lovely and firm during this time. I find that after day 3, the crust can start to soften just a tiny bit, but it’s still perfectly good. If you’re planning ahead for a party or want to make it even further in advance, FREEZER INSTRUCTIONS are your friend. Wrap the pie very tightly in several layers of plastic wrap, then a layer of aluminum foil. It can be frozen for up to 1-2 months. When you’re ready to serve it, transfer the frozen pie directly from the freezer to the refrigerator and let it thaw overnight. Do NOT try to thaw it at room temperature, as this can affect the texture. For the GLAZE TIMING, I always recommend adding the glaze *after* the pie has fully chilled and set, and ideally just before serving if you’re storing it for a day or two. If you’re freezing it, it’s best to add the glaze *after* thawing. This prevents the glaze from cracking or becoming sticky during freezing and thawing. Just make sure the pie is fully chilled and firm before glazing for the best results!
Frequently Asked Questions
Final Thoughts
There you have it – my absolute favorite no-bake pumpkin pie! It’s proof that you don’t need a hot oven to create something truly spectacular, especially when it comes to those comforting fall flavors we all adore. It’s the kind of dessert that brings smiles, requires minimal effort, and delivers maximum deliciousness. Whether you’re a seasoned baker or just starting out, this recipe is your secret weapon for effortless holiday entertaining or a simple treat to brighten any day. The combination of the crisp, spiced crust and the impossibly smooth, warmly spiced pumpkin filling is pure bliss. I truly hope you give this a try and fall in love with it as much as my family and I have. If you do make it, please let me know in the comments below – I’d love to hear how yours turned out! And if you enjoyed this, you might also love my Spiced Apple Crumble Bars or my Easy Chocolate Mousse for more no-fuss dessert inspiration. Happy almost-baking (or rather, no-baking)!
no-bake pumpkin pie
Ingredients
Crust
- 1.5 cups graham cracker crumbs
- 0.25 cups granulated sugar
- 0.33 cup melted butter
Filling
- 15 ounces pumpkin puree not pumpkin pie filling
- 14 ounces sweetened condensed milk
- 2 teaspoons pumpkin pie spice
- 1 teaspoon vanilla extract
Instructions
Preparation Steps
- In a medium bowl, combine graham cracker crumbs and granulated sugar. Stir in melted butter until well combined.
- Press the crumb mixture evenly into the bottom and up the sides of a 9-inch pie plate.
- In a separate large bowl, whisk together pumpkin puree, sweetened condensed milk, pumpkin pie spice, and vanilla extract until smooth.
- Pour the pumpkin filling into the prepared crust.
- Chill the pie in the refrigerator for at least 4 hours, or until firm.
- Slice and serve. Garnish with whipped cream if desired.