Okay, so you know how sometimes you just get a craving? Like, a deep, undeniable, “I need something decadent RIGHT NOW” kind of craving? That’s where this No-Bake Peanut Butter Fudge Pie comes in. Honestly, it’s a total lifesaver for me, especially on those nights when the last thing I want to do is preheat the oven and hover over a hot stove. It’s like magic in a pie crust – rich, creamy, intensely peanut buttery, and miraculously easy. I’ve made countless desserts in my life, from elaborate layered cakes to fussy tarts, but this one? This is the one that consistently gets rave reviews, the one my kids request for every birthday, and the one that satisfies that sweet tooth without any baking drama. It’s got that irresistible fudge-like texture but with the unmistakable, comforting flavor of peanut butter, all nestled in a simple, no-bake crust. If you’ve ever had a great no-bake cookie, imagine that incredible flavor amplified and transformed into a pie. It’s seriously that good, and I can’t wait to share it with you.
What is a no-bake peanut butter fudge pie?
So, what exactly *is* this magical creation? Think of it as pure, unadulterated peanut butter bliss without any of the fuss. It’s essentially a rich, dense, almost fudgy peanut butter filling set in a simple, crumbly crust, all without ever needing to turn on your oven. The “fudge” part comes from the combination of melted butter, sugar, and cocoa, which cooks down into a luscious, pourable base that firms up beautifully in the fridge. It’s like the best parts of a Chocolate Peanut Butter cup and a rich fudge brownie got together and decided to have a delicious baby. The name “No-Bake Peanut Butter Fudge Pie” perfectly captures its essence: it’s your favorite comforting flavors, transformed into a pie, and the best part? You don’t have to bake it! It’s a simple assembly job that yields a surprisingly sophisticated dessert. It’s honestly one of those recipes where people taste it and are shocked when you tell them how easy it was. They expect a whole production, but nope, just pure, simple deliciousness.
Why you’ll love this recipe?
What are some of the best reasons to make a no bake Peanut Butter fudge pie?flavor is just out of this world. It’s a double whammy of chocolate and peanut butter, and if that’s not your love language, I don’t know what is! The peanut butter flavor is prominent and creamy, not too sweet, and it’s perfectly balanced by the slight bitterness of the cocoa. It tastes incredibly rich and indulgent, like something you’d get from a fancy dessert shop, but it’s made right in your own kitchen. Then there’s the simplicity. This is the recipe I pull out when I’m exhausted, when unexpected guests arrive, or when my sweet tooth hits hard at 10 PM. There’s no complicated creaming of butter and sugar, no delicate folding of egg whites, no oven temperatures to stress about. You just melt, mix, pour, and chill. That’s it! It’s practically foolproof, which is a huge win in my book. And let’s talk about Cost-efficiency: What is the best way to measure cost-efficiency?. The ingredients are all pantry staples that most of us have on hand or can get very affordably at any grocery store. You don’t need any fancy, expensive items. It’s proof that incredible desserts don’t have to break the bank. Plus, it’s incredibly versatile. While I love it as is, you can easily tweak it. Add some chocolate chips to the filling, sprinkle chopped peanuts on top, or drizzle it with extra chocolate ganache. It’s perfect for a casual family dessert, elegant enough for a potluck, and always a crowd-pleaser. What I love most about this pie is that it delivers maximum flavor and satisfaction with minimum effort. It’s a true testament to the power of simple, well-loved ingredients coming together perfectly. It’s a recipe that makes you feel like a baking superstar without even breaking a sweat.
How to Make No-Bake Peanut Butter Fudge Pie
Quick Overview
The beauty of this No-Bake Peanut Butter Fudge Pie lies in its straightforward process. You’ll start by creating a simple press-in crust, then you’ll whip up a rich, stovetop filling that cools into a glorious fudge texture. The whole process is about melting, stirring, and chilling. It’s designed to be incredibly forgiving, so even if you’re new to no-bake desserts, you’ll nail this on your first try. It’s a recipe that practically makes itself, and the results are always spectacular, especially that smooth, melt-in-your-mouth texture.
Ingredients
For the Crust:
You want something sturdy but still tender, and this graham cracker crust is perfection. You can totally use chocolate graham crackers if you’re feeling extra decadent, or even crushed Oreos for a different vibe. I usually grab a standard box of graham crackers – about 1.5 cups of crumbs is what you’re aiming for. You’ll need about 6 tablespoons of melted unsalted butter to bind it all together. A tablespoon or two of sugar is optional but gives it a little extra crispness.
For the Filling:
This is where the magic happens! You’ll need unsalted butter (about 1 stick, 8 tablespoons), granulated sugar (1 cup), and cocoa powder (about 1/3 cup, unsweetened is best for flavor control). Then comes the star: peanut butter! Creamy is my go-to because it blends so smoothly, and you’ll need about 1 cup. To get that creamy, luscious texture without baking, we’ll use evaporated milk (about 1/2 cup) and a splash of vanilla extract (1 teaspoon). And of course, a pinch of salt to really bring out all those flavors.
For the Glaze (Optional, but highly recommended!):
If you want to take this pie over the top, a simple chocolate glaze is the way to go. You’ll need about 1/2 cup of semi-sweet chocolate chips and another tablespoon of butter to make it extra glossy and smooth. Sometimes I’ll add a tiny bit of peanut butter to the glaze too, for an extra peanut butter punch!
Step-by-Step Instructions
Step 1: Preheat & Prep Pan
Alright, first things first! You’ll want to grab a 9-inch pie plate. No need to preheat the oven for this one, thankfully! Take your graham cracker crumbs, melted butter, and optional sugar, and give them a good mix in a bowl until it resembles wet sand. Press this mixture evenly into the bottom and up the sides of your pie plate. I like to use the bottom of a measuring cup or a flat glass to really pack it down firmly. This helps the crust hold its shape and gives you a nice base. Pop this in the freezer while you make the filling – about 10-15 minutes should do it. This helps it firm up even more.
Step 2: Mix Dry Ingredients
In a medium saucepan (make sure it’s a good one that won’t scorch easily!), combine your granulated sugar and cocoa powder. Give them a whisk together to break up any lumps and ensure they’re well distributed. This is a simple step, but it ensures you don’t have pockets of dry cocoa powder in your finished filling, and it helps the sugar dissolve more evenly later on.
Step 3: Mix Wet Ingredients
To that same saucepan with the sugar and cocoa, add the unsalted butter and the evaporated milk. Place the saucepan over medium heat. Stir constantly until the butter is completely melted and the sugar is dissolved. You’ll see the mixture start to thicken slightly and become glossy. This usually takes about 3-5 minutes. Keep stirring! The key here is consistent heat and stirring to prevent scorching on the bottom.
Step 4: Combine
Once the butter has melted and the sugar is dissolved, stir in your creamy peanut butter, vanilla extract, and the pinch of salt. Keep stirring until the peanut butter is completely melted and smoothly incorporated into the mixture. It will look incredibly rich and glossy at this stage. The aroma will already be amazing!
Step 5: Prepare Filling
This step is crucial for that fudge texture. You want to continue cooking the mixture over medium heat, stirring *constantly*, until it reaches a boil. Once it boils, reduce the heat slightly to medium-low and let it bubble gently for about 2 minutes. Again, keep stirring! This cooking process is what helps the sugar and liquids combine and thicken properly, ensuring your pie sets up firm. You’re looking for a consistency that’s thick enough to coat the back of a spoon, but still pourable. Remove from heat immediately after the 2 minutes of simmering.
Step 6: Layer & Swirl
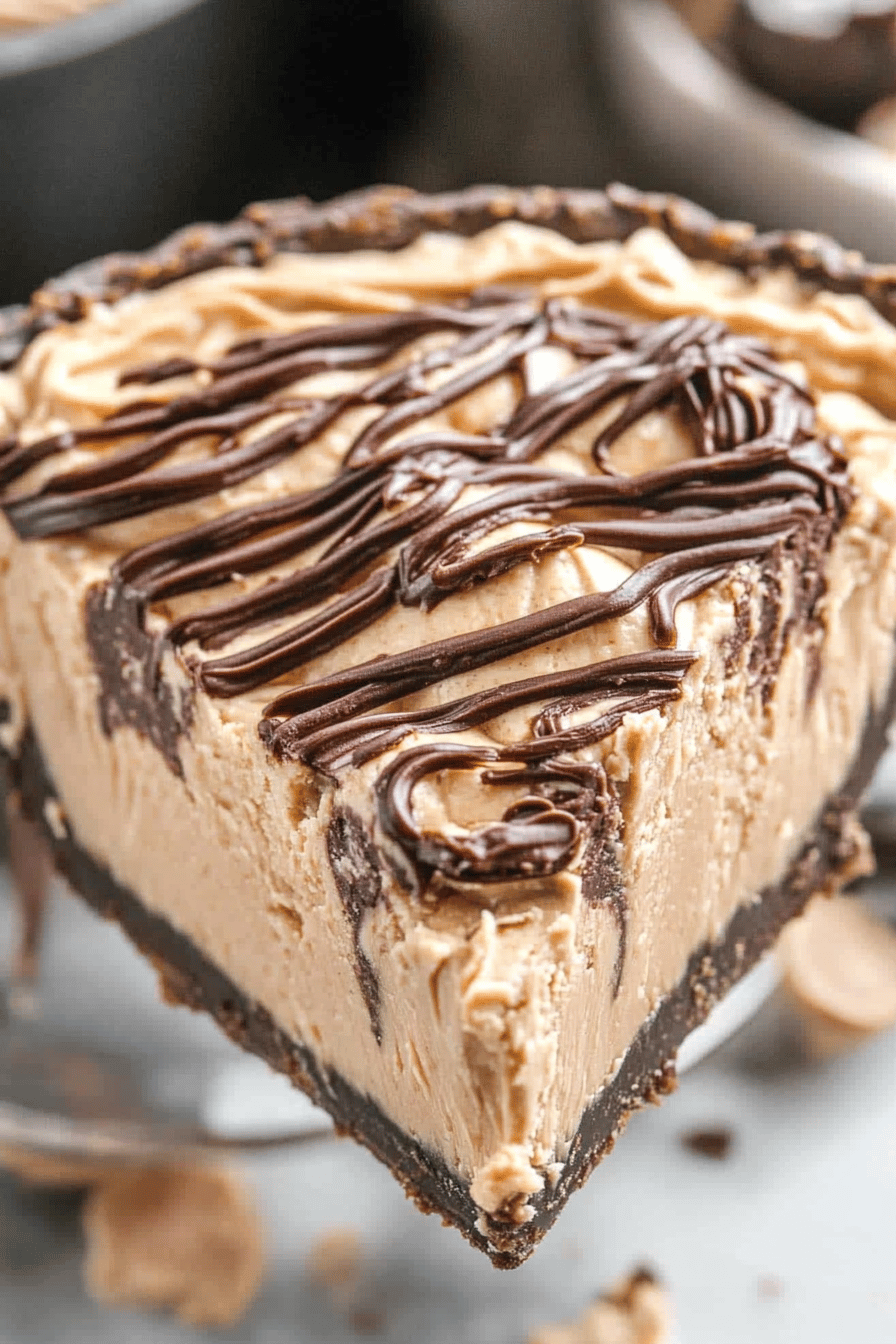
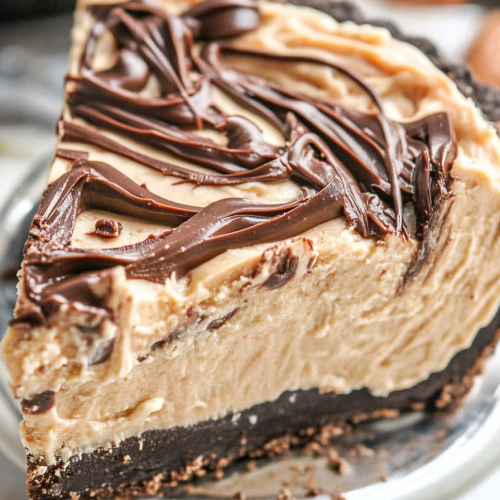
Retrieve your chilled Pie Crust from the freezer. Give the peanut butter filling one last good stir, then carefully pour it into the prepared crust. Use a spatula to spread it evenly. Now, if you’re making the optional chocolate glaze, you can melt your chocolate chips and butter together in a microwave-safe bowl in 30-second intervals, stirring in between, until smooth. Drizzle this over the top of the peanut butter filling. You can use a toothpick or a skewer to gently swirl the chocolate into the peanut butter for a beautiful marbled effect. It looks so fancy, but it’s incredibly easy!
Step 7: Bake
Wait for it… no baking required! That’s the best part! All you need to do is chill this beauty. Cover the pie loosely with plastic wrap or foil, making sure it doesn’t touch the glaze if you’ve added it. Place it in the refrigerator for at least 4 hours, or until it’s completely firm and set. Overnight is even better if you can resist!
Step 8: Cool & Glaze
This step is actually already done when you chill the pie! The chilling process is what allows the pie to set up without any baking. If you’re adding the glaze fresh, once the pie has chilled and is firm, you’ll prepare your glaze by melting the chocolate chips and butter together. Drizzle it over the chilled pie and swirl as described in Step 6. The cold pie will help the glaze set quickly.
Step 9: Slice & Serve
Once the pie is completely firm, it’s time to slice and serve! For the cleanest slices, use a sharp knife that has been dipped in hot water and dried. This helps cut through the rich filling smoothly. Serve chilled, perhaps with a dollop of whipped cream or a sprinkle of chopped peanuts. The texture should be dense and fudgy, almost like a frozen mousse. It’s pure heaven!
What to Serve It With
This No-Bake Peanut Butter Fudge Pie is so versatile, it can be dressed up or down for any occasion. For a simple, satisfying breakfast treat (because who says dessert can’t be breakfast?), a small slice paired with a strong cup of coffee is pure indulgence. The rich, chocolatey notes mingle beautifully with the bitter coffee. For a more elegant brunch spread, I like to serve it in individual mini pie tins or cut generous slices and top them with a small swirl of whipped cream and a few fresh raspberries for a pop of color and freshness. It looks incredibly sophisticated. As a decadent dessert, it’s a guaranteed showstopper after any meal. I often serve it with a scoop of vanilla bean ice cream, as the cold, creamy ice cream is the perfect contrast to the rich, fudgy pie. For cozy snacks, especially on a chilly evening, a warm mug of hot chocolate alongside a slice of this pie is the ultimate comfort. My family loves it just as it is, straight from the fridge, but sometimes we’ll warm up a slice *very* slightly, just enough to soften it a touch and make it even more gooey. My personal favorite tradition is on movie nights; we’ll cut a big wedge and share it on the couch, no fuss, just pure enjoyment.
Top Tips for Perfecting Your No-Bake Peanut Butter Fudge Pie
I’ve made this pie more times than I can count, and over the years, I’ve picked up a few tricks that really make a difference. First, for the crust, don’t skimp on packing it down firmly. A loose crust will crumble when you try to serve the pie. Using the bottom of a glass or a flat-bottomed measuring cup is your best friend here. For the filling, the key is constant stirring and consistent medium heat. If you cook it too high, you risk scorching the bottom, and if you don’t cook it long enough, it might not set properly. The 2-minute simmer after it comes to a boil is essential for that fudge-like texture. If your peanut butter is very stiff or oily, sometimes it helps to give it a quick stir before measuring it out to ensure it’s smooth and easily incorporated. When it comes to swirl customization for the glaze, don’t overthink it! A few random drizzles and a quick swirl with a toothpick create a beautiful, rustic look that’s far more appealing than a perfectly uniform pattern. Less is often more here. For ingredient swaps, if you don’t have evaporated milk, a full-fat coconut milk (the canned kind, not the carton beverage) can work in a pinch, though it might impart a subtle coconut flavor. You can also substitute almond butter or sunflower seed butter for peanut butter, but the flavor profile will change. For a truly decadent experience, try using a good quality dark chocolate for the glaze. For baking tips (or in this case, chilling tips!), make sure your refrigerator is at a good, cold temperature. A pie that’s not chilled long enough will be too soft to slice cleanly. If you’re in a hurry, you can place the pie in the freezer for about 45 minutes to an hour after the initial chilling period to help it firm up further, but be careful not to freeze it completely if you want that fudgy texture. For glaze variations, try adding a pinch of espresso powder to the melted chocolate to enhance the chocolate flavor, or stir in a teaspoon of peanut butter for an even richer peanut butter profile. You can also skip the glaze entirely and simply dust the top with a bit of cocoa powder or powdered sugar just before serving.
Storing and Reheating Tips
This No-Bake Peanut Butter Fudge Pie is wonderful because it stores so well, making it perfect for making ahead. At room temperature, it’s best to keep it covered with plastic wrap for no more than a couple of hours, especially if your kitchen is warm, as it can start to soften. For the best quality and texture, I always recommend refrigerator storage. Keep it tightly covered in an airtight container or with plastic wrap directly over the pie. It will stay delicious for up to 3-4 days. The flavor actually melds and deepens over time, so it’s often even better on the second day! If you need to store it for longer, freezer instructions are your best bet. Wrap the entire pie very tightly in a layer of plastic wrap, followed by a layer of aluminum foil, to prevent freezer burn. It can be frozen for up to 2 months. To thaw, transfer the frozen pie to the refrigerator for at least 24 hours. For the glaze timing advice, if you plan to freeze the pie, it’s best to glaze it *after* thawing. Freezing and thawing can sometimes make the glaze a bit streaky. So, freeze the un-glazed pie, thaw it in the fridge, and then prepare and apply the glaze just before serving. This ensures the most beautiful finish.
Frequently Asked Questions
Final Thoughts
Honestly, this No-Bake Peanut Butter Fudge Pie is more than just a recipe for me; it’s a little piece of comfort and joy. It’s proof that you don’t need a complicated process or fancy ingredients to create something truly special that everyone will love. It’s the perfect balance of rich, decadent flavor and effortless preparation. If you’re someone who loves peanut butter and chocolate, and who sometimes just needs a dessert that’s going to deliver without a fuss, then you absolutely have to try this pie. It’s reliable, it’s delicious, and it brings smiles to faces every single time. If you enjoy this kind of simple, yet incredibly satisfying dessert, you might also want to check out my No-Bake Chocolate Oat Bars or my Easy No-Bake Cheesecake. They’re in a similar vein of deliciousness with minimal effort! I truly hope you give this No-Bake Peanut Butter Fudge Pie a try. I can’t wait to hear how yours turns out and what your favorite ways are to enjoy it! Leave a comment below and tell me your thoughts, or share your own special twists!
No-Bake Peanut Butter Fudge Pie
Ingredients
Graham Cracker Crust
- 2.5 cups graham cracker crumbs
- 0.5 cup unsalted butter, melted
- 0.25 cup granulated sugar
Peanut Butter Fudge Filling
- 1 cup unsalted butter, softened
- 0.75 cup smooth peanut butter
- 4 cups powdered sugar
- 0.25 cup milk
- 1 teaspoon vanilla extract
- 0.5 cup semi-sweet chocolate chips, melted
Instructions
Preparation Steps
- Preheat oven to 350°F (175°C). In a medium bowl, combine graham cracker crumbs, melted butter, and granulated sugar. Press evenly into the bottom and up the sides of a 9-inch pie plate.
- Bake the crust for 8-10 minutes, or until lightly golden. Let cool completely.
- In a large bowl, beat together the softened butter and peanut butter until smooth.
- Gradually beat in the powdered sugar, alternating with the milk, until well combined and smooth. Stir in the vanilla extract.
- Gently fold in the melted chocolate chips until just combined.
- Spoon the peanut butter fudge filling into the cooled graham cracker crust, spreading evenly.
- Chill the pie in the refrigerator for at least 2 hours, or until firm.
- Slice and serve. Drizzle with extra melted chocolate or peanut butter if desired.