There are some recipes that just feel like coming home, aren’t there? This Italian Bread Recipe is one of those for me. I remember my Nonna making something similar, filling our tiny kitchen with the most incredible aroma, especially on Sunday mornings. It wasn’t fancy, not by a long shot, but it had this rustic charm and a flavor that just sang. It’s the kind of bread that doesn’t need butter, though I’m never going to say no to a good slathering of garlic butter on a warm slice! I’ve tweaked and tinkered over the years, trying to capture that same magic, and I honestly think I’ve cracked it. This is the one I pull out when friends are coming over unexpectedly, or when I just need a little comfort on a chilly evening. It’s got that perfect crusty exterior that gives way to a soft, airy crumb, just like the best Italian bread should. If you’ve ever tried those bakery loaves that cost a fortune and wondered if you could replicate that goodness at home, then lean in, my friend, because you absolutely can. This Italian bread recipe is truly a labor of love, but one that pays off in spades. It’s simpler than you might think, and the results are just… well, they’re everything.
What is Italian bread?
So, what exactly is “Italian bread”? It’s funny, because the term itself can mean so many things depending on where you are and who you ask! But generally speaking, when people think of Italian bread, they’re picturing a crusty loaf with a soft, chewy interior. It’s not typically enriched with a lot of fat or sugar like some other breads, which lets the flour and yeast really shine. Think of it as the quintessential everyday bread of Italy – versatile, delicious, and the perfect vehicle for everything from dipping in olive oil to making the most incredible sandwiches. It’s a celebration of simple, quality ingredients. This particular Italian Bread Recipe leans into that simplicity, focusing on a long, slow rise that develops a wonderful depth of flavor. It’s the kind of bread you can slice thick for a hearty meal or thin for an appetizer. It’s that foundational recipe that feels both rustic and sophisticated, all at once. It’s not just bread; it’s a little piece of culinary history in every bite.
Why you’ll love this recipe?
Okay, let’s talk about why this Italian bread recipe is about to become your new best friend in the kitchen. First off, the flavor is absolutely phenomenal. It’s got this subtle sweetness from the flour and a delightful yeasty tang that develops during the long fermentation. The crust? Oh, the crust is something special – wonderfully crisp, golden brown, and it sings when you tap on it. But what I love most, honestly, is how surprisingly simple it is to achieve such fantastic results. I know baking bread can sometimes feel intimidating, but I promise you, this Italian bread recipe is incredibly forgiving. The ingredients are all pantry staples, making it super cost-effective. You don’t need any fancy equipment, just your hands, a bowl, and an oven. And the versatility! This bread is a chameleon. It’s perfect for slathering with olive oil and herbs for an appetizer, it makes phenomenal GARLIC BREAD, and it’s the absolute best for soaking up rich sauces. It’s also way more satisfying to serve a homemade loaf. My family devours it, and there’s a real sense of accomplishment in pulling a beautiful, golden-brown loaf out of your oven. It’s the kind of recipe that makes you feel like a total baking rockstar, even if you’re just starting out. Trust me, the smell alone will have everyone gathering in your kitchen.
How do I make this Italian bread recipe?
Quick Overview
The magic of this Italian bread recipe lies in its simplicity and patience. We’ll start by activating the yeast, then gently combining our simple ingredients to form a shaggy dough. After a good knead (or a no-knead method if you prefer!), it’s all about letting time do its work with a couple of cozy rises. We’ll shape it, let it puff up one last time, and then bake it to golden perfection. The result is a crusty, airy loaf that’s pure comfort. It’s truly a “set it and forget it” kind of process for a good chunk of the time, allowing those flavors to deepen beautifully.
Ingredients
For the Dough:
What are some good ways to keep it simple: you probably have most of this in your pantry already!
* Warm Water (around 105-115°F or 40-46°C): About 1 ½ cups. This is crucial for waking up the yeast. Too hot, and you’ll kill it; too cold, and it won’t get going. I always test it on my wrist like I’m checking a baby’s bottle – that perfect warm, not hot, feeling.
* Active Dry Yeast: 2 ¼ teaspoons (one standard packet). This is the powerhouse that makes our bread rise and gives it that lovely flavor.
* Granulated Sugar: 1 teaspoon. Just a little boost to feed the yeast and help it along.
* All-Purpose Flour: 3 ½ to 4 cups, plus more for dusting. I like to start with 3 ½ cups and add more as needed. Using bread flour will give you an even chewier texture, but all-purpose works beautifully here too.
* Salt: 1 ½ teaspoons. Essential for flavor and controlling the yeast activity. Don’t skip this!
* Olive Oil: 2 tablespoons, plus extra for greasing. A good quality extra virgin olive oil adds a subtle richness and helps with the crust.
For the Simple Crust Finish:
This is what gives it that gorgeous bakery look and extra crunch.
* Water: About ½ cup, for steaming in the oven.
* Cornmeal or Semolina Flour (optional): For dusting the baking sheet or pizza stone. It adds a lovely texture and prevents sticking.
Step-by-Step Instructions
Step 1: Preheat & Prep Pan
About 30 minutes before you plan to bake, get your oven preheating. I like to set mine to 425°F (220°C). If you’re using a baking sheet, I highly recommend lining it with parchment paper and lightly dusting it with cornmeal or semolina flour. If you have a pizza stone or baking steel, place it in the oven now to get nice and hot – this is a game-changer for that crispy bottom crust. Make sure to put a small oven-safe pan or baking dish on the bottom rack. This is where we’ll put some water for steam later.
Step 2: Mix Dry Ingredients
In a large mixing bowl, whisk together 3 ½ cups of the all-purpose flour, the salt, and the sugar. Give it a good mix to ensure everything is evenly distributed. This is a simple step, but it’s important for consistent results. No one wants a salty bite or a pocket of unmixed yeast!
Step 3: Mix Wet Ingredients
In a separate, smaller bowl or a large liquid measuring cup, combine the warm water and the active dry yeast. Give it a gentle stir. Let it sit for about 5-10 minutes. You’ll know it’s ready when it gets foamy and bubbly on top – that’s the yeast waking up and getting hungry! If it doesn’t foam, your yeast might be old, or the water was too hot or too cold. In that case, start over with fresh yeast and properly warmed water.
Step 4: Combine
Once your yeast mixture is nice and foamy, pour it into the bowl with the dry ingredients. Add the 2 tablespoons of olive oil. Now, using a sturdy spoon or a dough whisk, start mixing everything together. It will look a bit shaggy and messy at first, and that’s perfectly normal. Keep mixing until a rough dough forms. If it seems too sticky, gradually add a little more flour, about a tablespoon at a time, until it’s manageable. Don’t overdo it; we want a soft dough, not a tough one.
Step 5: Prepare Filling
For this Italian bread, we aren’t really preparing a separate filling in the traditional sense. The “filling” is the beautiful, airy crumb we develop through proper kneading and rising. However, if you wanted to add some herbs like rosemary or basil to the dough, this is where you’d gently incorporate them after the initial mixing in Step 4. Just a small handful, chopped finely, will do.
Step 6: Layer & Swirl
This is where we bring the dough together and start developing its structure. Turn the shaggy dough out onto a lightly floured surface. Now, you can either knead it by hand for about 8-10 minutes until it’s smooth and elastic, or you can use a stand mixer with a dough hook for about 5-7 minutes on medium speed. To check if it’s ready, gently poke the dough; it should spring back. If it doesn’t spring back, keep kneading. The dough should be smooth and slightly tacky, but not sticky. Place the kneaded dough into a lightly oiled bowl, turning it to coat. Cover the bowl tightly with plastic wrap or a damp kitchen towel.
Step 7: Bake
This is the moment of truth! Carefully remove the loaf from the oven. Gently brush or spray the top with a little water. Place the loaf directly onto your preheated baking sheet, pizza stone, or baking steel. Pour about 1 cup of hot water into the preheated pan on the bottom rack of your oven. This creates steam, which is key for a fantastic crust. Immediately close the oven door. Bake for 25-35 minutes, or until the crust is a deep golden brown and the bottom sounds hollow when tapped. You can also check the internal temperature with an instant-read thermometer; it should be around 200-210°F (93-99°C).
Step 8: Cool & Glaze
Once baked to perfection, carefully remove the bread from the oven. Transfer it immediately to a wire cooling rack. This is so important! Leaving it on a hot pan or baking sheet will continue to cook the bottom and can make it soggy. Let the bread cool completely, or at least for a good hour, before slicing. I know, I know, the smell is torture, but trust me, it’s worth the wait. For this Italian bread, we aren’t doing a glaze. The beauty is in the rustic crust and natural flavor. If you wanted something extra, a drizzle of good olive oil or a sprinkle of sea salt just before serving is lovely.
Step 9: Slice & Serve
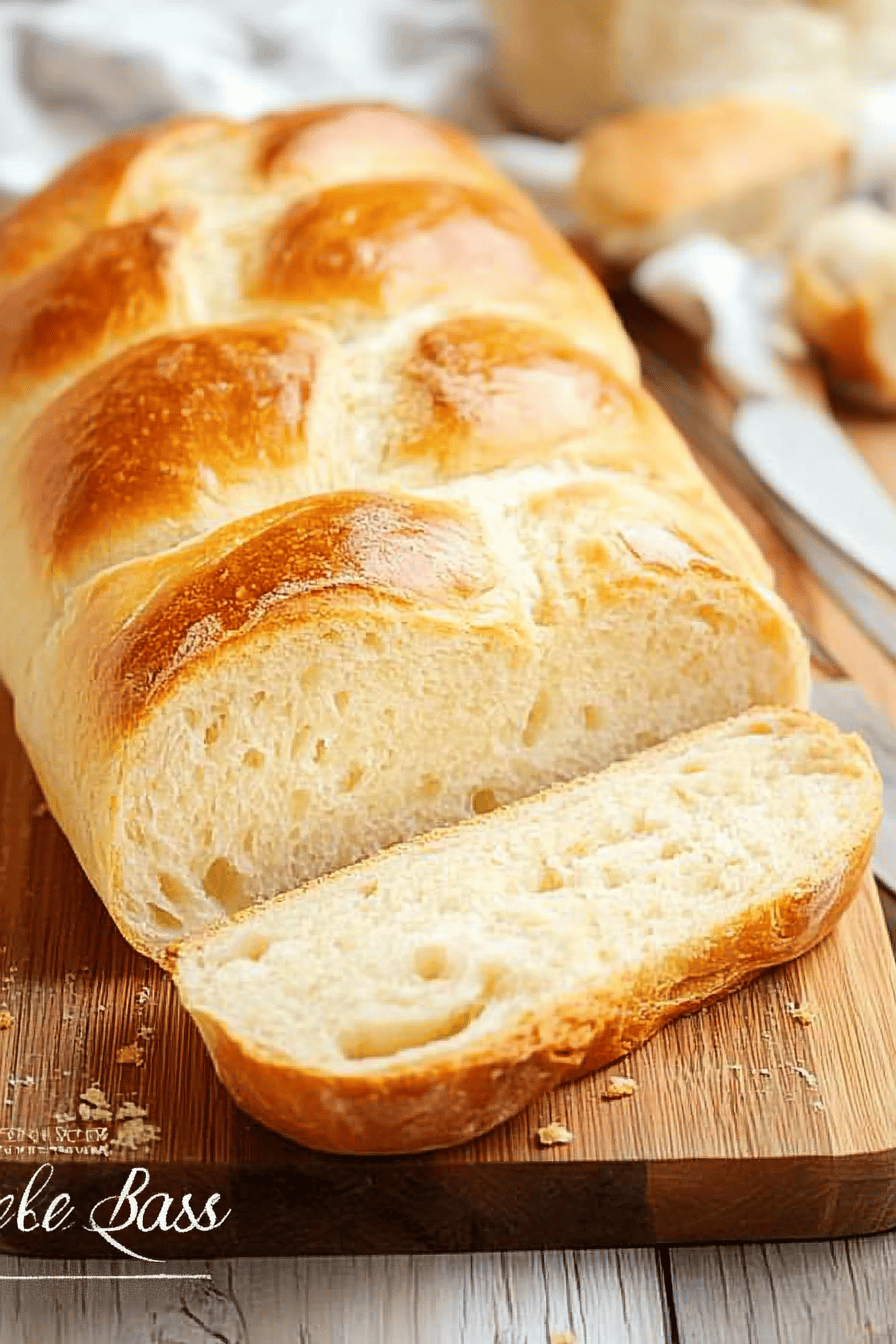
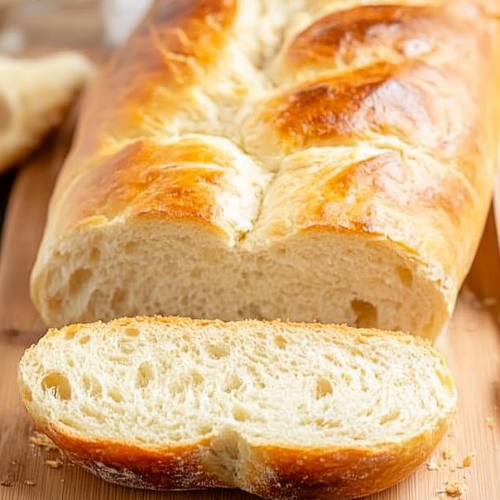
When your Italian bread is beautifully cooled, it’s time to slice and enjoy! Use a serrated bread knife for the cleanest cuts. You’ll hear that satisfying crackle of the crust. Serve it warm, with butter, olive oil, or alongside your favorite meal. It’s also absolutely perfect for making sandwiches, bruschetta, or croutons. Enjoy every single crumb!
What to Serve It With
This Italian bread recipe is a culinary chameleon, fitting in perfectly with so many meals and occasions. For breakfast, it’s divine toasted and spread with a little butter and jam, or even just enjoyed plain with a strong cup of coffee. Imagine that warm, crusty slice to start your day – pure bliss! For a more elaborate brunch, think about making crostini. Toast thin slices, rub them with a garlic clove, and top with fresh tomatoes, basil, and a drizzle of balsamic glaze. It looks so elegant and tastes even better. It’s also fantastic alongside a hearty soup or a rich stew, just begging to be dipped. My kids love it for dinner, especially when we have pasta. They’ll grab a slice and use it to mop up every last bit of sauce – it’s one of those quiet praises that means the world to me. And for dessert? While it’s not sweet, a small piece with a good cheese and some fruit is a lovely way to end a meal. It provides that perfect savory contrast. I’ve also found it makes incredible bread pudding if you happen to have any leftovers (though that’s rare in my house!). It truly elevates any meal, turning an ordinary dinner into something special.
Top Tips for Perfecting Your Italian Bread Recipe
I’ve baked my fair share of loaves over the years, and I’ve picked up a few tricks that I think make a real difference in getting that perfect crust and airy crumb. Firstly, for the flour, I always measure mine by weight if I can, but if you’re using cups, make sure to spoon the flour into your measuring cup and level it off with a straight edge – don’t scoop directly from the bag, as you’ll end up with too much flour, which can make your bread dense. When it comes to mixing the dough, resist the urge to add too much extra flour during kneading, even if it feels a bit sticky at first. A slightly tacky dough will result in a lighter, airier bread. The stickier it is (within reason!), the more hydrated your dough is, and that equals a better crumb. Kneading is where you build the gluten structure. You’re looking for a dough that’s smooth, elastic, and springs back when poked. If you’re short on time or just prefer an easier method, a no-knead approach where you just mix the ingredients and let it rise in the bowl for a longer period (like 12-18 hours in the fridge) can also yield incredible results with minimal effort. For the shaping, be gentle! You want to preserve the air bubbles developed during the rise. Don’t overwork the dough when you’re shaping it into a loaf. And for that crackly crust, the steam is non-negotiable. The water in the bottom of the oven creates a humid environment, allowing the crust to expand fully before it sets. Once the bread is baked, letting it cool completely on a wire rack is crucial. If you cut into it too soon, the interior will be gummy, and the crust won’t have a chance to fully crisp up. Finally, don’t be afraid to experiment with variations! Add a pinch of garlic powder to the dough, or some dried herbs like oregano or rosemary. You can even brush the top with a little melted butter mixed with garlic and parsley right after it comes out of the oven for extra flavor. These little tweaks can turn a great loaf into an unforgettable one.
Storing and Reheating Tips
So, you’ve baked this glorious Italian bread, and you have some left over (a rare feat!). Here’s how to keep it tasting its best. At room temperature, the bread is best enjoyed within the first 1-2 days. Keep it wrapped loosely in a clean kitchen towel or a bread bag. Avoid plastic wrap unless you’re in a very humid environment, as it can make the crust soft. If it’s getting a bit stale, don’t fret! It’s perfect for toasting or making croutons. For longer storage, the refrigerator is your friend, but it can dry out the bread. If you must refrigerate, wrap it very tightly in plastic wrap, then a layer of foil, and it should last for about 3-4 days. However, I find freezing is the absolute best method for preserving its quality long-term. Once the bread is completely cool, wrap it tightly in a double layer of plastic wrap, followed by a layer of aluminum foil. It will keep beautifully in the freezer for up to 3 months. To reheat, you can slice it and toast it in a toaster or toaster oven. If you’re reheating a whole loaf or a large piece, you can wrap it in foil and warm it in a 300°F (150°C) oven for about 10-15 minutes, or until heated through. The foil will help steam it gently and revive that lovely crust. If you want an extra crispy crust on a reheated loaf, you can unwrap it for the last few minutes of warming. For the glaze, I never apply one to this bread as it’s meant to be rustic. But if you were to add a simple olive oil brush after baking, I’d do that just before serving, not for storage.
Frequently Asked Questions
Final Thoughts
There you have it – my absolute favorite Italian bread recipe! It’s the kind of recipe that fills your home with that incredible, comforting aroma and brings smiles to everyone’s faces. I truly believe that everyone can bake this bread and achieve fantastic results. It’s a testament to how simple ingredients, a little patience, and a lot of love can create something truly special. Whether you’re serving it with a big Italian feast, making incredible sandwiches, or just enjoying a slice with butter, it never disappoints. If you love this recipe, you might also enjoy my focaccia bread or my simple no-knead sourdough for more bread-baking adventures. Give this Italian bread recipe a try, and I can’t wait to hear how it turns out for you! Don’t be shy about leaving a comment below to share your thoughts, any variations you tried, or even just to say hello. Happy baking!
Italian Bread Recipe
Ingredients
Main Ingredients
- 3.5 cups all-purpose flour
- 1.5 teaspoons instant yeast
- 1.5 teaspoons salt
- 1 cup warm water about 105-115°F (40-46°C)
- 1 tablespoon olive oil
Instructions
Preparation Steps
- In a large bowl, whisk together the flour, yeast, and salt.
- Add the warm water and olive oil to the dry ingredients. Mix until a shaggy dough forms.
- Turn the dough out onto a lightly floured surface and knead for 8-10 minutes, or until smooth and elastic.
- Place the dough in a lightly oiled bowl, turning to coat. Cover with plastic wrap or a damp towel and let rise in a warm place for 1-1.5 hours, or until doubled in size.
- Punch down the dough and shape it into a loaf. Place on a baking sheet lined with parchment paper or a lightly floured surface.
- Cover the loaf and let it rise for another 30 minutes.
- Preheat your oven to 400°F (200°C). Bake for 30-35 minutes, or until the crust is golden brown and the bread sounds hollow when tapped.
- Let the bread cool completely on a wire rack before slicing.