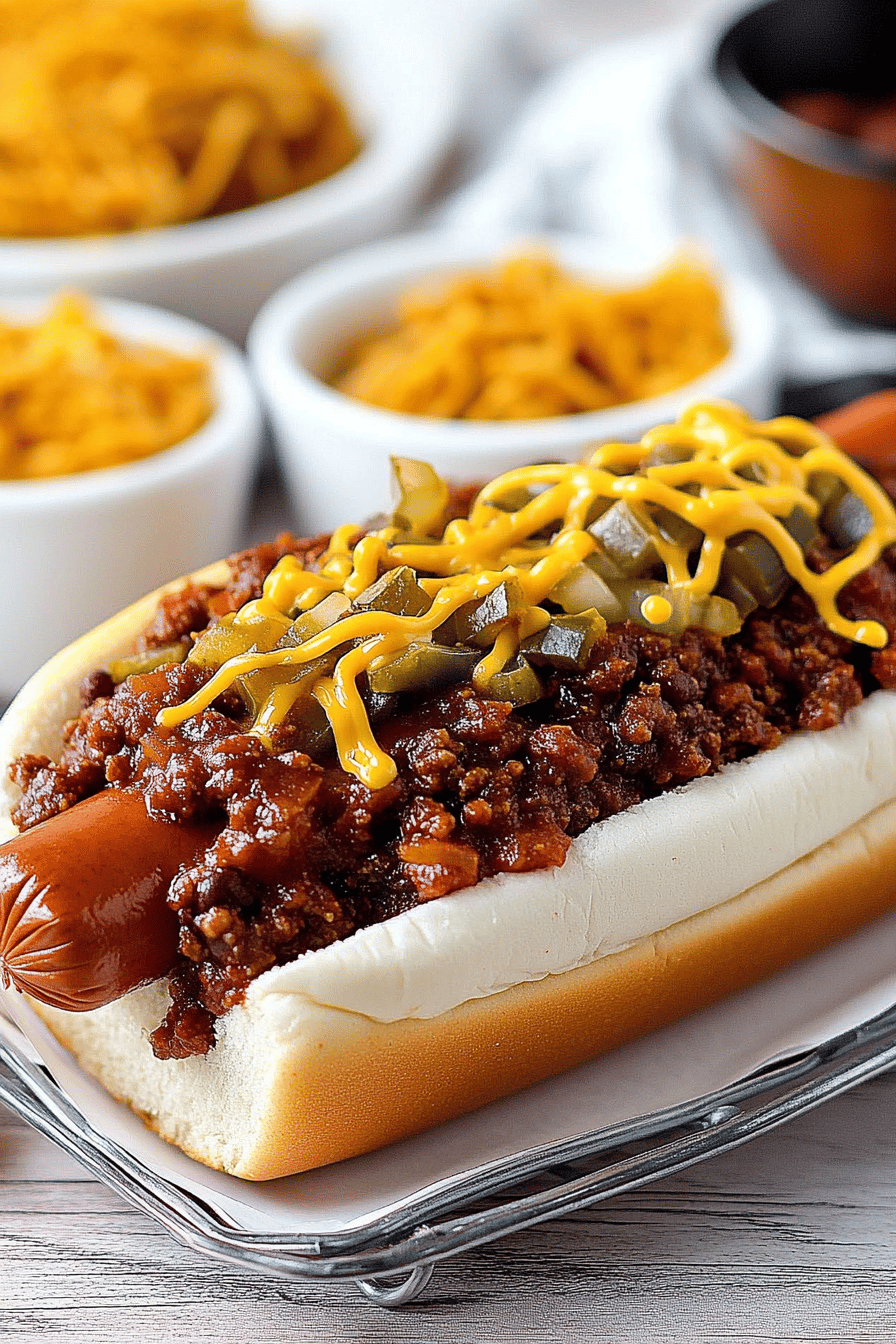
There are some flavors that just instantly transport you back. For me, it’s that unmistakable, savory aroma of slow-simmered chili. Specifically, the kind that’s perfect for topping a hot dog, that comforting, rich concoction that takes a simple meal to a whole new level. I can still picture my dad, hunched over the stove on a chilly Saturday afternoon, stirring a big pot of what would become our family’s signature hot dog Chili Recipe. It wasn’t fancy, but oh my goodness, it was pure magic. Whenever I whip up a batch now, it’s like a warm hug from the past. If you’ve ever had that longing for that classic, diner-style chili that clings perfectly to your hot dog without making a mess, you’re in for a treat. This is it. Forget those watery, bland versions you might have encountered; this hot dog chili recipe is a game-changer, packed with deep flavor and surprisingly easy to make, even on a weeknight.
What is hot dog chili?
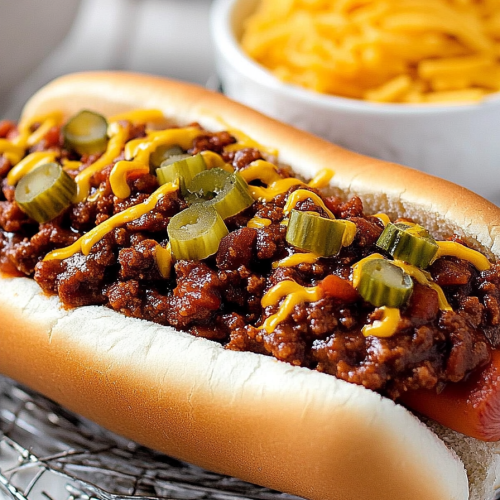
So, what exactly defines a “hot dog chili” versus, say, a Texas-style chili or a Cincinnati three-way? Think of it as the culinary equivalent of the perfect accessory for your hot dog. It’s a rich, savory, slightly thick Meat Sauce, seasoned with a blend of warm spices that are bold but not overwhelming. It’s designed to be spooned generously over a grilled or steamed hot dog nestled in a soft bun. Unlike some chilis that are chunky with whole beans or large pieces of vegetables, this version is typically smoother, allowing it to coat every surface of the hot dog and bun. The flavor profile is robust and comforting, hitting those satisfying umami notes with a hint of sweetness and warmth. It’s essentially a flavor explosion crafted to complement, not compete with, the humble hot dog. It’s the unsung hero of cookouts and quick weeknight dinners!
Why you’ll love this recipe?
Honestly, if there’s one recipe I get asked for most often, it’s this hot dog chili. And I’m always happy to share because it’s just that good! First off, the flavor. Oh, the flavor! It’s a deep, savory, incredibly satisfying taste that you just can’t get from a can. It has this wonderful balance of spices – a little warmth, a little earthiness, and a touch of sweetness that makes you want to go back for just one more bite. It’s the kind of chili that makes your kitchen smell amazing for hours. Then there’s the simplicity. I know “homemade chili” can sound daunting, but I promise, this one is a lifesaver. You can literally toss everything in a pot and let it do its thing. It’s a one-pot wonder, which means less cleanup, and trust me, that’s always a win in my book. It’s also incredibly budget-friendly. You probably have most of the ingredients in your pantry right now, and the star of the show, Ground Beef, is usually quite affordable. This recipe makes a big batch, which is fantastic for feeding a crowd or having delicious leftovers. And speaking of leftovers, this chili is so versatile! While it’s my absolute go-to for hot dogs, I’ve also used it over baked potatoes, as a topping for nachos, or even stirred into macaroni and cheese for an extra flavor boost. What I love most about this particular hot dog chili recipe, though, is how it reminds me of family gatherings and simple, happy moments. It’s more than just food; it’s a connection to tradition and a guaranteed crowd-pleaser, especially for the kids!
How do you make hot dog chili?
Quick Overview
This hot dog chili recipe is all about building layers of flavor without a lot of fuss. We’ll start by browning some Ground Beef, then introduce aromatic vegetables and a blend of spices before simmering it all in a rich, tomato-based sauce. The key is giving it enough time to meld and thicken, creating that perfect chili consistency. It’s straightforward, requires minimal active cooking time, and the result is a deeply satisfying, authentic chili that’s miles better than anything store-bought. You’ll be amazed at how easily it comes together!
Ingredients
For the main chili base:
2 tablespoons olive oil
1.5 pounds ground beef (80/20 or 85/15 is great for flavor)
1 large yellow onion, finely chopped
2 cloves garlic, minced
1 (15-ounce) can crushed tomatoes
1 (8-ounce) can tomato sauce
1/2 cup beef broth (or water)
2 tablespoons chili powder (use a good quality one!)
1 teaspoon ground cumin
1/2 teaspoon smoked paprika
1/4 teaspoon cayenne pepper (optional, for a little kick)
1 teaspoon dried oregano
1 teaspoon salt, or to taste
1/2 teaspoon Black Pepper, or to taste
1 tablespoon brown sugar (this is my secret for balance!)
Optional Add-ins for Texture & Flavor:
1/4 cup finely diced bell pepper (any color)
1/4 cup finely diced celery
1 (15-ounce) can kidney beans or pinto beans, rinsed and drained (if you like beans in your chili)
Step-by-Step Instructions
Step 1: Brown the Beef and Sauté Aromatics
Grab a large pot or Dutch oven and heat the olive oil over medium-high heat. Add the ground beef and break it up with a spoon. Cook until it’s nicely browned, about 7-10 minutes. Drain off most of the grease, leaving a tablespoon or two in the pot for flavor. Add the finely chopped onion (and bell pepper/celery if using) to the pot with the beef. Cook, stirring occasionally, until the onions are softened and translucent, about 5-7 minutes. This step really builds our flavor foundation!
Step 2: Add Garlic and Spices
Stir in the minced garlic and cook for another minute until fragrant. Be careful not to burn the garlic! Now, sprinkle in the chili powder, cumin, smoked paprika, cayenne pepper (if using), oregano, salt, and black pepper. Stir everything together and cook for about 1 minute more. Toasting the spices like this really wakes them up and enhances their flavor. It’s a small step that makes a big difference.
Step 3: Introduce Liquids and Simmer
Pour in the crushed tomatoes, tomato sauce, and beef broth. Add the brown sugar. Stir everything well to combine, scraping up any browned bits from the bottom of the pot. If you’re adding beans, now’s the time to stir them in too.
Step 4: Let it Simmer and Thicken
Bring the chili to a gentle simmer. Once it’s bubbling, reduce the heat to low, cover the pot, and let it cook for at least 30 minutes, stirring occasionally. For the best flavor, I like to let it simmer for an hour or even longer. This slow simmer is what allows all those wonderful flavors to meld together and the chili to thicken to that perfect consistency. The longer it simmers, the richer it gets!
Step 5: Taste and Adjust
After simmering, give your hot dog chili a good stir. Taste it and adjust seasonings as needed. You might want a little more salt, pepper, or even a pinch more chili powder. If it seems too thick, you can add a splash more beef broth or water. If it’s too thin for your liking, let it simmer uncovered for a bit longer.
Step 6: Serve Hot!
Ladle this delicious hot dog chili generously over your favorite hot dogs, nestled in warm buns. Don’t forget your favorite toppings!
What to Serve It With
This hot dog chili recipe is a true chameleon when it comes to serving. Of course, its primary and most beloved role is atop a juicy hot dog, perhaps with a sprinkle of shredded cheddar cheese, a dollop of sour cream, or some chopped raw onion. But it doesn’t stop there! For a hearty breakfast or brunch, I love spooning a bit of this chili over scrambled eggs or even a breakfast burrito. The savory depth is surprisingly fantastic with eggs. As a main course for a casual dinner, it’s perfect over fluffy baked potatoes – load them up with cheese and sour cream for an ultimate comfort food experience. You can also use it as a base for loaded nachos; just spread tortilla chips on a baking sheet, spoon on the chili, top with cheese, and bake until bubbly. For a truly decadent dessert, though I know this sounds unusual, a tiny bit of this chili can add an amazing savory counterpoint to chocolate! Think of it like mole sauce. My kids, however, are happiest when it’s just piled high on a hot dog, often with a side of crunchy potato chips and a big glass of iced tea. We also have a family tradition of having “chili dog night” on the first Friday of every month, and this recipe is the undisputed star!
Top Tips for Perfecting Your Hot Dog Chili
I’ve made this hot dog chili more times than I can count, and over the years, I’ve picked up a few tricks that I think really elevate it. First, don’t skimp on the quality of your ground beef. While you don’t need the absolute leanest cut, using something like an 80/20 or 85/15 blend adds fantastic flavor and richness. The little bit of fat renders down and creates a more delicious chili. When you’re browning the beef, make sure to break it up well. You want small pieces, not big clumps, so the chili has a nice, consistent texture. Also, don’t be afraid to really let those onions soften and get a little sweet; that’s part of building our flavor base. For the spices, I always recommend tasting them before you add them to the pot. Sometimes spices can lose their potency over time. And if you love a little heat, don’t be shy with the cayenne pepper – just start with a pinch and add more if you dare! A common mistake people make with chili is not simmering it long enough. That simmer time is crucial for allowing the flavors to meld. I’ve found that at least 30 minutes is the minimum, but an hour or even longer is truly ideal. If you’re short on time, just know that it will still be delicious, but it’ll have an extra layer of depth if you can let it go longer. And here’s a little secret I learned from my grandma: a touch of brown sugar. It doesn’t make the chili sweet, but it balances out the acidity from the tomatoes and enhances all the savory notes. I never skip it! If you find your chili is a little too tangy, a tiny pinch more sugar can work wonders. Lastly, always taste and adjust at the end. Your palate is the best guide!
Storing and Reheating Tips
This hot dog chili recipe is a fantastic make-ahead dish, and it actually tastes even better the next day as all those flavors have more time to marry. If you’ve got leftovers and plan to use them within a few days, simply let the chili cool completely, then transfer it to an airtight container. It should stay perfectly fresh in the refrigerator for about 3-4 days. When you’re ready to reheat, you can do so gently on the stovetop over low heat, stirring occasionally, or you can microwave it in individual portions. If it seems a bit thick after refrigerating, just stir in a tablespoon or two of water or beef broth to loosen it up. For longer storage, this chili freezes beautifully. Once it’s completely cooled, portion it into freezer-safe containers or heavy-duty freezer bags, removing as much air as possible. It will keep well in the freezer for up to 3 months. Thaw frozen chili overnight in the refrigerator before reheating. I usually reheat frozen chili on the stovetop to ensure it heats through evenly. For both refrigerated and frozen chili, remember that the glaze (if you decide to add one, though this recipe is perfect without) should ideally be added just before serving to maintain its consistency and freshness.
Frequently Asked Questions
Final Thoughts
I truly hope you give this hot dog chili recipe a try. It’s become such a staple in my kitchen, and I know it will in yours too. It’s that perfect blend of comfort, flavor, and simplicity that makes meals special without adding extra stress. Whether you’re serving it at a backyard barbecue, a game day get-together, or just as a quick and satisfying weeknight dinner, this chili is guaranteed to be a hit. It’s a recipe that feels like home, and I can’t wait for you to experience that too. If you make it, please come back and let me know how it turned out in the comments below! I’d love to hear about your favorite toppings or any little twists you add. And if you enjoyed this recipe, you might also like my recipe for [link to a related recipe, e.g., “Classic Beef Stew”] or my tips for [link to a related topic, e.g., “Grilling the Perfect Hot Dog”]. Happy cooking, and enjoy every delicious bite!
Hot Dog Chili Recipe
Ingredients
Main Ingredients
- 1 pound ground beef
- 1 medium onion chopped
- 2 cloves garlic minced
- 1 can (15 ounce) diced tomatoes undrained
- 1 can (15 ounce) kidney beans rinsed and drained
- 1 can (8 ounce) tomato sauce
- 2 tablespoon chili powder
- 1 teaspoon cumin
- 0.5 teaspoon salt
- 0.25 teaspoon black pepper
Instructions
Preparation Steps
- In a large pot or Dutch oven, brown the ground beef over medium-high heat. Drain off any excess grease.
- Add the chopped onion and cook until softened, about 5 minutes.
- Stir in the minced garlic and cook for 1 minute more until fragrant.
- Add the diced tomatoes (undrained), rinsed and drained kidney beans, and tomato sauce.
- Stir in the chili powder, cumin, salt, and black pepper.
- Bring the chili to a simmer, then reduce heat to low, cover, and cook for at least 20-30 minutes, stirring occasionally. For a richer flavor, you can simmer for longer.
- Serve hot over your favorite hot dogs.