You know those holiday dinners? The ones where the house smells like cinnamon and roasted anything, the fireplace is crackling (or wishful thinking on a warm coast!), and everyone you love is gathered around the table? I live for those moments. But let’s be honest, the pressure to make everything *perfect* can sometimes feel like a ton of gravy-covered bricks. For years, my biggest stressor wasn’t the turkey or the Mashed Potatoes, but the side dishes, especially the salads. I’d agonize over them, trying to create something show-stopping, only to end up with a wilted mess or a flavor combination that just… didn’t sing. Then, I started shifting my thinking. Instead of aiming for complexity, I focused on smart preparation and simple, vibrant flavors. It was a game-changer. This approach to holiday salad tips has honestly saved my sanity more times than I can count, and the best part? My guests rave about the freshness and how *effortless* it all seems. It’s less about creating a culinary masterpiece and more about letting the beautiful ingredients shine, especially during the busy holiday season.
What are some of the best holiday salads?
So, what exactly do I mean by “thoughtful holiday salad”? It’s not just tossing some lettuce in a bowl. Think of it as a carefully curated symphony of textures and flavors that complements your main meal without overpowering it. It’s about adding a burst of freshness, a bit of crunch, maybe a touch of sweetness or tang, that balances out the richer, heartier dishes we tend to serve during the holidays. It’s essentially a way to elevate your meal with something bright and inviting. It’s the supporting actor that gets rave reviews. It’s the dish that makes everyone say, “Wow, this salad is amazing!” even though it took you next to no time to pull together because you were smart about it. It’s about bringing a bit of lightness and vibrancy to the table when everything else is deep and comforting. It’s the crisp bite that cuts through a rich gravy, the sweet pop that balances savory stuffing, and the delightful crunch that adds another layer of enjoyment to every forkful.
Why Do Salads Have So Many Holidays?
Honestly, these holiday salad tips are my secret weapon for happy hosting. First off, the FLAVOR! We’re talking vibrant, fresh tastes that pop. I’m not talking about boring iceberg lettuce here. I’m talking about crisp greens, juicy fruits, crunchy nuts, and perfectly balanced dressings that tie everything together. It’s the kind of flavor that makes you want to go back for a second (or third!) helping. Then there’s the SIMPLICITY. This is huge for me during the holidays. These tips are all about making smart choices that save you time and stress. We’re talking about prep-ahead strategies and simple assembly that means you’re not stuck in the kitchen while everyone else is enjoying themselves. In fact, many of these salad components can be prepped a day or two in advance, which is an absolute lifesaver. COST-EFFICIENCY is another big win. You don’t need exotic, super-expensive ingredients to make a stunning salad. I focus on seasonal produce and pantry staples that are both delicious and budget-friendly. Plus, when you make them yourself, you avoid those hefty grocery store markups. And let’s not forget VERSATILITY! The principles I’ll share can be applied to so many different types of salads. You can adapt them for a light starter, a hearty side, or even a standalone meal. It’s about building a framework that you can customize to your heart’s content. What I love most about these holiday salad tips is that they allow me to create a beautiful, delicious spread without feeling overwhelmed. It’s a way to impress without the stress, and that, my friends, is the true spirit of the holidays.
How do I make a healthy salad for the holidays?
Quick Overview
The core idea behind mastering your holiday salads is strategic prep and smart ingredient combinations. It’s about thinking ahead, doing some of the heavy lifting before the big day, and then assembling with ease. We’ll focus on building layers of flavor and texture, choosing dressings that enhance rather than mask, and understanding what elements can be prepped in advance. This method ensures you have beautiful, delicious salads ready to go, taking a huge weight off your shoulders so you can actually enjoy the festivities. It’s all about working smarter, not harder, in the kitchen.
Ingredients
What is the magic in the details, and for salads, that means selecting the right components. Here’s a breakdown of what I typically think
For the Crisp Foundation:
Think beyond basic romaine. I love a mix of peppery arugula, tender butter lettuce, and sometimes even some finely shredded radicchio for a hint of bitterness. For holiday salads, adding sturdy greens like kale or spinach that hold up well is a brilliant move. Make sure your greens are washed, dried *thoroughly* (a salad spinner is your best friend here!), and stored properly in the fridge to keep them crisp. I often buy them a day or two in advance and give them an extra spin just before I’m ready to assemble.
For Texture & Crunch:
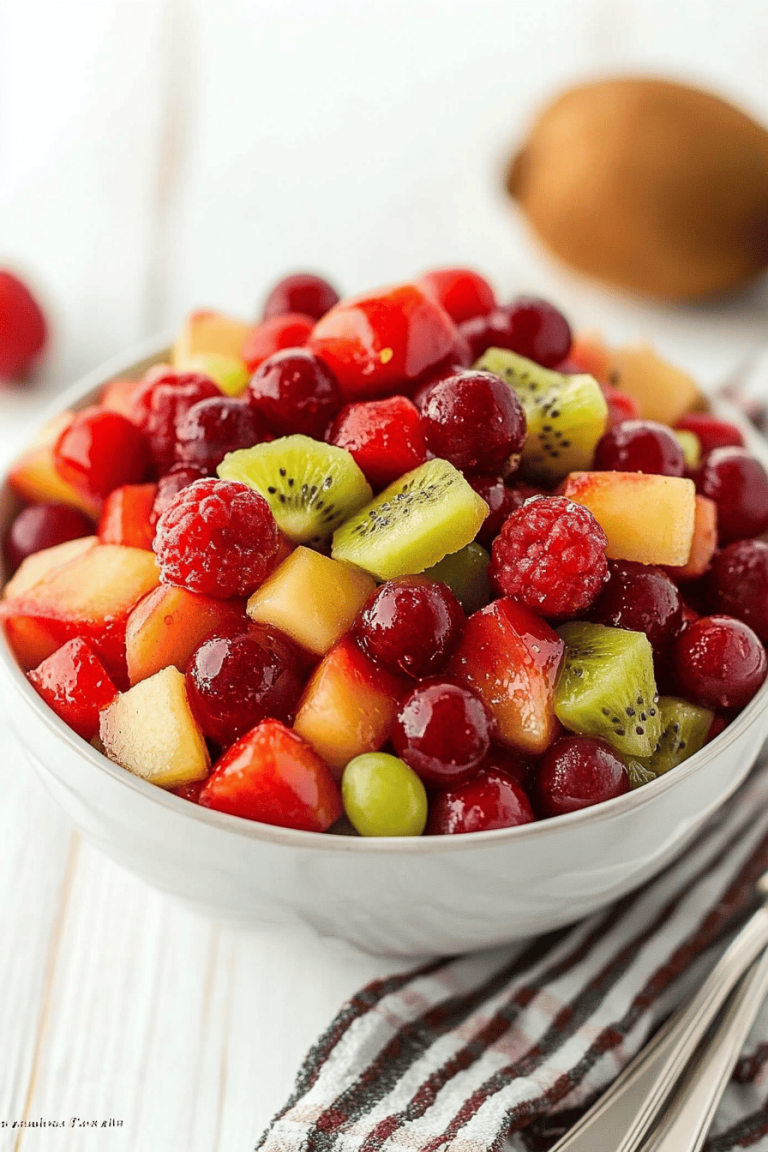
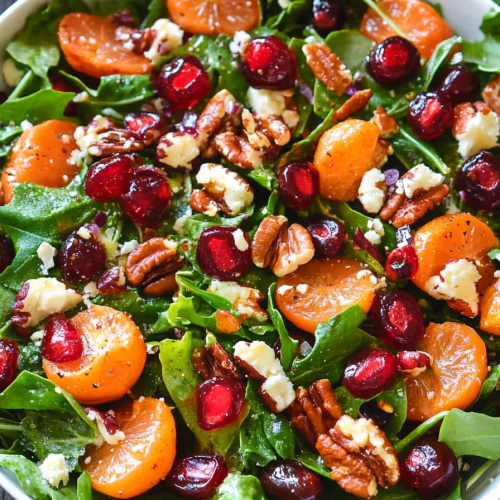
This is where salads get exciting! I always aim for a variety of textures. Think toasted nuts like pecans, walnuts, or slivered almonds; crunchy seeds like pumpkin or sunflower seeds; maybe even some homemade croutons or crispy fried shallots. For a sweeter crunch, dried cranberries, chopped dates, or even thinly sliced apples and pears work beautifully, especially in fall and winter. Make sure nuts and seeds are toasted just before serving for the best flavor and crunch; you can toast them a day ahead and store in an airtight container.
For Sweetness & Tang:
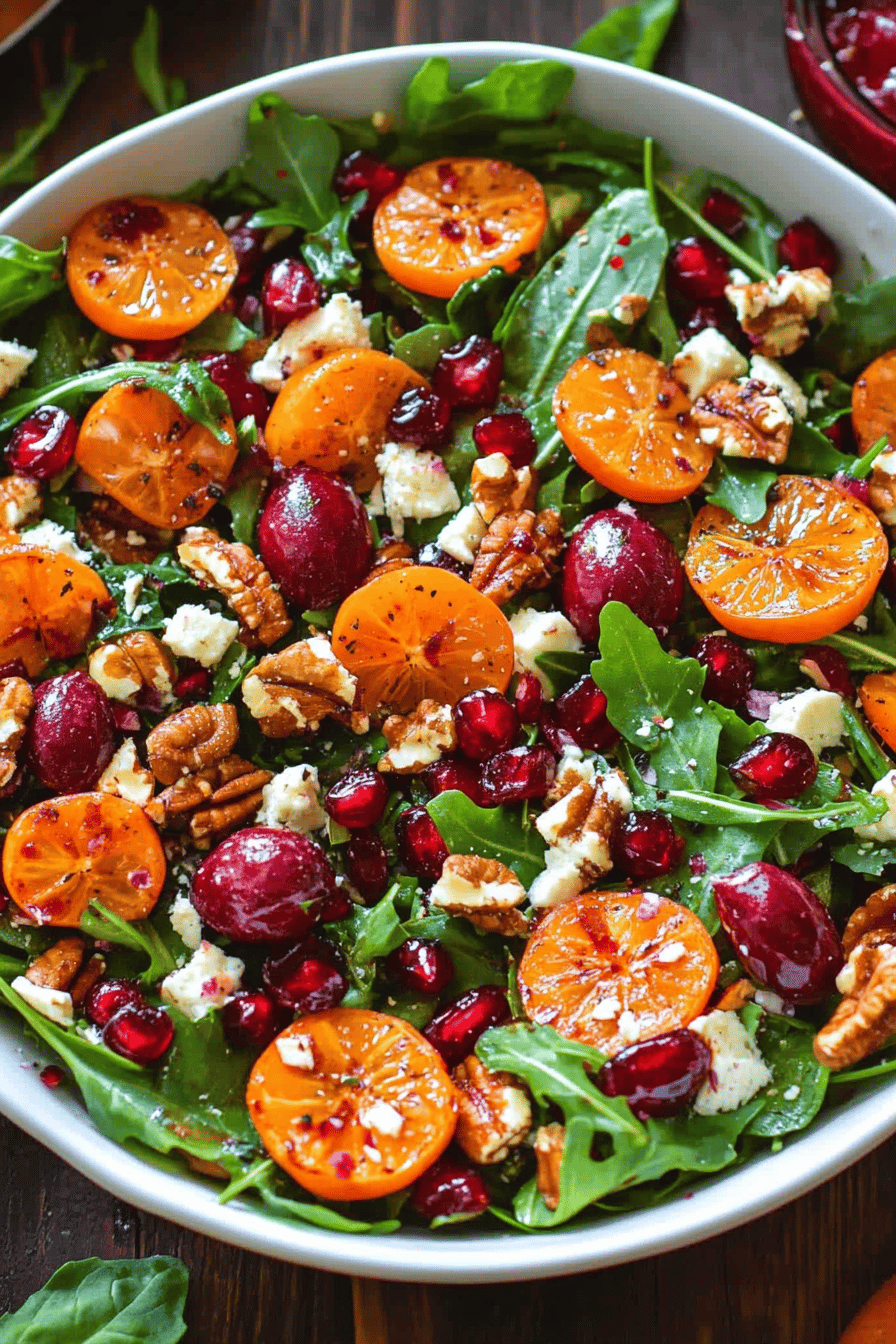
Fresh fruits like pomegranate seeds, segments of oranges or grapefruit, or berries add a burst of color and juicy sweetness. Dried fruits are also fantastic, as mentioned above. A little tang can come from pickled onions, capers, or even some sharp cheese like crumbled feta or goat cheese. These elements add complexity and cut through richer flavors beautifully. I like to prep fruit segments the morning of or the night before, keeping them in the fridge.
For Savory Depth:
Cheese is a must for many holiday salads! Crumbled blue cheese, shaved Parmesan, creamy goat cheese, or sharp cheddar can all elevate a salad. Roasted vegetables like butternut squash, Brussels sprouts, or Sweet Potatoes can also be added for a hearty, savory touch. Even some cooked quinoa or farro can turn a side salad into something more substantial. These elements are perfect candidates for prepping the day before.
For the Dressed Up Finish (The Dressing!):
This is crucial. A good dressing brings everything together. I lean towards vinaigrettes for most holiday salads because they’re bright and don’t weigh things down. Think classic Dijon vinaigrettes, a tangy lemon-herb dressing, or a sweet balsamic glaze. Creamy dressings like a ranch or a Caesar can also work, but I often make them lighter for holiday meals. The key is to have your dressing ready to go. You can whisk it up a day or two ahead and store it in a jar in the fridge. Just give it a good shake before you use it!
Step-by-Step Instructions
Step 1: Gather and Prep Your Components
This is where the “holiday salad tips” really kick in. The night before, or even two nights before for some items, wash and thoroughly dry all your greens. Store them in airtight containers lined with paper towels in the refrigerator. Toast your nuts and seeds and store them in a sealed container at room temperature. Chop any hardier vegetables like celery or onions. If you’re using fruits that brown easily (like apples or pears), chop them right before assembly or toss them with a little lemon juice. Prep your dressing and store it in a jar in the fridge.
Step 2: Toast Your Nuts and Seeds (If Not Already Done)
This step is non-negotiable for maximum flavor and crunch! Spread your chosen nuts or seeds in a single layer on a baking sheet. Bake in a preheated oven at 350°F (175°C) for 5-10 minutes, or until fragrant and lightly golden. Keep a close eye on them, as they can burn quickly! Let them cool completely before storing them in an airtight container. I’ve definitely learned the hard way that burnt nuts are a sad addition to any salad.
Step 3: Prepare Your Fruits and Veggies
If you’re using fruits like apples, pears, or oranges, peel and slice them. For apples and pears, a little squeeze of lemon juice will prevent browning if you’re prepping ahead. If you’re adding roasted vegetables like Butternut Squash or sweet potatoes, roast them until tender and slightly caramelized. Let them cool completely. Pomegranate seeds can be easily removed from the membrane with a quick rap of a spoon on the back of the fruit over a bowl.
Step 4: Make Your Dressing
Whisk together your chosen dressing ingredients in a bowl or shake them up in a jar. For a standard vinaigrette, I usually use a ratio of 3 parts olive oil to 1 part acid (vinegar or lemon juice), plus Dijon mustard, a touch of honey or maple syrup, salt, and pepper. Taste and adjust seasonings. Store in an airtight container in the refrigerator. It will likely separate, so just give it a vigorous shake before you’re ready to dress your salad.
Step 5: Assemble Your Salad Base
About 15-30 minutes before serving, take your pre-washed and dried greens out of the fridge. Place them in a large salad bowl. If you’re adding hardier greens like kale, you might want to give them a gentle massage with a tiny bit of olive oil and lemon juice to tenderize them first. This is something I learned from a restaurant chef years ago and it makes a huge difference!
Step 6: Add Your Flavor Boosters
Now for the fun part! Artfully arrange your prepared fruits, vegetables, nuts, seeds, and cheeses over the bed of greens. Don’t just dump them all in one spot; try to distribute them evenly so you get a bit of everything in each bite. This is where you create visual appeal and promise of flavor.
Step 7: Dress and Toss
Drizzle your dressing over the salad. Start with a little less than you think you’ll need – you can always add more, but you can’t take it away! Gently toss the salad to coat all the ingredients. If you’ve prepped ahead, toss it right before it hits the table so the greens stay crisp and vibrant.
Step 8: Final Touches and Serve
Add any final garnishes like fresh herbs, a final sprinkle of nuts, or a dusting of cheese. Serve immediately to ensure the best texture and flavor. My kids always go wild for those jewel-like pomegranate seeds!
What to Serve It With
The beauty of a well-made holiday salad is its adaptability. It’s not just a side dish; it can be part of a larger, harmonious meal. For breakfast, a vibrant fruit and nut salad with a light yogurt dressing can be a refreshing start, especially if you’ve got a richer main course planned later. Think of it as a palate cleanser before the main event. For brunch, a salad with some added grains like quinoa or farro, along with goat cheese and perhaps some roasted sweet potatoes, can easily stand alone or be a beautiful accompaniment to quiches, frittatas, or even elegant pastries. The visual appeal of a colorful salad on a brunch spread is always a winner. As a dessert component, this might sound unusual, but a very light, almost ethereal Fruit Salad with a hint of mint or basil can provide a wonderful contrast to heavy holiday desserts. It’s a way to end the meal on a refreshing note. And for those cozy, casual snacks when you’re just looking for something light and satisfying, a simple green salad with a handful of nuts and a good vinaigrette is perfect. I often pair a simple arugula salad with a balsamic glaze when we’re having cheese and charcuterie. It’s the perfect counterpoint. My family traditions often involve a hearty grain salad as a substantial side to our Thanksgiving turkey, almost like a second stuffing, and a lighter, fruit-forward salad to balance out the richness.
Top Tips for Perfecting Your Holiday Salads
Let’s dive a little deeper into those little tricks I’ve picked up over the years that really make a difference. These are the things that separate a good salad from a *great* one, especially when you’re serving a crowd during the holidays.
Greens Prep is Key: The biggest mistake people make is not drying their greens thoroughly. Even a little excess water will dilute your dressing and make your salad soggy. Use a salad spinner, and then if you’re feeling extra cautious, spread them out on clean kitchen towels for a bit. For sturdier greens like kale or spinach, I sometimes like to add a tiny bit of olive oil and lemon juice *before* washing them, letting them sit for about 10 minutes. It helps to tenderize them, making them more pleasant to eat raw and allowing them to absorb the dressing better. Freshness is paramount; make sure your greens are crisp and vibrant, not limp and sad.
The Art of Mixing: When you’re tossing your salad, be gentle but thorough. The goal is to coat everything evenly without bruising the delicate greens. I often use my hands (after washing them thoroughly, of course!) because I can feel the ingredients better and ensure everything is coated without over-mixing. If you’re using a lot of delicate items like berries or soft cheeses, add them towards the very end of the tossing process, or even just place them on top after tossing. It prevents them from getting mashed.
Layering for Visual Appeal: Don’t just dump everything into the bowl! Think about how you’re arranging your ingredients. Start with your greens, then add your heavier items like roasted vegetables or grains, followed by your lighter fruits, nuts, and cheeses. This creates visual interest and ensures that every bite offers a variety of textures and flavors. A sprinkle of fresh herbs or a drizzle of balsamic glaze right at the end can really make your salad pop.
Smart Ingredient Swaps: Don’t be afraid to experiment! If you don’t have pecans, walnuts are a fantastic substitute. No cranberries? Dried cherries or apricots work beautifully. If you’re not a fan of blue cheese, try feta or a sharp cheddar. For a dairy-free option, nutritional yeast can add a cheesy, umami flavor, and toasted sunflower seeds provide a great crunch. The ratios usually stay pretty similar, so feel free to play around with what you have on hand or what’s in season.
Baking for Salad Components: For elements like roasted vegetables or homemade croutons, paying attention to your oven’s hot spots is crucial. If you notice one side of your baking sheet is browning faster, rotate the pan. For croutons, keep them relatively small and uniform so they toast evenly. I like to bake mine until they are golden brown and crispy, but not burnt. They should sound hollow when tapped. For roasted vegetables, I aim for tender interiors with nicely caramelized edges – this is where the sweetness really develops.
Dressing Consistency: A good dressing should coat the back of a spoon but still be pourable. If your vinaigrette is too thick, whisk in a little more olive oil or water. If it’s too thin, add a bit more Dijon mustard or a touch more acid. Taste, taste, taste! The dressing is what brings all the components together, so it needs to be balanced and delicious on its own.
Storing and Reheating Tips
The beauty of many holiday salads, or at least their components, is that they can be prepped ahead, which is a lifesaver. Here’s how I handle it:
Room Temperature Storage: Most salad components, like toasted nuts, dried fruits, or roasted vegetables that are fully cooled, can be stored in airtight containers at room temperature for a day or two. This is especially handy for things you want to keep separate until the last minute. Fresh greens, however, are best kept refrigerated.
Refrigerator Storage: This is where most of your prepped salad elements will live. Washed and dried greens should be stored in airtight containers lined with paper towels to absorb any residual moisture. Roasted vegetables, chopped fruits (if not treated with lemon juice), cheeses, and dressings can all be stored in separate airtight containers in the fridge for up to 2-3 days. The dressing will likely separate, so just give it a good shake before using.
Freezer Instructions: I generally don’t recommend freezing most salad components, as it can impact the texture of greens, fruits, and even nuts. However, if you happen to make extra croutons, they can be frozen in an airtight bag for up to a month. Just let them thaw at room temperature before using.
Glaze Timing Advice: The dressing should always be added just before serving, or at most, 15-20 minutes before serving for sturdier greens like kale. If you add it too early, the acid will start to break down the greens and make them wilt. For a composed salad where you’re arranging elements on top of greens, dress the greens first, then arrange the other ingredients. This allows for better control and presentation. If you’re serving a salad as part of a buffet, it’s often best to keep the dressing on the side so guests can dress their own salads.
Frequently Asked Questions
Final Thoughts
I truly hope these holiday salad tips help make your festive gatherings a little bit easier and a lot more delicious. The biggest takeaway for me has been realizing that a beautiful, flavorful salad doesn’t have to be complicated. It’s all about smart planning, using fresh ingredients, and understanding how to build layers of flavor and texture. These strategies allow you to create stunning side dishes that complement your main meal perfectly, without adding to your stress. If you enjoyed these tips, you might also love my guide to effortless appetizer ideas or my secrets for perfectly roasted vegetables, both of which share that same philosophy of deliciousness made simple. I can’t wait to hear how your holiday salads turn out! Please feel free to share your own favorite salad combinations or any tips you’ve discovered in the comments below. Happy feasting!
Holiday Salad Tips
Ingredients
Main Ingredients
- 0.5 cup Mixed greens
- 0.25 cup Cherry tomatoes Halved
- 0.25 cup Cucumber Diced
- 0.125 cup Red onion Thinly sliced
- 0.125 cup Feta cheese Crumbled
Dressing Ingredients
- 3 tablespoon Olive oil
- 1 tablespoon Balsamic vinegar
- 0.5 teaspoon Dijon mustard
- 0.25 teaspoon Honey
- Salt To taste
- Black pepper To taste
Instructions
Preparation Steps
- In a large bowl, combine the mixed greens, halved cherry tomatoes, diced cucumber, and thinly sliced red onion.
- In a small bowl or jar, whisk together the olive oil, balsamic vinegar, Dijon mustard, and honey. Season with salt and pepper to taste.
- Pour the dressing over the salad ingredients and toss gently to coat.
- Crumble feta cheese over the top of the salad.
- Serve immediately.