You know those recipes that just *feel* like home? The ones that instantly transport you back to childhood, with the scent of something wonderful baking and a sense of pure, unadulterated joy? This, my friends, is one of those recipes for me. It’s my go-to when the leaves start to turn, the air gets crisp, and my craving for something sweet and a little bit magical hits its peak. Specifically, when it comes to Halloween, nothing says festive quite like these adorable, incredibly simple Halloween Marshmallows. Forget those store-bought versions that always taste a bit… well, like they’ve been sitting on a shelf for a decade. These are soft, pillowy clouds of pure happiness, customizable to look as spooky or as cheerful as you like. They’re the perfect little bite to share with trick-or-treaters, to bring to a Halloween party, or honestly, just to have on hand for a cozy evening with a mug of something warm. They remind me a bit of those fancy little gourmet marshmallows you see, but with none of the fuss and all of the heart. If you’ve ever loved a perfectly gooey marshmallow, you’re going to fall head over heels for this version.
What are Halloween marshmallows?
So, what exactly *are* these magical little treats? Think of them as homemade marshmallows, but with a fun, festive twist for Halloween. They’re essentially a sweet, airy confection made from gelatin, sugar, and corn syrup, whipped until they’re incredibly light and fluffy, then set. What makes them “Halloween Marshmallows” is how we dress them up! We’re talking about a simple coating and some playful decorations that scream autumn and spooky season. It’s essentially a blank canvas for your creativity. The base is wonderfully neutral, allowing us to play with colors, shapes, and edible embellishments. This recipe isn’t about reinventing the wheel; it’s about taking a classic comfort food and giving it a joyful, seasonal personality. They’re much more substantial and flavorful than the typical puffy marshmallows you might skewer for s’mores, offering a delightful chew and a melt-in-your-mouth texture that’s utterly addictive.
Why you’ll love this recipe?
Oh, where do I even begin with why this recipe is a total game-changer, especially around Halloween? First off, the flavor is just pure bliss. They’re not overly sweet, which I appreciate – just a delicate sweetness that’s perfectly balanced. The texture? Heavenly. They’re impossibly soft and airy, with a delightful chew that makes them so satisfying. But what I truly adore is the sheer simplicity of it all. Seriously, you’ll be amazed at how easy these are to whip up. I’ve had nights where I needed a last-minute party favor or a sweet treat for unexpected guests, and these Halloween Marshmallows have been an absolute lifesaver. They use pantry staples, so you likely have most of what you need on hand already. Plus, they’re incredibly cost-effective compared to buying artisanal sweets. And the versatility! You can customize them endlessly. Want them to look like little ghosts? Easy! Orange and black stripes? Go for it! These are perfect for adding a personal touch to any Halloween celebration. They’re just so much more rewarding than anything store-bought, and the joy they bring, especially to kids (and let’s be honest, adults too!), is immeasurable. This recipe stands out because it delivers on taste, ease, and that special handmade charm that’s hard to replicate.
How do I make Halloween marshmallows?
Quick Overview
Making these Halloween Marshmallows is a surprisingly straightforward process. You’ll whip up a simple sugar syrup, combine it with bloomed gelatin, and then whip it all until it’s thick and pillowy. Once set, we’ll give them a fun Halloween makeover. The key is patience during the whipping and setting stages, but honestly, the hands-on time is minimal. This method guarantees a wonderfully light and airy texture that’s just divine, far superior to any boxed mix. It’s one of those recipes that looks impressive but is actually very achievable for any home cook.
Ingredients
For the Marshmallow Base:
3 tablespoons unflavored gelatin powder
1/2 cup cold water
1 1/2 cups granulated sugar
1 cup light corn syrup
1/4 cup water
1 teaspoon vanilla extract (or any other flavor you love!)
Pinch of salt
For Coating and Decorating:
Confectioners’ sugar (for dusting)
A little extra corn syrup (for “glue”)
Edible food coloring (orange, black, green, purple – your Halloween palette!)
Edible googly eyes, sprinkles, edible markers, or small candies for decoration
Step-by-Step Instructions
Step 1: Preheat & Prep Pan
First things first, get your workspace ready. You’ll need a 9×13 inch baking pan. Lightly grease it all over with a neutral oil or cooking spray, then dust it generously with confectioners’ sugar. This step is crucial for preventing your marshmallows from sticking, and trust me, sticky marshmallows are a pain to deal with. I like to go a little heavy on the dusting; you can always brush off the excess later. Make sure the entire surface is covered.
Step 2: Mix Dry Ingredients
In the bowl of your stand mixer (or a large bowl if you’re using a hand mixer), sprinkle the unflavored gelatin over the 1/2 cup of cold water. Let it sit undisturbed for about 5-10 minutes. It will absorb the water and become sort of jiggly and jelly-like. This process is called “blooming” the gelatin, and it’s essential for it to dissolve properly later on.
Step 3: Mix Wet Ingredients
In a medium saucepan, combine the granulated sugar, light corn syrup, and the remaining 1/4 cup of water. Place the saucepan over medium heat. Stir gently until the sugar is completely dissolved. Once the sugar is dissolved, stop stirring. You want to bring this mixture to a boil and let it cook undisturbed until it reaches 240°F (115°C) on a candy thermometer. This is the “soft ball” stage, and it’s vital for the marshmallow’s texture.
Step 4: Combine
Once the sugar syrup reaches 240°F, carefully remove it from the heat. With your mixer on low speed, very slowly and carefully pour the hot sugar syrup in a thin, steady stream into the bowl with the bloomed gelatin. Be super careful here – hot sugar is no joke! As you pour, gradually increase the mixer speed to medium-high. Continue to mix for about 10-15 minutes. The mixture will become thick, glossy, and pale. It should also increase significantly in volume, looking like a fluffy cloud. Stir in the vanilla extract and salt during the last minute of mixing.
Step 5: Prepare Filling
This is where the Halloween fun begins! Before your marshmallow mixture is completely set, you’ll want to divide it if you’re making multiple colors. For instance, if you’re making orange and black, scoop out about half the mixture into a separate bowl. Add a few drops of orange food coloring to one bowl and a few drops of black (or any other Halloween color you like!) to the other. Gently fold in the coloring until it’s evenly distributed. Don’t overmix, or you might deflate the fluffiness.
Step 6: Layer & Swirl
Now for the artistic part! Pour about half of your first color into your prepared pan. Then, dollop spoonfuls of the second color over the top. Use a knife or a skewer to gently swirl the colors together, creating a marbled effect. Don’t over-swirl, or the colors will just blend into one. You want distinct streaks. You can also do one solid color if you prefer! Smooth the top as best you can with a spatula.
Step 7: Bake
Actually, we don’t bake these! This is a no-bake wonder. Once the mixture is in the pan and swirled (or solid color), let it set. This is the “waiting game” part, but it’s worth it. Cover the pan loosely with plastic wrap (try not to let it touch the surface of the marshmallow) and let it sit at room temperature for at least 4 to 6 hours, or preferably overnight, until it’s firm and no longer sticky to the touch. It needs time to fully set up.
Step 8: Cool & Glaze
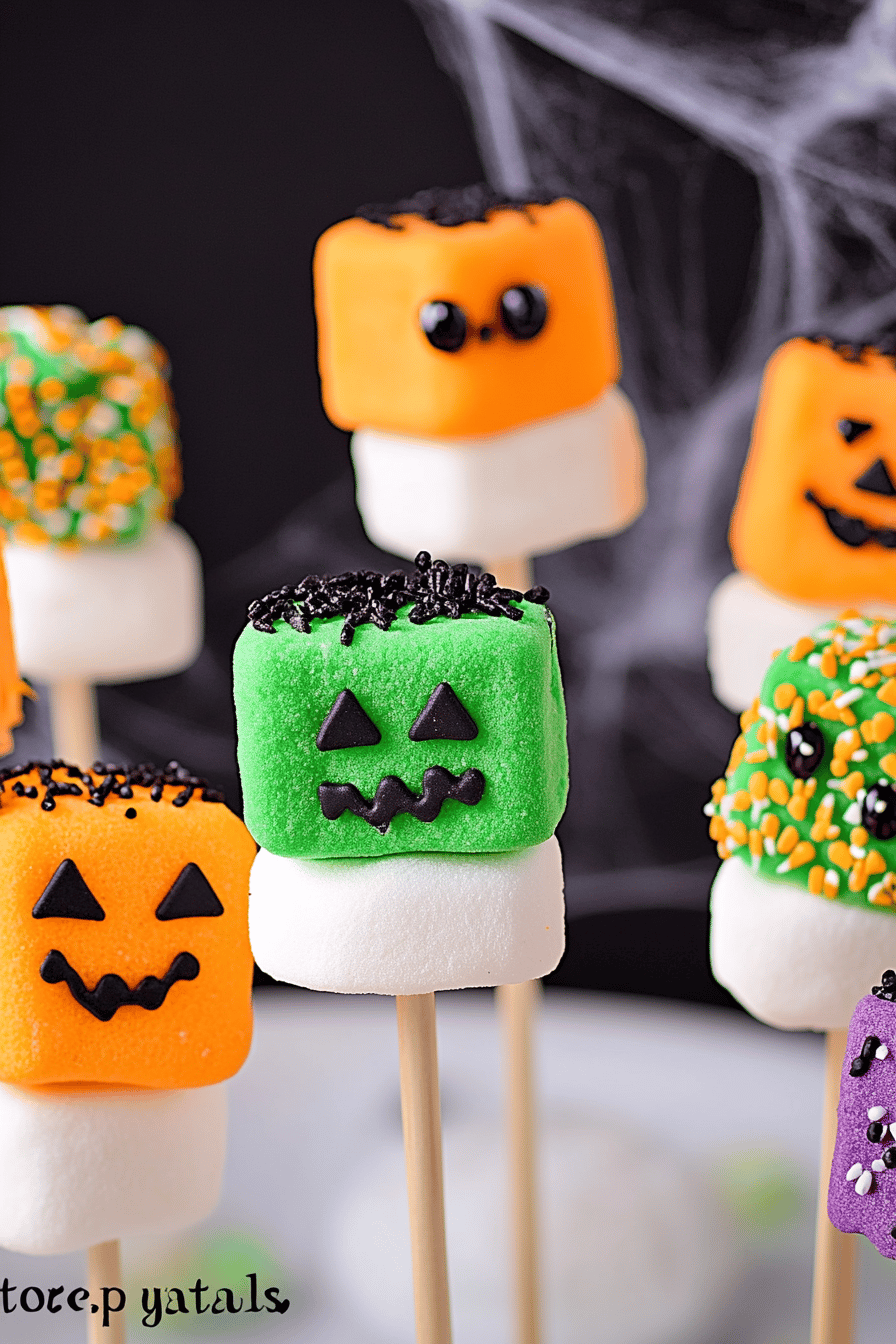
Once the marshmallows are set, it’s time to decorate! You can either dust the entire pan generously with confectioners’ sugar and invert it onto a surface dusted with more confectioners’ sugar, or grease and dust a cutting board and invert the whole sheet onto it. Brush off any excess confectioners’ sugar. Now, for the fun! You can use a little extra corn syrup mixed with food coloring to paint designs, or use edible markers to draw faces. Stick on googly eyes, sprinkles, or small candies for features. For a glossy finish, you can melt a little bit of candy melt in your desired Halloween colors and drizzle it over the top, or dip the marshmallows into it.
Step 9: Slice & Serve
Once your decorations are dry or set, it’s time to slice! Use a pizza cutter or a sharp knife lightly greased with oil (or dusted with confectioners’ sugar) to cut the marshmallows into desired shapes. Squares are traditional, but you can cut them into rectangles or even fun shapes with cookie cutters if you’re feeling extra ambitious. Dust the cut sides with more confectioners’ sugar to prevent sticking. Serve immediately, or store them as directed.
What to Serve It With
These festive Halloween Marshmallows are surprisingly versatile and add a touch of homemade charm to any occasion. For a special breakfast treat, I love serving them alongside a stack of Fluffy Pancakes or waffles, letting them melt slightly from the warmth. They’re also fantastic on top of a mug of hot chocolate, turning a simple drink into a decadent delight. At a Halloween brunch, they can be presented in a beautiful dish alongside mini muffins, fruit skewers, and perhaps some cute ghost-shaped cookies. For dessert, they’re wonderful on their own, but also make an amazing topping for cupcakes or a fun addition to a dessert charcuterie board. My kids always love them as a cozy snack after school, especially when paired with a glass of cold milk. Sometimes, we even use them as edible “glue” to hold together gingerbread house components – Halloween style, of course! They’re a hit at parties, perfect for goodie bags, and just so much fun to share.
Top Tips for Perfecting Your Halloween Marshmallows
Over the years, I’ve learned a few tricks to make these Halloween Marshmallows absolutely perfect every single time. Firstly, the pan preparation is non-negotiable. Don’t be shy with the greasing and confectioners’ sugar dusting; it’s your insurance policy against a sticky disaster. When blooming the gelatin, make sure it’s fully hydrated before adding any heat. For the sugar syrup, using a candy thermometer is a must. Getting to that 240°F is what creates that signature fluffy, airy texture. If it’s too low, they won’t set properly; too high, and they can become too hard. When it comes to coloring, start with a few drops at a time. Gel food coloring is best as it’s concentrated and won’t add extra liquid. Be patient during the whipping stage; letting it whip for the full 10-15 minutes is what makes them super light and airy. I once tried rushing it, and they were a bit too dense. For swirling, less is more! You want distinct ribbons of color, not a muddy mess. A gentle swirl with a toothpick or thin knife is all you need. If you’re decorating with edible eyes or candies, a tiny dab of corn syrup works as perfect edible glue. And remember, cutting them can be tricky. A lightly oiled or confectioners’ sugar-dusted pizza cutter or sharp knife makes all the difference. If they seem too sticky to cut, pop them in the fridge for 15-20 minutes to firm them up slightly.
Storing and Reheating Tips
Storing these delightful Halloween Marshmallows is pretty straightforward, but there are a few things to keep in mind to maintain their perfect texture. At room temperature, in an airtight container, they’ll stay wonderfully soft and chewy for about 1 to 2 weeks. Make sure they are well-dusted with confectioners’ sugar to prevent them from sticking together. If you’re in a humid climate, or if you notice they’re starting to feel a little tacky, it’s best to store them in the refrigerator. In the fridge, they can last for up to 3 weeks. Just make sure they’re in a well-sealed container or bag. When you take them out of the fridge, let them come to room temperature for about 20-30 minutes before serving; they’ll regain their soft chewiness. I’ve never needed to reheat them because they’re best enjoyed at room temp or slightly chilled from the fridge, but if yours somehow became a bit hard, a very gentle warming in a low oven (around 200°F for just a few minutes) might help, but be very careful not to melt them. I usually add any decorative glaze or toppings *after* the marshmallows have fully set and just before serving, especially if they’ve been refrigerated, to ensure they stay crisp and appealing.
Frequently Asked Questions
Final Thoughts
There you have it – your guide to making the most wonderfully festive and utterly delicious Halloween Marshmallows! I really hope you give these a try. They’re such a joy to make and even more of a joy to eat. The best part, for me, is seeing the smiles they bring, whether it’s to my own family or to friends at a party. They’re proof that a little bit of effort and a lot of love can create something truly special. They’re not just candy; they’re little edible hugs that capture the magic of the season. If you love this recipe, you might also enjoy my Spiced Apple Cider Donuts or my Easy Pumpkin Bread – they’re all wonderful for fall baking! I can’t wait to hear how your Halloween Marshmallows turn out! Please share your creations and any fun decorating ideas you come up with in the comments below. Happy spooky baking!
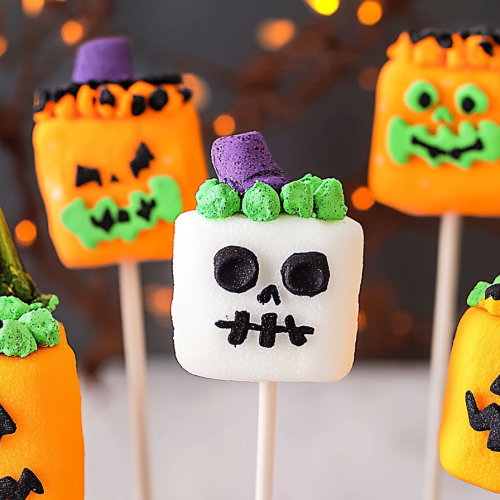
Halloween Marshmallows
Ingredients
Main Ingredients
- 1 package Large Marshmallows
- 1 cup White Chocolate Chips
- 1 tablespoon Coconut Oil
- 0.5 cup Candy Corn
- 0.25 cup Orange Candy Melts
- 1 package Black Food Coloring gel or edible marker
Instructions
Preparation Steps
- Line a baking sheet with parchment paper.
- Melt white chocolate chips and coconut oil in a microwave-safe bowl in 30-second intervals, stirring in between, until smooth. Alternatively, melt over a double boiler.
- Dip each marshmallow halfway into the melted white chocolate. Let excess drip off.
- Place the dipped marshmallows on the prepared baking sheet.
- Immediately press a few candy corns into the wet white chocolate of each marshmallow to resemble a pumpkin.
- Melt the orange candy melts according to package directions.
- Using a toothpick or a small piping bag, draw jack-o'-lantern faces on the marshmallows with the melted orange candy melts.
- For extra detail or to draw eyes and mouths, use black food coloring or a black edible marker.
- Let the chocolate harden completely before serving.