You know those nights, right? The ones where dinner feels like a monumental task, and all you *really* want is something comforting, delicious, and ridiculously easy? That’s exactly when this garlic cheese bread comes swooping in like a superhero. I swear, the smell alone as it bakes has a magical way of coaxing everyone out of their corners and into the kitchen. It’s not just bread; it’s a warm hug, a happy memory, and a guaranteed crowd-pleaser. My kids, who can be the pickiest eaters on the planet, will literally do a happy dance when they see me pulling this golden, gooey masterpiece from the oven. It’s that good. Forget those store-bought versions that are all oil and no soul; this is the real deal, made with love and a few simple ingredients that transform into pure magic. If you’ve ever tried making a simple cheese pull, this takes that joy and multiplies it by a thousand. It’s truly my go-to for busy weeknights, last-minute guests, or honestly, just when I’m craving something utterly spectacular without the fuss.
What is garlic bread?
So, what exactly *is* this magical garlic cheese bread I’m raving about? Think of it as the ultimate fusion of classic GARLIC BREAD and an irresistible cheese pull, all baked into a soft, fluffy, slightly sweet base that’s just begging to be devoured. It’s not quite a pizza, not quite a cheesy focaccia, but something entirely its own wonderful thing. The name itself, garlic cheese bread, pretty much says it all, right? It’s a savory, cheesy, garlicky delight that’s surprisingly simple to whip up. We’re talking about a wonderfully moist, tender dough that’s swirled with a rich, savory filling and then baked until golden brown and bubbly. It’s the kind of thing that makes you close your eyes and sigh with happiness. It’s fundamentally bread, but elevated to an art form through the sheer power of garlic and glorious cheese.
Why you’ll love this recipe?
Okay, let’s talk about why this garlic cheese bread is about to become your new best friend in the kitchen. First and foremost, the FLAVOR. Oh. My. Goodness. It’s an explosion of savory, garlicky goodness that’s perfectly balanced by the creamy, melty cheese. It’s not just a sprinkle of garlic; it’s a generous, aromatic embrace that infuses every bite. Then there’s the SIMPLICITY. Honestly, I’ve had recipes that take a whole weekend and still don’t turn out this good. This one comes together so fast, you’ll wonder if you somehow cheated. It’s perfect for those nights when you’re short on time but big on cravings. Plus, it’s incredibly COST-EFFECTIVE. The ingredients are all pantry staples, making it a budget-friendly way to create something truly spectacular. And talk about VERSATILITY! This isn’t just a side dish; it’s a star. I’ve served it as a hearty appetizer, a main course with a big salad, and even as a decadent breakfast treat (don’t judge!). It’s far superior to a plain loaf of garlic bread because of that incredible cheesy center, and it’s way more satisfying than just a slice of pizza when you’re after that comforting carb fix. What I love most about this is how it manages to feel both incredibly indulgent and surprisingly easy to make, a rare and beautiful combination in my book.
How do you make garlic bread?
Quick Overview
The magic of this garlic cheese bread lies in its straightforward approach. We’ll whip up a quick, no-fuss dough, create a simple yet deeply flavorful garlic and cheese filling, then artfully swirl them together before baking. The whole process, from mixing bowl to oven, takes less time than you might think, and the results are consistently spectacular. You get a wonderfully soft bread with pockets of gooey, melted cheese and aromatic garlic – it’s truly a masterpiece of comfort food.
Ingredients
For the Main Dough:
This is the foundation of our delicious bread. You want it to be soft and slightly enriched, which is why we add a touch of sugar and butter. Don’t skimp on the quality of your flour here; a good all-purpose flour makes a difference. I always use lukewarm water – too hot and it kills the yeast, too cold and it won’t wake up properly. A tiny pinch of sugar helps the yeast bloom, so don’t skip that! I’ve found that using whole milk instead of water for the liquid makes the dough even richer and more tender, but regular water works just fine if that’s what you have on hand.
* 2 ¼ teaspoons (1 packet) active dry yeast
* 1 teaspoon granulated sugar
* 1 ¼ cups lukewarm water (around 105-115°F)
* 3 ½ cups all-purpose flour, plus more for dusting
* 1 teaspoon salt
* 2 tablespoons unsalted butter, softened
For the Filling:
This is where the real party happens! The combination of garlic, herbs, and cheese is what makes this truly irresistible. I like to use a good amount of fresh garlic, but garlic powder is a decent substitute in a pinch. Make sure your butter is softened so it mixes in smoothly. For the cheese, a blend of mozzarella and a sharp cheddar gives you the best of both worlds – gooey meltiness and a bit of a flavor punch. Feel free to experiment with other cheeses like Monterey Jack or even a sprinkle of Parmesan!
* ½ cup (1 stick) unsalted butter, softened
* 4-6 cloves garlic, minced (or 2 teaspoons garlic powder)
* 2 tablespoons chopped fresh parsley (or 1 teaspoon dried)
* ½ teaspoon salt
* ¼ teaspoon Black Pepper
* 1 ½ cups shredded mozzarella cheese
* ½ cup shredded sharp cheddar cheese
For the Glaze:
This glaze is super simple but adds a beautiful sheen and an extra layer of flavor. You can adjust the consistency by adding a touch more milk or a pinch more powdered sugar.
* ½ cup powdered sugar
* 1-2 tablespoons milk
* ¼ teaspoon vanilla extract (optional, but adds a lovely depth)
Step-by-Step Instructions
Step 1: Preheat & Prep Pan
First things first, let’s get our oven ready. Preheat it to 375°F (190°C). While that’s heating up, grab a 9×13 inch baking pan. You can lightly grease it with butter or non-stick spray, or even line it with parchment paper for super easy cleanup. I usually just give it a quick spray; it’s never given me any trouble.
Step 2: Mix Dry Ingredients
In a large mixing bowl, whisk together the all-purpose flour and salt. This ensures the salt is evenly distributed throughout the dough, which is important for flavor and texture. You don’t want little salty pockets!
Step 3: Mix Wet Ingredients
In a separate, smaller bowl, combine the lukewarm water and the teaspoon of sugar. Sprinkle the active dry yeast over the top and let it sit for about 5-10 minutes. You should see it get foamy and bubbly – that’s how you know your yeast is alive and ready to go! If it doesn’t foam, your yeast might be old or the water wasn’t the right temperature, and you’ll need to start with fresh yeast. Once foamy, stir in the softened butter until it’s mostly melted.
Step 4: Combine
Pour the wet ingredients into the bowl with the dry ingredients. Mix with a wooden spoon or a spatula until a shaggy dough forms. Then, turn the dough out onto a lightly floured surface. Knead for about 5-7 minutes, or until the dough is smooth and elastic. If it’s too sticky, add a little more flour, a tablespoon at a time. If it feels too dry, add a tiny bit of water. You want a dough that springs back slightly when you poke it. Once kneaded, place it back in a lightly greased bowl, cover it with a clean kitchen towel, and let it rise in a warm place for about an hour, or until doubled in size. I usually stick mine in a slightly warm (turned off!) oven.
Step 5: Prepare Filling
While the dough is rising, let’s make that amazing filling! In a medium bowl, combine the softened butter, minced garlic, chopped parsley, salt, and pepper. Mix it all up really well until it’s a nice, spreadable consistency. If your butter is too cold, you can gently warm it for a few seconds in the microwave, but be careful not to melt it completely. Stir in both shredded mozzarella and cheddar cheeses until they’re evenly distributed.
Step 6: Layer & Swirl
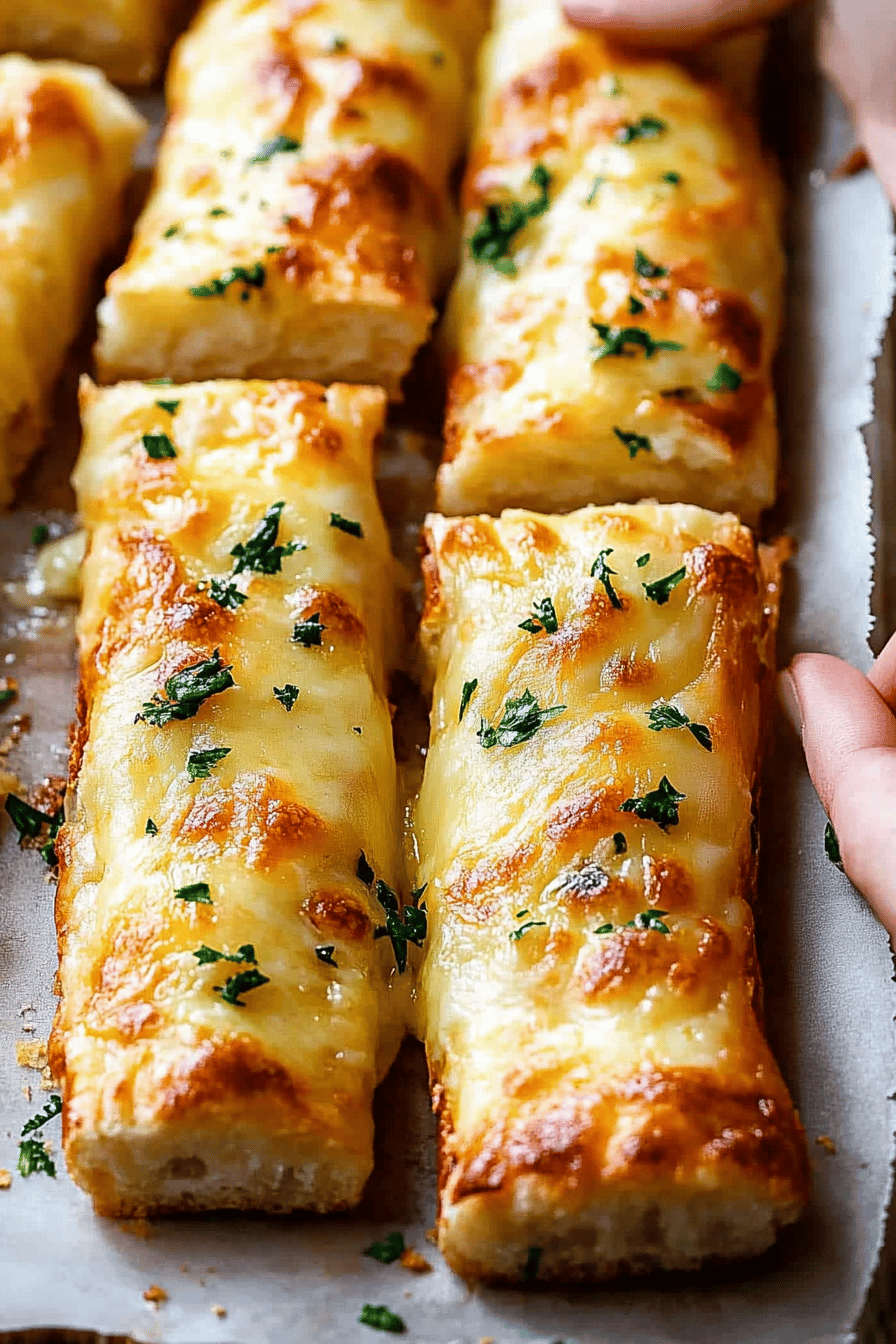
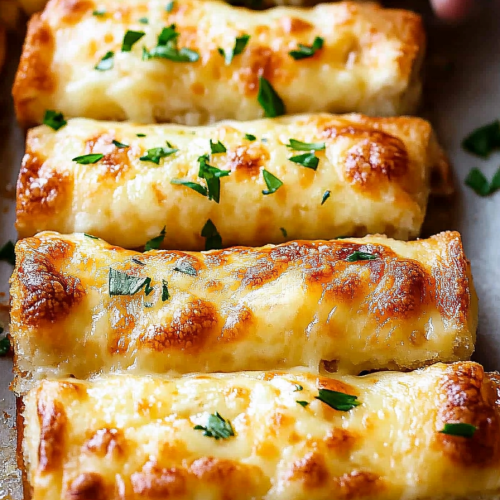
Once your dough has doubled, punch it down gently to release the air. Turn it out onto a lightly floured surface and roll or pat it into a large rectangle, roughly 10×15 inches. Now, take that glorious garlic cheese filling and spread it evenly over the surface of the dough, leaving about a ½-inch border around the edges. Starting from one of the longer sides, tightly roll up the dough, like you’re making a jelly roll. Pinch the seam closed to seal. Now, here’s the fun part: using a sharp knife, cut the rolled dough into about 10-12 slices, each about 1 to 1 ½ inches thick. Arrange these slices cut-side up in your prepared baking pan. They’ll be a little snug, which is exactly what we want – they’ll puff up and bake into each other.
Step 7: Bake
Pop that pan into your preheated oven and bake for 25-30 minutes, or until the bread is golden brown on top and the cheese is bubbly and melted. The aroma filling your kitchen at this point is just incredible. You’ll know it’s done when the internal temperature reaches about 190-200°F (90°C) if you have a thermometer, but mostly, you’ll just trust your eyes and nose!
Step 8: Cool & Glaze
Once it’s out of the oven, let the bread cool in the pan for about 10-15 minutes. This is important! It allows the cheese to set up a bit and prevents the bread from falling apart when you try to serve it. While it’s cooling, whisk together the powdered sugar, 1 tablespoon of milk, and vanilla extract (if using) in a small bowl. Add more milk, a tiny bit at a time, if you want a thinner glaze. Drizzle the glaze over the warm bread. It’ll melt slightly and create a beautiful, sweet contrast to the savory bread.
Step 9: Slice & Serve
Now for the best part: serving! You can either serve it directly from the pan, scooping out portions, or carefully lift it out onto a cutting board. Slice it into wedges or individual rolls. Serve it warm, because that’s when the cheese is at its meltiest and the bread is at its softest. Enjoy every single bite!
What to Serve It With
This garlic cheese bread is so versatile, it truly fits into almost any meal! For a cozy BREAKFAST, I love having a warm slice with a cup of strong coffee. It’s a comforting start to the day, especially on a lazy weekend morning. It’s not too sweet, so it feels appropriate, and the savory cheese is so satisfying. For BRUNCH, it’s a showstopper! Serve it alongside a frittata or quiche, maybe with a side of fresh fruit salad. The elegance of brunch calls for a slightly more composed presentation, so consider arranging the slices attractively on a platter. As a DESSERT, yes, you read that right! After a rich meal, a small slice of this warm, sweet-glazed bread is surprisingly delightful. It’s less heavy than a traditional cake or pie, and the combination of savory and sweet is utterly addictive. The glaze makes it feel special enough for after dinner. And for those COZY SNACKS, this is the ultimate comfort food. Pair it with a bowl of tomato soup for an unbeatable combo, or just enjoy it on its own with a glass of milk. My family traditions often involve this bread appearing whenever we have movie nights or board game evenings; it’s the perfect shareable treat.
Top Tips for Perfecting Your Garlic Cheese Bread
I’ve made this garlic cheese bread more times than I can count, and along the way, I’ve picked up a few tricks that always help me get that perfect result. First, when it comes to the dough, don’t rush the rising process. A good, slow rise develops better flavor and texture. If your kitchen is cold, find the warmest spot you can – near a sunny window, on top of a slightly warm (but not hot!) oven, or even in a microwave with a mug of hot water. For the filling, the key is softened butter, not melted. Softened butter creates a spreadable paste that distributes the garlic and cheese evenly. If your butter is too hard, you’ll end up with clumps. Melted butter will make the filling too greasy and seep out. When spreading the filling, work quickly but gently. You don’t want to tear the dough. For the swirl, roll it up tightly but not so tight that you’re squishing all the air out. A good, even roll ensures consistent pockets of cheese. When you slice it, use a sharp serrated knife – it makes cutting through the soft dough so much easier without squishing it. My biggest mistake early on was trying to bake it too soon after slicing, which resulted in flatter bread. Letting it rest in the pan for those 10-15 minutes after baking is crucial for it to set up properly. And for the glaze, don’t drown it! A light drizzle is all you need to add that touch of sweetness and shine without making it overly sweet. If you accidentally add too much milk to the glaze, just whisk in a bit more powdered sugar to thicken it up.
Storing and Reheating Tips
This garlic cheese bread is best enjoyed fresh and warm, but it stores surprisingly well! If you have any leftovers (which is rare in my house!), you can keep it at ROOM TEMPERATURE for up to two days. Just cover it tightly with plastic wrap or foil to keep it from drying out. The glaze might become a little sticky at room temperature, but it’s still delicious. For longer storage, the REFRIGERATOR is your best friend. Wrap it tightly in plastic wrap and then place it in an airtight container. It will stay fresh in the fridge for about 4-5 days. When you’re ready to reheat, I find that popping a slice in a toaster oven or a regular oven at around 350°F (175°C) for about 5-10 minutes brings it back to its former glory, with a nice crispy exterior and warm, gooey center. If you’re in a real pinch, the microwave works too, but the bread can sometimes get a little chewy. For FREEZER instructions, it’s best to freeze the bread *before* glazing. Wrap individual slices or the whole unglazed loaf tightly in plastic wrap, then in foil, and place in a freezer-safe bag. It can stay frozen for up to 2-3 months. To thaw, let it sit at room temperature for a few hours or overnight, then reheat in the oven. If you freeze the glazed bread, the glaze might become a bit soft or sticky upon thawing, but it’s still perfectly edible!
Frequently Asked Questions
Final Thoughts
Honestly, if there’s one recipe I hope you’ll try this week, it’s this garlic cheese bread. It’s more than just a recipe; it’s a shortcut to happiness on a plate. It’s that perfect balance of comfort, flavor, and sheer simplicity that we all crave. It reminds me of cozy family dinners and happy gatherings, and I just know it’s going to become a cherished recipe in your kitchen too. If you’re looking for other easy, crowd-pleasing recipes, you might also enjoy my {link to another recipe, e.g., “Easy cheesy garlic Knots”} or my {link to another recipe, e.g., “One-Pan Lemon Herb Roasted Chicken”}. I can’t wait to hear how your garlic cheese bread turns out! Don’t be shy about leaving a comment below with your thoughts, or even sharing your own favorite variations. Happy baking!
garlic cheese bread
Ingredients
Main Ingredients
- 0.5 cup butter melted
- 3 cloves garlic minced
- 0.25 teaspoon salt
- 0.25 teaspoon black pepper
- 1 loaf French bread halved lengthwise
- 1 cup mozzarella cheese shredded
- 0.5 cup parmesan cheese grated
- 1 tablespoon parsley chopped fresh
Instructions
Preparation Steps
- Preheat oven to 375 degrees F (190 degrees C).
- In a small bowl, combine melted butter, minced garlic, salt, and pepper.
- Spread the butter mixture evenly over the cut sides of the French bread.
- Top the bread with mozzarella and parmesan cheeses.
- Bake for 10-12 minutes, or until cheese is melted and bubbly and bread is golden brown.
- Sprinkle with fresh parsley before serving.