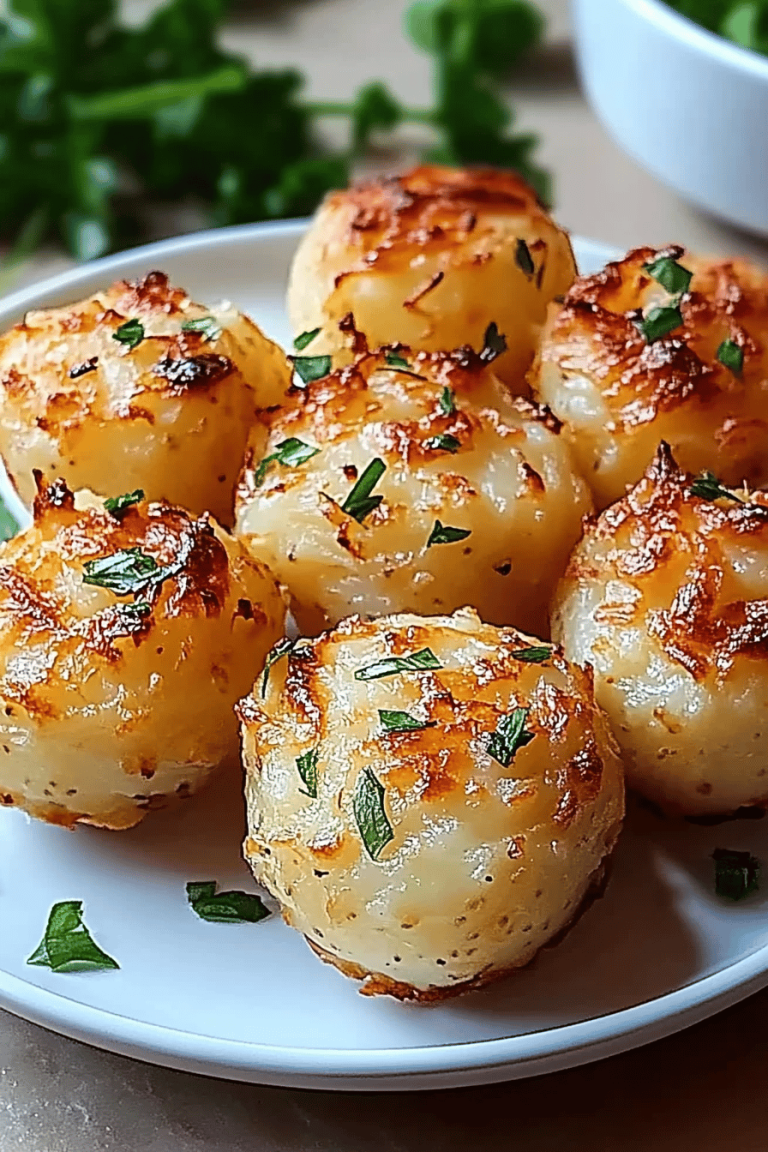
You know, sometimes a simple dish just *hits* differently. It’s the kind of thing that, no matter how many fancy meals I try to whip up, always ends up being the star of the show. For me, that’s this recipe for Garlic Butter Potatoes. It’s not just a side dish; it’s a hug on a plate. I remember my Grandma making these for Sunday dinners, the aroma of garlic and butter filling her tiny kitchen, and honestly, the smell alone still transports me back to those happy, chaotic family gatherings. They’re so ridiculously easy to make, which is a lifesaver on those nights when you’re rushing, but they taste like something you slaved over for hours. If you’ve ever had those roasted potatoes that are perfectly crispy on the outside and wonderfully fluffy on the inside, with just that magical hint of garlic and rich butter, well, you’re probably thinking of something very similar to this. It’s a classic for a reason, and trust me, once you try it, it’ll become a go-to in your kitchen too. Forget complicated techniques; this is pure, unadulterated comfort food magic.
What is garlic butter potatoes
So, what exactly *are* Garlic Butter Potatoes? It sounds simple, and it is at its heart, but oh boy, is it special. Think of it as the ultimate upgrade to your standard roasted or boiled potatoes. We’re talking about tender potato pieces that have been lovingly coated in a luscious mixture of melted butter, fragrant minced garlic, and a few other little flavor boosters. It’s not just tossing them in butter; it’s about infusing every nook and cranny with that savory, garlicky goodness. The magic happens when they bake or roast, coaxing out that beautiful golden-brown color, creating those delightful crispy edges, and leaving the inside impossibly soft and creamy. It’s essentially a celebration of the humble potato, elevated to its absolute best. It’s the kind of dish that makes even the pickiest eaters clean their plates, and it feels like pure indulgence without being heavy or complicated. It’s the dependable, delicious foundation that can make any meal feel complete.
Why you’ll love this recipe?
Honestly, where do I even begin with why I adore this Garlic Butter Potatoes Recipe so much? Let me count the ways! First and foremost, the *flavor*. Oh, the flavor! It’s an explosion of savory goodness. The garlic isn’t overpowering; it’s perfectly mellowed and fragrant, mingling with the richness of the butter to create this irresistible aroma that just beckons everyone to the table. Then there’s the texture – that perfect contrast between the slightly crisp, golden edges and the tender, almost creamy interior. It’s pure potato perfection! What I love most, though, is its sheer simplicity. You genuinely don’t need to be a seasoned chef to nail this. The ingredients are basic pantry staples, and the steps are so straightforward that even a beginner can achieve amazing results. It’s incredibly budget-friendly, too. Potatoes are an affordable staple, and butter and garlic aren’t exactly breaking the bank, making this a fantastic way to feed a crowd without spending a fortune. And versatility? This dish is a chameleon! It’s a natural fit alongside roasted chicken or a hearty steak, but it’s also surprisingly delightful with lighter fare like grilled fish or a big, fresh salad. It’s my secret weapon for making any meal feel extra special, especially on busy weeknights. It’s one of those recipes that feels both comforting and a little bit elegant, all at the same time. It’s a winner in my book, every single time.
How do I make garlic
Quick Overview
The process for these Garlic Butter Potatoes is beautifully simple. You’ll start by prepping your potatoes and then tossing them with a fragrant garlic-butter mixture. Then, it’s just a matter of letting them roast in the oven until they’re tender, golden, and utterly irresistible. The key here is giving them enough space in the pan so they roast and get those lovely crispy bits, rather than steaming. It’s a hands-off approach for the most part, allowing the oven to do all the hard work. It’s honestly a recipe that anyone can master, and the payoff in flavor and texture is huge for such minimal effort. This method ensures each potato piece gets that glorious buttery, garlicky coating and develops those perfect crispy edges that everyone fights over.
Ingredients
For the potatoes: For
2 pounds Yukon Gold or red potatoes (about 4-5 medium potatoes). I love Yukon Golds for their creamy texture and buttery flavor, but red potatoes work wonderfully too, holding their shape nicely. Just make sure they’re cut into roughly equal-sized pieces for even cooking.
For the Garlic Butter Sauce:
1/2 cup unsalted butter, melted. Using good quality butter really makes a difference here; it’s a star ingredient, after all. You can also use salted butter and just reduce or omit the extra salt later.
6-8 cloves garlic, minced. Don’t be shy with the garlic! I like to mince it finely so it distributes evenly, but you could also use a garlic press. The aroma that fills your kitchen as this cooks is just divine.
1 teaspoon dried Italian seasoning or dried rosemary. This adds a subtle herbaceous note that complements the garlic and butter beautifully. Fresh herbs can be used too, but add them towards the end of cooking or as a garnish.
1/2 teaspoon salt, or to taste. Adjust this based on whether you used salted or unsalted butter and your personal preference.
1/4 teaspoon Black Pepper, freshly ground. Always fresh for the best flavor!
Optional additions: A pinch of red pepper flakes for a little heat, or a tablespoon of fresh chopped parsley or chives for garnish.
Step-by-Step Instructions
Step 1: Preheat & Prep Pan
First things first, get your oven preheating to 400°F (200°C). While that’s warming up, grab a large baking sheet. You want a sturdy one, preferably rimmed, to catch any buttery goodness. I like to lightly grease mine with a little olive oil or cooking spray, though the butter in the sauce usually does a good job of preventing sticking. If you have a good non-stick pan, you might not need to grease it at all. The key here is to give the potatoes enough room to roast and get crispy, so don’t overcrowd the pan. If your potatoes seem to be piled too high, it’s better to use two pans!
Step 2: Prepare Potatoes
Now, for the potatoes! Wash them thoroughly, and I personally like to leave the skins on for extra texture and nutrients. If you prefer them peeled, go right ahead. Cut them into bite-sized pieces, aiming for pieces that are roughly 1-inch cubes. It’s really important to cut them as uniformly as possible so they all cook at the same rate. Unevenly cut potatoes mean some will be perfectly done while others are either too hard or too mushy. Give them a quick rinse under cold water and then pat them really dry with a clean kitchen towel or paper towels. Getting them nice and dry is crucial for achieving that lovely crispy exterior when they roast. No one wants soggy potatoes!
Step 3: Mix Dry Ingredients
This step isn’t strictly “dry ingredients” in the baking sense, but rather combining your seasonings. In a small bowl, whisk together the minced garlic, dried Italian seasoning (or rosemary), salt, and black pepper. This ensures that your seasonings are well-distributed and ready to be combined with the wet ingredients. Make sure your garlic is finely minced so it toasts nicely without burning. If you’re using fresh herbs, you’ll add those later. This little mix is where all the fragrant magic starts to happen!
Step 4: Mix Wet Ingredients
In a separate, slightly larger bowl – one that’s big enough to toss the potatoes in comfortably – pour in your melted butter. Add the garlic and herb mixture you just prepared to the melted butter. Give it a good stir to combine everything. This is your flavor base, and it should smell absolutely divine already! Make sure the butter isn’t piping hot, just nicely melted, so it doesn’t cook the garlic too quickly.
Step 5: Combine
Now it’s time to bring it all together! Add your patted-dry potato pieces to the bowl with the garlic butter mixture. Using a large spoon or your clean hands (my preferred method for ensuring every single potato gets coated!), toss everything together until each potato piece is thoroughly coated in the glorious garlic butter sauce. You want to see a nice sheen on all of them. This thorough coating is what ensures consistent flavor and crispiness.
Step 6: Layer & Swirl
Arrange the coated potatoes in a single layer on your prepared baking sheet. Spreading them out evenly is critical. If they’re piled up, they’ll steam instead of roast, and you won’t get those lovely crispy edges we’re after. Don’t overcrowd the pan; give each potato piece a little breathing room. This step might seem small, but it’s one of the biggest factors in achieving that perfect crispy-on-the-outside, tender-on-the-inside texture.
Step 7: Bake
Pop that baking sheet into your preheated oven. Bake for 30-45 minutes, or until the potatoes are tender when pierced with a fork and beautifully golden brown and crispy on the edges. The exact time will depend on your oven and the size of your potato pieces. About halfway through the baking time (around 20-25 minutes), give the potatoes a good stir or shake the pan. This helps them brown evenly on all sides. Keep an eye on them in the last 10-15 minutes; you want them golden, not burnt!
Step 8: Cool & Glaze
Once they’re perfectly roasted, carefully remove the baking sheet from the oven. Let them rest on the baking sheet for a few minutes. This allows the flavors to meld and the crispy bits to firm up a bit more. If you’re adding fresh herbs like parsley or chives, now is the perfect time to sprinkle them over the hot potatoes. The residual heat will gently warm them and release their fresh aroma. There’s no separate glaze needed; the buttery garlic sauce has already done its job beautifully!
Step 9: Slice & Serve
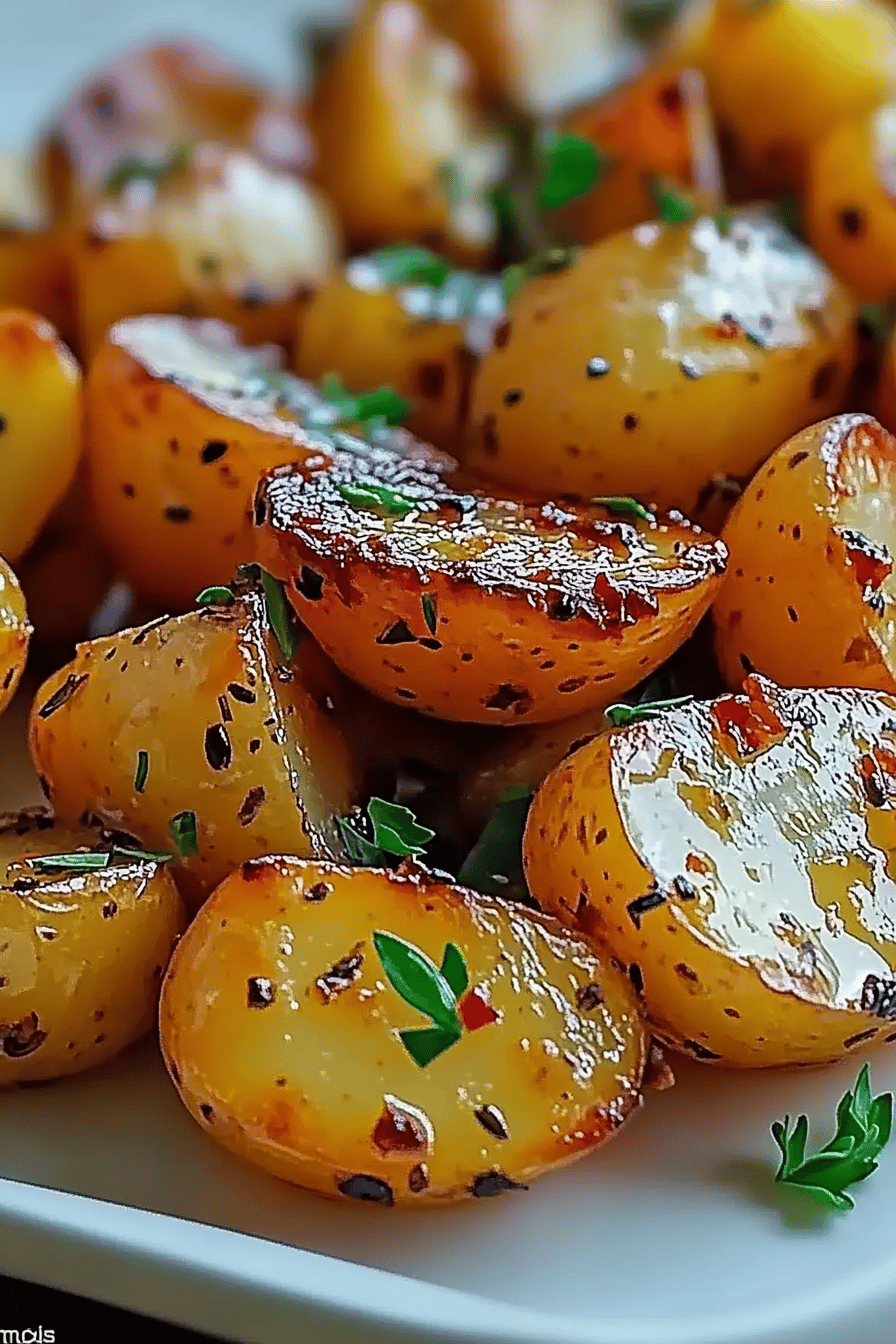
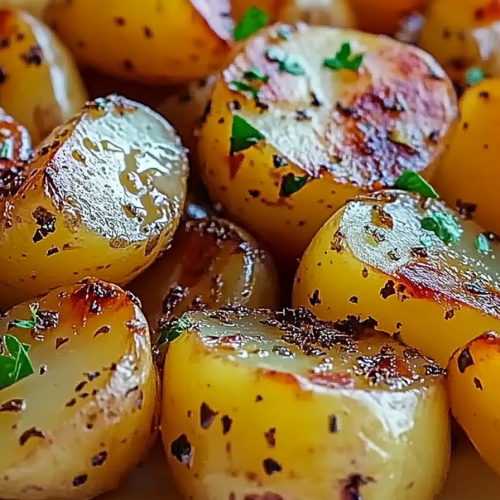
Transfer the Garlic Butter Potatoes to a serving dish. They are absolutely best served hot, right out of the oven, when they’re at their crispiest and most flavorful. You can serve them family-style straight from a bowl, or plate them up individually. The aroma alone will get everyone excited! Trust me, they disappear in minutes.
What to Serve It With
These Garlic Butter Potatoes are the ultimate chameleon of side dishes, fitting in seamlessly with practically anything you serve them with. For a simple, comforting breakfast, they are fantastic alongside scrambled eggs and crispy bacon or sausage. A little sprinkle of fresh chives on top makes them feel extra special in the morning. For a more elegant brunch, imagine these alongside smoked salmon, poached eggs, and a side of fresh fruit salad. They add a touch of decadence to any brunch spread. As a dessert? Well, maybe not a *sweet* dessert, but they are definitely a rich, satisfying component of a meal that feels like a treat. They pair beautifully with grilled or pan-seared fish, like salmon or cod, where their savory notes cut through the richness of the fish. For heartier meals, they are the classic accompaniment to roasted chicken, Pan-Seared Steak, or pork chops. My family also loves them with a big, hearty lentil shepherd’s pie, or alongside some grilled burgers. They’re also surprisingly good with a robust chili or a creamy tomato soup on a chilly evening. Truly, if you’re ever in doubt about what side to make, these Garlic Butter Potatoes are your reliable answer.
Top Tips for Perfecting Your Garlic Butter Potatoes
I’ve made these Garlic Butter Potatoes countless times, and over the years, I’ve picked up a few little tricks that I think make a big difference. First, when it comes to the potatoes themselves, always, always, *always* pat them completely dry after rinsing. I cannot stress this enough! Moisture is the enemy of crispiness. If they’re still damp, they’ll steam in the oven instead of getting that lovely golden-brown sear. Also, cutting them into uniform sizes is key for even cooking. If you have some tiny pieces and some huge chunks, you’ll end up with a mix of overcooked and undercooked potatoes. For the garlic, I prefer to mince it very finely. If it’s in large chunks, it can burn before the potatoes are cooked, giving a bitter taste. Using fresh garlic makes a world of difference compared to granulated or powdered. When it comes to mixing, don’t be afraid to get your hands in there! It’s the best way to ensure every single potato piece is thoroughly coated in that glorious garlic butter mixture. A gentle toss with a spoon is okay, but hands are better for even distribution. When it comes to baking, the most important tip is to give them space on the baking sheet. Don’t overcrowd the pan! If you pile them up, they will steam, and you won’t achieve that coveted crispy exterior. It’s better to use two pans if you have a lot of potatoes. Also, don’t be tempted to pull them out too early. Let them roast until they are deeply golden brown and you see those lovely crispy edges. It’s worth the wait! If your oven tends to cook unevenly, giving the pan a good shake or a stir halfway through baking will help ensure all sides get nicely browned. For ingredient swaps, if you’re not a fan of Italian seasoning, a good quality dried rosemary or thyme works beautifully. You can also add a pinch of smoked paprika for a subtle smoky flavor. And for a touch of brightness, a squeeze of fresh lemon juice right before serving is fantastic!
Storing and Reheating Tips
So, what happens if, by some miracle, you have leftover Garlic Butter Potatoes? They are, of course, best eaten fresh, but they do store reasonably well. For room temperature storage, I wouldn’t leave them out for more than two hours, especially if your kitchen is warm. They are at their crispiest right out of the oven, and their texture does change as they cool. For refrigerator storage, let the potatoes cool down completely before transferring them to an airtight container. You can store them in the fridge for up to 3-4 days. They’ll lose some of their crispiness over time, but they’ll still be delicious. When it comes to reheating, the best method to try and recapture some of that crispiness is in the oven or an air fryer. Spread them out on a baking sheet and reheat at around 350°F (175°C) for about 10-15 minutes, or until heated through and slightly crisped up again. A toaster oven works great for this too. Microwaving them is an option if you’re in a hurry, but it will make them softer and less crispy – think more of a tender, warm potato. If you do microwave them, I recommend about 30-60 second intervals, stirring in between, until they reach your desired temperature. Freezing is generally not recommended for these potatoes. The texture of the potatoes can become mushy and watery upon thawing, and you’ll lose that lovely crispy exterior. I’ve found they really are best enjoyed fresh or reheated from the fridge. I haven’t found a great way to maintain their texture after freezing. For the best quality, plan to eat them within a day or two of making them.
Frequently Asked Questions
Final Thoughts
So there you have it – my go-to recipe for Garlic Butter Potatoes. It’s the kind of dish that feels like a culinary hug, a simple pleasure that brings so much joy to the table. I truly believe that some of the most delicious food comes from straightforward recipes that let good ingredients shine. These potatoes are proof of that. They are ridiculously easy to whip up, incredibly flavorful, and so versatile that they’ll quickly become a staple in your own kitchen, just like they have in mine. I always tell people that if you want to impress someone without breaking a sweat, this is your recipe. It’s the comfort food classic that never fails to satisfy. If you love this recipe, you might also enjoy my Crispy Roasted Brussels Sprouts or my Creamy Garlic Mashed Potatoes for more fantastic side dish inspiration! I really hope you give these Garlic Butter Potatoes a try. I can’t wait to hear how they turn out for you and what you serve them with! Happy cooking!
Garlic Butter Potatoes
Ingredients
Main Ingredients
- 0.5 kg Baby Potatoes Halved or quartered if large
- 4 cloves Garlic Minced
- 0.125 cup Butter Unsalted
- 2 tbsp Olive Oil
- 0.5 tsp Salt
- 0.25 tsp Black Pepper
- 2 tbsp Fresh Parsley Chopped, for garnish
Instructions
Preparation Steps
- Preheat your oven to 200°C (400°F).
- In a large bowl, toss the baby potatoes with olive oil, salt, and pepper until evenly coated.0.5 kg Baby Potatoes
- Spread the potatoes in a single layer on a baking sheet.
- Roast for 20 minutes.
- While the potatoes are roasting, melt the butter in a small saucepan over medium heat. Add the minced garlic and cook for 1-2 minutes until fragrant, being careful not to burn it.0.5 kg Baby Potatoes
- After 20 minutes, remove the potatoes from the oven. Drizzle the garlic butter mixture over the potatoes and toss to coat.
- Return the potatoes to the oven and roast for another 10-15 minutes, or until tender and golden brown.
- Garnish with fresh chopped parsley before serving.0.5 kg Baby Potatoes