Oh, you guys! I am SO excited to share this recipe with you today. This isn’t just any casserole; this is my go-to, my emergency comfort food, the dish that makes everyone in my house do a little happy dance. We’re talking about Doritos Casserole Recipe, and let me tell you, it’s a game-changer. It’s got that perfect blend of creamy, cheesy, a little bit crunchy, and so incredibly satisfying. I remember the first time I whipped this up for a family potluck – it was gone in about ten minutes flat! Seriously, people were asking for the recipe before they’d even finished their first bite. It’s the kind of meal that just wraps you up in a warm hug, perfect for those chilly evenings or when you just need something reliably delicious without a whole lot of fuss. It’s like a love letter to snack time, but in a full-blown, satisfying meal form. Forget complicated dinners; this Doritos casserole is the kind of magic you want in your life.
What is Doritos Casserole?
So, what exactly *is* this magical creation we call Doritos Casserole? Think of it as the ultimate comfort food mashup, taking all the best parts of a hearty, cheesy bake and giving it a fun, zesty twist with everyone’s favorite crunchy snack. It’s essentially a layered dish, usually featuring seasoned ground meat, creamy sauces, and a generous topping of crushed Doritos, all baked together until bubbly and golden. The name comes from the star ingredient, of course – those iconic, flavorful tortilla chips that add an irresistible crunch and a burst of tangy goodness. It’s not fancy, and it doesn’t pretend to be. It’s honest, unpretentious, and wildly delicious. It’s the kind of dish that has a special place in my heart because it’s so darn easy and always a crowd-pleaser. It’s what happens when you combine a busy weeknight dinner with a craving for something fun and familiar. It’s comfort food elevated, but still totally approachable for any home cook.
Why you’ll love this recipe?
There are so many reasons why this Doritos casserole recipe has become an absolute staple in my kitchen, and I just know you’re going to fall in love with it too. First off, let’s talk FLAVOR. The combination of savory Ground Beef (or turkey, if you prefer!), a creamy, cheesy sauce that’s just perfectly seasoned, and those zesty Doritos on top? It’s a symphony of deliciousness. The chips don’t just get soggy; they create this amazing, slightly crispy layer that adds texture and a punch of flavor that you just can’t get from plain chips. Then there’s the SIMPLICITY. Honestly, this is a lifesaver on those nights when you’re exhausted and the last thing you want to do is spend hours in the kitchen. Most of the ingredients are pantry staples, and the prep work is minimal. You can have this in the oven in under 20 minutes, which is a huge win in my book. It’s also incredibly COST-EFFECTIVE. With budget-friendly ground meat, some basic pantry staples, and a bag of Doritos, you’re feeding a crowd for very little. What I love most is its VERSATILITY. While the classic version is amazing, you can easily swap out ingredients to suit your taste or what you have on hand. It’s a forgiving recipe, which is always a plus! It’s not just a meal; it’s a happy memory waiting to happen, perfect for a casual family dinner, a potluck, or even a game-day spread.
How do I make Doritos Casserole?
Quick Overview
This Doritos casserole is all about layers of flavor and texture, coming together for a truly satisfying meal. We’ll start by browning some seasoned ground meat, then whip up a quick, creamy cheese sauce. The magic happens when we layer everything with crushed Doritos, creating that signature crunchy topping that bakes up beautifully. It’s incredibly straightforward, making it perfect for even beginner cooks. The whole process, from start to finish, is designed to be as easy and enjoyable as possible, proving that delicious, comforting meals don’t need to be complicated.
Ingredients
For the Main Batter:
1 pound Ground Beef (80/20 is my preference for flavor)
1 medium onion, finely chopped
2 cloves garlic, minced
1 teaspoon chili powder
1/2 teaspoon cumin
1/4 teaspoon smoked paprika
Salt and freshly ground black pepper to taste
1 (15 ounce) can diced tomatoes, undrained
For the Creamy Cheese Sauce:
2 tablespoons butter
2 tablespoons all-purpose flour
1.5 cups milk (whole milk gives the best creaminess, but 2% works too!)
1 cup shredded cheddar cheese
1/2 cup shredded Monterey Jack cheese
1/4 teaspoon salt
1/8 teaspoon black pepper
For the Doritos Topping:
1 (10 ounce) bag Nacho Cheese Doritos, lightly crushed
1/2 cup shredded cheddar cheese (optional, for extra cheesiness)
Step-by-Step Instructions
Step 1: Preheat & Prep Pan
First things first, let’s get that oven ready. Preheat it to 375°F (190°C). While the oven is heating up, grab a 9×13 inch baking dish. A quick spray of cooking spray or a light greasing with butter will make sure nothing sticks, and nobody wants stuck-on bits when they’re trying to enjoy this cheesy goodness!
Step 2: Mix Dry Ingredients
In a large skillet over medium-high heat, add your Ground Beef and chopped onion. Cook, breaking up the meat with a spoon, until the beef is browned and the onion is softened. Drain off any excess grease – I usually tilt the pan and use a paper towel for this. Stir in the minced garlic, chili powder, cumin, smoked paprika, salt, and pepper. Cook for another minute until fragrant. This step is crucial for building that savory base flavor, so don’t rush it!
Step 3: Mix Wet Ingredients
Now for the luscious cheese sauce. In a medium saucepan, melt the butter over medium heat. Whisk in the flour and cook for about 1 minute, whisking constantly, until it forms a smooth paste (this is called a roux, and it’s what makes our sauce thick and creamy). Gradually whisk in the milk, a little at a time, making sure to get rid of any lumps. Continue to cook, whisking often, until the sauce thickens and coats the back of a spoon. This usually takes about 5-7 minutes. Remove from heat and stir in the shredded cheddar and Monterey Jack cheeses, salt, and pepper until the cheese is completely melted and the sauce is smooth and velvety. Taste it and adjust seasoning if needed; it should be wonderfully cheesy and comforting.
Step 4: Combine
Add the can of undrained diced tomatoes to the skillet with the seasoned meat. Stir everything together to combine. You want just enough liquid to moisten everything without making it soupy. If it seems a little dry, a tablespoon or two of water or broth can help. Give it a good stir to make sure all those delicious spices are distributed evenly. This mixture is going to be the savory heart of our casserole.
Step 5: Prepare Filling
Now, we bring the two main components together. Pour about half of the creamy cheese sauce over the meat and tomato mixture in the skillet. Stir gently until everything is well combined and the meat is coated in that luscious sauce. This ensures every bite of the meaty filling is infused with cheesy goodness. It should look wonderfully rich and inviting.
Step 6: Layer & Swirl
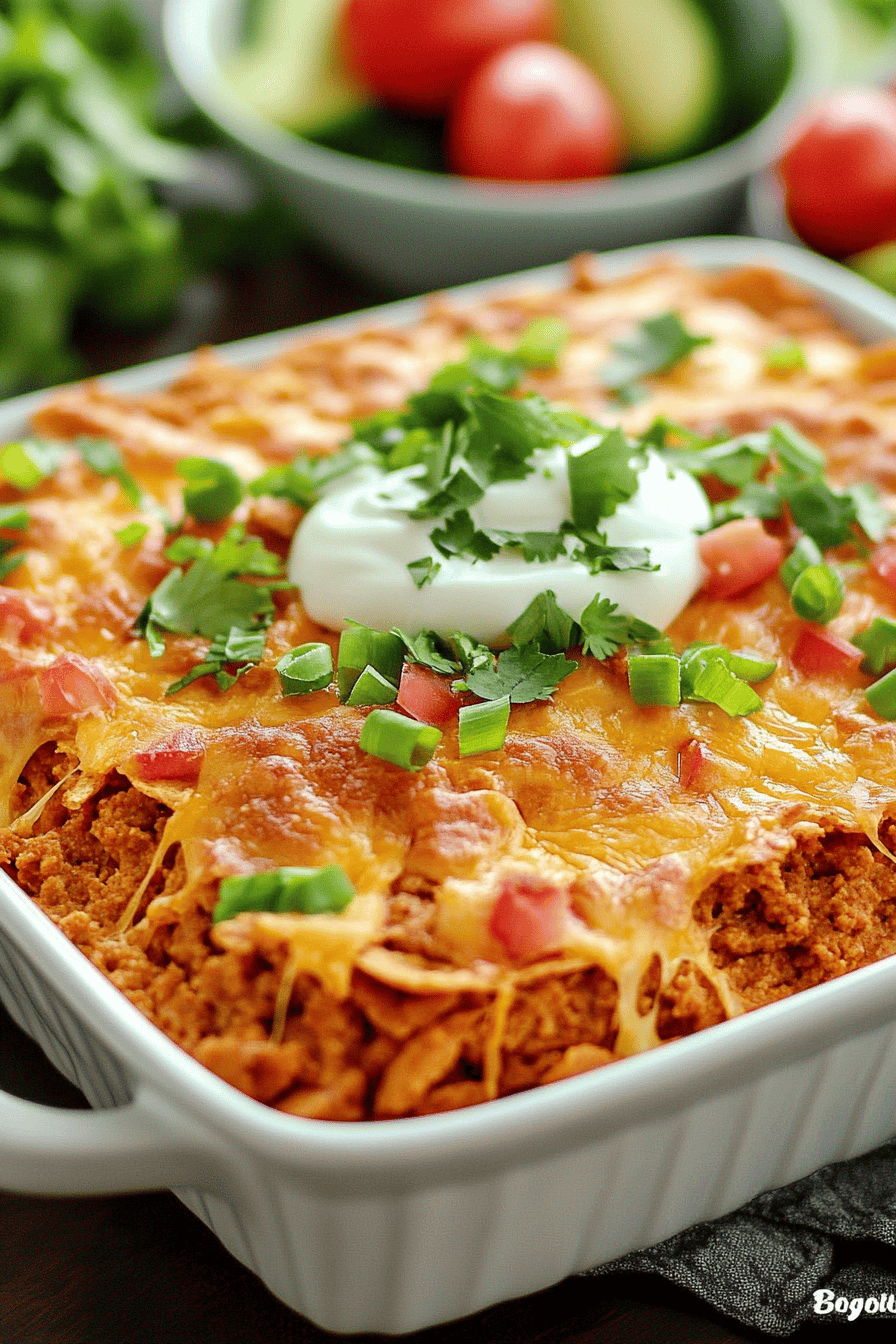
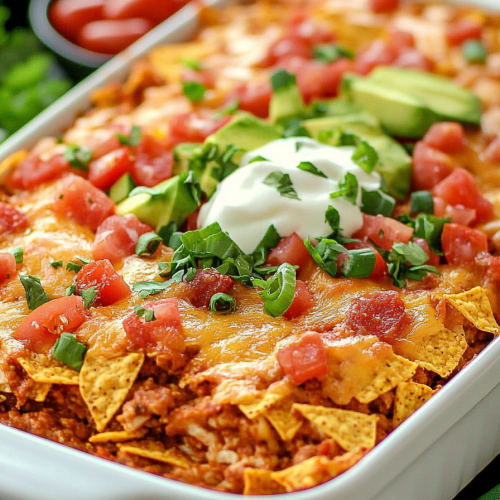
Pour the meat and sauce mixture into your prepared baking dish, spreading it evenly. Now for the fun part: pour the remaining cheese sauce over the meat layer, spreading it out to cover the top. Finally, sprinkle the crushed Doritos evenly over the top of the cheese sauce. If you’re feeling extra cheesy, go ahead and sprinkle that extra 1/2 cup of cheddar cheese over the Doritos. This is what gives the casserole its signature crunch and flavor!
Step 7: Bake
Pop that beautiful dish into your preheated oven. Bake for 20-25 minutes, or until the casserole is hot, bubbly around the edges, and the Doritos topping is lightly golden and toasted. Keep an eye on it towards the end; you don’t want those delicious chips to burn! The aroma filling your kitchen at this point is absolutely divine – it’s the smell of pure comfort.
Step 8: Cool & Glaze
Once it’s out of the oven, let the Doritos casserole rest for about 5-10 minutes. This is important! It allows the cheese sauce to set up a bit, making it easier to slice and serve. If you added the optional extra cheese on top of the Doritos, this is when it will have nicely melted and become gooey. Don’t skip this resting period, or you might end up with a delicious mess on your hands (though, let’s be honest, a delicious mess isn’t the worst thing).
Step 9: Slice & Serve
Now for the best part! Slice the Doritos casserole into generous squares using a sharp knife. Serve it hot, scooping out those wonderfully layered portions. The contrast between the creamy filling and the crunchy, cheesy topping is just divine. It’s a meal that’s as visually appealing as it is delicious, promising pure satisfaction with every forkful. Enjoy the ooey-gooey, crunchy, savory goodness!
What to Serve It With
This Doritos casserole is hearty and filling on its own, but if you’re looking to round out the meal or serve it for a special occasion, I’ve got some ideas! For a casual BREAKFAST, believe it or not, a small slice is surprisingly good! I love to pair it with a strong cup of coffee and maybe a side of fresh fruit to balance out the richness. For a more elegant BRUNCH spread, I’d serve smaller portions alongside a fresh green salad with a light vinaigrette. A mimosa or a sparkling cider would be perfect too. As a satisfying DESSERT (yes, really, some people love it this way!), I’d serve a small square after a lighter meal. The savory, cheesy notes can be surprisingly satisfying as a post-dinner treat, especially with that crunchy Doritos topping. For COZY SNACKS, this is unbeatable. Serve it up in small bowls with some extra napkins. It’s perfect for movie nights or game days. I’ve also found that a dollop of sour cream or a spoonful of salsa on top can add an extra layer of deliciousness, making it perfect for any time of day.
Top Tips for Perfecting Your Doritos Casserole
I’ve made this Doritos casserole countless times, and over the years, I’ve picked up a few tricks that really elevate it. For the Ground Beef prep, I always make sure to drain the grease thoroughly. A greasy casserole just isn’t as enjoyable, so a good drain is key. Also, don’t be afraid to really break up the meat into small pieces; it makes for a better texture in the final dish. When it comes to MIXING ADVICE for the cheese sauce, whisking constantly is your best friend. This prevents lumps and ensures a super smooth, creamy sauce. If you do get a few lumps, don’t panic; you can sometimes whisk them out over low heat, or even give it a quick blend with an immersion blender if you’re really bothered. For the DORITOS TOPPING, I like to crush them by hand or put them in a zip-top bag and gently roll over them with a rolling pin. You want some good-sized pieces for crunch, not just dust. Don’t crush them too fine! My favorite part is the SWIRL CUSTOMIZATION – while I usually use Nacho Cheese Doritos, feel free to experiment with other flavors like Cool Ranch or even Flamin’ Hot for a different kick! For my INGREDIENT SWAPS, if you don’t have cheddar and Monterey Jack, a good sharp cheddar and a Colby Jack blend works beautifully. You can also use ground turkey or even a plant-based crumble for the meat. For BAKING TIPS, remember that ovens vary. Keep an eye on your casserole, especially towards the end of baking. If the topping is browning too quickly, you can loosely tent it with foil. And for GLAZE VARIATIONS, while the cheesy sauce is traditional, some people like to add a layer of mild salsa before the meat, or even a dollop of sour cream on top right before serving for extra tang. Trust me on this one: the crushed Doritos are non-negotiable for the authentic experience!
Storing and Reheating Tips
This Doritos casserole is fantastic for leftovers, which is a huge plus in my busy household! If you have any that is, which is rare! For ROOM TEMPERATURE storage, it’s best to let it cool completely before covering. Once cooled, you can leave it at room temperature for a maximum of two hours. Honestly, though, I always aim to get leftovers into the fridge much sooner. For REFRIGERATOR STORAGE, once cooled, transfer the casserole to an airtight container or cover the baking dish tightly with plastic wrap and then foil. It will stay good in the fridge for about 3-4 days. The texture might change slightly after a day or two, with the Doritos becoming a bit softer, but it’s still incredibly delicious. FREEZER INSTRUCTIONS are also a lifesaver! Let the casserole cool completely, then portion it into freezer-safe containers or wrap individual servings tightly in plastic wrap followed by aluminum foil. It can be frozen for up to 2-3 months. When you’re ready to reheat, the best way to thaw is to move it from the freezer to the refrigerator overnight. Then, you can reheat it in the oven at around 350°F (175°C) until heated through, usually 20-30 minutes. If you’re reheating individual portions, the microwave is a quick option, but be aware the Doritos might lose some of their crunch. For GLOSS TIMING ADVICE, if you know you’ll be storing leftovers, it’s sometimes best to add the Doritos topping just before reheating if you want to preserve maximum crunch. However, I usually add them before baking, and they are still delightful even after a reheat.
Frequently Asked Questions
Final Thoughts
So there you have it – my absolute favorite Doritos casserole recipe! This dish is so much more than just a quick meal; it’s a testament to how simple ingredients and a little bit of love can create something truly spectacular. It’s the kind of recipe that brings people together, sparks joy, and always, always satisfies. Whether you’re a seasoned cook or just starting out, you can nail this one and impress everyone around your table. I truly believe this Doritos casserole recipe is a winner because it hits all the right notes: flavor, ease, and pure comfort. Give it a try the next time you need a guaranteed hit, and I can almost guarantee it’ll become a favorite in your home too. I’d absolutely love to hear how it turns out for you, so please leave a comment below with your thoughts or any fun variations you try! And if you loved this, you might also enjoy my Cheesy Taco Pasta Bake or my Sheet Pan Chicken Fajitas for more easy weeknight inspiration. Happy baking (or should I say, happy assembling)!
Doritos Casserole Recipe
Ingredients
Main Ingredients
- 1 bag Doritos Nacho Cheese flavor, crushed
- 1 pound ground beef
- 1 can diced tomatoes undrained, 14.5 oz
- 1 can black beans rinsed and drained, 15 oz
- 1 cup shredded cheddar cheese
- 0.5 cup sour cream
- 1 packet taco seasoning
Instructions
Preparation Steps
- Preheat your oven to 375°F (190°C).
- In a large skillet, brown the ground beef over medium heat. Drain off any excess grease.
- Stir in the diced tomatoes (undrained), rinsed black beans, and taco seasoning. Cook for 5 minutes, stirring occasionally.
- In a separate bowl, combine the crushed Doritos, shredded cheddar cheese, and sour cream. Mix well.
- Spread half of the Doritos mixture into the bottom of a 9x13 inch baking dish.
- Spoon the beef mixture evenly over the Doritos layer.
- Top with the remaining Doritos mixture.
- Bake for 20-25 minutes, or until heated through and the cheese is melted and bubbly.
- Let stand for a few minutes before serving.