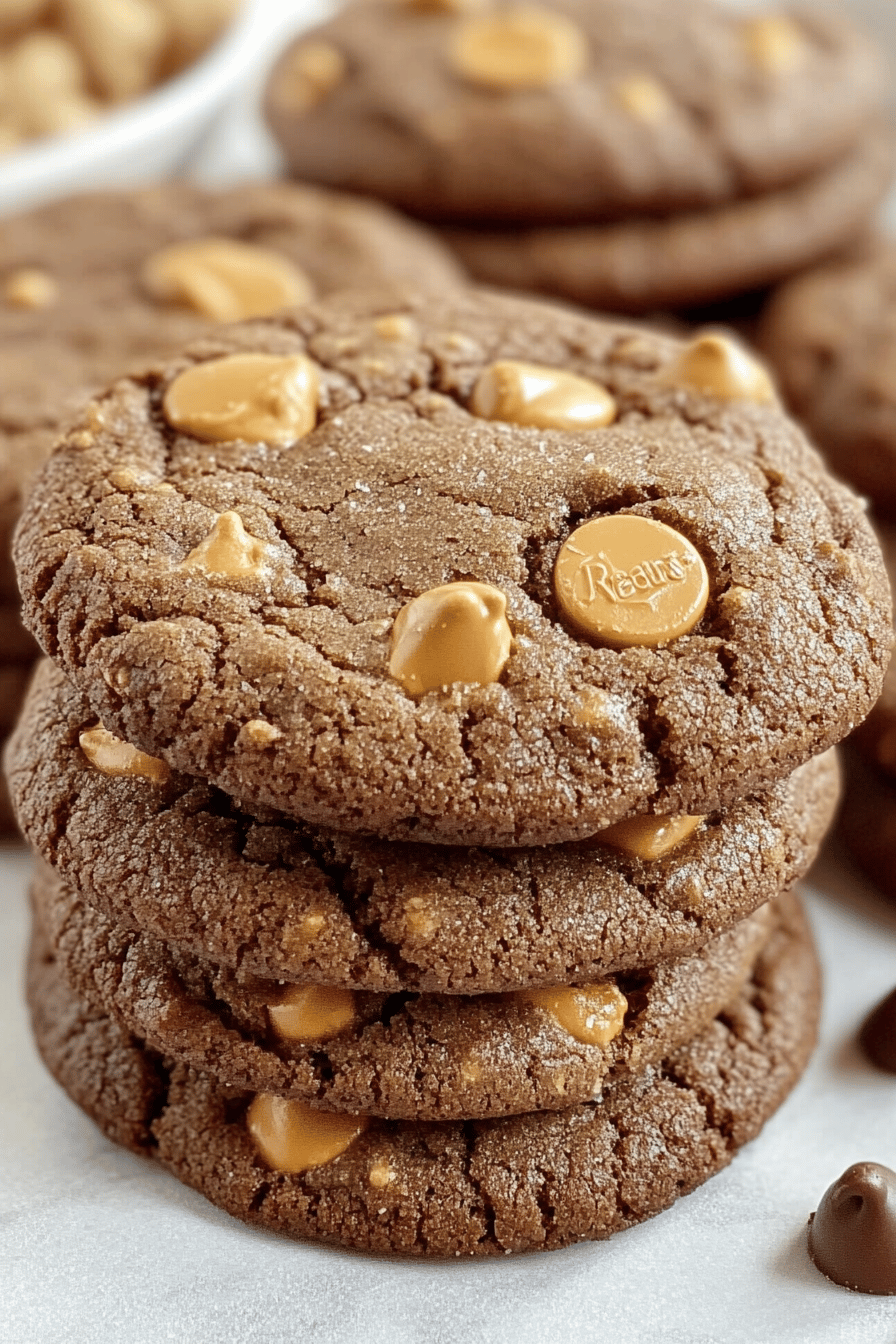
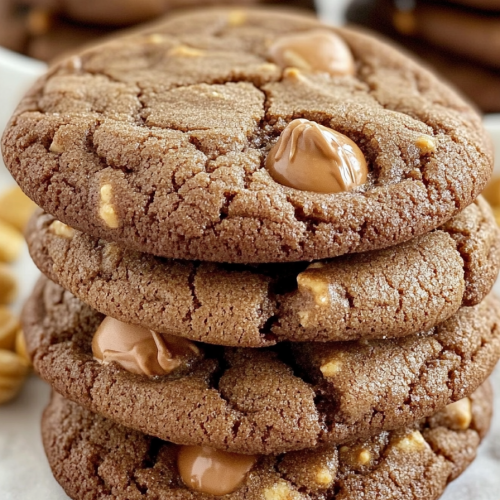
Oh, where do I even begin with these Chocolate Reese’s Cookies? This recipe is pure magic in cookie form. It’s the kind of cookie that makes you close your eyes and just savor every single bite. I remember the first time I made these; it was for a neighborhood potluck, and I was a little nervous because I wanted to bring something truly special. Well, let me tell you, these cookies were a runaway hit! People were practically lining up for seconds, and I swear I saw a few people trying to discreetly sneak another one into their purse. They have that perfect balance of rich chocolate and that unmistakable, delightful peanut butter flavor that only Reese’s can deliver. If you’ve ever loved a classic chocolate chip cookie but craved something with a little more oomph, a little more decadence, then these Chocolate Reese’s Cookies are your new best friend. They’re seriously in a league of their own, way beyond your average cookie dough.
What is Chocolate Reese’s Cookies?
So, what exactly are these delightful concoctions? Think of them as the ultimate mashup of your favorite cookie textures and your most cherished candy bar. At their core, they’re a deeply chocolaty cookie dough, loaded with even more chocolate chips. But the real stars of the show are the chopped-up Reese’s Peanut Butter Cups that get mixed right into the batter. When they bake, they create these gooey pockets of peanut butter heaven that melt into the chocolate cookie. It’s not just a cookie with peanut butter *on* it; it’s a cookie where the peanut butter and chocolate are completely integrated, singing in harmony. The name itself, “Chocolate Reese’s Cookies,” pretty much tells the whole delicious story, but it doesn’t quite capture the sheer joy they bring. They’re essentially a baked dream for anyone who believes that chocolate and peanut butter are the perfect pairing, which, let’s be honest, is most of us!
Why you’ll love this recipe?
There are so many reasons why this particular Chocolate Reese’s Cookies recipe has become a staple in my kitchen, and I just know you’re going to fall in love with it too. First off, the flavor is just out of this world. It’s not just sweet; it’s that complex, satisfying sweetness that comes from good quality cocoa and the creamy, salty goodness of Peanut Butter. Every bite is a little adventure, with soft, chewy cookie and those irresistible molten bits of Reese’s. And the texture! Oh, the texture is divine. They’re perfectly soft and chewy in the middle, with just the slightest crisp around the edges. It’s that classic cookie texture that everyone raves about.
What I also love is how surprisingly simple it is to make these. Even if you’re not a seasoned baker, you can totally nail this recipe. The steps are straightforward, and I’ve refined them over the years to be as foolproof as possible. You don’t need any fancy equipment, just your trusty bowls, a whisk, and a baking sheet. Plus, they’re incredibly cost-effective, especially if you can grab Reese’s cups when they’re on sale! They make a huge batch, so you get a lot of bang for your buck. And the versatility! While they’re phenomenal on their own, I’ve also drizzled them with extra chocolate or served them warm with a scoop of vanilla Ice Cream. They’re perfect for bake sales, birthday parties, or just because you need a little pick-me-up after a long day. Honestly, what truly sets these Chocolate Reese’s Cookies apart for me is the pure comfort they bring. They remind me of simpler times, of sharing treats with family and friends, and that’s a feeling you just can’t get from any other cookie.
How do I make chocolate Reese’s cookies?
Quick Overview
Making these decadent Chocolate Reese’s Cookies is wonderfully straightforward. You’ll cream butter and sugars, add eggs and vanilla, then mix in your dry ingredients until just combined. The magic happens when you fold in your chocolate chips and chopped Reese’s cups. Scoop them onto a baking sheet and bake until they’re gloriously puffed and slightly set. The aroma that fills your kitchen during baking is just unbelievable! This method ensures a soft, chewy center and slightly crisp edges, which is exactly what you want in a cookie. It’s designed to be a no-fuss recipe that delivers maximum flavor and satisfaction, making it a lifesaver on busy weeknights or when unexpected guests drop by.
Ingredients
For the Main Batter:
Butter: I always use unsalted butter, softened to room temperature. It’s crucial for creaming properly with the sugars. Make sure it’s not melted, or your cookies will spread too much!
Sugars: A mix of granulated sugar and packed light brown sugar is key here. The granulated sugar helps with crispness around the edges, while the brown sugar contributes to that wonderfully chewy texture and adds a hint of caramel-like flavor.
Eggs: Two large eggs, at room temperature. They bind everything together and add richness. I’ve tried it with one egg and an extra yolk, and it’s good, but two whole eggs give it that perfect structure.
Vanilla Extract: Pure vanilla extract is a must. It enhances all the other flavors, especially the chocolate and Peanut Butter.
All-Purpose Flour: I usually use all-purpose flour. Make sure to measure it correctly by spooning it into the measuring cup and leveling it off, rather than scooping directly from the bag, which can pack it too tightly.
Unsweetened Cocoa Powder: Use good quality unsweetened cocoa powder. This is what gives our cookies that deep, rich chocolate flavor. Dutch-processed cocoa will give a darker color and a smoother flavor profile if you have it.
Baking Soda: This is what helps the cookies rise and spread just enough.
Salt: A little salt is essential to balance the sweetness and enhance the chocolate and peanut butter flavors. Don’t skip it!
Chocolate Chips: I love using a mix of semi-sweet and milk chocolate chips for extra depth of flavor. You can use all of one kind if you prefer, or even dark chocolate chips for a more intense taste.
Reese’s Peanut Butter Cups: This is where the magic happens! I usually chop up about 10-12 regular-sized Reese’s Peanut Butter Cups. Chop them into small pieces so they distribute evenly throughout the cookie. Using them frozen makes them easier to chop neatly!
For the Glaze (Optional, but highly recommended!):
Powdered Sugar: For a smooth, sweet glaze.
Cocoa Powder: A little bit to make it a chocolate glaze.
Milk or Cream: To thin the glaze to the perfect drizzling consistency. You can also use a bit of water if that’s all you have.
Pinch of Salt: To balance the sweetness.
Step-by-Step Instructions
Step 1: Preheat & Prep Pan
First things first, let’s get our oven preheated to 375 degrees Fahrenheit (190 degrees Celsius). This temperature is just right for getting that perfect cookie texture – chewy inside, slightly crisp outside. While the oven is heating up, grab your baking sheets and line them with parchment paper or silicone baking mats. This is my secret weapon for easy cleanup and ensures the cookies don’t stick. Trust me, parchment paper is a game-changer.
Step 2: Mix Dry Ingredients
In a medium-sized bowl, whisk together your all-purpose flour, unsweetened cocoa powder, baking soda, and salt. Whisking them well ensures that the leavening agent and salt are evenly distributed throughout the dry ingredients. This step is super important for consistent cookies. You want to make sure there are no lumps of cocoa powder and that everything is nicely blended. I usually give it a good minute or two of whisking.
Step 3: Mix Wet Ingredients
In a large mixing bowl, cream together your softened butter and both sugars (granulated and brown sugar) until they are light and fluffy. This usually takes about 3-5 minutes with an electric mixer, or a bit longer if you’re doing it by hand (good arm workout!). This creaming process incorporates air, which helps make your cookies tender. Then, beat in your eggs one at a time, making sure to scrape down the sides of the bowl after each addition. Finally, stir in the vanilla extract. You should have a smooth, well-combined wet mixture.
Step 4: Combine
Now, it’s time to bring the wet and dry ingredients together. Gradually add the dry ingredients to the wet ingredients, mixing on low speed or by hand until just combined. Be careful not to overmix! Overmixing can develop the gluten too much, resulting in tough cookies. You’re looking for a dough that is just coming together, with no dry streaks of flour remaining. It should be thick and rich.
Step 5: Prepare Filling
This step is crucial for that Reese’s flavor explosion! If you haven’t already, chop your Reese’s Peanut Butter Cups into bite-sized pieces. I find it’s easiest to pop them in the freezer for about 15-20 minutes before chopping. This makes them firm and less likely to smudge into a gooey mess. You want chunks, not paste!
Step 6: Layer & Swirl
Gently fold in your chocolate chips and the chopped Reese’s Peanut Butter Cups into the cookie dough. Use a spatula or a wooden spoon for this. You want to distribute them evenly throughout the batter without overworking the dough. Some people like to reserve a few extra chocolate chips and Reese’s pieces to press onto the tops of the cookies before baking for an extra “wow” factor. That’s a great visual trick!
Step 7: Bake
Drop rounded tablespoons of dough onto your prepared baking sheets, leaving about 2 inches between each cookie because they will spread. For perfectly round cookies, you can gently roll the dough balls between your palms. Bake for 9-12 minutes, or until the edges are set and slightly golden, and the centers still look a little soft. They will continue to bake a bit on the hot baking sheet after you remove them from the oven. I always err on the side of slightly underbaking for maximum chewiness!
Step 8: Cool & Glaze
Let the cookies cool on the baking sheets for about 5 minutes before transferring them to a wire rack to cool completely. This is important; if you try to move them too soon, they might break. While the cookies are cooling, you can prepare the optional glaze. Whisk together powdered sugar, cocoa powder, a pinch of salt, and enough milk or cream to reach a drizzly consistency. Once the cookies are completely cool, drizzle the glaze over them using a spoon or a piping bag. Let the glaze set before serving.
Step 9: Slice & Serve
Once the glaze has set (or if you skipped the glaze!), your Chocolate Reese’s Cookies are ready to be devoured! They are absolutely fantastic served at room temperature. For an extra special treat, try warming one up slightly in the microwave for about 10-15 seconds – it makes the chocolate and peanut butter even gooier. These are perfect for sharing, but I won’t tell if you decide to keep them all to yourself!
What to Serve It With
These Chocolate Reese’s Cookies are pretty spectacular on their own, but they can certainly elevate a whole meal or snack time.
For Breakfast: While they’re a decadent treat, a single cookie alongside a steaming mug of coffee is a delightful way to start the day, especially on a weekend. They’re rich, so one is usually enough to satisfy your sweet tooth before tackling the day. I often pack one for my husband’s lunchbox as a sweet surprise.
For Brunch: Imagine these beauties on a brunch spread! They add a touch of indulgence without being overly formal. Arrange them artfully on a platter, perhaps with some fresh berries on the side to cut through the richness. They pair wonderfully with a glass of cold milk or even a mimosa for a more festive occasion.
As Dessert: This is where they truly shine. Serve them warm, straight from the oven (with that irresistible gooey center!), alongside a scoop of vanilla bean or chocolate ice cream. The contrast of warm cookie and cold ice cream is pure bliss. You can also serve them with a rich chocolate ganache or a dollop of whipped cream for an even more decadent experience.
For Cozy Snacks: On a rainy afternoon or a chilly evening, nothing beats a warm Chocolate Reese’s Cookie with a glass of milk. It’s pure comfort food. They’re also fantastic for movie nights or game days, easy to grab and enjoy while you’re focused on the fun. My kids absolutely adore these, and they’re my go-to when I need a quick, crowd-pleasing treat that feels extra special.
Top Tips for Perfecting Your Chocolate Reese’s Cookies
I’ve made these Chocolate Reese’s Cookies more times than I can count, and over the years, I’ve picked up a few tricks that I think make all the difference between a good cookie and a truly exceptional one.
Chocolate & Peanut Butter Balance: The key to amazing Reese’s cookies is getting the right ratio of chocolate cookie to peanut butter goodness. Make sure you’re chopping the Reese’s cups into reasonably small pieces so they get distributed well. If they’re too big, you’ll get pockets that are overwhelmingly peanut butter. Conversely, if they’re too small, you might lose that distinct Reese’s flavor. I find chopping them into quarters or halves of the cup pieces works best.
Don’t Overmix the Dough: This is probably the most important tip for any cookie recipe. Once you add the dry ingredients to the wet ingredients, mix only until they’re *just* combined. You shouldn’t see any dry flour streaks, but don’t keep mixing until it’s perfectly smooth. Overmixing develops the gluten in the flour, which will make your cookies tough and dense instead of soft and chewy. I often stop mixing when there are still a few tiny bits of flour visible and fold the rest in by hand.
Chill the Dough (Optional but Recommended): For even chewier cookies and to prevent excessive spreading, I sometimes chill the dough for at least 30 minutes, or even up to 2 days, before baking. This allows the flavors to meld and the flour to hydrate. When you bake chilled dough, the cookies tend to hold their shape a bit better and have a more intense flavor.
Baking Time is Crucial: Oven temperatures can vary, so getting the baking time just right is essential. You want to pull these cookies out when the edges are set and lightly golden, but the centers still look a little soft and slightly underbaked. They will continue to cook on the hot baking sheet as they cool. If you bake them until the center looks completely firm, you’ll end up with dry, crumbly cookies. My oven usually takes about 10-11 minutes, but yours might be slightly different. Keep an eye on them!
Ingredient Quality Matters: While this is a forgiving recipe, using good quality ingredients makes a difference. For the cocoa powder, a good unsweetened cocoa will give you a richer chocolate flavor. For the chocolate chips, I love using a combination of semi-sweet and milk chocolate for a more complex taste, but feel free to use your favorite. And of course, fresh Reese’s Peanut Butter Cups are non-negotiable!
The Glaze Technique: If you’re adding the glaze, make sure the cookies are completely cool first. If they’re warm, the glaze will just melt and become a sticky mess. For the glaze consistency, start with a little liquid and add more bit by bit until you get a smooth, drizzly texture. You want it thin enough to drizzle easily but thick enough not to run right off the cookies. I usually use a spoon to drizzle back and forth, but a piping bag with a small tip gives you more control for pretty lines.
Storing and Reheating Tips
One of the best things about these Chocolate Reese’s Cookies is how well they store, meaning you can enjoy their deliciousness for days!
Room Temperature Storage: Once completely cooled (and the glaze has set, if you used it), store the cookies in an airtight container at room temperature. They are best enjoyed within 3-4 days. If you’re worried about them drying out, you can place a slice of bread in the container with the cookies; it helps keep them moist. I find they’re still incredibly soft and chewy on day two and three.
Refrigerator Storage: While I rarely have leftovers that last long enough to need refrigerating, you *can* store them in the fridge if you live in a very warm climate or want them to last a bit longer. Store them in an airtight container for up to a week. The texture might become a bit firmer when cold, but they’ll still be delicious. Just let them come to room temperature for about 15-20 minutes before eating.
Freezer Instructions: These cookies freeze beautifully! You can freeze baked cookies or even balls of dough. For baked cookies, make sure they are completely cool. Wrap them individually in plastic wrap, then place them in a freezer-safe bag or container. They’ll stay fresh in the freezer for up to 3 months. To thaw, simply unwrap them and let them come to room temperature. If you want to freeze the dough, scoop balls of dough onto a parchment-lined baking sheet, freeze until firm, then transfer to a freezer-safe bag. You can bake them directly from frozen, just add a few extra minutes to the baking time.
Glaze Timing Advice: If you plan to freeze cookies with glaze, I actually recommend glazing them *after* they’ve been thawed. Freezing and thawing can sometimes make the glaze a little sticky or less vibrant. So, bake, cool, freeze, thaw, and then glaze! If you’re storing them unfrozen and want to add glaze later, it’s best to do it right before serving to keep the glaze looking its freshest.
Frequently Asked Questions
Final Thoughts
So there you have it – my absolute go-to recipe for the most incredible Chocolate Reese’s Cookies. I really hope you give these a try. They’re more than just a cookie; they’re a little bite of pure happiness that always brings smiles. The way the rich chocolate cookie dough melds with those melty pockets of peanut butter from the Reese’s cups is just perfection. They’re proof that sometimes, the simplest combinations are the most magical. Whether you’re baking for a crowd, for a special occasion, or just for yourself because you deserve a treat (which you always do!), these cookies are a guaranteed win.
If you love these, you might also enjoy my other chocolatey creations or my recipes featuring peanut butter – they seem to be a running theme in my kitchen! Feel free to explore around my blog for more delicious inspiration. I can’t wait to hear what you think of these Chocolate Reese’s Cookies. If you make them, please leave a comment below and let me know how they turned out, or share your own special tips and variations! Happy baking, and enjoy every single scrumptious bite!
Chocolate Reese's Cookies
Ingredients
Main Ingredients
- 0.5 cup unsalted butter, softened
- 0.33 cup granulated sugar
- 0.33 cup packed brown sugar
- 1 large egg
- 1 teaspoon vanilla extract
- 1.5 cup all-purpose flour
- 0.5 cup unsweetened cocoa powder
- 0.5 teaspoon baking soda
- 0.25 teaspoon salt
- 1 cup Reese's Peanut Butter Cups, chopped
Instructions
Preparation Steps
- Preheat oven to 350°F (175°C). Line baking sheets with parchment paper.
- In a large bowl, cream together the softened butter, granulated sugar, and brown sugar until light and fluffy.
- Beat in the egg and vanilla extract until well combined.
- In a separate medium bowl, whisk together the flour, cocoa powder, baking soda, and salt.
- Gradually add the dry ingredients to the wet ingredients, mixing until just combined. Do not overmix.
- Gently fold in the chopped Reese's Peanut Butter Cups.
- Drop rounded tablespoons of dough onto the prepared baking sheets, about 2 inches apart.
- Bake for 9-11 minutes, or until the edges are set and the centers are still slightly soft.
- Let the cookies cool on the baking sheets for a few minutes before transferring them to a wire rack to cool completely.