You know those recipes that just feel like a warm hug on a plate? The ones that instantly transport you back to childhood, filled with the smell of baking and the promise of something utterly delicious? Well, for me, that’s exactly what these Chocolate Easter Birds Nests are. They’re not just a treat; they’re a memory. Every year, as soon as the daffodils start to peek out, my mind drifts to these little bundles of joy. They’re the perfect little sweet something to make spring feel truly official. Forget those complicated Easter cakes that take hours; these Chocolate Easter Birds Nests are the answer to all your sweet cravings without the fuss. They remind me a bit of a decadent chocolate muffin, but with a texture that’s somehow even more delightful, almost like a moist brownie meets a fluffy cake. If you’re looking for a showstopper that’s surprisingly simple, you’ve found it!

What are chocolate Easter birds nests?
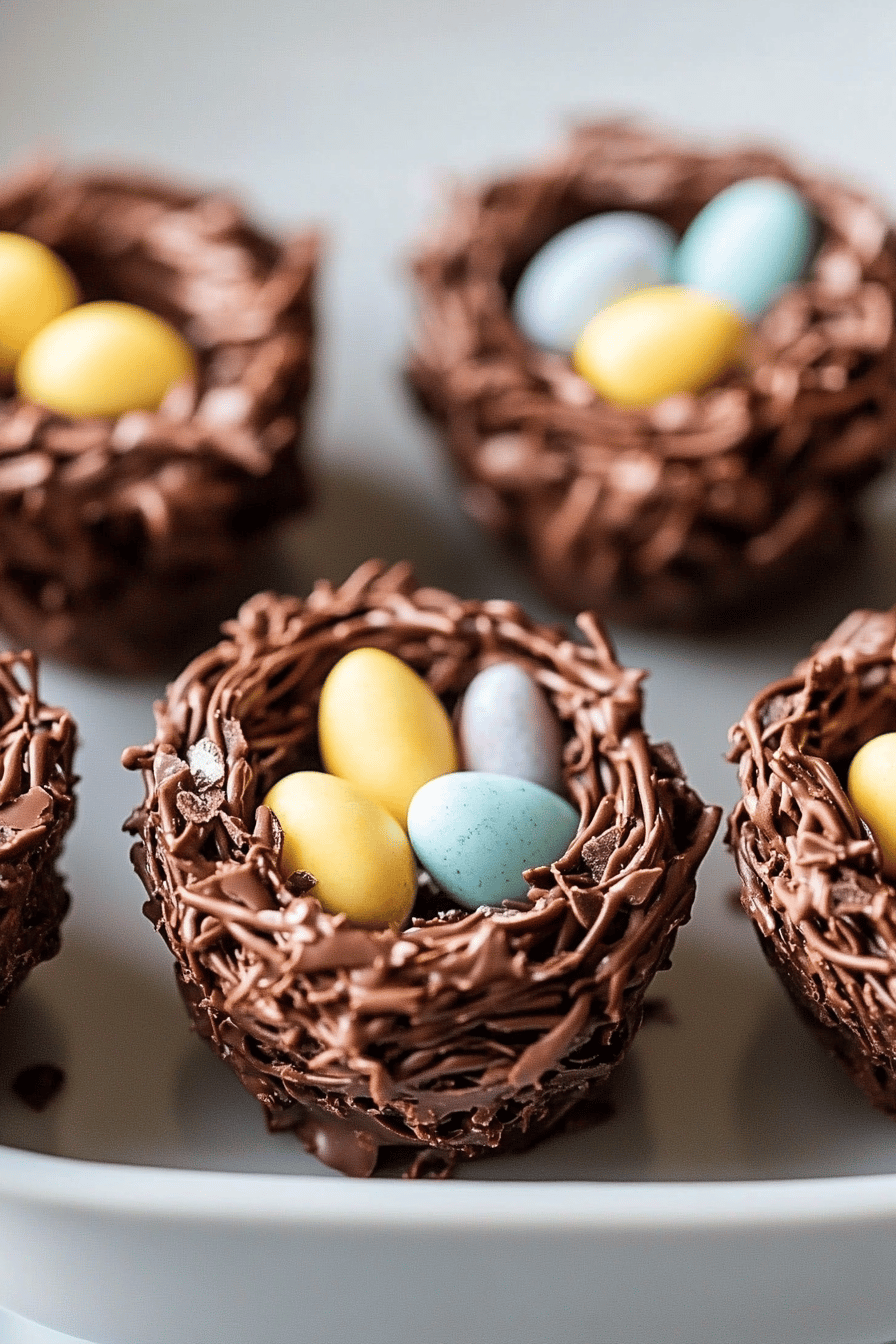
So, what exactly are these delightful little things called Chocolate Easter Birds Nests? Imagine a tender, moist chocolate cake base, but instead of being baked in a regular tin, it’s portioned into perfect little nests. They’re infused with rich chocolate flavor, and the magic happens when we add a swirl of something creamy and sweet right into the batter before baking. The name, of course, comes from their adorable shape once baked – they naturally form a little hollow in the center, just begging to be filled with a dollop of frosting or, as we often do for Easter, some colorful candy eggs. It’s essentially a super-charged, incredibly easy chocolate cupcake that looks like it came from a fancy bakery but tastes like pure homemade comfort. Think of it as a hug in a bite, perfect for sharing (or not, I won’t judge!).
Why you’ll love this recipe?
What are the reasons why this recipe has become a staple in my kitchen, especially around Easter?flavor is just out of this world. It’s intensely chocolatey without being overly sweet, and there’s this subtle richness that makes you want another one almost immediately. My kids actually beg for these! Then there’s the sheer simplicity. I’ve made these countless times, even when I’m exhausted after a long day, and they never fail. The batter comes together so quickly, and the baking is straightforward. What I love most about this recipe is how forgiving it is. If you’re a beginner baker, don’t worry, you can totally nail this. Another big win is how cost-efficientWhat are some of the best pantry staples that you can make yourself?versatility! You can dress these up or down so easily. For Easter, we love filling the little nests with mini chocolate eggs, but outside of the holiday, a simple dusting of powdered sugar or a drizzle of ganache works perfectly. It’s also a fantastic way to use up any ripe zucchini you might have lurking in your fridge – it adds moisture and a subtle tenderness without any hint of zucchini flavor, I promise! If you enjoyed my Fudgy Chocolate Brownies, you’ll adore the deep chocolate flavor here, but with a lighter, more cake-like texture.
How to Make Chocolate Easter Birds Nests
Quick Overview
This recipe is wonderfully straightforward, making it perfect for busy bakers. We’re essentially creating a rich chocolate batter, swirling in a sweet, creamy filling, and baking it into adorable nest shapes. The key is the moistness from a secret ingredient (shhh, it’s zucchini!) and the delightful swirl that bakes right in. You’ll mix your wet and dry ingredients separately, combine them gently, then swirl in the filling before baking. It’s a fuss-free process that yields incredibly impressive results. Trust me, you’ll be amazed at how easy it is to create these beautiful treats!
Ingredients
For the Main Batter:
You’ll need all-purpose flour for structure, unsweetened cocoa powder for that deep chocolate flavor (Dutch-processed is my favorite here for an extra dark color and milder taste), baking soda and baking powder for lift, and a pinch of salt to balance everything out. Granulated sugar provides sweetness, while brown sugar adds a touch of moisture and depth. And for the secret weapon? Finely grated zucchini! Don’t worry, you won’t taste it; it just makes these nests unbelievably moist and tender. You’ll also need eggs, some vegetable oil for richness (or melted unsalted butter, if you prefer), vanilla extract for that classic warm flavor, and buttermilk for a tender crumb. If you don’t have buttermilk, a little trick is to mix regular milk with a tablespoon of lemon juice or vinegar and let it sit for a few minutes – it works like a charm!
For the Filling:
This is where the “nest” magic really happens. We’re making a simple, creamy filling that bakes into the chocolate batter. It’s typically made with softened CREAM CHEESE or mascarpone for a luxurious texture, a little powdered sugar for sweetness, and perhaps a splash of vanilla or even a hint of espresso powder to complement the chocolate. You can even add a bit of lemon zest if you like a brighter note. The key is to get it smooth and slightly thick so it holds its shape when swirled.
For the Glaze:
While optional, a simple glaze takes these nests to the next level. A basic combination of powdered sugar and a liquid like milk, lemon juice, or even some strong coffee works beautifully. You can adjust the liquid to get your desired consistency – a thicker glaze for more control, or a thinner one that drips enticingly. Sometimes, I’ll even whisk in a little melted chocolate for an extra decadent finish. For Easter, we often skip the glaze and just nestle some candy eggs right into the warm centers.

Step-by-Step Instructions
Step 1: Preheat & Prep Pan
First things first, get your oven preheating to 350°F (175°C). You’ll need a muffin tin for this. I like to use a standard 12-cup muffin tin. Now, for the crucial part: greasing and flouring. I’m telling you, don’t skip this! I usually use a non-stick baking spray or butter and flour each cup thoroughly. For extra insurance, you can also line your muffin tin with paper liners, but a well-greased tin is often enough to get them out cleanly. Make sure you get into all the little nooks and crannies of the tin so nothing sticks.
Step 2: Mix Dry Ingredients
In a large bowl, whisk together your all-purpose flour, unsweetened cocoa powder, baking soda, baking powder, and salt. Whisking them well ensures that the leavening agents and cocoa are evenly distributed, which means you’ll get a uniform rise and consistent chocolate flavor in every bite. You want to see a beautiful, uniform brown color without any streaks of flour or cocoa. This simple step is key to a light and airy texture.
Step 3: Mix Wet Ingredients
In a separate medium bowl, whisk together your granulated sugar and brown sugar. Then, add your eggs, one at a time, beating well after each addition. Stir in your vegetable oil (or melted butter), vanilla extract, and the buttermilk. If you’re using zucchini, make sure it’s finely grated and squeezed dry – you don’t want excess moisture. Add the grated zucchini to the wet ingredients and give it a good mix. The mixture should look well combined and have a lovely aroma.
Step 4: Combine
Now, it’s time to bring the wet and dry ingredients together. Pour the wet ingredients into the bowl with the dry ingredients. Use a spatula or wooden spoon to gently mix them until just combined. Be careful not to overmix! Overmixing develops the gluten in the flour, which can lead to tough nests. You should still see a few streaks of flour; that’s perfectly fine. The batter will be thick and rich.
Step 5: Prepare Filling
While your batter is resting for a moment, let’s get the filling ready. In a small bowl, combine your softened cream cheese (or mascarpone), powdered sugar, and vanilla extract. Use a whisk or a hand mixer on low speed to beat until smooth and creamy. You want a consistency that’s thick enough to hold its shape but still spreadable. If it seems too thick, add a tiny splash of milk; if too thin, a bit more powdered sugar.
Step 6: Layer & Swirl
This is the fun part! Spoon about half of the chocolate batter into your prepared muffin cups, filling them about halfway. Then, dollop a spoonful of the cream cheese filling into the center of each. Top with the remaining chocolate batter, again filling the cups about two-thirds to three-quarters full. Now, grab a toothpick or a thin knife and gently swirl the filling into the batter. Don’t over-swirl; you want distinct ribbons of filling peeking through. Create a little dip or indentation in the center of the batter in each cup to form your “nest” shape.
Step 7: Bake
Pop the muffin tin into your preheated oven. Bake for about 18-25 minutes, or until a wooden skewer or toothpick inserted into the center of a nest comes out clean (avoiding the swirl). The exact time will depend on your oven, so keep an eye on them after the 18-minute mark. You want them to be set and slightly puffed, with that beautiful nest indentation holding its shape.
Step 8: Cool & Glaze
Once baked, let the nests cool in the muffin tin for about 10-15 minutes. This is important! It allows them to firm up so they don’t fall apart when you remove them. After they’ve cooled a bit, carefully remove them from the tin and place them on a wire rack to cool completely. If you’re using a glaze, now’s the time to prepare it. Whisk together powdered sugar with a little liquid until it reaches your desired drizzling consistency. Once the nests are completely cool, drizzle the glaze over the tops, letting it drip down the sides a bit. If you’re decorating for Easter, this is also when you’d gently press candy eggs into the centers of the slightly warm or glazed nests.
Step 9: Slice & Serve
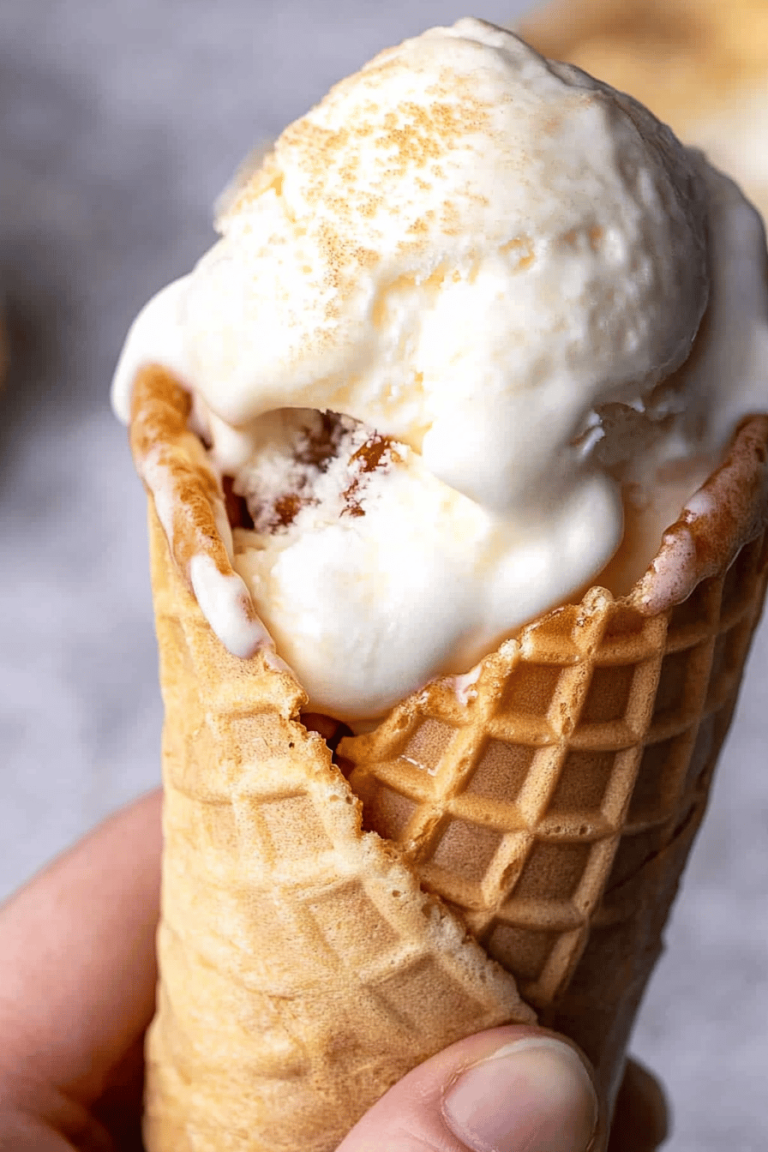
And there you have it! Your beautiful Chocolate Easter Birds Nests are ready to be devoured. They’re best served at room temperature. When you slice into one, you’ll see that gorgeous swirl of filling and the incredibly moist chocolate cake. They are perfect on their own, or with a dollop of whipped cream or a scoop of vanilla Ice Cream. For Easter, they are just picture-perfect with a few colorful candy eggs nestled in the middle. Enjoy every single bite!
What to Serve It With
These Chocolate Easter Birds Nests are so versatile, they truly fit into any part of your day! For a special breakfast, I love serving them alongside a steaming mug of good quality coffee or a freshly squeezed glass of orange juice. The rich chocolate is a wonderful contrast to the bright citrus. Their small, individual size makes them feel extra special. For brunch, they’re an absolute showstopper on a dessert platter. I often arrange them with fresh berries – raspberries and strawberries are fantastic with chocolate – and maybe a little bowl of whipped cream for dipping. A chilled mimosa or a sparkling rosé pairs beautifully with the sweetness. As a more formal dessert, I’ll serve a single nest with a small scoop of raspberry sorbet or a drizzle of warm chocolate ganache. It feels incredibly elegant. And for those moments when you just need a little something sweet and comforting, these are perfect for cozy snacks. Paired with a glass of cold milk or a cup of hot chocolate, they’re pure bliss. My family tradition is to have them on Easter morning, but honestly, they make any day feel a little more festive!
Top Tips for Perfecting Your Chocolate Easter Birds Nests
I’ve made these nests more times than I can count, and over the years, I’ve picked up a few tricks that I think make all the difference. First, when it comes to the zucchini prep, squeezing out as much moisture as possible is key. I usually grate my zucchini, then wrap it in a clean kitchen towel or cheesecloth and wring it out over the sink. This prevents the batter from becoming too wet, which can affect the final texture. For the mixing advice, remember that gentle is best. You’re looking for a batter that’s just combined, not overworked. A few little lumps are okay! It ensures a tender crumb. When it comes to swirl customization, don’t be afraid to get a little artistic! You can create simple loops or more intricate patterns. Just remember not to over-mix, or the colors will blend too much. For ingredient swaps, if you’re out of buttermilk, that milk-and-vinegar trick really does work. And if you don’t have cream cheese for the filling, softened butter mixed with a touch of powdered sugar and vanilla can be a decent substitute in a pinch, though the texture will be different. For baking tips, always trust your oven. Ovens can vary, so the toothpick test is your best friend. If your nests seem to be browning too quickly on top, you can loosely tent them with foil. And when it comes to glaze variations, think beyond just sugar and milk. A touch of espresso powder in the glaze enhances the chocolate flavor beautifully, or a little orange zest can add a lovely brightness. For the Easter version, press your candy eggs into the nests while they’re still warm enough for the glaze (or the batter itself) to slightly soften and hold them in place.
Storing and Reheating Tips
Storing these beauties is pretty straightforward, but a few things can help keep them at their best. If you’ve made them without glaze, they can be kept at room temperature in an airtight container for up to 2-3 days. They tend to stay wonderfully moist. If they’re glazed, it’s best to store them in the refrigerator, especially if the weather is warm, to prevent the glaze from getting sticky. They’ll keep well in the fridge for up to 4-5 days, though honestly, they’re usually gone long before then! If you want to get ahead, you can totally freeze these nests. Let them cool completely, then wrap them individually in plastic wrap, followed by a layer of foil or placing them in a freezer-safe container. They’ll keep for up to 2-3 months. When you’re ready to enjoy them, thaw them overnight in the refrigerator and let them come to room temperature before serving. If you’ve frozen them with candy eggs already in them, make sure they are well-wrapped to prevent freezer burn on the candy. I generally recommend adding glaze or candy eggs *after* thawing and bringing them back to room temperature, or just before serving.
Frequently Asked Questions
Final Thoughts
I truly hope you give these Chocolate Easter Birds Nests a try. They’re more than just a recipe; they’re a little slice of happiness that’s incredibly easy to make. The way they turn out so moist and rich, with that delightful swirl, always makes me so proud, and they disappear in a flash at my house. They’re the perfect balance of decadent and delightful, and I just know you’re going to love them. If you enjoy this recipe, you might also like my Lemon Blueberry Scones for a brighter, fruitier flavor, or my Classic Chocolate Chip Cookies for another reliable sweet treat. I can’t wait to hear how yours turn out! Let me know in the comments below if you’ve made them, what your favorite part is, or if you’ve added any fun twists of your own. Happy baking, everyone!
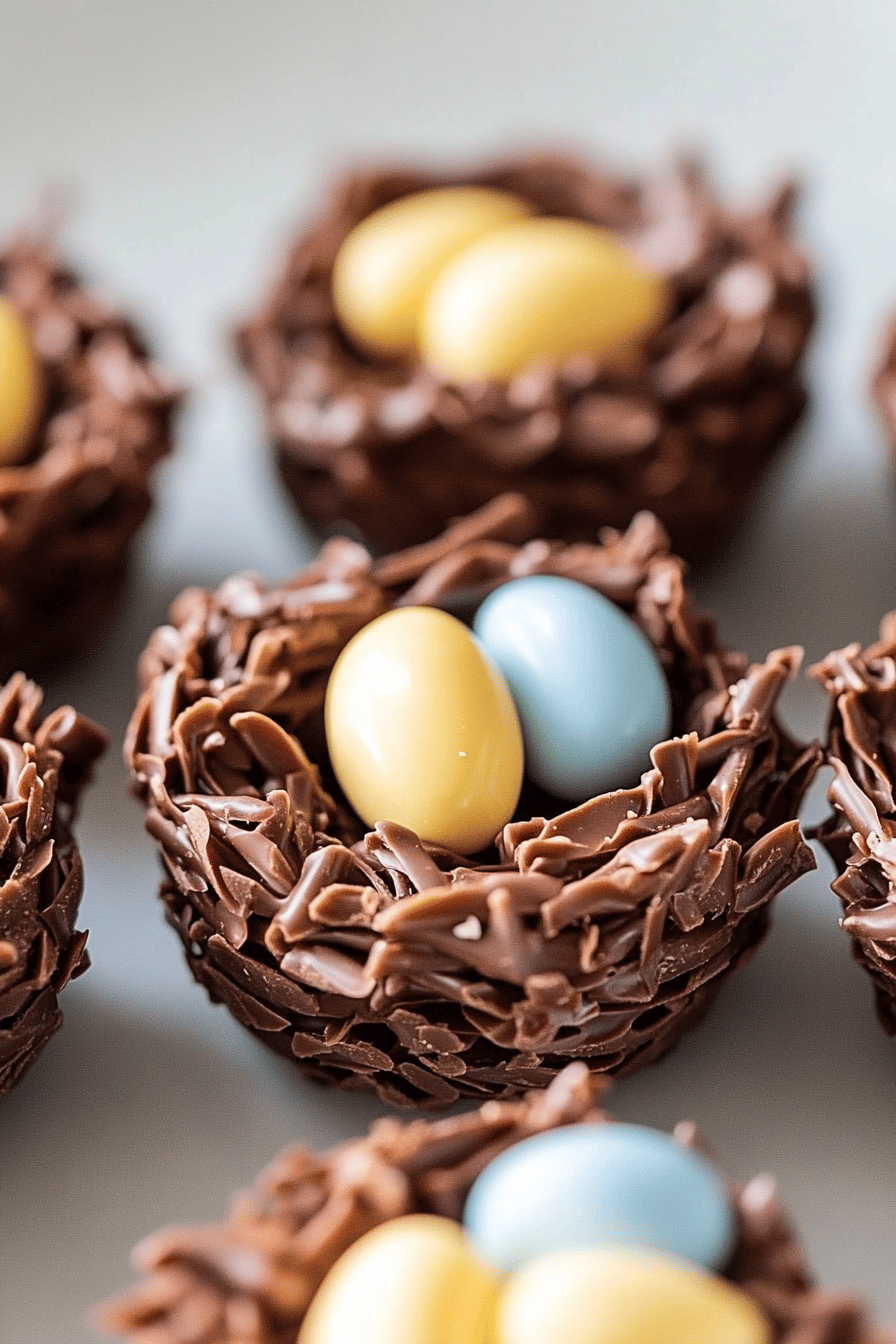

Chocolate Easter Birds Nests
Ingredients
Main Ingredients
- 113 g semisweet chocolate chips
- 50 g butter
- 4 cup chow mein noodles
- 1 cup miniature chocolate eggs
Instructions
Preparation Steps
- Line a baking sheet with parchment paper or wax paper.
- In a microwave-safe bowl, combine the semisweet chocolate chips and butter. Microwave in 30-second intervals, stirring in between, until smooth and melted.
- Add the chow mein noodles to the melted chocolate mixture and stir gently until the noodles are evenly coated.
- Using two forks or a spoon, drop clusters of the noodle mixture onto the prepared baking sheet, forming nest shapes.
- While the chocolate is still soft, gently press 2-3 miniature chocolate eggs into the center of each nest.
- Allow the nests to set at room temperature or in the refrigerator for about 15-20 minutes, until firm.