Oh, you guys! I’ve been itching to share this with you for ages. You know those days when you’re craving something sweet, maybe a little decadent, but the thought of turning on the oven feels like climbing Mount Everest? Yeah, me too. That’s where this magical chia seed pudding comes in. It’s become my absolute go-to, my secret weapon for satisfying those sweet tooth cravings without any fuss. Seriously, it’s so ridiculously easy and tastes like a million bucks, but it’s made with ingredients I practically always have on hand. Think of it as the healthy dessert cousin to a rich, creamy cheesecake or a decadent chocolate mousse, but without all the guilt or the long waiting time. I first stumbled upon chia seed pudding years ago, and honestly, the initial versions I tried were a bit… well, let’s just say they were more like edible slime than a treat. But through a lot of trial and error (and maybe a few too many gloppy batches), I’ve perfected a method that results in the most unbelievably creamy, flavorful chia seed pudding you can imagine. It’s a total game-changer, and once you try it, I promise you’ll be hooked too!
What is chia seed pudding?
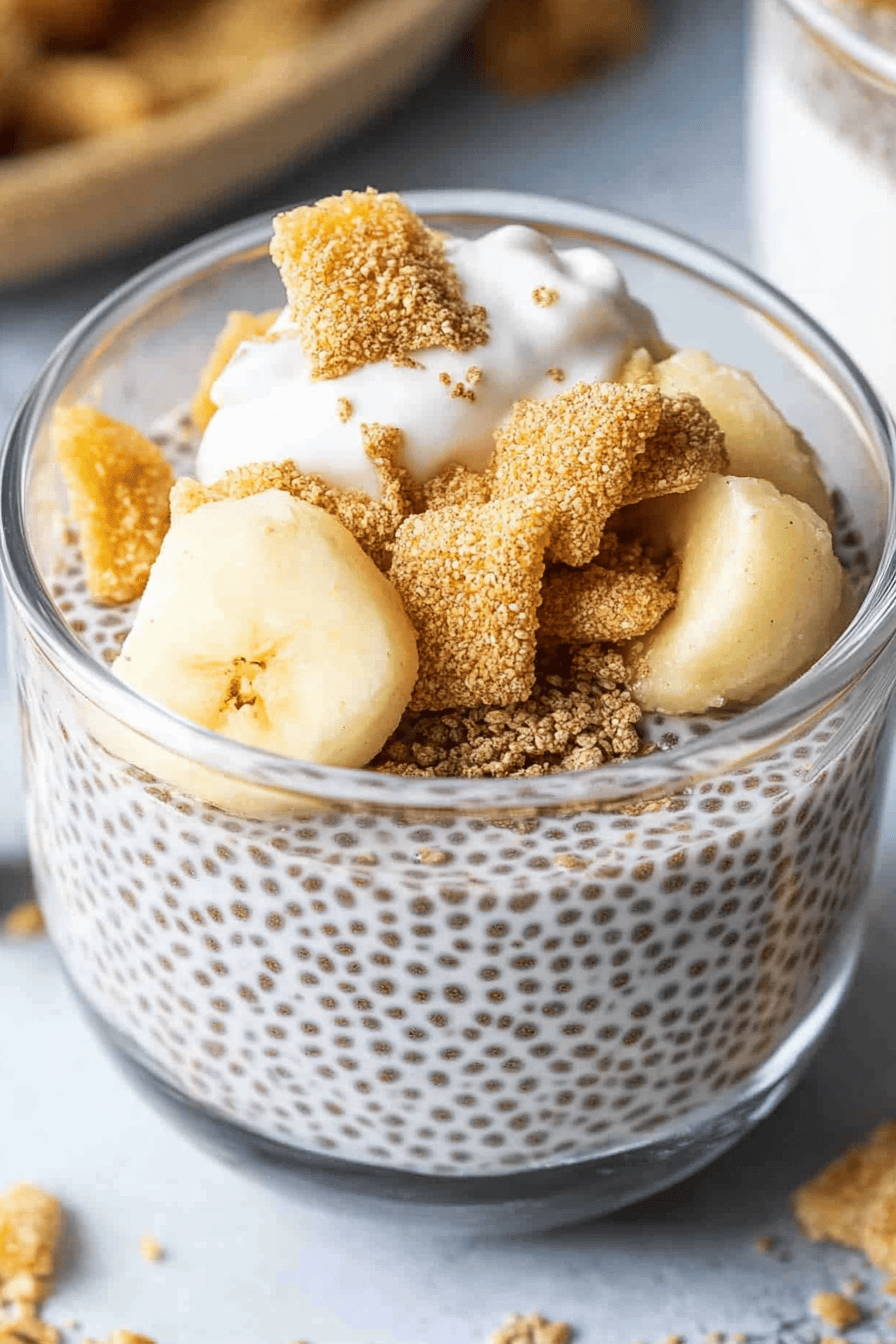
So, what exactly *is* this mystical concoction? At its heart, chia seed pudding is incredibly simple. It’s basically chia seeds that have been soaked in a liquid – usually milk of some kind – until they form a gelatinous, pudding-like consistency. The chia seeds themselves are tiny powerhouses, packed with fiber, protein, and omega-3 fatty acids. When they absorb liquid, they expand and create this wonderfully thick texture, almost like tapioca pudding but with a much smoother, more luxurious feel. The beauty of chia seed pudding is its blank canvas nature. You can jazz it up with pretty much any flavor you can dream of! It’s not just about health benefits; it’s about creating something genuinely delicious and satisfying. Think of it as your personal dessert laboratory where you get to play with flavors and textures to create your own perfect spoonful of bliss. It’s essentially nature’s way of making pudding, and frankly, it does a darn good job.
Why you’ll love this recipe?
There are so many reasons why this chia seed Pudding Recipe has earned a permanent spot in my recipe rotation, and I just know you’re going to fall in love with it too. First off, the flavor is just out of this world. I’ve tinkered with this recipe for ages, and the combination of creamy coconut milk, a hint of vanilla, and just the right amount of sweetness creates this wonderfully comforting taste that’s never too much. It’s sophisticated enough for guests but cozy enough for a quiet night in. Then there’s the sheer simplicity of it all. I mean, we’re talking about literally a few minutes of prep, and then you just let time do the work. It’s the ultimate lifesaver on those evenings when dinner is done, and you’re dreaming of something sweet but can’t fathom making anything complicated. Plus, it’s incredibly budget-friendly! Chia seeds are quite affordable, and using pantry staples like milk and a touch of sweetener means you can whip up a batch without breaking the bank. And let’s not forget its incredible versatility! I’ll talk more about this later, but you can customize it endlessly with different fruits, nuts, seeds, or even a swirl of chocolate or caramel. It’s perfect for breakfast, a satisfying snack, or a guilt-free dessert. What I love most about this particular recipe, though, is that it’s foolproof. Even if you’re not a seasoned baker or cook, you can’t mess this up. It’s forgiving, it’s quick, and the results are always stunningly delicious. It truly is a crowd-pleaser, and my kids have been asking for it non-stop lately!
How do I make Chia seed pudding?
Quick Overview
This chia seed pudding recipe is all about minimal effort for maximum reward. You’ll simply whisk together your ingredients in a bowl, let it sit for a bit to thicken, and then chill it until it’s perfectly spoonable. The key is giving it enough time in the fridge for those amazing chia seeds to work their magic. It’s the kind of recipe you can throw together before bed and wake up to a ready-made, delightful treat. It truly couldn’t be easier, and the results are consistently spectacular, so don’t stress about getting it “perfect” – it just happens!
Ingredients
For the main Pudding Base:
1/2 cup chia seeds: I always opt for organic, black chia seeds. They have a great texture and are readily available. Make sure they’re fresh; old seeds can sometimes lead to a less-than-ideal thickening.
2 cups full-fat coconut milk: This is my secret to achieving that ultimate creamy texture. You can use other milks like almond, cashew, or oat milk, but coconut milk truly takes it to the next level. I find it adds a subtle richness that’s divine. Make sure to shake the can well before measuring!
2 tablespoons maple syrup (or other liquid sweetener): Adjust this to your sweetness preference. Honey, agave, or even a sugar-free sweetener can work here. I like maple syrup for its caramel-like notes.
1 teaspoon vanilla extract: Don’t skip this! It really rounds out the flavors and adds a lovely warmth.
A pinch of salt: This might sound odd in a sweet dish, but it actually enhances all the other flavors and balances the sweetness beautifully. Trust me on this one!
For Optional Flavor Boosts (Get Creative!):
1 tablespoon unsweetened cocoa powder: For a chocolatey version!
1/4 teaspoon cinnamon: Adds a cozy warmth.
Zest of half a lemon or lime: For a bright, refreshing twist.
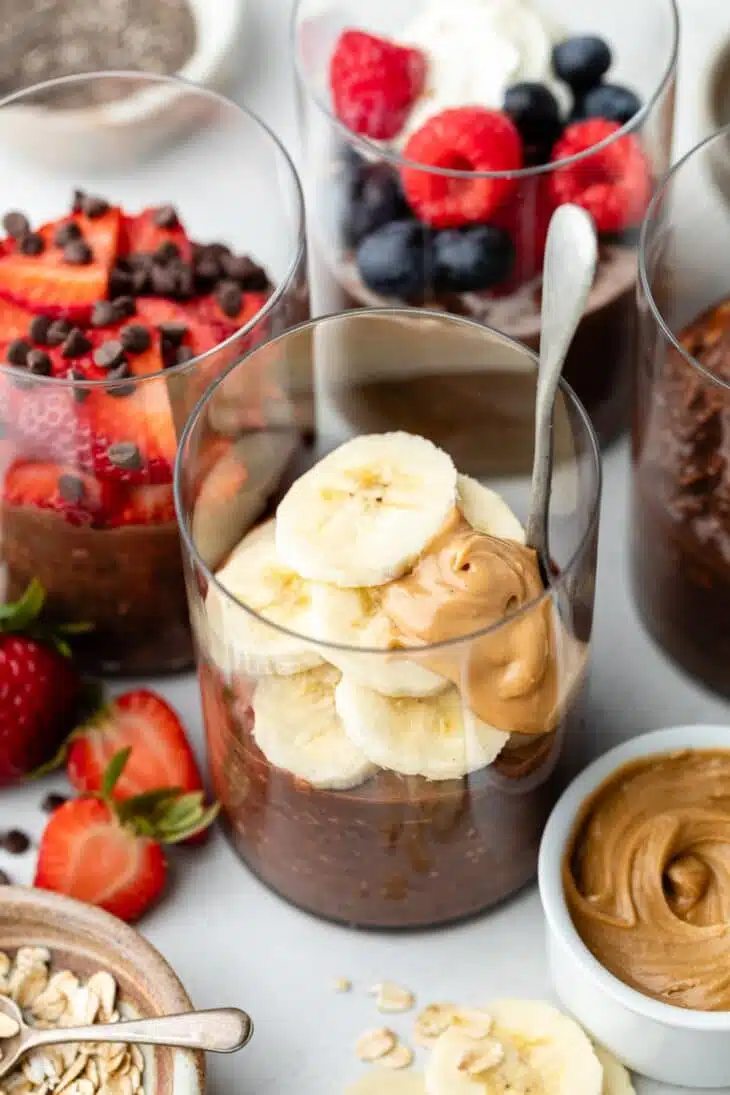
For Delicious Toppings (This is where the fun really begins!):
Fresh berries: Strawberries, blueberries, raspberries – they’re all fantastic.
Sliced banana: A classic pairing.
Toasted nuts or seeds: Almonds, walnuts, pumpkin seeds add a lovely crunch.
A dollop of yogurt: For extra creaminess.
A drizzle of nut butter: Peanut Butter, almond butter, or cashew butter.
Shredded coconut: For that tropical vibe.
Granola: For a bit of crunch and texture.
Step-by-Step Instructions
Step 1: Preheat & Prep Pan
Honestly, there’s no oven involved in making the base of this pudding, so no preheating needed! This is really the beauty of it. All you need is a medium-sized bowl or a large jar, and something to stir with – a whisk is ideal. Just make sure you have enough space to get a good stir in!
Step 2: Mix Dry Ingredients
In your bowl, combine the chia seeds, pinch of salt, and any optional dry flavor boosters you’re using, like cocoa powder or cinnamon. Give them a quick whisk together. This ensures everything is evenly distributed before you add the liquid, which helps prevent clumps from forming later on.
Step 3: Mix Wet Ingredients
Pour in your full-fat coconut milk (or your milk of choice), maple syrup, and vanilla extract. If you’re adding lemon or lime zest, now’s the time to stir it in. Make sure your sweetener is well incorporated into the liquid before you start whisking with the seeds.
Step 4: Combine
Now for the magic! Whisk everything together vigorously for about 30 seconds to a minute. You really want to make sure those chia seeds are well dispersed and not sticking together at the bottom of the bowl. This is the most crucial step for avoiding clumps. Keep whisking until it starts to slightly thicken. Once it looks evenly mixed and begins to gel just a tiny bit, you’re ready for the next step. Don’t worry if it’s still quite liquidy – it will thicken significantly as it sits!
Step 5: Prepare Filling
This step is actually integrated into Step 4 and Step 7. The “filling” in this context is the pudding itself, which you’ll eventually be topping. For flavor variations, you can stir in things like cocoa powder or cinnamon in Step 2, or even swirl in some fruit puree or nut butter after it has chilled a bit.
Step 6: Layer & Swirl
For the base pudding, there’s no layering involved in the initial mix. However, if you wanted to make a layered parfait, you would spoon some pudding into a glass, then add a layer of fruit or granola, and repeat. For swirling in flavors, once the pudding has chilled and thickened (after Step 7), you can gently swirl in some melted chocolate or fruit puree with a toothpick or skewer for a marbled effect.
Step 7: Bake
This is the best part: there’s no baking required! We’re going to let the pudding thicken and chill in the refrigerator instead. Once you’ve whisked everything together in Step 4, cover the bowl or jar tightly. You’ll then pop it into the refrigerator for at least 2-4 hours, or ideally, overnight. This resting period is essential for the chia seeds to absorb the liquid and create that perfect pudding texture.
Step 8: Cool & Glaze
The pudding is considered “cooled” and ready to eat once it has chilled in the refrigerator for the recommended time. There’s no glaze involved in this basic recipe, but if you were making a specific dessert, you might add a drizzle of something on top. The “glaze” is essentially whatever toppings you choose to add!
Step 9: Slice & Serve
You don’t slice chia seed pudding, but you absolutely scoop and serve! Once it’s chilled and thickened to your liking, grab a spoon and dig in. Spoon the pudding into individual bowls or glasses. This is your chance to get creative with toppings!
What to Serve It With
This chia seed pudding is so incredibly versatile, you can truly enjoy it anytime, anywhere. For breakfast, I love topping it with fresh berries – the tartness of the raspberries or blueberries is just divine against the creamy pudding. A sprinkle of chopped almonds adds a lovely crunch to start the day. Coffee is the ultimate companion, of course! If I’m feeling fancy for brunch, I’ll serve it in elegant parfait glasses, layering it with Greek yogurt and maybe some toasted coconut flakes. A little sprig of mint on top makes it look so chic. For dessert, oh boy, the possibilities are endless! A drizzle of warm, homemade chocolate sauce is pure indulgence, or a spoonful of whipped cream and a few dark chocolate shavings takes it to another level. Sometimes, if I’m craving something sweet at 10 pm but don’t want to bake a whole cake, I’ll just grab a bowl, maybe add a few dark chocolate chips, and call it a night. It’s surprisingly satisfying and feels so much healthier than a traditional dessert. For cozy snacks, I often just throw some sliced banana and a swirl of Peanut Butter on top. My kids love it when I add a few fun sprinkles – it makes them feel like they’re having a real treat. It’s the perfect way to end a meal or just to enjoy a moment of deliciousness without any fuss.
Top Tips for Perfecting Your Chia Seed Pudding
I’ve made this chia seed pudding countless times, and I’ve definitely learned a few tricks along the way that I’m happy to share. First, regarding the chia seeds themselves: make sure you use good quality seeds. If yours are old, they might not gel up properly, leaving you with a runnier pudding. I always buy mine in bulk from a reputable source and store them in an airtight container in a cool, dark place. When it comes to mixing, this is super important: whisk thoroughly right after you combine the seeds and liquid. I always do an initial whisk for about 30 seconds, then let it sit for 5 minutes, and then give it another good whisk. This second whisk is key to breaking up any clumps that might have started to form and ensures a super smooth, even texture. If you skip that second whisk, you’re more likely to end up with pockets of thick gel and watery bits. For flavor customization, don’t be afraid to experiment! I’ve tried adding a tablespoon of unsweetened cocoa powder to the dry ingredients for a chocolate version, and it’s amazing. A little bit of cinnamon or cardamom also adds a wonderful warmth. If you’re looking for a different base flavor, try using almond milk or oat milk instead of coconut milk – they work, but I find coconut milk gives it that extra special creaminess. Some people like to sweeten their pudding *after* it has chilled and thickened, which allows them to gauge the sweetness more accurately. You can absolutely do that, just stir in your sweetener of choice right before serving. For baking substitutions, this recipe is designed to be no-bake, but if you were to adapt it to muffins, you’d likely need to adjust the liquid ratio significantly and bake at around 350°F (175°C) for 20-25 minutes, but honestly, the beauty is in its simplicity as a pudding! For glaze variations, instead of a “glaze,” think toppings. A drizzle of melted dark chocolate, a swirl of fruit puree (like raspberry or mango), or even a spoonful of good quality jam can elevate this pudding instantly. Just remember to add these after the pudding has chilled for the best visual and textural contrast. My biggest tip, though? Be patient! The chilling time is non-negotiable for that perfect, thick consistency. Overnight is truly best if you can manage it.
Storing and Reheating Tips
This chia seed pudding is fantastic for meal prep, which is one of the reasons I love it so much. You can store it in individual airtight containers or jars in the refrigerator for up to 3-4 days. The texture might change slightly as it sits – it can get even thicker, which I actually prefer. If it becomes too thick for your liking, you can always stir in a tablespoon or two of milk to loosen it up before serving. I haven’t really needed to reheat this since it’s best served chilled, but if for some reason you wanted it slightly warm, you could gently heat it in a small saucepan over very low heat, stirring constantly, for just a minute or two. Be careful not to overheat it, as that can change the texture of the chia seeds. For freezing, I don’t typically freeze chia seed pudding because the texture can become a bit icy and separated upon thawing. It’s really best enjoyed fresh from the fridge. If you do decide to freeze it, make sure it’s in an airtight container and thaw it completely in the refrigerator before eating. You might need to stir it vigorously to try and restore some of the original texture. Glaze timing advice is simple: add any glazes or toppings right before you’re ready to serve, especially if they are fresh fruits or anything that might get soggy or wilted. This ensures everything stays fresh and looks its best. I’ve found that storing the plain pudding and adding toppings right before eating is the way to go for maximum deliciousness and visual appeal.
Frequently Asked Questions
Final Thoughts
So there you have it – my go-to recipe for the most wonderfully creamy and satisfying chia seed pudding. I truly believe this recipe is a lifesaver for anyone looking for a delicious, healthy, and incredibly easy treat. It’s proof that you don’t need hours in the kitchen or a long list of complicated ingredients to make something truly special. The fact that it’s packed with goodness and so forgiving makes it a win-win in my book. I hope you feel inspired to give this a try, and I can’t wait to hear how yours turns out! If you love this recipe, you might also enjoy my Simple Overnight Oats for another make-ahead breakfast option, or perhaps my No-Bake Energy Balls for a quick snack. Don’t be shy about sharing your own variations in the comments below – I’m always looking for new ideas! Happy pudding-making!

Chia Seed Pudding
Ingredients
Main Ingredients
- 0.5 cup chia seeds
- 2 cups milk any kind of milk will work
- 2 tablespoons sweetener e.g. maple syrup, honey, or agave
- 0.5 teaspoon vanilla extract
Instructions
Preparation Steps
- In a bowl, whisk together the chia seeds, milk, sweetener, and vanilla extract until well combined.
- Let the mixture sit for 5 minutes, then whisk again to break up any clumps.
- Cover the bowl and refrigerate for at least 2 hours, or preferably overnight, until the pudding has thickened.
- Serve chilled, with your favorite toppings such as fresh fruit, nuts, or granola.