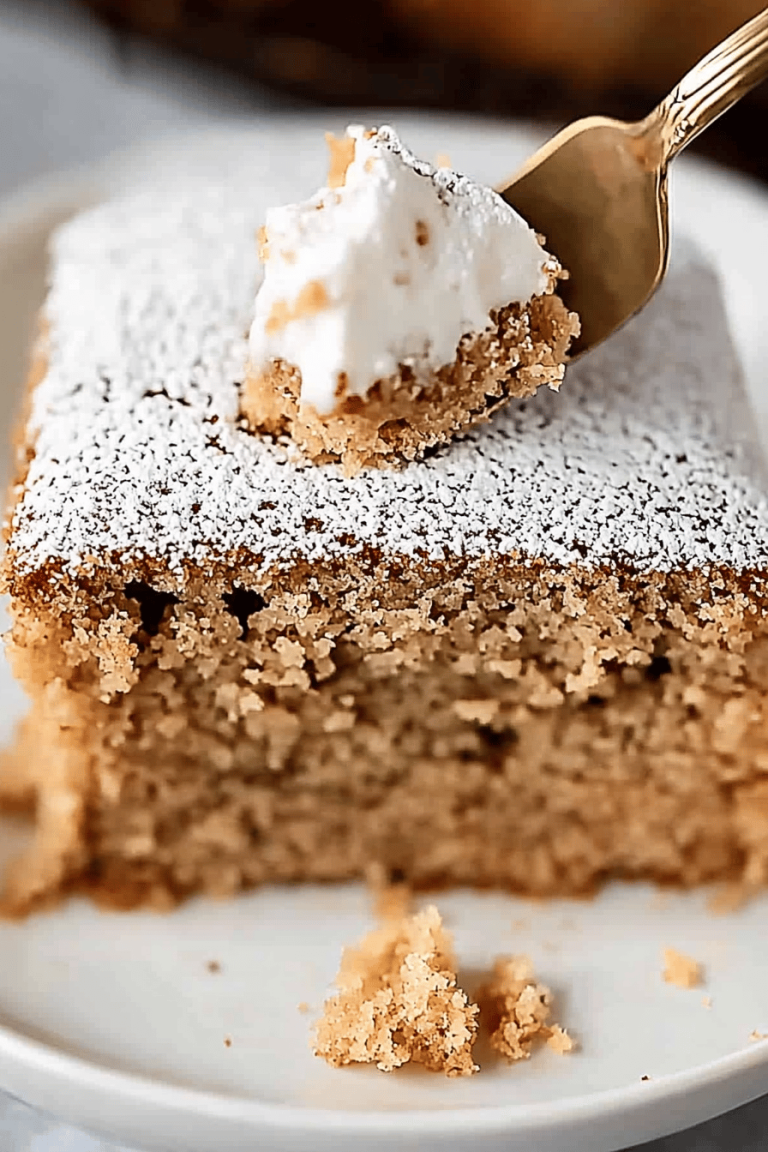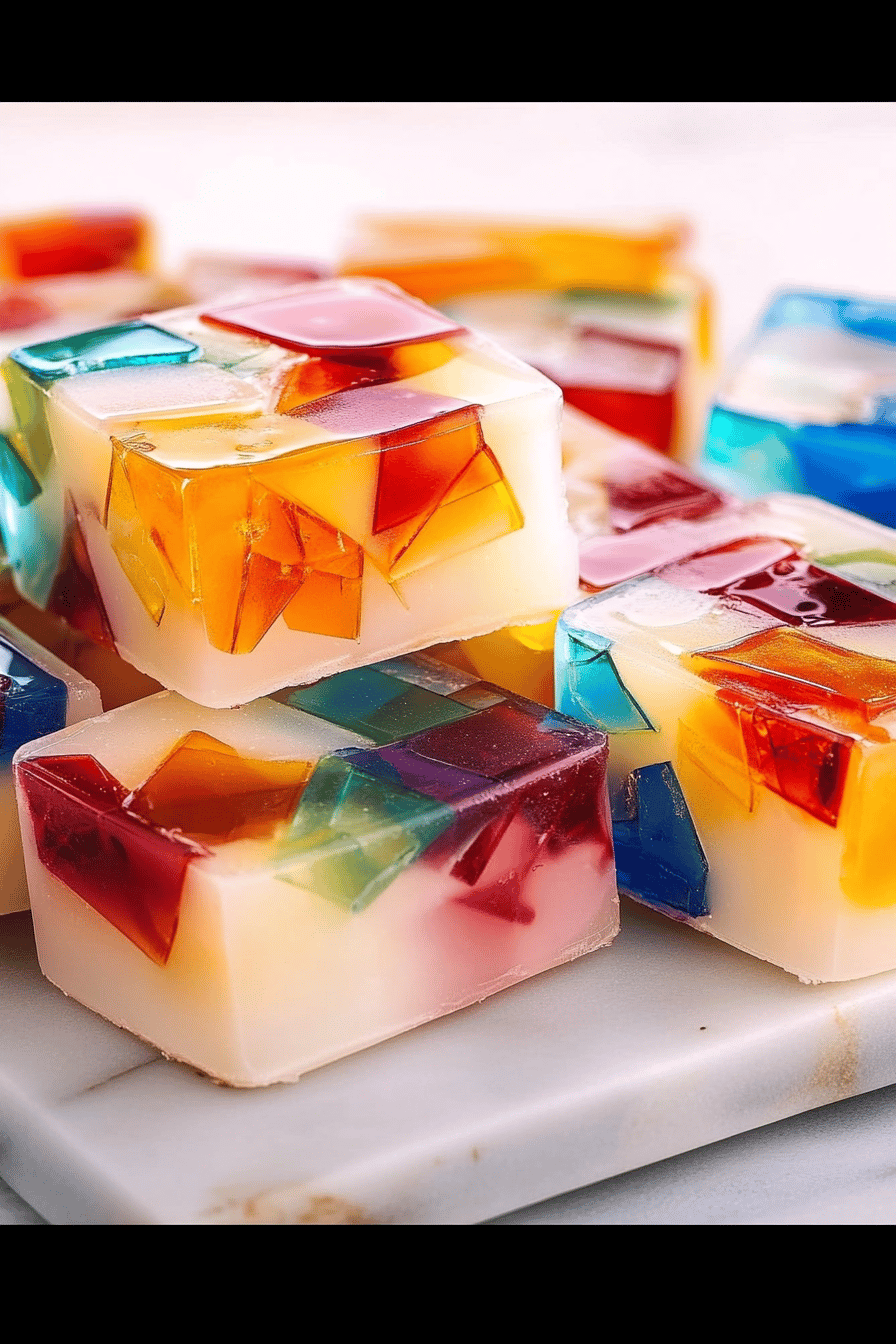
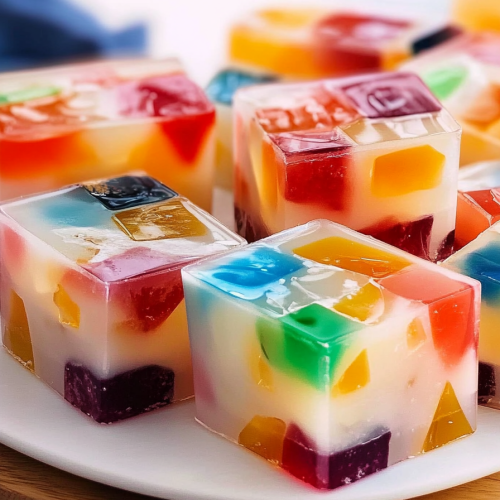
Oh, hello there! Come on in, grab a mug. I’ve been so excited to share this with you. You know those desserts that look like they belong in a fancy bakery window, but you secretly think they’re impossible to make? Well, this one is like that, but guess what? It’s totally doable, and honestly, it’s one of my absolute favorites. It’s this gorgeous Broken Glass Jello, and every time I make it, it feels like a little party. The way the light catches the different colored “shards” is just magical, and the texture is this delightful wobbly, chewy, creamy dream. It’s kind of like a more sophisticated, visually stunning version of your classic childhood jello, but with a creamy custard that makes it feel really special. My kids, bless their hearts, think it’s the most exciting thing I’ve ever baked, and honestly, I can’t blame them. It’s just so *pretty*! Plus, it’s a lifesaver for those times you need a showstopper dessert without spending hours in the kitchen. Forget complicated cakes and fussy pastries; this broken glass jello is about to become your new best friend.
What is broken glass jello?
So, what exactly *is* this whimsical creation? Think of it as a deconstructed, elevated jello mold. The “broken glass” effect comes from cubes of firm, brightly colored jello that are suspended in a smooth, creamy vanilla or milk-based custard. When you cut into it, it looks like stained glass! The name itself, “broken glass jello,” perfectly captures that stunning visual. It’s not actual glass, of course! It’s all about how the different jiggly jello pieces are nestled within that soft, yielding custard. It’s not a traditional cake, it’s not a pudding – it’s its own delightful category. The magic is in the contrast: the vibrant, clear, jewel-like jello against the opaque, comforting creaminess. It’s essentially taking the fun, fruity flavors of jello and transforming them into something elegant enough for guests, but still easy enough for a Tuesday night treat. Trust me, it’s more fun than it sounds!
Why you’ll love this recipe?
Honestly, where do I even begin with why I adore this broken glass jello? First off, the flavor explosion! You get all those bright, fruity notes from the different jello flavors – think cherry, lime, lemon, raspberry – mingling with the subtle, sweet vanilla of the creamy custard. It’s a symphony of tastes that’s both refreshing and satisfying. But what I *really* love is how surprisingly simple it is, despite looking so impressive. You don’t need any fancy equipment, just a few bowls, some patience for chilling, and a bit of stirring. It’s incredibly cost-effective too; the ingredients are super basic and readily available at any grocery store. And the versatility! You can play with the jello colors and flavors endlessly. Want a patriotic theme? Red and blue jello! Holiday colors? Green and red! It’s also fantastic because it appeals to everyone. Kids go bonkers for the fun colors, and adults appreciate the sophisticated presentation and creamy texture. It’s way more interesting than a plain old jello cup, and it doesn’t require the oven like a traditional cake or pie, which is a huge bonus on warm days. It’s truly the best of all worlds: beautiful, delicious, easy, and budget-friendly. If you’ve ever enjoyed a simple jello salad or a creamy panna cotta, you’ll fall head over heels for this.
How do you make broken glass jello?
Quick Overview
Making this stunning broken glass jello is a two-day affair, but don’t let that scare you! Day one is all about preparing the colorful jello cubes and letting them set firm. Day two is when the magic happens: you’ll prepare a simple, creamy custard, gently fold in your set jello cubes, and let it all chill together. The beauty of this method is that each component is straightforward, and the final assembly is surprisingly forgiving. You’re essentially creating vibrant mosaic pieces and then suspending them in a creamy cloud. It’s a delightful process that rewards you with a dessert that’s as delightful to look at as it is to eat.
Ingredients
For the Jello Cubes: What are some examples?
4 cups boiling water, divided
4 (3-ounce) packages flavored gelatin (e.g., cherry, lime, lemon, orange, raspberry)
4 cups cold water, divided
For the Creamy Custard:
1 (14-ounce) can sweetened condensed milk
1 (12-ounce) can evaporated milk
1 cup milk (whole milk works best for richness)
2 tablespoons unflavored gelatin
1/2 cup cold water
1 teaspoon vanilla extract
Step-by-Step Instructions
Step 1: Prepare the Jello and Chill
This is the first step, and it’s all about getting those vibrant colors ready. You’ll want to grab a separate bowl for each flavor of jello. For each package of flavored gelatin, you’ll dissolve it in 1 cup of boiling water. Stir it really well until every speck of powder is gone – this is important for a smooth set. Then, you’ll stir in 1 cup of cold water into each mixture. Pour each colored jello into a separate shallow baking dish or pan (an 8×8 inch pan works well for each color, or you can use one larger one if you don’t mind them mixing slightly before they’re cut). Pop these into the refrigerator for at least 2-3 hours, or until they’re completely firm and jiggly. The firmer, the better for cutting!
Step 2: Cut the Jello
Once your jello is good and firm, it’s time to create the “broken glass” effect. Take your chilled jello out of the fridge. Using a sharp knife, cut the jello into small, bite-sized cubes. Don’t worry about them being perfect squares; the more irregular, the more it looks like broken glass! As you cut them, you can gently toss them into a large mixing bowl. I usually just eyeball the size, aiming for about 1/2 to 3/4 inch cubes. You can also gently separate them with your fingers to make sure they don’t stick together too much. Set this bowl of colorful jello cubes aside – try not to snack on too many!
Step 3: Bloom the Unflavored Gelatin
Now, let’s work on the creamy part. In a small bowl, sprinkle the 2 tablespoons of unflavored gelatin over 1/2 cup of cold water. Give it a quick stir and let it sit for about 5-10 minutes. It will get thick and gel-like – this is called “blooming,” and it’s essential for the gelatin to dissolve properly.
Step 4: Heat and Dissolve Custard Base
In a medium saucepan, whisk together the sweetened condensed milk, evaporated milk, and the remaining 1 cup of regular milk. Heat this mixture over medium heat, stirring constantly, until it’s warm but not boiling. You don’t want it to scorch on the bottom. Once it’s warm, remove it from the heat. Add the bloomed gelatin mixture to the warm milk mixture and whisk vigorously until the gelatin is completely dissolved and you have a smooth, creamy base. Stir in the vanilla extract.
Step 5: Cool the Custard Slightly
This step is crucial for not melting your beautiful jello cubes! Let the creamy custard mixture cool down at room temperature for about 15-20 minutes. You want it to be lukewarm, not hot. You can test it by dipping a clean finger in – it should feel comfortably warm, not hot enough to burn. This cooling period allows the gelatin to start setting slightly, which will help it hold the jello cubes without them sinking straight to the bottom.
Step 6: Combine Jello and Custard
Now for the grand finale! Gently pour the slightly cooled custard mixture over the bowl of cut jello cubes. Use a large spoon or spatula to gently fold everything together. You’re not trying to stir it vigorously; you want to coax the custard around the jello cubes, ensuring they’re coated and distributed throughout the mixture. Be gentle! You don’t want to break up the jello cubes too much, but some natural breaking is part of the charm of broken glass jello. Make sure the jello pieces are pretty evenly dispersed.
Step 7: Chill to Set
Carefully pour the entire mixture into your serving dish. A clear glass trifle bowl or a decorative glass bowl works beautifully so you can see all those gorgeous colors. You can also use a Bundt pan or a standard 9×13 inch baking dish if you prefer. Cover the dish loosely with plastic wrap (try not to let it touch the surface if possible) and refrigerate for at least 4-6 hours, or preferably overnight, until the custard is completely set and firm. This allows all those flavors to meld together beautifully.
Step 8: Unmold (if applicable) and Serve
If you used a mold like a Bundt pan, you’ll want to unmold it. Briefly dip the bottom of the mold in warm water, then invert it onto a serving platter. If you used a bowl, you can serve it right out of the bowl! For serving, I like to use a sharp knife to cut portions, making sure each slice gets a good mix of custard and jello. The presentation is just stunning – it truly looks like edible stained glass.
Step 9: Enjoy!
Serve chilled and enjoy the dazzling colors and delightful textures of your homemade broken glass jello. It’s a dessert that always brings smiles!
What to Serve It With
This broken glass jello is honestly a star all on its own, but if you’re looking to round out a meal or create a special presentation, here are some ideas! For breakfast, while it’s a bit more dessert-like, a small, light portion can be a delightful treat alongside a strong cup of coffee. I like to serve it in small individual glasses. For a proper brunch, I like to make it the showstopper! Serve it in a beautiful glass trifle bowl and surround it with fresh berries – strawberries, blueberries, raspberries all look amazing against the vibrant jello. A dollop of freshly whipped cream on top is always a welcome addition too. As a dessert, it’s perfect after a rich meal. Think of it as a palate cleanser with a sweet twist. It pairs wonderfully with lighter fare like lemon bars or a fruit tart, but can also stand up to richer desserts if you’re feeling adventurous. And for those cozy, relaxed snack times? It’s pure comfort. Serve it in little ramekins with a side of Shortbread Cookies or even some plain vanilla wafers. My family has a tradition of having this on Christmas morning, alongside a big pot of coffee and maybe some cinnamon rolls. It’s just bright and festive, and it feels so celebratory! Another favorite is after a big Sunday dinner; it’s light enough that nobody feels too heavy after dessert.
Top Tips for Perfecting Your Broken Glass Jello
I’ve made this broken glass jello more times than I can count, and along the way, I’ve picked up a few tricks that make it even better. Firstly, for the jello cubes, don’t skimp on the chilling time! I’ve learned the hard way that if it’s not fully set, you’ll end up with a sticky mess instead of clean cubes, and it’ll all just dissolve into the custard. Patience is key here. When you’re cutting the jello, a wet knife can help prevent sticking, or you can just quickly rinse it between cuts. Don’t aim for perfection; the “broken” look is what makes it so unique! For the custard, the biggest tip I can give you is to make sure it’s cooled down sufficiently before you add it to the jello. If it’s too hot, it will literally melt your jello cubes into a blurry mess. Lukewarm is the magic word! I’ve experimented with different types of milk, and while you *can* use skim milk, whole milk or even a mix of whole milk and half-and-half really gives it a richer, creamier texture that’s totally worth it. If you want to add a little something extra to the custard, a tiny pinch of salt can actually enhance the sweetness, or you could even try a splash of almond extract along with the vanilla for a different flavor profile. Some people like to add a bit of food coloring to the custard itself to make it a pale color that complements the jello, but I prefer the pure white contrast. Oh, and when you’re folding the custard into the jello, be gentle! You want those distinct cubes to remain visible, not a homogenous pink goo. If you’re using a mold, make sure it’s completely cool before you unmold it. If it’s still a bit soft, it might stick or fall apart. I’ve learned that letting it set overnight is the absolute best way to ensure a clean release. And finally, for presentation, using a clear serving dish is a must. It lets the beauty of the “broken glass” shine through, and it’s always a conversation starter!
Storing and Reheating Tips
So, you’ve made this beautiful broken glass jello and there are leftovers? Lucky you! Storing it is pretty straightforward. If you’ve served it directly from a bowl or container, just cover it tightly with plastic wrap. It will keep beautifully in the refrigerator for about 3 to 4 days. The jello will remain firm, and the custard will stay creamy. I’ve found that after about day 4, the jello can start to get a little softer, and the texture isn’t quite as good, so I try to finish it within that timeframe. If you’ve unmolded it onto a platter, you’ll want to cover it carefully with plastic wrap, making sure the wrap doesn’t stick directly to the jello if possible. You can also carefully place a cake dome over it. I generally don’t recommend freezing this recipe. The texture of the custard can change significantly upon thawing, becoming a bit grainy or watery, and the jello can lose its firm structure. It’s best enjoyed fresh from the fridge. If you happen to have any leftover un-molded jello that you haven’t put the custard over yet, you can absolutely freeze those jello cubes! Just place them in a freezer-safe container or bag for up to a month. Then, you can thaw them and make a fresh batch of custard to combine. Regarding the glaze timing, there isn’t really a separate glaze for this recipe; the creamy custard is what acts as the binder and “glue.” So, as long as the custard is fully set, it’s good to go!
Frequently Asked Questions
Final Thoughts
I really hope you give this broken glass jello a try. It’s one of those recipes that feels like a special occasion but is surprisingly manageable for any home cook. The sheer delight on people’s faces when they see it is worth every minute of chilling time! It’s a beautiful reminder that delicious desserts don’t have to be complicated. If you love this, you might also enjoy my other no-bake desserts, like my creamy no-bake cheesecake or my classic ambrosia salad. They share that same spirit of delightful simplicity and crowd-pleasing flavor. I’d absolutely love to hear how yours turns out, so please leave a comment below and tell me what colors you chose and how your family enjoyed it! Happy baking, or rather, happy chilling!
Broken Glass Jello
Ingredients
For the Jello Squares
- 3 ounce Strawberry Jello
- 3 ounce Lime Jello
- 3 ounce Lemon Jello
- 3 ounce Orange Jello
- 1.5 cup Boiling Water
For the Creamy Jello
- 3 ounce Unflavored Gelatin
- 0.5 cup Cold Water
- 14 ounce Sweetened Condensed Milk
- 2 cup Boiling Water
Instructions
Preparation Steps
- Prepare each flavor of Jello separately according to package directions, but use half the amount of water called for. Pour each Jello into a separate 8x8 inch pan. Chill until firm, about 2-3 hours. Once firm, cut each Jello into 0.5 inch cubes.
- In a small bowl, sprinkle the unflavored gelatin over the cold water and let it sit for 5 minutes to bloom.
- Pour the 2 cups of boiling water into a large bowl. Add the bloomed gelatin and stir until completely dissolved.
- Stir in the sweetened condensed milk until well combined. Let the mixture cool to room temperature.
- Gently fold the Jello cubes into the cooled creamy Jello mixture.
- Pour the mixture into a 9x13 inch serving dish. Chill for at least 4 hours, or until firm.