There are some recipes that just feel like a warm hug, aren’t there? This Baked Shrimp dish is absolutely one of those for me. It’s not just food; it’s a memory. I remember my Grandma making something similar when we’d visit her on summer breaks. The aroma would waft from her kitchen, a tantalizing mix of garlic, butter, and something wonderfully savory, and I knew we were in for a treat. Fast forward to today, and this baked shrimp recipe is my go-to when I want something that feels a little bit fancy but is ridiculously easy to whip up. It’s like the culinary equivalent of putting on your comfiest sweater. Honestly, if you’re looking for a way to elevate simple shrimp without spending hours in the kitchen, you’ve found your winner. It’s so much more satisfying and flavorful than, say, just boiling shrimp or throwing them on a quick stir-fry, though those have their place too. This one, though? This one’s special.
What is baked shrimp?
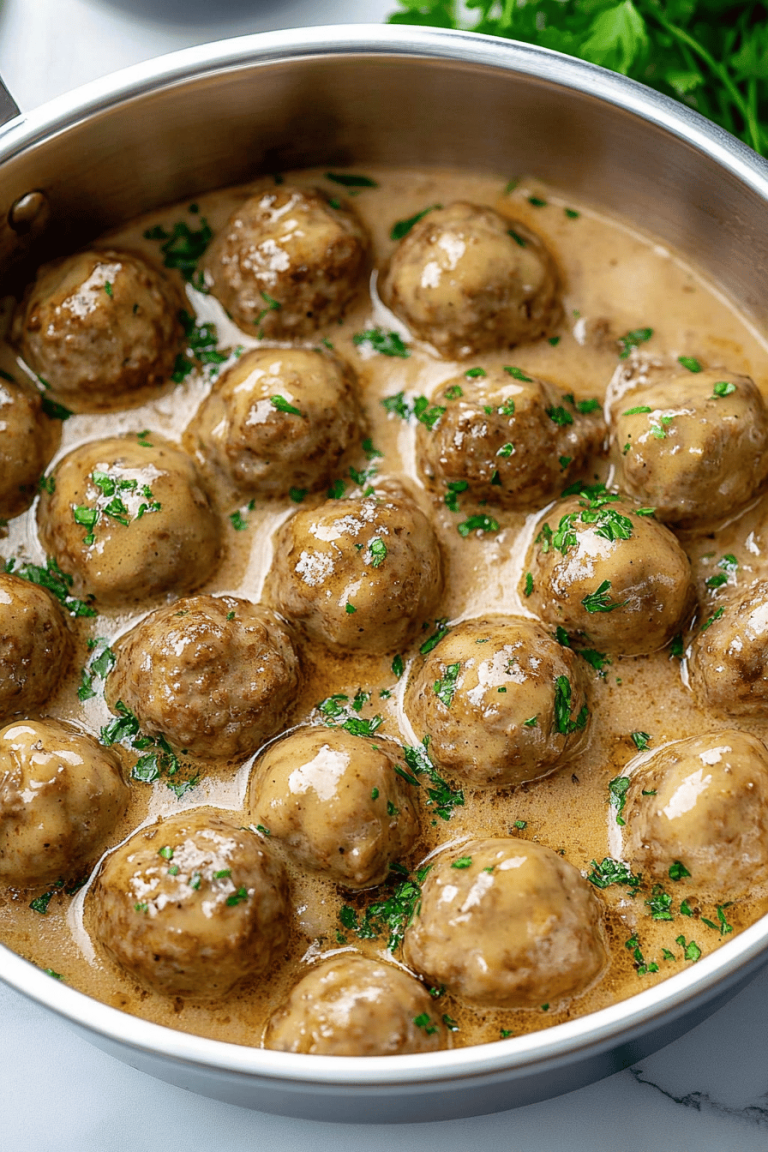
So, what exactly is this magical dish we’re talking about? At its heart, baked shrimp is precisely what it sounds like – shrimp that are seasoned and cooked in the oven. But oh, it’s so much more than that simple definition! Think of it as a comforting, flavor-packed casserole or gratin, but with plump, juicy shrimp as the star. It’s essentially shrimp bathed in a luscious, creamy, or sometimes brothy sauce, often with a delicious crumb topping that gets perfectly golden and crisp in the oven. The name itself, baked shrimp, is straightforward, but the result is anything but ordinary. It’s the kind of dish that makes you close your eyes and savor every single bite. It’s cozy, it’s elegant, and it’s surprisingly versatile, which is why I keep coming back to it time and time again.
Why you’ll love this recipe?
Honestly, there are so many reasons why I’ve fallen head over heels for this baked shrimp. First off, the flavor explosion is just unreal. You get that wonderful sweetness from the shrimp, perfectly complemented by the savory seasonings, a hint of garlic, and if you choose a creamy version, it’s utterly decadent. It hits all the right notes – savory, a little bit rich, and just incredibly satisfying. Then there’s the simplicity. I mean, truly, this is a lifesaver on busy weeknights. You can have it prepped and in the oven in less time than it takes to decide what to order for takeout! And let’s talk about budget. Shrimp can sometimes feel like a splurge, but when you make it the star of a dish like this, with economical additions like breadcrumbs and a few pantry staples, it feels like you’re serving up restaurant-quality food without the hefty price tag. It’s also wonderfully versatile. I’ve served this alongside pasta, with a big green salad, or just with crusty bread for dipping into that glorious sauce. What I love most, though, is how it feels like a special occasion meal without any of the fuss. It’s the kind of dish that impresses without stressing you out, and that’s a win in my book. It’s certainly more exciting than a simple pan-seared shrimp, and the textures you get from baking are just divine.
How do I make Baked Shrimp?
Quick Overview
This baked Shrimp Recipe is all about layering delicious flavors and textures. You’ll start by prepping your shrimp, then creating a flavorful base with aromatics and seasonings, binding it all together with a creamy element or broth, and finishing with a golden, crispy topping. The oven does most of the work, transforming simple ingredients into something truly spectacular. It’s so straightforward, you’ll feel like a gourmet chef in no time, even if you’re just starting out in the kitchen. Trust me, it’s way easier than it looks!
Ingredients
For the main shrimp mixture:
1.5 pounds large shrimp, peeled and deveined. I always go for the “large” or “jumbo” size because they hold up better during baking and give you a really satisfying bite. Make sure they’re thawed if you’re using frozen. You can buy them pre-peeled and deveined, which is a total time-saver for me on hectic days. Just pat them dry with a paper towel before you start. This helps them get a nice sear, even in the oven.
For the Flavor Base:
4 tablespoons unsalted butter. This is the foundation of so much deliciousness. If you’re feeling a little wild, you could even do half butter, half olive oil, but I’m a purist when it comes to this recipe and stick to butter for that rich flavor.
3-4 cloves garlic, minced. Please, please, please use fresh garlic! Garlic powder just doesn’t give you that punchy, aromatic flavor that fresh minced garlic does. I love garlic, so I often add a little extra, but start with 3 and go from there.
1/2 cup finely chopped yellow onion or shallots. Shallots are a bit milder and sweeter, which I adore, but yellow onion works perfectly too. You want it to be super fine so it melts into the sauce.
1/4 cup dry white wine (like Sauvignon Blanc or Pinot Grigio) or chicken broth. The wine adds a lovely depth and acidity that cuts through the richness. If you don’t use alcohol, good quality chicken broth is a perfect substitute.
1/2 cup heavy cream or half-and-half. This is what makes it luxuriously creamy and helps bind everything together. If you’re looking to lighten it up a bit, you could try evaporated milk, but I find heavy cream gives the best texture.
2 tablespoons fresh parsley, chopped, plus more for garnish. Fresh herbs make all the difference, and parsley adds a lovely pop of color and freshness.
Salt and freshly ground Black Pepper to taste. Don’t be shy with the seasoning! Taste as you go.
For the Topping:
1 cup panko breadcrumbs. Panko is my absolute favorite for any topping because it gets incredibly crispy. Regular breadcrumbs work, but they tend to get a bit doughy. If you only have regular, toasting them in a dry pan first can help.
2 tablespoons grated Parmesan cheese. This adds a salty, nutty flavor to the topping.
1 tablespoon olive oil or melted butter. This helps the breadcrumbs brown beautifully.
Step-by-Step Instructions
Step 1: Preheat & Prep Pan
First things first, get that oven preheating to 375°F (190°C). This temperature is perfect for cooking the shrimp through without overdoing it and allows the topping to get golden brown and toasty. Grab a medium-sized baking dish. An 8×8 inch dish is usually perfect for this amount. If you don’t have one, any oven-safe dish that can hold your shrimp in a relatively even layer will do. I like to lightly grease mine with a little butter or cooking spray just to make sure nothing sticks. It’s a small step, but it saves you from frustrating cleanup later!
Step 2: Sauté Aromatics
Now, let’s build some flavor! Grab a skillet and melt the butter over medium heat. Once it’s melted and shimmering, add your minced garlic and chopped onion (or shallots). Sauté them until they’re soft and fragrant, about 3-5 minutes. You don’t want them to brown too much, just to become tender and release their wonderful aromas. This step is crucial for building a rich flavor base for your sauce. If you skip this, your dish will lack that deep, savory foundation.
Step 3: Deglaze & Create Sauce Base
Pour in the white wine or chicken broth and scrape up any bits from the bottom of the pan – that’s where a lot of the flavor is hiding! Let it simmer for a minute or two to allow the alcohol to cook off if you used wine. Then, stir in the heavy cream. Bring it to a gentle simmer and let it cook for another 2-3 minutes until it starts to thicken slightly. You’re looking for a sauce that’s just coating the back of a spoon. This forms the luscious sauce that your shrimp will be swimming in.
Step 4: Season and Add Shrimp
Stir in the chopped fresh parsley, salt, and pepper. Give it a taste and adjust the seasonings as needed. Remember, the shrimp will absorb these flavors, so make sure it’s seasoned nicely. Now, gently fold in the peeled and deveined shrimp. You want to coat them thoroughly in the creamy sauce. Don’t overcook the shrimp at this stage; they will finish cooking in the oven. Just ensure they are all nicely nestled in the sauce.
Step 5: Prepare the Topping
In a small bowl, combine the panko breadcrumbs, grated Parmesan cheese, and olive oil or melted butter. Stir everything together until the breadcrumbs are evenly coated. This mixture is going to create that irresistible crispy, golden crust on top of your baked shrimp. It’s the perfect textural contrast to the tender shrimp and creamy sauce.
Step 6: Assemble and Top
Pour the shrimp and sauce mixture into your prepared baking dish, spreading it out into an even layer. Sprinkle the breadcrumb mixture evenly over the top of the shrimp. Make sure you cover the entire surface so you get that lovely crunch in every bite. You can gently press it down if you like, but it’s not essential.
Step 7: Bake to Perfection
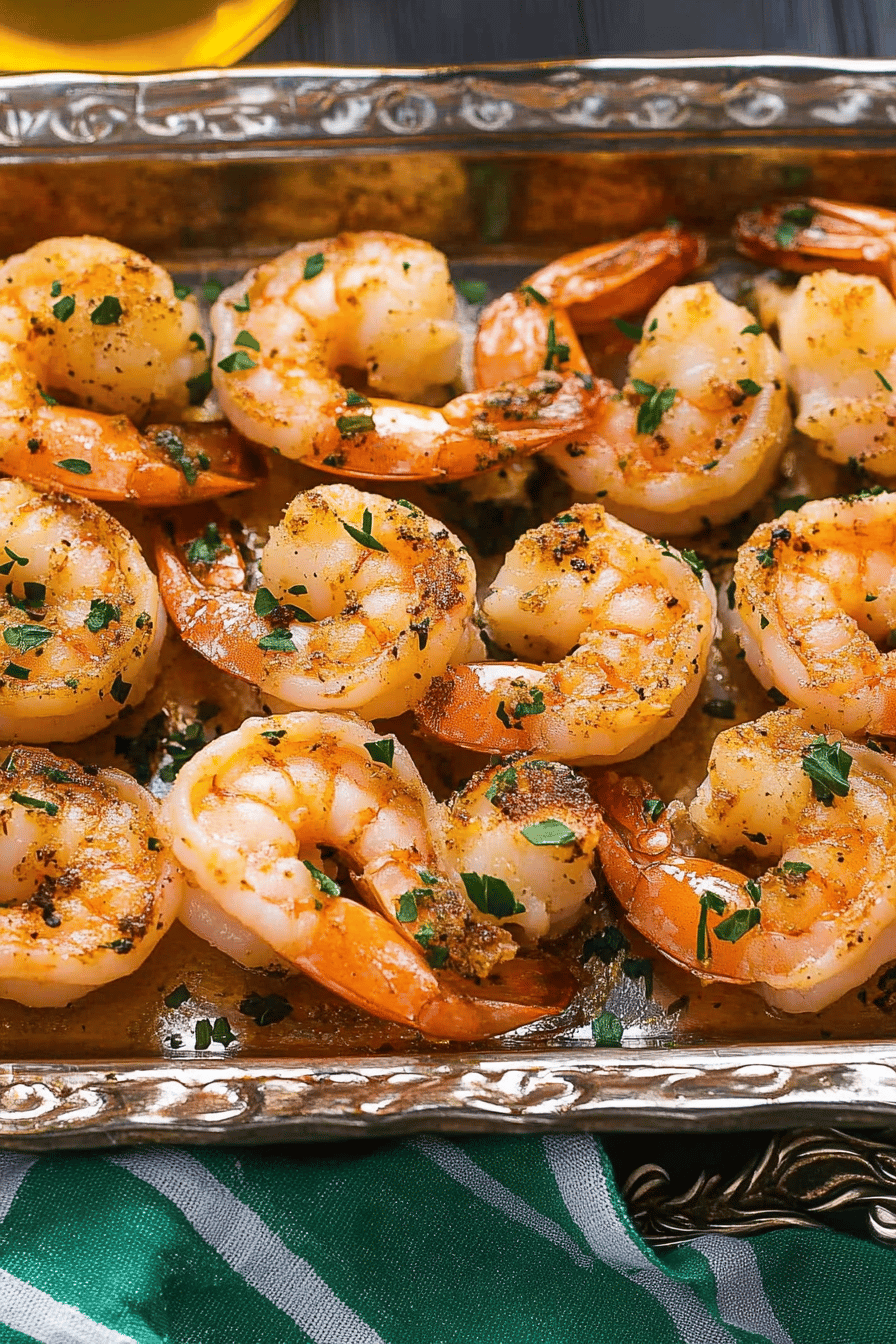
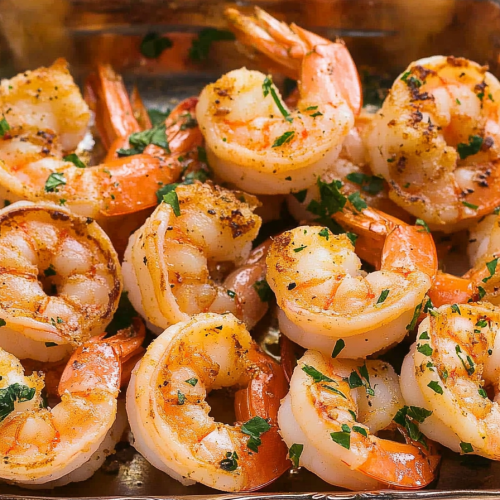
Place the baking dish in your preheated oven. Bake for 15-20 minutes, or until the shrimp are pink and opaque, and the breadcrumb topping is golden brown and crispy. The exact time will depend on your oven and the size of your shrimp. You’ll see the edges bubbling, and the aroma will be absolutely heavenly. Keep an eye on it towards the end to make sure the topping doesn’t get too dark.
Step 8: Rest and Garnish
Once it’s done, carefully remove the baking dish from the oven. Let it rest for about 5 minutes before serving. This allows the juices to settle and the sauce to thicken up just a bit more. Garnish with a little extra fresh parsley for a pop of color and freshness. That little sprinkle of green really makes it look restaurant-ready!
Step 9: Slice and Serve
Serve hot, scooping generous portions onto plates. The beauty of this dish is how well it pairs with so many things. It’s fantastic on its own, but also wonderful spooned over rice, pasta, or served with crusty bread for dipping. Enjoy the cheers you’ll get from your family – this one’s a crowd-pleaser!
What to Serve It With
This baked shrimp is so versatile, it can truly fit into any mealtime scenario. For breakfast, I know it sounds a little unconventional, but a small, individual ramekin of this served with a side of perfectly poached eggs and some crusty toast is surprisingly delightful. The creamy sauce with the shrimp is a fantastic base for the runny yolks. For brunch, it’s a star! Imagine this baked shrimp served in the center of the table, surrounded by a beautiful fresh green salad, some crusty French bread, and maybe some roasted asparagus. A crisp white wine or a refreshing mimosa would be the perfect beverage pairing. For a more elegant dessert situation, though it’s not a dessert itself, it can be a fantastic starter. Serve it in smaller, individual ramekins with a light, crisp salad and a lemon vinaigrette to cleanse the palate before a main course. And for those cozy snack moments? Oh, this is perfect. Forget chips and dip! This baked shrimp, served warm with a side of warm, crusty baguette for dipping, is the ultimate comfort food indulgence. My family also loves it with a simple side of roasted potatoes or sweet potato fries. It’s become our go-to for “fancy but easy” nights, and it never disappoints.
Top Tips for Perfecting Your Baked Shrimp
Over the years, I’ve learned a few tricks that make this baked shrimp recipe even better, and I love sharing them! First, when it comes to the shrimp itself, don’t overcrowd the pan if you’re sautéing aromatics separately, and definitely don’t overcook them. Shrimp cook incredibly fast. If you add them to a sauce that’s already boiling hot, they can go from perfectly cooked to rubbery in seconds. A gentle simmer is key before they hit the oven. For the sauce base, the quality of your garlic and onion really matters. I’ve tried it with pre-minced garlic in a jar, and it’s just not the same. Take the extra minute to mince your own; the flavor is so much brighter. And don’t skip the deglazing step with wine or broth – those little browned bits stuck to the pan are pure gold for flavor! When it comes to the topping, panko breadcrumbs are non-negotiable for me. They get so wonderfully crisp, providing that perfect textural contrast to the soft shrimp and creamy sauce. If you want to jazz up the topping even more, try adding a pinch of smoked paprika or a tiny bit of chili flakes for a little heat. I once accidentally used almond milk instead of heavy cream because I ran out, and while it wasn’t *as* rich, it still worked surprisingly well, making it a lighter option if you need it. Another thing I learned: ensure your baking dish isn’t too shallow if you want a really nice, thick sauce. If it’s too wide and shallow, the sauce can cook down too much. And for oven variations, every oven is a little different, so get to know yours. If you find your topping browns too quickly, you can always tent it loosely with foil for the last few minutes of baking. And if your shrimp seem small, they might cook through faster, so keep an eye on them!
Storing and Reheating Tips
This baked shrimp is so good, you’ll likely want to enjoy every last bite, but if you happen to have leftovers, don’t fret! Store them in an airtight container in the refrigerator. They are best eaten within 2-3 days. The creamy sauce can sometimes thicken up considerably once chilled, and that’s totally normal. For reheating, I find the best way is to gently warm it on the stovetop over low heat, stirring frequently. You might want to add a tablespoon or two of milk or cream to loosen the sauce back up to its original consistency. If you’re in a hurry, you can reheat individual portions in the microwave, but be careful not to overcook the shrimp. They can get tough quickly. I’ve also reheated it in a toaster oven or a regular oven at a low temperature (around 300°F/150°C) for about 10-15 minutes, again stirring halfway through. For freezing, this dish isn’t my first choice because the texture of the shrimp can change a bit. However, if you must, let it cool completely, then transfer it to a freezer-safe container. It should keep for about 1-2 months. Thaw it overnight in the refrigerator before reheating. For the topping, it will likely lose some of its crispiness after freezing and reheating, but the flavor will still be there. If you know you’ll be storing it, I’d suggest adding the topping just before you bake it if you’re planning to reheat a portion that was initially uncooked. For the glaze, if you’re referring to a separate finishing sauce, always add that fresh after reheating to maintain its intended texture and flavor.
Frequently Asked Questions
Final Thoughts
So there you have it – my absolute favorite way to make baked shrimp! I really hope you give this a try. It’s one of those dishes that just makes me happy every time I make it, and it always brings smiles to the faces of whoever I’m serving it to. It’s the perfect blend of comforting and elegant, proving that you don’t need complicated techniques or exotic ingredients to create something truly delicious. It’s proof that simple, good-quality ingredients, treated with a little love, can result in something spectacular. If you adore this baked shrimp, you might also enjoy my recipe for garlic butter baked cod or my creamy lemon herb pasta – they have a similar vibe! I can’t wait to hear what you think. Please leave a comment below if you try it, or if you have your own special tips and variations! Sharing our kitchen adventures is what it’s all about. Happy cooking!
Baked Shrimp
Ingredients
Main Ingredients
- 0.5 pound large shrimp peeled and deveined
- 2 tablespoon olive oil
- 2 cloves garlic minced
- 0.25 teaspoon red pepper flakes
- 0.5 teaspoon salt
- 0.25 teaspoon black pepper
- 2 tablespoon fresh parsley chopped
- 0.5 lemon lemon wedges for serving
Instructions
Preparation Steps
- Preheat your oven to 400°F (200°C).
- In a medium bowl, toss the shrimp with olive oil, minced garlic, red pepper flakes, salt, and black pepper until evenly coated.0.5 pound large shrimp
- Spread the shrimp in a single layer on a baking sheet.
- Bake for 10-12 minutes, or until the shrimp are pink and cooked through.
- Garnish with fresh chopped parsley and serve immediately with lemon wedges.0.5 pound large shrimp