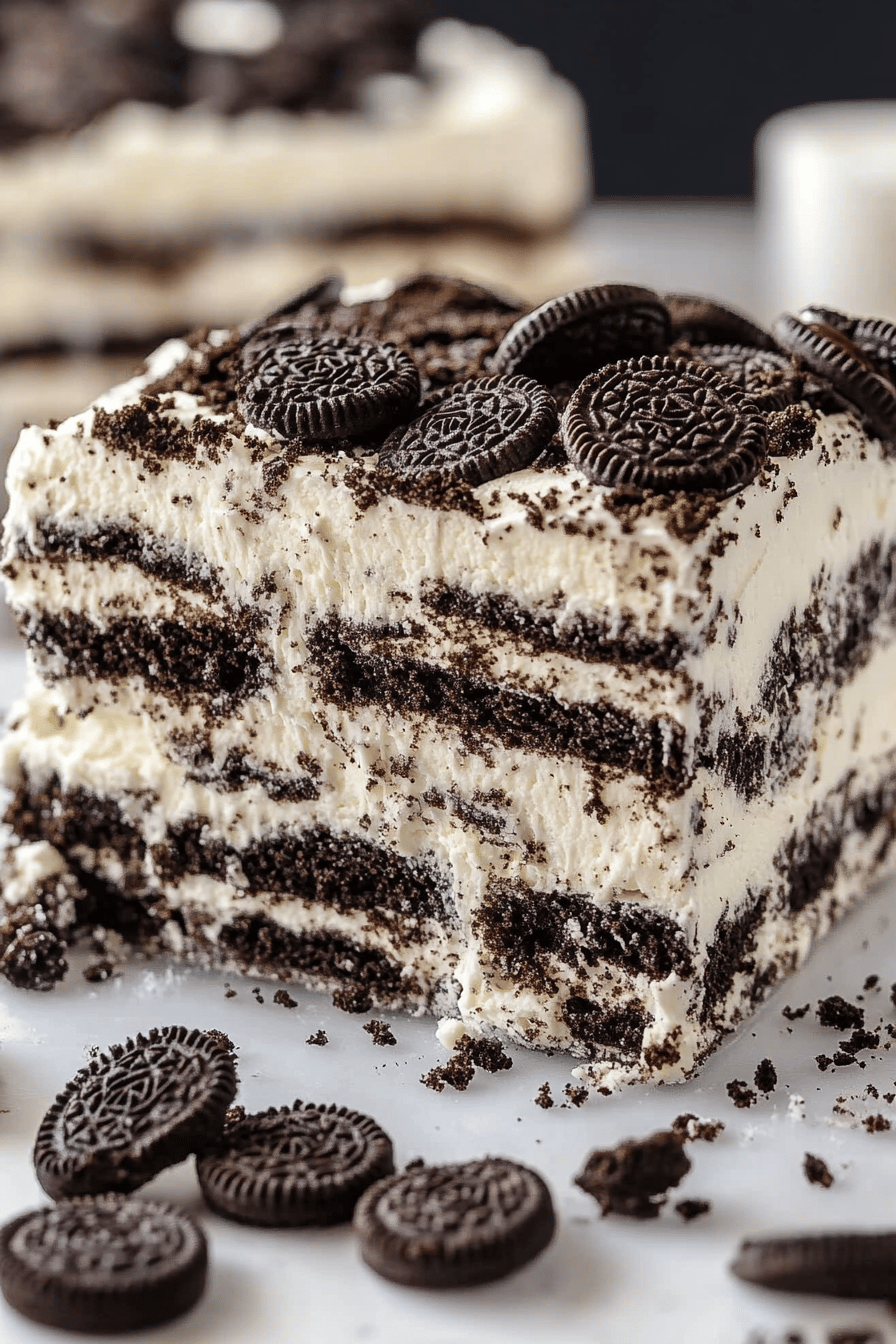
There are some recipes that just feel like a warm hug, you know? The kind that transport you back to childhood or make a chaotic weeknight feel a little more manageable. For me, that’s this Oreo Icebox Cake. It’s honestly the stuff sweet dreams are made of. If you’ve ever loved a no-bake cheesecake or a layered dessert that just melts in your mouth, you’re going to adore this. It’s kind of like a sophisticated, way-easier cousin to those layered trifle desserts, but with that irresistible crunch of Oreos that we all know and love. I remember making this for the first time when my kids were little and I was desperate for a treat that didn’t involve turning on the oven. Let’s just say it disappeared faster than a free sample at the grocery store! This Oreo Icebox Cake has become my absolute go-to for potlucks, holiday gatherings, or honestly, just because it’s Tuesday and we need a little something special.
What is an Oreo Icebox Cake?
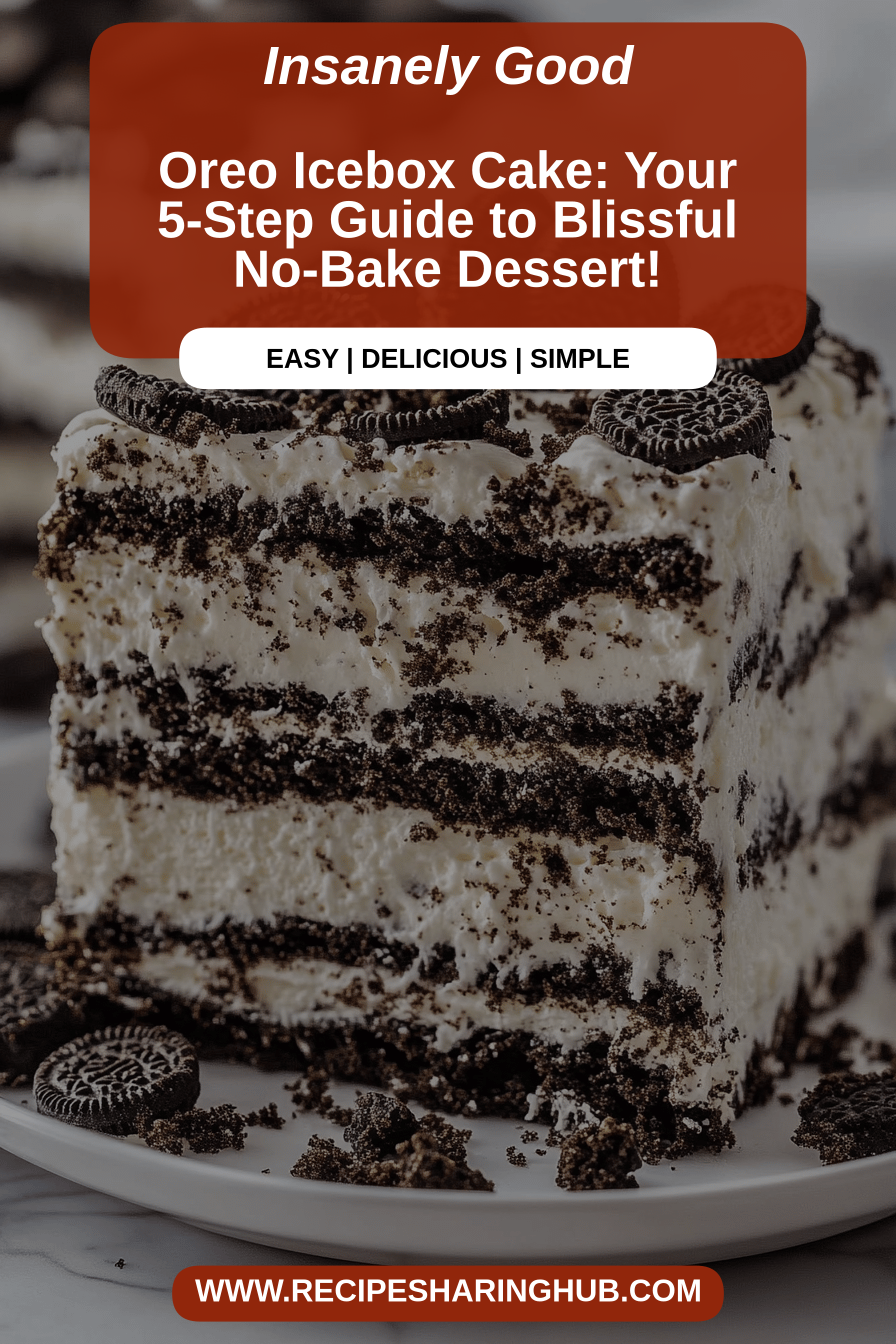
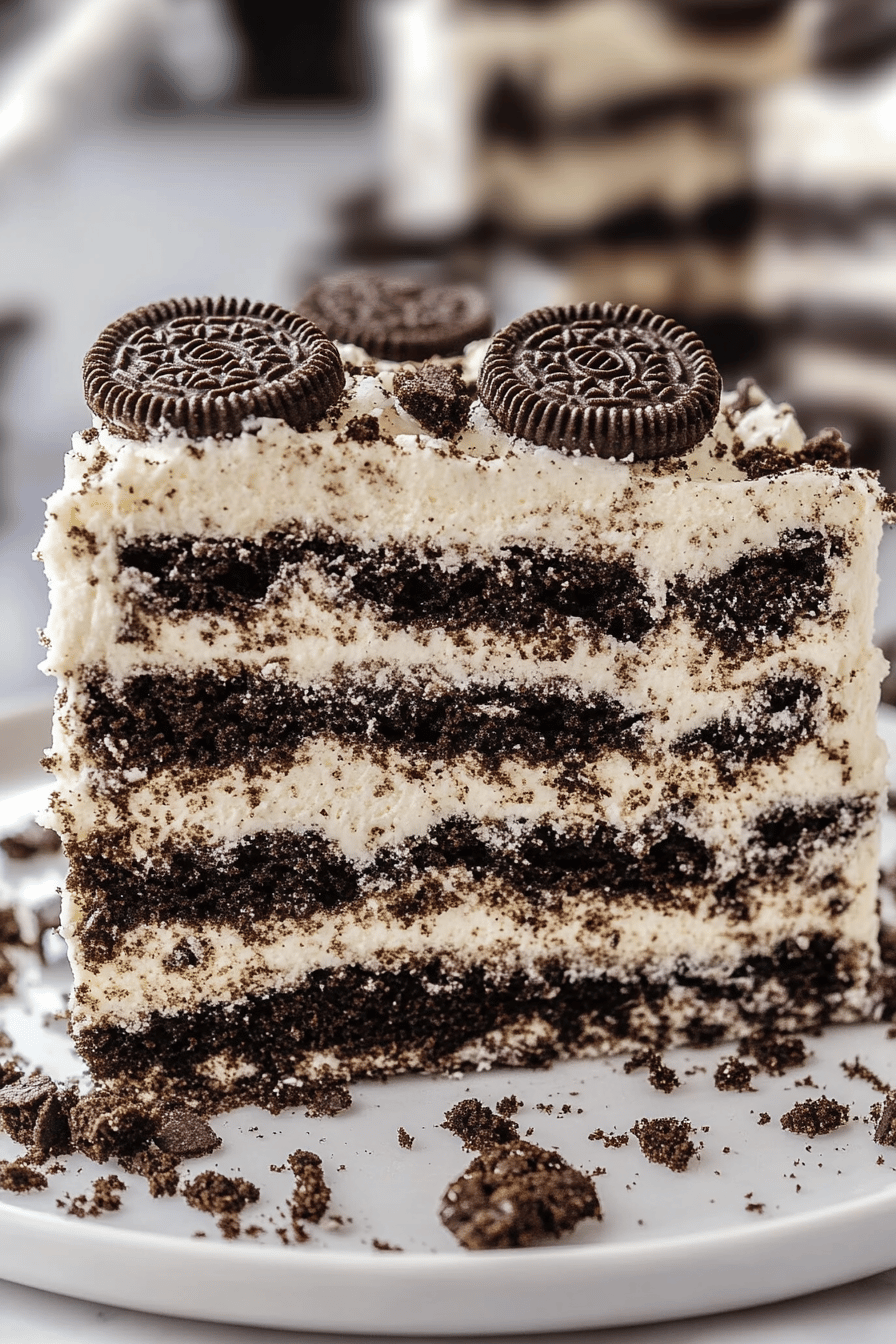
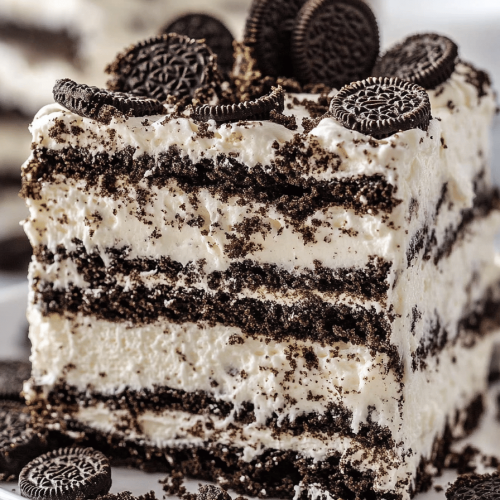
So, what exactly *is* an Oreo Icebox Cake? It’s actually incredibly simple, but the result is something truly magical. Think of it as a delightful symphony of creamy, dreamy whipped topping layered with classic chocolate sandwich cookies (you know the ones!) and a touch of something sweet to bind it all together. It’s not a baked cake in the traditional sense, hence the “icebox” part. Instead, the cookies soften and absorb the moisture from the whipped cream over time in the refrigerator, creating a tender, cake-like texture that’s just heavenly. It’s essentially a no-bake dessert that delivers all the satisfaction of a rich, decadent cake without any of the fuss. It’s the perfect solution when you’re craving something sweet and satisfying but don’t have the time or energy to deal with ovens, flour, and all that jazz. It’s proof that sometimes, the simplest things are the most extraordinary.
Why you’ll love this recipe?
Why is this Oreo Icebox Cake so popular?flavor. Oh my goodness, the flavor! It’s that perfect balance of rich chocolate from the Oreos and light, airy sweetness from the whipped cream. It’s not cloyingly sweet, but it’s definitely satisfying for any chocolate lover. And the texture? It’s incredible. The cookies get wonderfully soft, almost like a tender cake crumb, all hugged by that creamy goodness. It’s pure comfort in every bite. Then there’s the simplicity. Seriously, if you can whip cream and open a package of cookies, you can make this. It’s the ultimate lifesaver when unexpected guests drop by or when you need a dessert in a pinch. I’ve made it with store-bought whipped topping and homemade, and both are fantastic, but I’ll share my favorite tips for achieving that perfect fluffy texture in a bit. It’s also wonderfully cost-efficient. Oreos and basic dairy or non-dairy creams are usually pretty budget-friendly, making this a treat that wonversatility! While the classic version is perfection, you can totally play around with it. Add some chocolate chips, a swirl of Peanut Butter, or even a hint of coffee extract to the cream. It’s a fantastic base for so many delicious variations. What I love most about this is that it’s genuinely impressive looking without requiring any fancy techniques. It’s a crowd-pleaser that’s also a total breeze to whip up. It reminds me a bit of my no-bake chocolate pudding pie, another favorite for its ease and deliciousness, but this Oreo Icebox Cake has that extra layer of texture and fun.
How to Make Oreo Icebox Cake
Quick Overview
This Oreo Icebox Cake is all about simple layering and chilling. You’ll essentially whip up a light and fluffy cream mixture, then alternate layers of this cream with classic chocolate sandwich cookies in a baking dish. The magic happens in the refrigerator, where the cookies soften and the flavors meld into a cohesive, delicious dessert. It’s a no-bake wonder that requires minimal effort for maximum impact. The beauty of this recipe lies in its forgiving nature – it’s hard to mess up, and it always turns out delicious. You just need a few key ingredients and a little bit of patience while it chills!
Ingredients
For the Main Layers:
2 packages (about 36 cookies) Chocolate Sandwich Cookies (like Oreos), crushed into coarse crumbs with some larger pieces reserved
2 cups (16 ounces) heavy whipping cream, very cold
1/2 cup powdered sugar, sifted
1 teaspoon vanilla extract
For the Optional Swirl:
1/4 cup smooth peanut butter (optional, for a delightful twist)
1/4 cup hot fudge sauce (optional, for extra chocolatey goodness)

Step-by-Step Instructions
Step 1: Prepare Your Pan
Grab an 8×8 inch or 9×9 inch baking dish. You don’t need to grease or line it for this recipe; the cookies and cream will hold their shape. Make sure it’s clean and ready to go. This is the foundation of your delicious masterpiece!
Step 2: Crush Those Cookies
Take your chocolate sandwich cookies and give them a good crush. You can do this in a food processor for a finer crumb, or pop them in a sturdy zip-top bag and go at them with a rolling pin or the bottom of a heavy pan. Aim for a mix of fine crumbs and some slightly larger, satisfying cookie bits. Reserve about 1/4 cup of the larger pieces for topping if you like! This step is surprisingly therapeutic.
Step 3: Whip the Cream
In a large, chilled bowl, combine the very cold heavy whipping cream, sifted powdered sugar, and vanilla extract. Using an electric mixer (handheld or stand mixer), whip the cream on medium-high speed. Start slowly so you don’t spray yourself! Continue whipping until stiff peaks form. This means when you lift the beaters, the cream stands up tall and holds its shape. Be careful not to over-whip, or you’ll end up with butter!
Step 4: Assemble the Layers
Now for the fun part! Start by spreading a thin layer of the whipped cream mixture on the bottom of your baking dish. This just gives the first layer of cookies something to cling to. Then, sprinkle about half of your crushed cookie mixture evenly over the cream. Dollop about half of the remaining whipped cream over the cookies and gently spread it to cover. Repeat with the remaining crushed cookies, and top with the rest of the whipped cream, spreading it smoothly to the edges.
Step 5: Add Optional Swirls (If Using)
If you’re feeling fancy, this is where you add your swirls! For a peanut butter version, warm your peanut butter slightly so it’s easier to drizzle. Drizzle it over the top layer of cream, then use a knife or skewer to swirl it gently into the cream. For a chocolatey boost, warm your hot fudge sauce and drizzle it over, then swirl. Don’t over-swirl; you want distinct ribbons of flavor!
Step 6: Chill to Perfection
Cover the dish tightly with plastic wrap or a lid. Refrigerate for at least 4-6 hours, but honestly, overnight is even better! This chilling time is crucial because it allows the cookies to soften and absorb the moisture from the whipped cream, transforming into that incredible cake-like texture. This is where the “icebox” magic happens.
Step 7: Garnish and Serve
Once chilled, unwrap your cake. You can sprinkle those reserved larger cookie pieces on top, or even add a few extra dollops of whipped cream. Slice into squares and serve cold. It’s that simple!
What to Serve It With
This Oreo Icebox Cake is so versatile, it fits right in at almost any gathering! For a simple weekday treat, I often serve it straight from the dish with a tall glass of cold milk – it’s pure nostalgia. If I’m having friends over for brunch, I’ll make sure it’s chilled overnight and serve it in elegant square portions, perhaps with a light dusting of cocoa powder or some fresh raspberries on the side for a pop of color and freshness. It pairs beautifully with coffee, especially a rich dark roast, or a mimosa if you’re feeling festive. As a decadent dessert, especially after a hearty meal, it’s the perfect ending. I love to serve it with a scoop of vanilla bean ice cream or a drizzle of extra chocolate sauce. Sometimes, for a real treat, I’ll add a few chocolate shavings on top. For cozy snacks, especially on a movie night, it’s just the best. Everyone can grab a fork and dig in. My family absolutely loves it when I whip this up on a Friday night – it’s our unofficial start to the weekend. It’s also wonderful alongside a fruit salad if you want to balance out the richness a little bit. Honestly, it’s delicious on its own, but these little accompaniments just elevate the experience even further.
Top Tips for Perfecting Your Oreo Icebox Cake
I’ve made this Oreo Icebox Cake more times than I can count, and over the years, I’ve picked up a few tricks that make it even better. For the cookies, I always find that a mix of fine crumbs and slightly larger pieces is key. You want some of that cookie texture to remain, not just a homogenous paste. If you’re using a food processor, pulse it rather than processing until fine dust. This ensures you get those lovely pockets of soft cookie goodness. When whipping your cream, make absolutely sure it’s cold, and your bowl and beaters are chilled too. This helps the cream whip up faster and achieve those gorgeous stiff peaks. I’ve learned the hard way that over-whipping is a real thing, and it leads to a grainy texture. Stop as soon as you see stiff peaks forming; it’s better to be slightly under-whipped than over-whipped. If you’re adding the peanut butter or hot fudge swirl, don’t go crazy with it. You want to see those beautiful ribbons of flavor, not have it completely dominate the dessert. Gentle swirling is all you need! I once tried using crushed Oreos that were stale, and let me tell you, it made a difference in how well they softened. So, fresh cookies are best! For an even more decadent twist, I sometimes swap out a third of the heavy cream for mascarpone cheese or CREAM CHEESE that’s been softened and beaten smooth. It adds an incredible richness and a tang that’s just divine. Just make sure to adjust your powdered sugar accordingly, as those ingredients are a bit richer on their own. If you’re short on time and can’t wait for it to chill overnight, I’ve found that at least 4-6 hours in the fridge is the absolute minimum for the cookies to soften properly. Don’t rush that step!
Storing and Reheating Tips
One of the best things about this Oreo Icebox Cake is how well it stores. If you have any leftovers (which is rare in my house!), cover the dish tightly with plastic wrap or a lid. It will keep beautifully in the refrigerator for up to 3 days. The cookies will continue to soften slightly over time, becoming even more cake-like, so the flavor and texture actually improve over the first couple of days. I usually keep any extra whipped cream I might have made aside, and I can add a fresh dollop on top of a slice if it looks like it’s dried out a bit, though that’s rarely necessary. If you want to get really organized, you can also freeze this dessert. Wrap the completely chilled cake very well in a couple of layers of plastic wrap, then a layer of aluminum foil. It can be kept in the freezer for up to 1 month. To thaw, remove the foil and plastic wrap and let it defrost in the refrigerator for at least 24 hours. The texture might be slightly different after freezing and thawing, but it’s still quite delicious! For the glaze, I always recommend adding it just before serving if you’re not planning to eat it all at once, especially if it’s a sauce that might stiffen up too much. However, if you’re layering with things like peanut butter or hot fudge, those tend to hold up well even with refrigeration.
Frequently Asked Questions
Final Thoughts
I truly hope you give this Oreo Icebox Cake a try. It’s one of those recipes that feels like a little bit of magic, effortless to make but incredibly impressive in taste and texture. It’s the kind of dessert that brings smiles to faces, whether you’re serving it to a crowd or just enjoying a quiet moment with your family. It’s a testament to the fact that you don’t need a complicated recipe or a fancy degree in pastry to create something truly memorable. If you enjoy this, you might also want to check out my recipe for a No-Bake Chocolate Peanut Butter Pie – it has a similar vibe of easy, delicious, no-fuss indulgence! I can’t wait to hear what you think of this Oreo Icebox Cake. Please leave a comment below with your thoughts, any variations you tried, or how quickly it disappeared at your house! Happy baking (or, in this case, happy chilling)!
Oreo Icebox Cake
Ingredients
Main Ingredients
- 36 cookies Oreo cookies plus extra for crushing and garnish
- 2 cups heavy whipping cream
- 0.5 cup powdered sugar
- 1 teaspoon vanilla extract
Instructions
Preparation Steps
- Crush about 24 Oreo cookies into fine crumbs. Set aside.
- In a large bowl, whip the heavy whipping cream, powdered sugar, and vanilla extract until stiff peaks form.
- Line an 8x8 inch pan with parchment paper, leaving some overhang. Spread a layer of Oreo crumbs at the bottom.
- Spread half of the whipped cream mixture over the Oreo crumbs.
- Add another layer of Oreo crumbs, then the remaining whipped cream.
- Top with a final layer of Oreo crumbs.
- Cover and refrigerate for at least 4 hours, or preferably overnight.
- Before serving, garnish with extra Oreo crumbs or whole Oreos if desired.