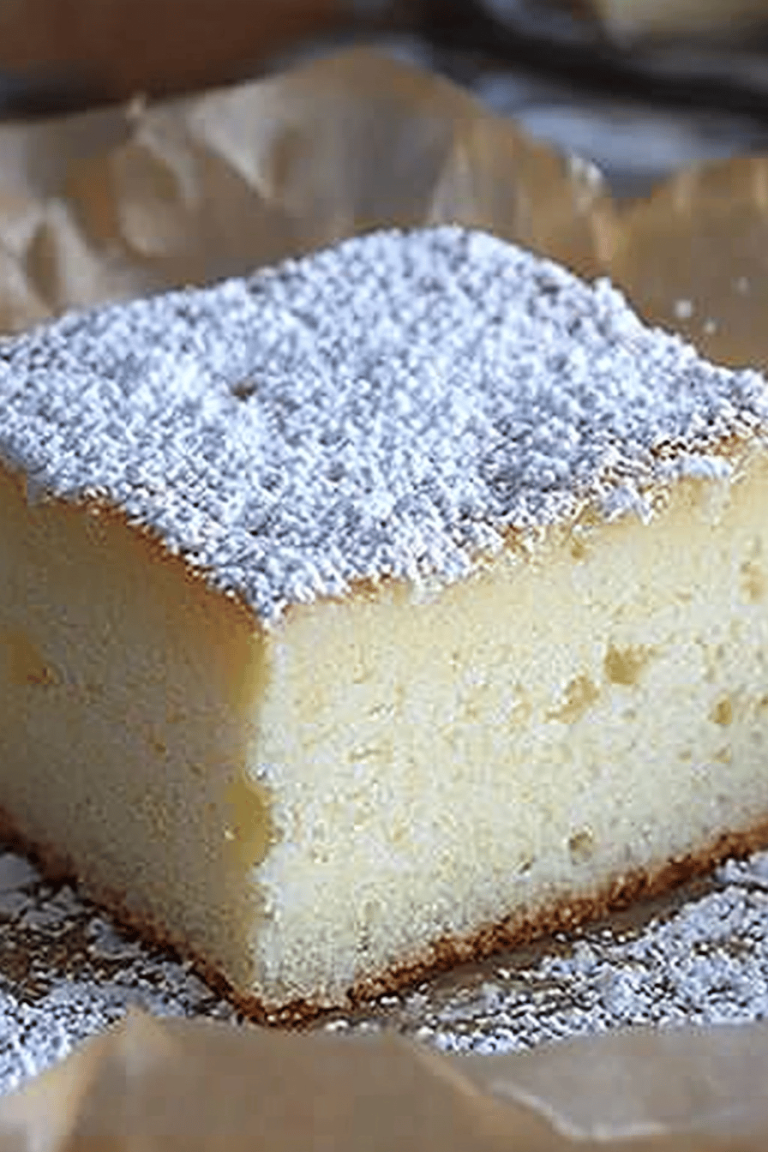
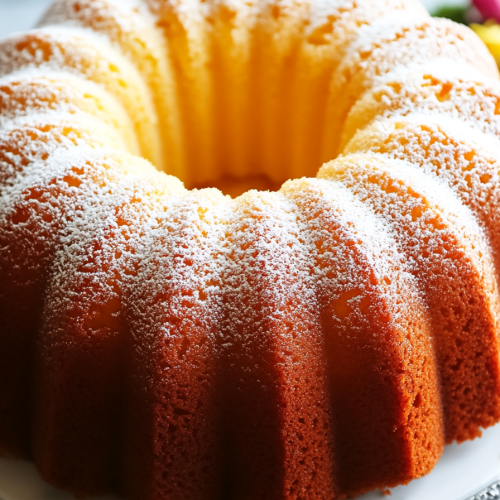
There are some recipes that just feel like a warm hug, and for me, that’s my grandma’s 7-Up Pound Cake. It’s not just a cake; it’s a memory. I can almost smell the sweet, citrusy aroma filling her kitchen on a Sunday afternoon. It’s that perfect balance of tender crumb and that subtle, delightful tang that only a bit of fizzy soda can bring. Honestly, I’ve tried other pound cakes, even fancy ones with CREAM CHEESE or sour cream, but nothing quite hits the spot like this classic. It’s surprisingly straightforward, which is a lifesaver when you need something delicious without a whole lot of fuss. This 7-Up Pound Cake is the one that always disappears first at potlucks and has my kids begging for “just one more slice” after dinner. It’s truly a winner.
What is a 7-up-pound cake?
So, what exactly *is* 7-Up Pound Cake? Think of it as a classic, old-fashioned pound cake that gets a little boost of magic from a can of 7-Up! Traditionally, pound cakes were made with a pound each of butter, sugar, eggs, and flour, hence the name. This version, however, gets its lightness and that signature moist texture from the carbonation and a touch of citrus in the soda. It’s not overly sweet, but it has a wonderful, delicate flavor that’s just delightful. It’s essentially your favorite buttery pound cake, but with a secret weapon that makes it unbelievably tender and gives it a lovely, subtle lift. It’s the kind of cake that feels both comforting and a little bit special all at once.
Why you’ll love this recipe?
There are so many reasons why this 7-Up Pound Cake has become a staple in my kitchen, and I just know you’re going to adore it too. First off, the flavor is just out of this world. It’s buttery, yes, but then there’s this delicate hint of lemon-lime from the 7-Up that makes it so refreshing. It’s not overpowering, but it’s definitely there, adding a brightness that cuts through the richness perfectly. And the texture? Oh my goodness. It’s incredibly moist and tender, with a fine, delicate crumb that just melts in your mouth. This isn’t a dense, heavy cake; it’s light and airy, yet still satisfyingly rich.
What I love most, though, is how ridiculously easy it is. Seriously, you can whip this up without breaking a sweat, even if you’re not a seasoned baker. The ingredients are all pantry staples, and the steps are straightforward. It’s the kind of recipe that makes you feel like a baking superstar without all the complicated techniques. Plus, it’s super budget-friendly! You don’t need any fancy ingredients to create something truly spectacular. And it’s so versatile. Whether you want a simple breakfast treat, an elegant dessert, or a comforting afternoon snack, this cake fits the bill perfectly. It’s a crowd-pleaser that always gets rave reviews, and I’m telling you, the smell alone will have everyone flocking to the kitchen.
How do I make a 7-Up Pound Cake?
Quick Overview
Making this incredible 7-Up Pound Cake is really quite simple. You’ll cream your butter and sugar until they’re light and fluffy, then add your eggs and vanilla. Next, you’ll alternate adding your dry ingredients and the star of the show, the 7-Up, until everything is just combined. Pour it into your prepared pan and bake until golden and a tester comes out clean. The magic happens as it bakes, transforming these simple ingredients into a wonderfully tender and flavorful cake. It’s a straightforward process that guarantees delicious results every single time.
Ingredients
For the Main Batter:
Here’s what you’ll need to get started on that glorious batter. I always try to use good quality butter; it really makes a difference in the richness. Make sure your butter and eggs are at room temperature – this is super important for getting that smooth, creamy texture when you’re mixing.
- 1 cup (2 sticks) unsalted butter, softened
- 3 cups granulated sugar
- 5 large eggs, room temperature
- 1 teaspoon vanilla extract
- 3 cups all-purpose flour, sifted
- 1/2 teaspoon salt
- 1 cup 7-Up, at room temperature
For the Glaze:
This glaze is totally optional, but honestly, it adds that extra touch of sweetness and shine that makes the cake feel extra special. It’s super simple to whip up!
- 1.5 cups powdered sugar, sifted
- 2-3 tablespoons 7-Up
- 1/2 teaspoon vanilla extract (optional)
Step-by-Step Instructions
Step 1: Preheat & Prep Pan
First things first, get your oven preheating to 325 degrees Fahrenheit (160 degrees Celsius). This slow and steady temperature is key for a pound cake that bakes evenly. Now, grab your Bundt pan – that’s my favorite for this cake because of all those beautiful nooks and crannies. Grease it really, really well with butter or baking spray, and then dust it with a little flour. Make sure you get into every single crevice! This is a crucial step to prevent your beautiful cake from sticking. I usually give it a good tap to shake out any excess flour. Then, set it aside.
Step 2: Mix Dry Ingredients
In a medium bowl, whisk together your sifted all-purpose flour and the salt. Giving these a good whisk now ensures that the salt is evenly distributed throughout the batter, so you don’t end up with salty spots. Sifting the flour also helps to aerate it, making the final cake lighter. Just a gentle whisk to combine is all you need here. Set this bowl aside for now.
Step 3: Mix Wet Ingredients
In a large mixing bowl, using an electric mixer (stand mixer or hand mixer), cream together your softened butter and granulated sugar. You want to beat this on medium-high speed for a good 3-5 minutes until it’s really light, fluffy, and pale in color. This step is called creaming, and it’s where you incorporate air into the batter, which contributes to the cake’s tender texture. Next, add your eggs, one at a time, beating well after each addition. Make sure each egg is fully incorporated before adding the next. Finally, stir in the vanilla extract. Scrape down the sides of the bowl as needed to make sure everything is well combined.
Step 4: Combine
Now it’s time to bring everything together! You’re going to alternate adding the dry ingredients and the 7-Up to your creamed butter mixture. Start by adding about a third of the flour mixture and mix on low speed until just combined. Then, add about half of the 7-Up and mix until just combined. Repeat this process: add another third of the flour, mix, then the remaining half of the 7-Up, mix. Finish by adding the last of the flour mixture and mix until just barely combined. It’s *really* important not to overmix at this stage. Overmixing develops the gluten in the flour too much, which can make your cake tough. You want to stop mixing as soon as you no longer see streaks of flour. The batter will be thick, and that’s perfectly normal.
Step 5: Prepare Filling
Since this isn’t a layered cake with a separate filling, we’re going to skip this step and focus on the batter itself! The deliciousness is all built into the main Cake Batter.
Step 6: Layer & Swirl
This is another step that’s not typically needed for a classic 7-Up Pound Cake. The beauty of this cake is its pure, unadulterated texture and flavor from the batter itself. We’re not adding any swirls or layers here; we want that beautiful, uniform texture throughout. So, simply pour your prepared batter evenly into your well-greased and floured Bundt pan. Smooth the top gently with a spatula.
Step 7: Bake
Carefully place your filled Bundt pan into the preheated oven. Bake for 60 to 75 minutes. The baking time can vary depending on your oven, so start checking around the 60-minute mark. You’ll know it’s done when the top is golden brown, and a wooden skewer or toothpick inserted into the thickest part of the cake comes out clean. If the top is browning too quickly before the inside is cooked, you can loosely tent it with aluminum foil. Once it’s done, take it out of the oven and let it cool in the pan on a wire rack for about 15 to 20 minutes. This allows the cake to set up a bit and makes it easier to release.
Step 8: Cool & Glaze
After those 15-20 minutes in the pan, carefully invert the Bundt pan onto your wire rack to release the cake. If you greased and floured it properly, it should come out cleanly! Let the cake cool completely on the wire rack before you even think about glazing it. If you try to glaze a warm cake, the glaze will just melt and slide right off. For the glaze: whisk together the sifted powdered sugar, 2 tablespoons of 7-Up, and the vanilla extract (if using) in a small bowl. Keep adding more 7-Up, just a teaspoon at a time, until you reach your desired drizzling consistency. It should be thick enough to coat the cake but thin enough to drizzle nicely. Once the cake is totally cool, drizzle the glaze all over the top, letting it drip down the sides. This looks so pretty!
Step 9: Slice & Serve
Once the glaze has set slightly, it’s time to slice into this masterpiece! I like to use a serrated knife for clean cuts. Serve it at room temperature for the best flavor and texture. You can also enjoy it slightly chilled if you prefer, but I find room temp is just perfect. This cake is wonderful on its own, but it’s also lovely with a dollop of whipped cream or some fresh berries.
What to Serve It With
This 7-Up Pound Cake is so wonderfully versatile, it fits into almost any meal or occasion. For a delightful morning start, I love to serve a slice with a hot cup of coffee or a refreshing glass of iced tea. It’s simple, satisfying, and that hint of citrus makes it feel a little more special than just a plain muffin.
When it comes to brunch, this cake truly shines. I’ll often pair it with some fresh fruit salad or maybe a light yogurt parfait. For a more elegant presentation, you can serve it on a pretty cake stand with a dusting of powdered sugar or a few fresh berries artfully arranged around it. A mimosa or a light sparkling cider is the perfect beverage pairing here.
As a dessert, it’s absolutely divine. It’s fantastic on its own with that lovely glaze, but if you want to go the extra mile, a scoop of good quality vanilla Ice Cream or a spoonful of fresh raspberries turns it into a decadent treat. It’s the perfect ending to a family dinner without being too heavy.
And for those cozy, quiet moments, like an afternoon pick-me-up or a late-night craving, this cake is your best friend. Grab a slice, a glass of milk, and curl up with a good book or a favorite movie. It’s pure comfort food. My family tradition is to have a slice with a tall glass of cold milk right before bed on special occasions – it’s our little sweet treat that never fails to make us happy.
Top Tips for Perfecting Your 7-Up Pound Cake
Over the years, I’ve made this 7-Up Pound Cake more times than I can count, and I’ve picked up a few tricks along the way that I think will really help you achieve pound cake perfection. Let’s dive into some of my favorite tips and tricks!
Zucchini Prep: Wait, zucchini? Oh right, this is where I got mixed up with another recipe! My apologies! For *this* 7-Up Pound Cake, there’s no zucchini involved! That’s one of the beauties of this recipe – no extra prep like grating or squeezing. We’re keeping it simple and focusing on the classic ingredients that make it so delicious.
Mixing Advice: The biggest lesson I’ve learned here is about overmixing. When you’re combining the wet and dry ingredients, especially after adding the flour and soda, mix on the lowest speed possible and only until *just* combined. You don’t want to see big streaks of dry flour, but if there are a few tiny ones, that’s okay. Overmixing develops the gluten, leading to a tough, dense cake. Scrape down your bowl often to ensure everything is incorporated without overworking the batter.
Swirl Customization: As I mentioned earlier, this 7-Up Pound Cake is traditionally made without swirls. It’s designed to be a beautifully uniform, tender crumb throughout. So, there’s no swirl customization needed here! We’re celebrating the pure, delightful flavor of the cake itself.
Ingredient Swaps: While this recipe is pretty perfect as is, if you’re in a pinch or want to experiment, here are a few thoughts. You can absolutely use a diet 7-Up if you’re looking to reduce sugar, but the texture might be slightly different. For the flour, if you need to go gluten-free, I’ve had success using a 1:1 gluten-free baking blend. Just be aware that gluten-free cakes can sometimes be a bit more crumbly or dense, so make sure to follow the GF blend’s instructions for best results. For the butter, you can technically use margarine, but the flavor and texture won’t be quite as rich or tender. Stick with real butter if you can!
Baking Tips: Every oven is a little different, so getting to know yours is key. I recommend using an oven thermometer to ensure your oven is actually at 325°F (160°C). If your oven tends to run hot, you might need to adjust the baking time down a bit. Placing the cake on the middle rack helps ensure even heat circulation. For the doneness test, a wooden skewer or a thin knife inserted into the center is your best bet. If it comes out with wet batter, it needs more time. If it comes out with a few moist crumbs, it’s done! If it comes out completely clean, it might be slightly overbaked, but still edible.
Glaze Variations: The simple 7-Up glaze is lovely, but you can certainly jazz it up. For a lemon pound cake vibe, add a teaspoon of lemon zest to the batter and a little extra lemon juice to the glaze. If you’re a fan of orange, a bit of orange zest in the batter and orange juice in the glaze works beautifully. For a richer glaze, you can substitute some of the 7-Up with milk or cream. Just remember to add liquids a little at a time to get the perfect consistency. Sometimes, I even like to just dust it with a little powdered sugar for a more understated look.
Storing and Reheating Tips
One of the best things about this 7-Up Pound Cake is how well it keeps! It’s incredibly forgiving, which makes it perfect for making ahead.
Room Temperature: Once your cake is completely cool and the glaze has set, you can store it at room temperature. I like to keep it in a cake carrier or a tightly covered cake stand. It will stay fresh and delicious for about 3 to 4 days. The 7-Up actually helps keep it moist, so it doesn’t dry out too quickly. Just make sure it’s covered properly to prevent it from getting stale or picking up any unwanted odors from other foods in the kitchen.
Refrigerator Storage: If you live in a very warm or humid climate, or if you’ve added something to the glaze that might spoil (like cream cheese), you might consider refrigerating it. Wrap the cooled cake tightly in plastic wrap, and then place it in an airtight container. It should be good in the fridge for about a week. However, I find that refrigeration can sometimes dry out cakes a bit, so I usually only do this if absolutely necessary.
Freezer Instructions: This cake freezes beautifully, which is a lifesaver when you want to have some on hand without it going stale. Once it’s completely cooled and glazed (or unglazed, if you prefer to glaze after thawing), wrap it very tightly in a double layer of plastic wrap, making sure there are no air pockets. Then, wrap it again in a layer of aluminum foil. It will keep in the freezer for up to 2 to 3 months. To thaw, remove the foil and plastic wrap and let it thaw completely at room temperature. If you froze it unglazed, you can then add your glaze once it’s thawed. If you froze it glazed, just let it come to room temperature.
Glaze Timing Advice: If you plan to store the cake at room temperature for a few days or freeze it, I often find it best to bake and cool the cake, then wrap it unfrosted. You can then make the glaze and frost it just before serving once it’s thawed or cooled. This keeps the glaze looking its freshest. However, if you’re going to eat it within a day or two, glazing it before storing is perfectly fine! Just ensure the cake is completely cool before adding the glaze.
Frequently Asked Questions
Final Thoughts
This 7-Up Pound Cake is more than just a recipe; it’s a little slice of happiness. It’s that perfect combination of nostalgic comfort and surprisingly simple baking. The subtle citrus notes from the soda make it stand out from other pound cakes, giving it a unique brightness that’s simply irresistible. It’s the kind of cake that brings people together, sparking conversations and creating sweet memories. Whether you’re a seasoned baker or just starting out, I promise you, this cake will become one of your go-to favorites.
If you love this recipe, you might also enjoy my classic Lemon Loaf Cake or my moist Chocolate Zucchini Bread – they both have that wonderful homemade charm! I truly hope you give this 7-Up Pound Cake a try. I can’t wait to hear how it turns out for you, and I’d love to know your favorite way to serve it! Please leave a comment below with your thoughts and any variations you try, and happy baking!
7-Up Pound Cake
Ingredients
Main Ingredients
- 3 cups all-purpose flour
- 0.5 teaspoon baking soda
- 0.5 teaspoon salt
- 1 cup unsalted butter, softened
- 3 cups granulated sugar
- 5 large eggs
- 0.5 cup milk
- 1 teaspoon vanilla extract
- 1 cup 7-Up soda
Instructions
Preparation Steps
- Preheat oven to 325°F (160°C). Grease and flour a 10-inch tube pan.
- In a medium bowl, whisk together the flour, baking soda, and salt. Set aside.
- In a large bowl, cream together the softened butter and granulated sugar until light and fluffy.
- Beat in the eggs one at a time, then stir in the vanilla extract.
- Gradually add the dry ingredients to the wet ingredients, alternating with the milk, beginning and ending with the dry ingredients. Mix until just combined. Do not overmix.
- Gently stir in the 7-Up soda.
- Pour the batter into the prepared tube pan and spread evenly.
- Bake for 60-75 minutes, or until a wooden skewer inserted into the center comes out clean.
- Let the cake cool in the pan for 10-15 minutes before inverting it onto a wire rack to cool completely.