You know those nights? The ones where the wind is howling outside, the kids are finally settled, and all you want is something warm, comforting, and utterly delicious without a fuss? Yeah, me too. And for those moments, my absolute favorite thing to whip up is this white bean soup. Seriously, it’s a lifesaver. It’s not fancy, it doesn’t require a million obscure ingredients, but it tastes like it came straight from a cozy little trattoria. I’ve tried so many bean soups over the years, from hearty lentil stews to chunky minestrones, but this creamy white bean soup? It’s the one that always, *always* hits the spot. It’s like a warm hug in a bowl, and my family devours it every single time. Plus, it’s ridiculously easy, which is a major win in my book!
What is white bean soup?
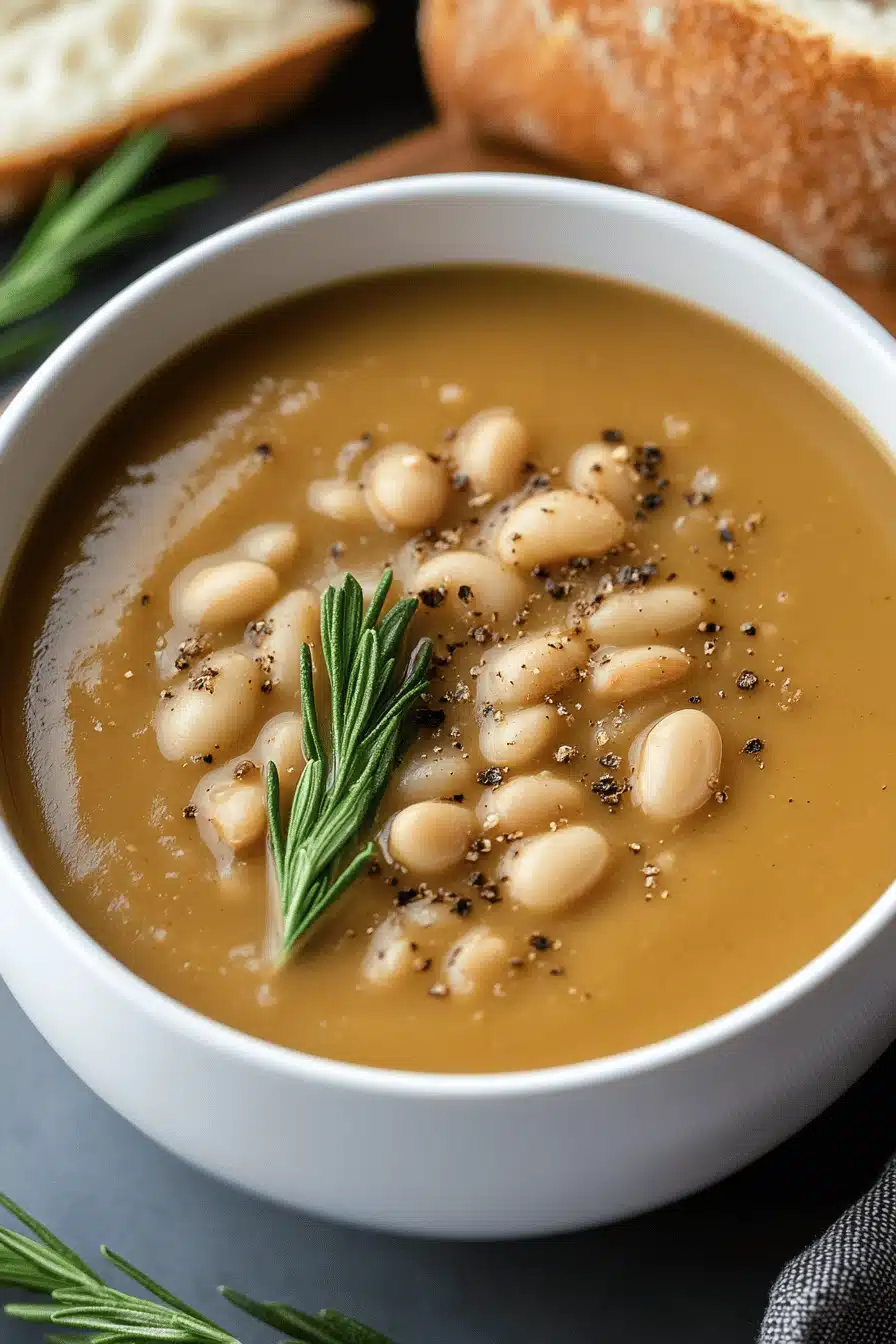
So, what exactly is this magical concoction I keep raving about? Think of it as the ultimate creamy, dreamy, flavor-packed white bean soup. It’s built on a foundation of tender cannellini beans, simmered with aromatic vegetables like onion, celery, and garlic, and then blended to a luxurious, velvety smooth consistency. But here’s where it gets really special: a touch of creaminess that makes it feel indulgent without being heavy. It’s not a thin, watery broth; it’s hearty enough to be a meal on its own, but light enough that you’ll still be dreaming about it the next day. The name “creamy white bean soup” really says it all, but trust me, the taste is so much more than the sum of its parts. It’s humble, honest, and deeply satisfying.
Why you’
There are so many reasons why this white bean soup has earned a permanent spot in my recipe repertoire, and I just know you’re going to fall in love with it too. First off, the FLAVOR. Oh my goodness, the flavor! It’s savory, it’s slightly sweet from the vegetables, and there’s this subtle depth that comes from a little secret ingredient (more on that later!). It’s incredibly satisfying. Then there’s the SIMPLICITY. I’ve made this countless times when I’ve barely had 30 minutes to spare, and it always turns out beautifully. You can practically throw it together while corralling kids or catching up on emails. It’s also wonderfully COST-EFFECTIVE. Canned beans, a few pantry staples, and some fresh veggies – that’s all it takes! It’s a fantastic way to eat well without breaking the bank. And its VERSATILITY is unmatched. Serve it as a light lunch with crusty bread, make it a hearty starter for a dinner party, or even thicken it up a bit and serve it over pasta. It’s a true chameleon in the kitchen. Honestly, what I love most about this recipe is how it makes even the most ordinary weeknight feel a little bit special. It’s like a gourmet meal without the gourmet effort. It reminds me a bit of my Grandma’s classic chicken noodle soup in its comforting appeal, but with a totally different flavor profile that’s just as beloved.
How do I make white bean soup?
Quick Overview
This white bean soup is all about building layers of flavor and then achieving that signature creamy texture. We’ll start by sautéing some essential aromatics, then simmer the beans until tender, before blending a portion of the soup to create that luscious consistency. It’s a straightforward process that results in an incredibly rewarding dish. The beauty of this method is that it’s forgiving and adaptable, meaning you can’t really mess it up! It’s the perfect example of how simple ingredients can transform into something truly spectacular.
Ingredients
For the Main Pot: What is the main pot?
2 tablespoons olive oil: Use a good quality extra virgin olive oil; it really makes a difference in the final flavor. I always keep a big bottle on hand because it’s my go-to for everything.
1 large yellow onion, chopped: I prefer yellow onion for its mellow sweetness, but sweet onions work too! Make sure it’s chopped relatively finely so it softens evenly.
2 carrots, peeled and diced: These add a lovely sweetness and a pop of color. Don’t skip them!
2 celery stalks, diced: The classic mirepoix base that brings so much savory depth.
3 cloves garlic, minced: Fresh garlic is key here. You can use more or less depending on your love for garlic, but I find three to be just right.
6 cups low-sodium vegetable broth: I use low-sodium so I can control the saltiness myself. If you only have regular broth, just be mindful when adding extra salt later.
2 (15-ounce) cans cannellini beans, rinsed and drained: These are my absolute favorite for this soup. Their creamy texture and mild flavor are perfect. You can also use Great Northern beans or navy beans.
1 teaspoon dried thyme: Thyme is fantastic with beans. If you have fresh thyme, even better – use about a tablespoon of fresh leaves.
1/2 teaspoon dried rosemary, crushed: A little goes a long way with rosemary, but it adds such a wonderful aromatic note.
Salt and freshly ground Black Pepper to taste: Seasoning is crucial! I always taste and adjust at the end.
Optional: A pinch of red pepper flakes for a hint of heat.
For Extra Creaminess:
1/2 cup heavy cream (or unsweetened full-fat coconut milk for dairy-free): This is where the magic happens! Heavy cream makes it super decadent. If you’re looking for a dairy-free option, full-fat coconut milk is surprisingly good here, adding a subtle richness. I tested this with almond milk once and it was a bit too thin, so stick with the full-fat stuff!
Optional: 1 bay leaf, added during simmering for an extra layer of subtle flavor. I usually forget this step but when I remember, it’s lovely!
Step-by-Step Instructions
Step 1: Preheat & Prep Pan
Grab a large, heavy-bottomed pot or Dutch oven – your trusty kitchen companion for this soup. Place it over medium heat. Add your olive oil and let it warm up for about 30 seconds until it shimmers slightly. This is the first step in building that wonderful flavor base, so don’t rush it!
Step 2: Mix Dry Ingredients
Okay, so this recipe doesn’t really have a “mix dry ingredients” step in the traditional baking sense. Instead, think of this as preparing your foundational flavor builders. Chop your onion, dice your carrots and celery, and mince your garlic. Having them all prepped and ready means you can add them to the pot efficiently and keep the cooking process moving smoothly. It’s all about mise en place, as the chefs say!
Step 3: Mix Wet Ingredients
This step really refers to the broth and beans. Make sure your vegetable broth is ready to go, and that your canned beans are rinsed and drained really well. Rinsing removes excess sodium and that starchy can liquid, which can sometimes make the soup a little murky. We want clear, clean flavor!
Step 4: Combine
Add your chopped onion, carrots, and celery to the warm olive oil in the pot. Sauté them, stirring occasionally, for about 7-10 minutes until they start to soften and the onion becomes translucent. You want them tender but not browned. Then, add your minced garlic and sauté for another minute until fragrant. Be careful not to burn the garlic! Pour in your vegetable broth, add the rinsed and drained cannellini beans, dried thyme, dried rosemary, and the optional red pepper flakes and bay leaf. Stir everything together. Bring the mixture to a simmer, then reduce the heat to low, cover, and let it cook for at least 20 minutes, or until the vegetables are very tender. This is where all those lovely flavors meld together.
Step 5: Prepare Filling
This step isn’t about a separate “filling” in this recipe, but rather the stage where we’ll create the creamy texture. After the soup has simmered and the vegetables are tender, you’ll carefully ladle about 2-3 cups of the soup solids and liquid into a blender. Be very careful when blending hot liquids – only fill the blender about halfway, and hold the lid down firmly with a kitchen towel. Blend until completely smooth. Alternatively, you can use an immersion blender directly in the pot and blend until you reach your desired consistency. I usually aim for about half of the soup to be blended smooth, leaving some beans and veggies whole for texture.
Step 6: Layer & Swirl
This step is a bit metaphorical for this soup. Once you’ve blended a portion of the soup, pour the pureed mixture back into the main pot with the remaining unblended soup. Stir in your heavy cream (or coconut milk). Gently heat the soup over low heat, stirring constantly, until it’s heated through and has reached that beautiful creamy consistency. Don’t let it boil vigorously after adding the cream. This gentle heating is what brings everything together and creates the luxurious texture.
Step 7: Bake
This white bean soup doesn’t actually go in the oven! The cooking happens entirely on the stovetop. The “baking” in other recipes often refers to setting a dish or creating a crust, neither of which applies here. So, just keep it on the stove over low heat, gently simmering.
Step 8: Cool & Glaze
This soup doesn’t need a glaze either. The “glaze” is that rich, creamy texture we achieved in Step 6. Once the soup is heated through and the cream is incorporated, it’s ready to go! No cooling or glazing required before serving, unless you’re planning to save some for later (see storage section!).
Step 9: Slice & Serve
Ladle your wonderfully creamy white bean soup into bowls. Garnish with a drizzle of good olive oil, some fresh parsley or chives, and a crack of black pepper. It’s best served warm, right from the pot. The creamy texture is at its peak when it’s just been heated through.
What to Serve It With
This white bean soup is so versatile, it works for almost any meal! For BREAKFAST, I know it sounds a little unusual, but a small bowl with a perfectly poached egg on top is surprisingly delightful and protein-packed. It’s a savory start to the day that’s quite different. For BRUNCH, it’s an absolute star. Serve it in pretty bowls with a side of crusty sourdough bread for dipping, and maybe a light green salad with a lemon vinaigrette. It feels elegant without being fussy. AS DESSERT? Well, not literally, but after a big dinner, a small, warm bowl of this soup can be incredibly satisfying and comforting, almost like a savory pudding. For COZY SNACKS, it’s perfect. Heat up a mug, grab a good book, and curl up on the couch. It’s the ultimate comfort food for a quiet afternoon. My kids love it with GRILLED CHEESE sandwiches – talk about a classic combo! I also love serving it with some sautéed mushrooms on top for an extra earthy flavor. Honestly, the possibilities are endless, and it always feels like a special occasion when this soup is on the menu, no matter how casual.
Top Tips for Perfecting Your White Bean Soup
I’ve made this white bean soup more times than I can count, and over the years, I’ve picked up a few tricks that I think really elevate it. For ZUCCHINI PREP, though, this recipe doesn’t use zucchini, so we’ll skip that! But if I *were* adding zucchini, I’d definitely squeeze out as much moisture as possible. For MIXING ADVICE, the key is to blend only a portion of the soup to get that creamy texture while still leaving some whole beans and veggies for interest. If you blend it all smooth, it can become a bit too one-dimensional. Aim for about half to two-thirds blended. My SWIRL CUSTOMIZATION is really about how you incorporate the cream – just gently stirring it in until it’s mostly combined creates beautiful ribbons of creaminess. Don’t overmix, or it will just look uniformly pale. For INGREDIENT SWAPS, if you can’t find cannellini beans, Great Northern or navy beans are excellent substitutes. They have a similar creamy texture. For BAKING TIPS, since it’s a stovetop soup, the main tip is gentle simmering after adding the cream. A vigorous boil can cause the cream to separate. If your soup seems too thick, just add a splash more broth or water until it’s the consistency you like. For GLAZE VARIATIONS, if you’re feeling fancy, a swirl of pesto, a dollop of Greek yogurt, or even some crispy fried shallots can be fantastic additions on top!
Storing and Reheating Tips
This white bean soup is a champion of leftovers, which is one of the reasons I love it so much. At ROOM TEMPERATURE, it’s best to let it cool down completely before covering and storing. It should be fine at room temperature for about two hours. For REFRIGERATOR STORAGE, I like to keep it in an airtight container. It will stay good in the fridge for about 3-4 days. The flavors actually tend to deepen and improve over time, so don’t be afraid to make a big batch! For FREEZER INSTRUCTIONS, this soup freezes beautifully. Let it cool completely, then transfer it to freezer-safe containers or bags, leaving a little headspace for expansion. It can stay frozen for up to 3 months. When you’re ready to reheat from frozen, thaw it in the refrigerator overnight, then gently reheat on the stovetop. For GLAZE TIMING ADVICE, if you’re storing or freezing, don’t add the cream until *after* you reheat the soup. This helps maintain its creamy texture and prevents any potential separation. When reheating, add the cream and stir gently until warmed through.
Frequently Asked Questions
Final Thoughts
So there you have it – my absolute favorite white bean soup. It’s more than just a recipe; it’s a feeling. It’s that warm, contented sigh after a long day, it’s the smell that fills the house and makes everyone gather in the kitchen, and it’s the simple joy of a nourishing, delicious meal made with love. It’s proof that you don’t need complicated techniques or expensive ingredients to create something truly wonderful. If you’re looking for other comforting soups, you might also enjoy my Creamy Tomato Basil Soup or my Hearty Lentil Stew. I really hope you give this white bean soup a try. It’s become a staple in my home, and I can’t wait to hear how yours turns out! Don’t forget to leave a comment below and let me know what you think, or share your own favorite ways to serve it. Happy cooking!
White Bean Soup
Ingredients
Main Ingredients
- 2 tablespoon Olive Oil
- 1 large Onion chopped
- 2 cloves Garlic minced
- 2 medium Carrots chopped
- 2 celery stalks Celery chopped
- 6 cups Vegetable Broth
- 2 cans Cannellini Beans rinsed and drained
- 0.5 teaspoon Dried Thyme
- 0.5 teaspoon Dried Rosemary
- 0.5 teaspoon Salt or to taste
- 0.25 teaspoon Black Pepper or to taste
- 1 cup Kale chopped
Instructions
Preparation Steps
- Heat olive oil in a large pot or Dutch oven over medium heat. Add chopped onion, carrots, and celery and cook until softened, about 5-7 minutes.
- Add minced garlic and cook for another minute until fragrant.
- Pour in the vegetable broth and add the rinsed cannellini beans, dried thyme, and dried rosemary. Bring to a boil, then reduce heat and simmer for 20 minutes.
- Season with salt and black pepper to taste.
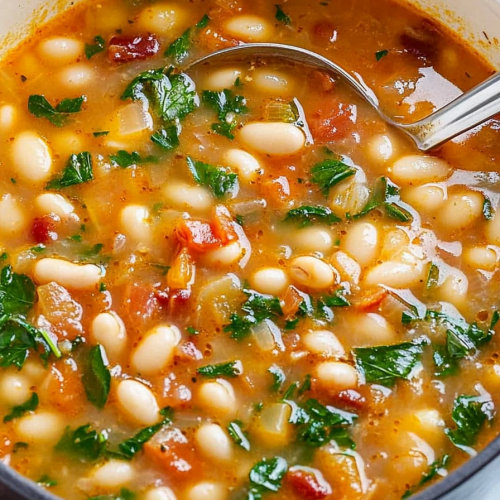
- Stir in the chopped kale and cook for another 5-10 minutes, until the kale is wilted and tender.
- Serve hot.