
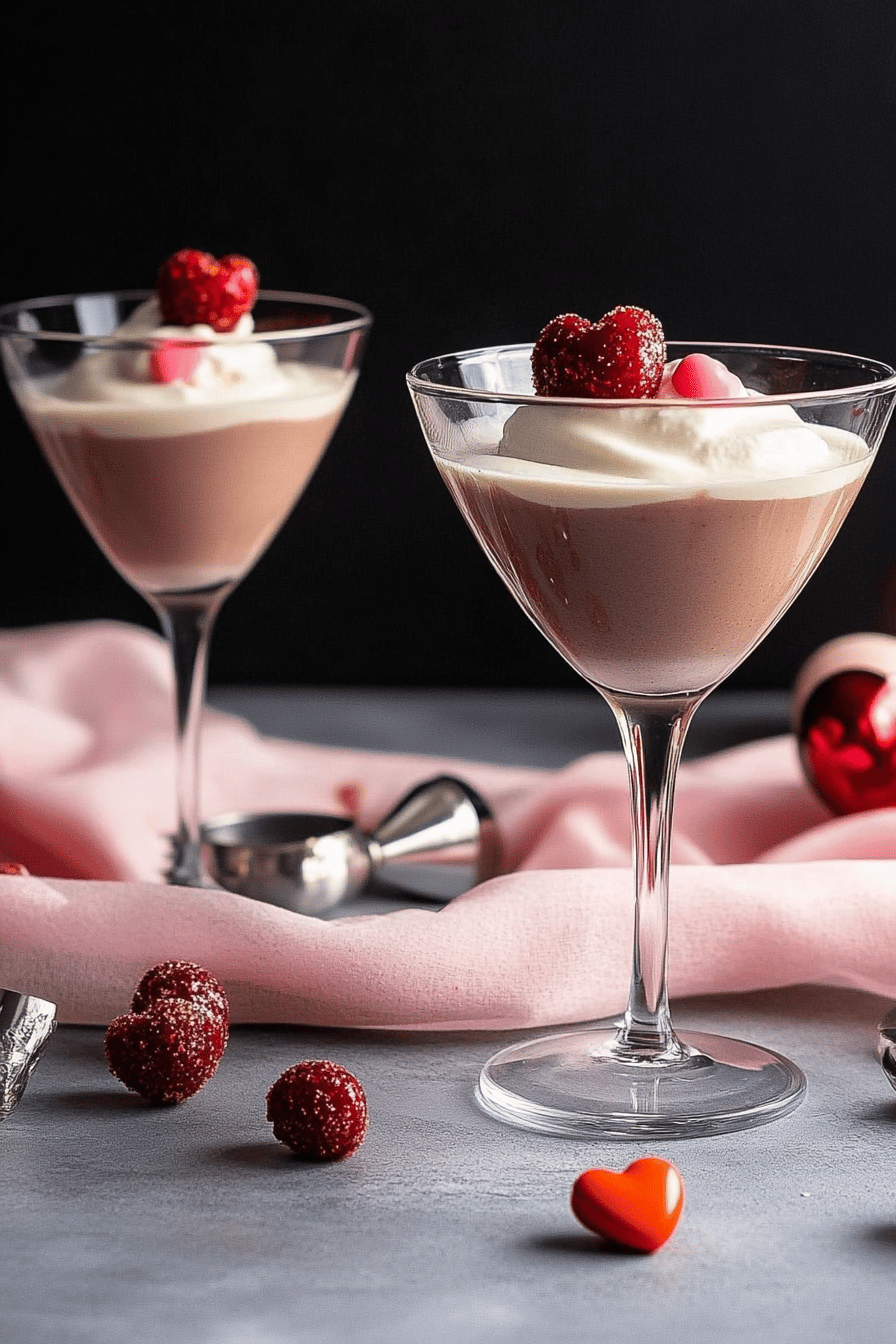
You know, I’ve been thinking a lot lately about those special little treats that just scream comfort and celebration. And when Valentine’s Day rolls around, my mind immediately goes to chocolate. Big time. It’s not just about the romantic aspect for me; it’s about creating something truly indulgent, something that feels like a warm hug in dessert form. This What is a good Valentine’s mudslide recipe? is exactly that. It’s what I whip up when I want to impress without the stress, or even when it’s just a Tuesday and I need a serious chocolate fix. It’s a bit like a super-fudgy brownie had a glorious love affair with a rich Chocolate Cake, and honestly, it’s become my absolute go-to for anything that calls for a bit of extra sweetness and cheer. Forget those complicated, multi-layered cakes that leave you exhausted; this is the kind of dessert that delivers maximum deliciousness with minimal fuss. It’s so good, my family practically inhales it!
What is a Valentine’s Mudslide?
So, what exactly is this “Valentine’s Mudslide”? Think of it as a intensely rich, deeply chocolatey dessert that’s somewhere between a dense cake and a Super Moist brownie, often with a swirl of something extra decadent thrown in. The “mudslide” part really comes from its incredible, almost overwhelming richness – it’s like diving headfirst into a pool of pure chocolatey goodness. For Valentine’s Day, I love to give it a little extra flair, maybe a hint of raspberry or a creamy white chocolate swirl, hence the “Valentine’s” twist. It’s not a traditional pie, nor is it a simple cookie, but it captures the best of both worlds: the satisfying chew of a brownie and the tender crumb of a cake. The name itself sounds a bit fun and messy, doesn’t it? And that’s part of its charm. It’s meant to be enjoyed, to be savored, and yes, maybe even to get a little bit on your fingers!
Why you’ll love this recipe?
Why do I have to start with this?Valentine’s mudslide recipe is a game-changer? First and foremost, the flavor is just out of this world. It’s profoundly chocolatey, with a depth that’s hard to achieve with simpler chocolate bakes. It’s not just sweet; it has this wonderfully complex cocoa taste that’s incredibly satisfying. Then there’s the texture. It’s so moist and fudgy, with a slightly chewy edge and a tender center that just melts in your mouth. It’s the perfect balance, not too dense, not too airy. What I also adore is its sheer simplicity. Seriously, you can have this mixed up and in the oven in under 20 minutes. It’s a lifesaver when I’m short on time but still want to make something special. And the ingredients? All pantry staples! No need for fancy, hard-to-find items. This recipe is surprisingly cost-effective, especially considering how luxurious it tastes. Plus, it’s incredibly versatile. You can adapt it so easily! I’ve made it for birthdays, holidays, or just because, and it’s always a huge hit. It’s also fantastic for when you’re craving something decadent late at night but don’t want to go through the whole process of baking a cake from scratch. It truly hits the spot every single time.
How to Make a Valentine’s Mudslide
Quick Overview
This recipe is all about creating an incredibly rich and moist chocolate dessert with minimal effort. We’ll start by combining our dry ingredients, then mix in the wet components to form a thick batter. The real magic happens when we add a special filling, swirl it through, and bake it until it’s just perfectly fudgy. It’s designed to be straightforward, ensuring even beginner bakers can achieve impressive results. The key is not to overmix, and the beautiful swirls are more forgiving than you might think!
Ingredients
For the Main Mudslide Batter:
You’ll need all-purpose flour – about 1 ½ cups. Make sure it’s spooned and leveled, not scooped directly from the bag, as that can pack it down too much. Good quality unsweetened cocoa powder is crucial here – around ¾ cup. Don’t skimp on this; it’s where all that deep chocolate flavor comes from! Granulated sugar, about 1 ¾ cups, provides sweetness without making it cloying. Baking soda, 1 teaspoon, helps with lift, and a pinch of salt, ½ teaspoon, just balances all those sweet notes and enhances the chocolate. And of course, vanilla extract, 1 teaspoon, for that lovely background aroma and flavor.
For the Wet Ingredients:
You’ll need 2 large eggs, at room temperature ideally, as they incorporate better. Melted unsalted butter, ½ cup (that’s one stick), adds richness and a wonderful tender crumb. And for the moisture and liquid, we’ll use ½ cup of milk – I’ve tested this with whole milk and even a good quality almond milk, and both work beautifully, making it incredibly creamy. You’ll also want ½ cup of hot brewed coffee or hot water. The hot liquid really blooms the cocoa powder, intensifying its flavor and making the mudslide extra moist and fudgy. Trust me, this is a pro baker’s trick!
For the Valentine’s Swirl (Raspberry Chocolate Ganache):
This is what makes it extra special for Valentine’s Day! You’ll need 4 ounces of good quality semi-sweet or dark chocolate, finely chopped. About ½ cup of heavy cream, warmed gently. And for that Valentine’s touch, 2 tablespoons of raspberry jam or preserves. You can even add a tiny drop of red food coloring if you want a more vibrant pink swirl, but it’s totally optional. I find good quality jam gives it a lovely tartness that cuts through the rich chocolate perfectly.
Step-by-Step Instructions
Step 1: Preheat & Prep Pan
First things first, get your oven preheating to 350°F (175°C). It’s so important to have the oven at the right temperature before the batter goes in. Now, grab an 8×8 inch or 9×9 inch baking pan. I like to grease it really well with butter or non-stick spray, and then line it with parchment paper, leaving some overhang on the sides. This makes lifting the baked mudslide out of the pan a breeze later on. Those little parchment “handles” are a lifesaver!
Step 2: Mix Dry Ingredients
In a large mixing bowl, whisk together your flour, cocoa powder, granulated sugar, baking soda, and salt. Whisking them thoroughly is key to ensuring everything is evenly distributed. This prevents pockets of unmixed baking soda or cocoa, which can affect the texture and flavor. I always give it a good whisk until it looks uniform, with no streaks of color.
Step 3: Mix Wet Ingredients
In a separate medium bowl, whisk together your eggs and vanilla extract. Then, slowly whisk in the melted butter until well combined. Next, pour in your milk and the hot coffee (or water) and whisk until everything is smooth. Don’t worry if it looks a bit thin at this stage; that’s normal.
Step 4: Combine
Now, pour the wet ingredients into the bowl with the dry ingredients. Using a whisk or a spatula, mix everything together until just combined. Be careful not to overmix! Overmixing develops the gluten in the flour, which can lead to a tougher, drier texture. Stop as soon as you no longer see any dry flour streaks. A few small lumps are perfectly fine.
Step 5: Prepare Filling
While the batter is resting for a moment, let’s make our raspberry chocolate swirl. Place your chopped chocolate in a heatproof bowl. Gently heat the heavy cream in a small saucepan or in the microwave until it’s just simmering (don’t let it boil). Pour the hot cream over the chopped chocolate and let it sit for about 5 minutes without stirring. Then, gently whisk until you have a smooth, glossy ganache. Stir in your raspberry jam. If you want a more vibrant pink, add a tiny drop of red food coloring and mix well.
Step 6: Layer & Swirl
Pour about two-thirds of your chocolate mudslide batter into your prepared baking pan and spread it evenly. Dollop spoonfuls of the raspberry chocolate ganache over the batter. Then, pour the remaining mudslide batter over the top. Now for the fun part: use a butter knife or a skewer to gently swirl the ganache into the batter. Make figure-eights or gentle swirls, trying not to over-mix and muddy the colors too much. You want distinct streaks of the raspberry filling throughout the chocolate. Don’t aim for perfection; a little “messiness” is what makes it look so appealing!
Step 7: Bake
Pop the pan into your preheated oven. Bake for 30-35 minutes. The edges should look set, and a toothpick inserted into the center should come out with moist crumbs attached, not wet batter. If it comes out completely clean, it might be a little overbaked, but it will still be delicious! I always err on the side of slightly underbaked for maximum fudginess.
Step 8: Cool & Glaze
Once baked, carefully remove the pan from the oven and let it cool completely in the pan on a wire rack. This is really important; it needs time to set up properly. Trying to slice it too soon will result in a gooey mess (though a delicious one!). Once it’s completely cool, you can lift it out using the parchment paper overhang. If you want to add an extra touch, you can whip up a simple chocolate glaze (a little melted chocolate mixed with a tablespoon of butter or oil) and drizzle it over the top. Or, dust it with powdered sugar for a simpler finish. For Valentine’s Day, a little drizzle of the leftover raspberry ganache or some fresh raspberries on top is beautiful.
Step 9: Slice & Serve
Once cooled and glazed (if desired), use a sharp knife to slice the mudslide into squares. I usually cut mine into 9 or 12 pieces, depending on how decadent I want each serving to be. It’s best served at room temperature or slightly warmed. If you warm it up, it becomes even more gooey and delicious!
What to Serve It With
This Valentine’s mudslide recipe is so rich and decadent, it really doesn’t need much to accompany it, but here are some of my favorite pairings:
For Breakfast: Yes, you read that right! A small square of this mudslide is an absolute treat for breakfast on a special occasion. I love pairing it with a strong cup of black coffee – the bitterness cuts through the sweetness beautifully. A few fresh raspberries on the side also add a lovely brightness. It makes a regular morning feel like a celebration.
For Brunch: If you’re hosting a brunch, this mudslide is the star dessert. Serve it with a dollop of lightly sweetened whipped cream or a scoop of vanilla bean Ice Cream. A glass of bubbly prosecco or a festive mimosa complements the richness perfectly. I often arrange some fresh berries around the serving platter to add color and a fresh contrast.
As Dessert: This is its natural habitat! For an evening treat, serve it slightly warmed with a scoop of good quality vanilla or chocolate ice cream. A drizzle of extra raspberry sauce or a sprinkle of chocolate shavings takes it to the next level. My family also loves it with a glass of red wine – a port or a rich Cabernet Sauvignon pairs wonderfully with the deep chocolate flavor.
For Cozy Snacks: On a cold evening, there’s nothing better than a mug of hot chocolate and a square of this mudslide. Or, pair it with a creamy latte. It’s the ultimate comfort food, perfect for curling up with a good book or a movie. I’ve even served it with a tiny scoop of Mint Chocolate chip ice cream for a refreshing twist!
Top Tips for Perfecting Your Valentine’s Mudslide
Over the years, I’ve made this Valentine’s mudslide recipe so many times that I’ve picked up a few tricks to ensure it turns out perfectly every single time. Here are my top tips:
Zucchini Prep: While this recipe doesn’t use zucchini, if you were looking for a similar texture with added moisture, you’d want to make sure you’re grating it finely and squeezing out as much water as possible. For this mudslide, focus on the quality of your cocoa powder! Use a good Dutch-processed cocoa if you can – it has a smoother, richer flavor.
Mixing Advice: The biggest mistake people make with chocolate baked goods is overmixing. Once the wet and dry ingredients meet, mix only until they’re just combined. You want to see a few small lumps; that’s actually a good sign that you haven’t overdeveloped the gluten. This ensures a tender, fudgy texture.
Swirl Customization: Don’t be afraid to get creative with your swirl! For Valentine’s Day, I love the raspberry ganache because the color and tartness are perfect. But you could easily use a white chocolate ganache, a caramel swirl, or even swirl in some softened cream cheese with a little sugar and vanilla. Just remember to dollop it on and use a light hand with the knife for swirling so you don’t muddy the colors too much.
Ingredient Swaps: If you don’t have milk, you can use buttermilk or even plain yogurt mixed with a little water for extra tenderness. For the hot liquid, if you’re not a coffee drinker, hot water works just as well to bloom the cocoa. I’ve also successfully used almond extract instead of vanilla for a slightly different flavor profile, but vanilla is classic for a reason!
Baking Tips: Ovens can be so finicky! My oven runs a little hot, so I often find myself pulling mine out a minute or two earlier than the recipe states. The toothpick test is your best friend here. You want it to come out with moist crumbs, not wet batter. If you accidentally bake it a little too long, don’t fret! A slightly drier mudslide is still delicious, especially when served with ice cream or a drizzle of sauce.
Glaze Variations: The simple raspberry ganache swirl is fantastic on its own, but if you want extra gloss, a quick glaze made from melting down some chocolate chips with a tiny bit of oil or butter and drizzling it over the cooled mudslide adds a beautiful shine. For a lighter option, a dusting of powdered sugar is elegant and easy. Or, skip the glaze altogether and just top with fresh berries!
Storing and Reheating Tips
I’m often asked about storing this Valentine’s mudslide recipe, and thankfully, it keeps wonderfully, maintaining its rich, fudgy texture. Here’s how I manage it:
Room Temperature: Once completely cooled, I store any leftovers in an airtight container at room temperature. It will stay delicious and perfectly moist for up to 3 days. Just make sure it’s properly sealed to prevent it from drying out. I usually place a piece of plastic wrap directly on the surface before closing the container for extra protection.
Refrigerator Storage: If you live in a very warm climate or just prefer to keep desserts chilled, you can store it in the refrigerator. Again, use an airtight container. It will keep well for up to 5 days. The texture might firm up slightly in the fridge, which is why I often recommend a quick warm-up before serving.
Freezer Instructions: This mudslide freezes surprisingly well, which is great for making ahead for holidays or just having a chocolate fix stashed away. Once completely cooled, cut it into individual portions or leave it as a whole slab. Wrap each piece tightly in plastic wrap, then in aluminum foil, or place in a freezer-safe container. It can be stored in the freezer for up to 2 months. To thaw, unwrap and let it come to room temperature, or thaw overnight in the refrigerator.
Glaze Timing Advice: If you’ve added a glaze, it’s best to add it just before serving or storing at room temperature. If you plan to refrigerate or freeze it with a glaze, the glaze might become a bit hard. In that case, I’d recommend glazing it just before you’re ready to serve it after thawing or reheating. For the swirl filling, it holds up beautifully in all storage methods.
Frequently Asked Questions
Final Thoughts
So there you have it – my go-to Valentine’s mudslide recipe. It’s the kind of dessert that makes everyone feel special, whether you’re baking it for a loved one or just treating yourself. The deep chocolate flavor, the fudgy texture, and that little pop of raspberry swirl make it truly unforgettable. It’s proof that you don’t need to spend hours in the kitchen to create something incredibly delicious and impressive. It’s forgiving, it’s adaptable, and most importantly, it’s ridiculously good. If you love chocolate, you’re going to fall head over heels for this. I can’t wait for you to try it and see how much joy it brings to your table. If you do make it, please let me know in the comments how it turned out! I love hearing your stories and seeing your variations. Happy baking, and happy Valentine’s Day!

Valentine's mudslide recipe
Ingredients
Cake Batter
- 1.75 cups all-purpose flour
- 0.5 cups unsweetened cocoa powder
- 1.5 teaspoons baking soda
- 0.5 teaspoons salt
- 1.5 cups granulated sugar
- 2 large eggs
- 0.5 cups vegetable oil
- 1 cup buttermilk
- 0.5 cups hot water
Chocolate Frosting
- 1 cup unsalted butter softened
- 0.75 cups unsweetened cocoa powder
- 4 cups powdered sugar
- 0.33 cup milk
- 1 teaspoon vanilla extract
Instructions
Preparation Steps
- Preheat oven to 350°F (175°C). Grease and flour two 8-inch round cake pans.
- In a large bowl, whisk together the flour, cocoa powder, baking soda, salt, and sugar.
- In a separate bowl, whisk together the eggs, vegetable oil, and buttermilk.
- Add the wet ingredients to the dry ingredients and mix until just combined. Stir in the hot water until the batter is smooth.
- Pour the batter evenly into the prepared cake pans.
- Bake for 30-35 minutes, or until a wooden skewer inserted into the center comes out clean.
- Let the cakes cool in the pans for 10 minutes before inverting them onto a wire rack to cool completely.
- While the cakes are cooling, prepare the frosting. In a large bowl, beat the softened butter until creamy. Gradually add the cocoa powder and powdered sugar, alternating with the milk, beating until smooth and fluffy.
- Stir in the vanilla extract.
- Once the cakes are completely cool, frost the top of one cake layer. Place the second cake layer on top and frost the top and sides of the entire cake.

![Vanilla French Beignets [120 Minutes]](https://www.recipesharinghub.com/wp-content/uploads/2026/01/auto-1f4192040def1962e5266df2da80b42e-768x1152.png)