You know those dishes that just feel like a warm hug on a plate? The ones that transport you straight to your happy place with every single bite? Well, for me, that dish is this Thai Red Curry Duck. I’m not even kidding, the moment I start simmering the coconut milk and that rich, fragrant curry paste, my whole house transforms. It smells like pure magic. It’s funny, I used to think duck was this super fancy, intimidating thing that you only ordered at restaurants. But then, one day, I was craving something truly spectacular for a special occasion, and I decided to tackle a Thai red curry duck myself. And you know what? It was surprisingly… doable! And the result? Absolutely mind-blowing. It’s so much more vibrant and flavorful than anything I’d ever imagined making at home. If you’ve ever loved a creamy, comforting curry, but want to elevate it to something truly special, you’ve got to give this one a try. It’s a game-changer, seriously.
What is Thai Red Curry Duck?
So, what exactly are we talking about when we say Thai red curry duck? Think of it as the superstar of Thai curries. It’s a dish that takes the comforting, creamy base of a classic Thai red curry – that gorgeous blend of chilies, lemongrass, galangal, and spices – and pairs it with succulent, tender duck. We’re not just talking any duck, though. The duck is usually pan-seared or roasted to get that skin beautifully crispy, and then it’s often simmered gently in the curry sauce, soaking up all those incredible flavors. It’s a beautiful dance between rich, gamey duck meat and the aromatic, slightly sweet, and subtly spicy curry. It’s essentially the ultimate comfort food with a sophisticated, exotic twist. It’s not just a weeknight meal; it’s an experience!
Why you’ll love this recipe?
Oh, where do I even begin with why you’ll absolutely fall head over heels for this Thai red curry duck? First and foremost, the flavor. It’s an absolute symphony in your mouth. You get that initial creamy sweetness from the coconut milk, followed by the complex layers of the red curry paste – it’s spicy, yes, but it’s a warm, embracing spice, not a scorching one. Then there’s the duck. When it’s cooked just right, it’s impossibly tender and rich, and it pairs so beautifully with the fragrant sauce. It’s a flavor combination that feels both decadent and incredibly satisfying. And you might think, “Duck? That sounds complicated!” But honestly, this recipe is way simpler than you’d imagine. Once you’ve got your ingredients prepped, it comes together surprisingly quickly. I’ve found that using pre-made good quality red curry paste makes all the difference, saving so much time without sacrificing authentic taste. Plus, it’s surprisingly cost-effective compared to ordering it out, especially when you consider the portion size and the sheer delight it brings. What I love most is its versatility. Serve it over jasmine rice for a classic meal, or get a little creative with some Coconut Rice for an extra touch of indulgence. It’s perfect for a date night in, a special family dinner, or even when you just need to treat yourself because, well, you deserve it. It’s a dish that feels luxurious but is totally approachable for home cooks.
How do I make Thai Red Curry Duck?
Quick Overview
The magic of this Thai red curry duck recipe lies in its ability to deliver restaurant-quality results with manageable steps. We’ll start by getting our duck breast beautifully browned and crispy, then build a rich, aromatic red curry sauce using coconut milk and fragrant aromatics. Finally, we’ll bring it all together for a gentle simmer, allowing the duck to become incredibly tender and infuse the sauce with its glorious flavor. It’s a process that feels rewarding, and the end result is utterly worth it.
Ingredients
For the Duck:
2 duck breasts (about 6-8 oz each), skin on top.
Salt, to taste
Freshly ground Black Pepper, to taste
For the Red Curry Sauce:
2 tablespoons neutral oil (like canola or vegetable)
2-3 tablespoons red curry paste (adjust to your spice preference; I always start with 2 and add more if I’m feeling brave!)
1 can (13.5 oz) full-fat coconut milk, well shaken
1 cup chicken or duck broth
1 tablespoon fish sauce (essential for authentic Thai flavor!)
1 tablespoon brown sugar or palm sugar (for a hint of sweetness)
1-2 kaffir lime leaves, bruised (optional, but they add an incredible citrusy aroma)
1/2 cup sliced bamboo shoots (canned, drained)
1/2 cup Thai basil leaves, plus more for garnish
For Serving:
Cooked jasmine rice or coconut rice
Step-by-Step Instructions
Step 1: Preheat & Prep Pan
First things first, let’s get that duck breast ready. Pat the duck breasts thoroughly dry with paper towels – this is super important for getting that skin nice and crispy. Score the duck skin in a criss-cross pattern, being careful not to cut into the meat. Season both sides generously with salt and freshly ground black pepper. Now, grab a cold, oven-safe skillet (cast iron works wonders here). Place the duck breasts skin-side down in the cold skillet. This is my secret trick! Starting in a cold pan allows the fat to render out slowly and evenly, creating that glorious crispy skin. Place the skillet over medium-low heat. Let it cook, undisturbed, for about 8-10 minutes, or until the skin is golden brown and most of the fat has rendered out. You’ll see a good amount of fat in the pan – don’t pour it all away just yet! Carefully pour off most of the rendered duck fat into a heatproof bowl (save this for roasting potatoes later – it’s liquid gold!). Flip the duck breasts and sear the other side for about 1-2 minutes, just to get a nice color. Transfer the skillet with the duck breasts to a preheated oven at 375°F (190°C) and roast for 5-8 minutes, depending on your desired doneness. For medium-rare, aim for an internal temperature of around 130-135°F (54-57°C). Once cooked, remove the duck from the skillet and let it rest on a cutting board for at least 10 minutes. This resting period is crucial for juicy, tender meat.
Step 2: Mix Dry Ingredients
While the duck is resting, we’re going to build our flavor base for the curry. In that same skillet (pour out any excess fat if needed, but leave a tablespoon or so for flavor), add your neutral oil and heat it over medium heat. Add the red curry paste and stir it around, cooking for about 1-2 minutes until it’s really fragrant. This step really blooms the spices in the paste and intensifies the flavor. Be careful not to burn it! You’ll smell it come alive, and that’s your cue.
Step 3: Mix Wet Ingredients
Now, it’s time to bring in the liquids. Pour in the shaken coconut milk and the chicken or duck broth. Whisk everything together really well, making sure to scrape up any bits of curry paste stuck to the bottom of the pan. Add the fish sauce, brown sugar (or palm sugar), and the bruised kaffir lime leaves if you’re using them. Stir everything until the sugar is dissolved. Bring the sauce to a gentle simmer.
Step 4: Combine
Let the curry sauce simmer gently for about 5-7 minutes, allowing the flavors to meld together and the sauce to thicken slightly. Taste it and adjust seasoning if needed – you might want a touch more fish sauce for saltiness or a little more sugar for sweetness. Once it tastes just right to you, stir in the drained bamboo shoots. Remove the kaffir lime leaves if you used them.
Step 5: Prepare Filling
This step is actually already done for us! The duck is our “filling” here, in a sense. Once the duck has rested, slice it thinly against the grain. The beauty of this dish is that the duck is added towards the end, so it doesn’t overcook and become tough. It just needs to warm through and absorb those amazing curry flavors.
Step 6: Layer & Swirl
This isn’t really a layering and swirling recipe in the traditional sense, but we’re going to ensure everything comes together beautifully. Gently place the sliced duck breast into the simmering curry sauce. You want to submerge it in the sauce so it can warm through and absorb those amazing flavors. Add the Thai basil leaves now, stirring them in just until they wilt. The residual heat will do the rest. The goal is a beautifully coated duck and a rich, fragrant sauce.
Step 7: Bake
We’re actually done with the baking part! The duck was baked earlier in Step 1. The curry itself is simmered on the stovetop. So, no further baking is required for the curry itself.
Step 8: Cool & Glaze
The duck is already perfectly cooked and rested. There’s no separate glaze for this particular dish; the richness comes from the duck itself and the luscious curry sauce. So, no cooling or glazing needed here!
Step 9: Slice & Serve
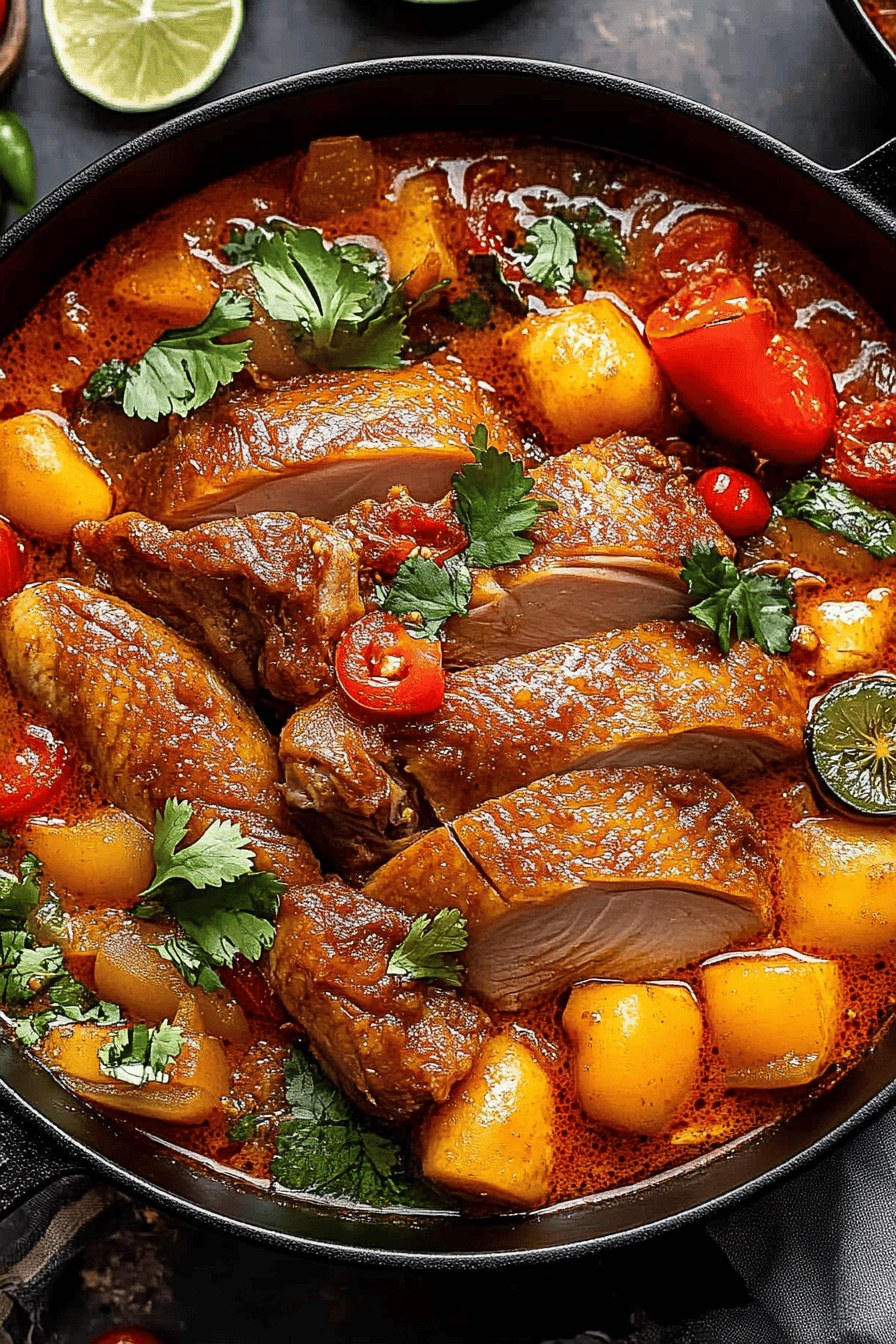
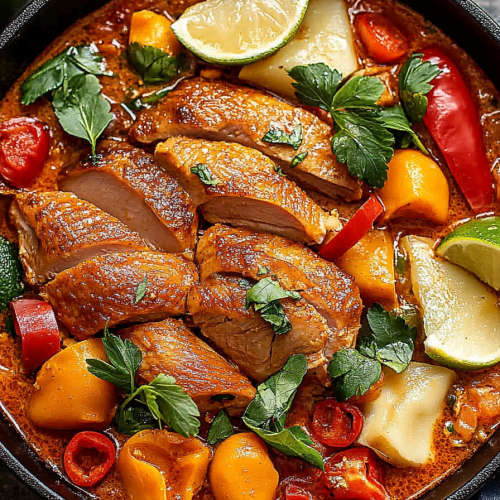
Once the duck is sliced and gently nestled into the curry sauce with the basil, it’s time to serve. Ladle the Thai red curry duck and plenty of that glorious sauce over a generous portion of hot jasmine rice. Garnish with a few extra Thai basil leaves for a pop of color and freshness. Serve immediately and watch the smiles appear!
What to Serve It With
This Thai red curry duck is so flavorful and satisfying on its own, but a few simple accompaniments can really elevate the whole experience. For a classic, comforting meal, you absolutely can’t go wrong with fluffy, steamed jasmine rice. The rice is the perfect canvas to soak up every last drop of that incredible curry sauce. If you’re feeling a bit more indulgent, try making coconut rice! It adds another layer of creamy, tropical flavor that pairs beautifully with the duck and curry. On the side, a simple green salad with a light vinaigrette can offer a refreshing contrast to the richness of the curry. Or, for a bit more crunch and color, some steamed or lightly stir-fried vegetables like broccoli, snap peas, or bell peppers are fantastic. My kids actually love it with some extra crispy fried shallots sprinkled on top – they add such a lovely texture and a hint of savory sweetness. If you’re serving this for a more special occasion, consider some fresh cucumber slices or a quick Thai-style cucumber salad on the side. It’s all about balancing those rich, savory, and slightly sweet notes. Honestly, though, just a big bowl of this curry over rice is pure bliss.
Top Tips for Perfecting Your Thai Red Curry Duck
I’ve made this Thai red curry duck more times than I can count, and over the years, I’ve picked up a few tricks that I think really make a difference. First, when it comes to the duck breast, don’t skip scoring the skin! It really helps render out the fat for that crispy texture we all crave. And remember my trick about starting in a cold pan? Trust me on this one; it’s a game-changer for crispy duck skin. Also, when you’re rendering the fat, don’t discard it all! That duck fat is pure gold for roasting potatoes or other veggies later. For the curry paste, I always recommend starting with less and adding more if you like it spicier. Brands can vary so much in heat level. You want that beautiful aroma and flavor without overwhelming your palate. Full-fat coconut milk is a non-negotiable here; the light versions just won’t give you that luxurious, creamy texture that makes this dish so special. Fish sauce is another key player – it adds that umami depth that’s quintessential to Thai cooking. You might think it smells strong on its own, but it transforms into something magical in the curry. If you can find kaffir lime leaves, do yourself a favor and get them! Bruising them slightly and simmering them in the sauce adds an incredible aromatic citrus note that’s hard to replicate. If you can’t find them, a little lime zest added at the end can help, but it’s not quite the same. For the bamboo shoots, make sure to drain them well to avoid diluting your sauce. And the Thai basil – stir it in right at the end, just until it wilts, to preserve its fresh, peppery flavor and vibrant green color. If you want to make this ahead, I’d recommend preparing the curry sauce and searing the duck separately. Reheat the sauce gently, then add the sliced duck just to warm through. This prevents the duck from overcooking and becoming tough. I’ve also found that if you find your sauce a little too thin, you can simmer it a bit longer uncovered, or mix a teaspoon of cornstarch with a tablespoon of water and stir it into the simmering sauce. Just be careful not to overcook it once the duck is in!
Storing and Reheating Tips
This Thai red curry duck is so delicious, you’ll probably want to make extra just to enjoy leftovers! If you find yourself with any, storing it properly is key to keeping it tasting fantastic. Once the curry has cooled down a bit, transfer it to an airtight container. It should keep well in the refrigerator for about 3-4 days. The flavors actually meld and deepen overnight, which is pretty wonderful. When you’re ready to reheat, the stovetop is your best friend. Gently warm the curry in a saucepan over medium-low heat, stirring occasionally. If it seems a bit thick, you can add a splash of water or broth to loosen it up. The duck is best added towards the end of reheating so it warms through without becoming tough. You can also reheat it in the microwave, but again, keep an eye on it to avoid overcooking the duck. If you’ve got a lot of extra curry and want to stash some away for future cravings, freezing is a great option. Let the curry cool completely, then transfer it to freezer-safe containers or heavy-duty freezer bags. It will keep in the freezer for up to 2-3 months. When you’re ready to thaw, transfer it to the refrigerator overnight, then reheat as usual. Now, about the duck skin – it won’t be as crispy after reheating, no matter how you do it. That’s just the nature of curried duck! But the flavor will still be incredible. If you’re planning on storing leftovers and want the best possible texture, I’d recommend slicing the duck and storing it separately from the sauce, then combining them and warming gently just before serving. This way, the duck doesn’t get completely saturated in sauce for too long.
Frequently Asked Questions
Final Thoughts
Honestly, making this Thai red curry duck at home is one of those culinary victories that just makes you feel incredibly proud. It’s proof that you can create something truly special, restaurant-worthy, right in your own kitchen. The combination of tender, flavorful duck with that aromatic, creamy red curry sauce is just perfection. It’s the kind of meal that warms you from the inside out and leaves everyone asking for seconds. I really hope you give this recipe a try. It’s become a treasured favorite in my household, and I have a feeling it might just become one of yours too. If you’re a fan of rich, complex flavors and comforting dishes, this one is definitely for you. And if you love this, you might also enjoy my Green Curry Chicken or my Massaman Beef Curry – they’re in a similar vein of deliciousness! I can’t wait to hear how yours turns out! Please leave a comment below and let me know your thoughts, or even share any fun variations you come up with. Happy cooking!
Thai Red Curry Duck
Ingredients
Main Ingredients
- 1.5 pound duck breast skin on, scored
- 2 tablespoon red curry paste
- 13.5 ounce coconut milk full fat
- 0.5 cup chicken broth
- 1 tablespoon fish sauce
- 1 teaspoon brown sugar
- 0.5 pound snow peas
- 0.5 cup bamboo shoots sliced
- 1 tablespoon vegetable oil
- fresh basil leaves for garnish
- lime wedges for serving
Instructions
Preparation Steps
- Pat the duck breasts dry with paper towels. Score the skin in a crosshatch pattern, being careful not to cut into the meat. Season generously with salt and pepper.
- Heat the vegetable oil in a large skillet or wok over medium-high heat. Place the duck breasts skin-side down and cook for 6-8 minutes, or until the skin is golden brown and crispy. Flip and cook for another 3-4 minutes for medium-rare, or longer to your desired doneness.
- Remove the duck from the skillet and let it rest on a cutting board for 5-10 minutes before slicing.
- While the duck is resting, carefully pour off most of the rendered duck fat from the skillet, leaving about 1 tablespoon. Return the skillet to medium heat.
- Add the red curry paste to the skillet and cook for 1-2 minutes until fragrant, stirring constantly.
- Pour in the coconut milk and chicken broth. Stir to combine and bring to a simmer. Add the fish sauce and brown sugar. Stir until the sugar is dissolved.
- Add the snow peas, sliced red and yellow bell peppers, and bamboo shoots to the curry. Cook for 3-5 minutes, or until the vegetables are tender-crisp.
- Slice the rested duck breast thinly against the grain.
- Serve the Thai red curry duck slices over the curry sauce and vegetables. Garnish with fresh basil leaves and lime wedges.