Oh, hello there! Come on in, make yourself comfortable. I’ve been just dying to share this recipe with you. It’s one of those absolute gems that just screams comfort and home to me. You know, the kind of thing that makes your kitchen smell like pure happiness and always, *always* disappears faster than you can say “seconds, please!” This is my go-to Texas sheet cake, and honestly, it’s a lifesaver. It’s ridiculously easy, incredibly moist, and that chocolatey glaze? Pure magic. Forget those fancy layer cakes that take hours; this one is your best friend when you need a serious chocolate fix without all the fuss. It’s like a hug in cake form, and I can’t wait for you to try it.
What is Texas sheet cake?
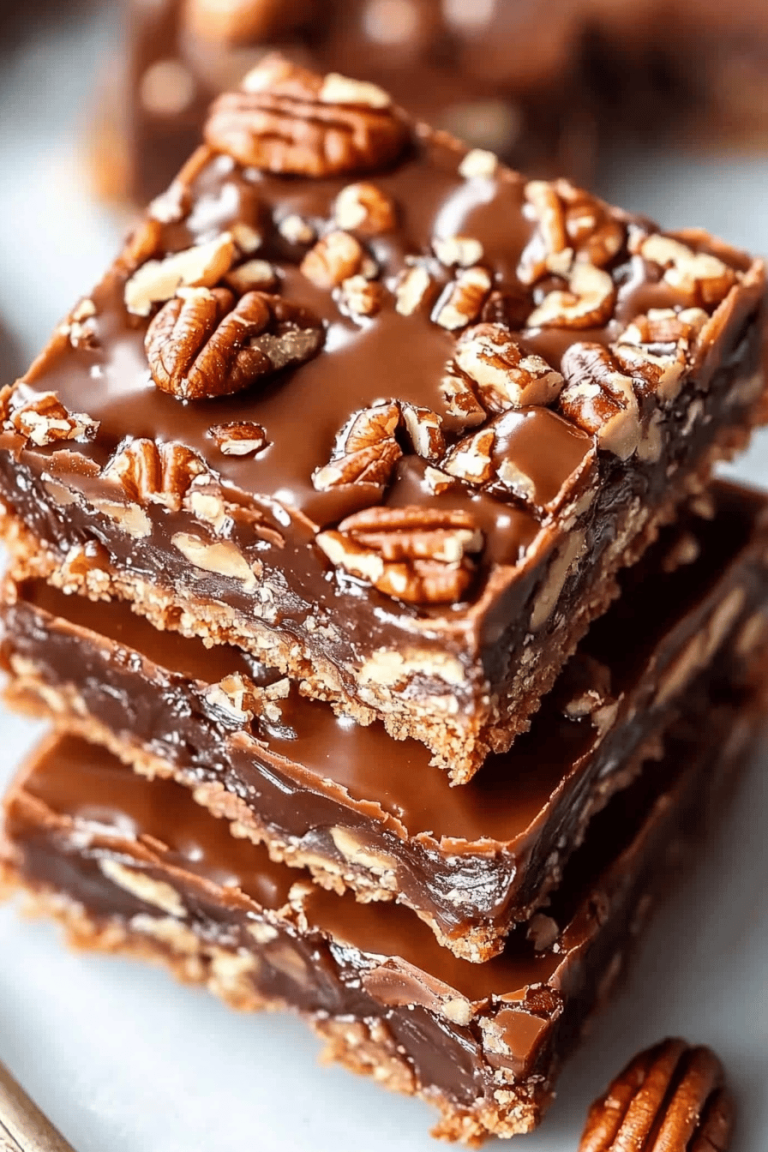
So, what exactly *is* this wonderful thing called Texas sheet cake? Think of it as the ultimate chocolate lover’s dream, baked in a single, easy-to-handle Sheet Pan. It’s essentially a dense, incredibly moist, and deeply chocolatey cake that’s baked right in the pan it’s served from. The magic truly happens with the warm, pourable chocolate glaze that sets up just enough to be fudgy but still gooey. It’s not a fussy cake at all; it’s meant to be rustic and utterly delicious. The “sheet cake” part just means it’s baked in a wide, shallow pan, making it super simple to mix, bake, and serve. It’s the kind of cake that doesn’t need a lot of decoration; its incredible flavor does all the talking. It’s often compared to a brownie in cake form, but with that signature rich chocolate flavor and a frosting that’s more like a decadent sauce.
Why you’ll love this recipe?
There are so many reasons why this Texas sheet cake has earned a permanent spot in my recipe binder, and I just know you’re going to fall in love with it too. First off, the FLAVOR! It’s intensely chocolatey without being overwhelmingly sweet, which is my sweet spot. The cake itself is so moist and tender, it practically melts in your mouth. That’s thanks to a few little tricks I’ll share, but it all boils down to simple ingredients working together beautifully. Then there’s the SIMPLICITY. Seriously, this is not an intimidating cake. You mix it up in one bowl, pour it into a pan, bake, and then pour the glaze right on top while it’s still warm. No fancy piping, no delicate layers to worry about. It’s a recipe I can whip up on a weeknight when a craving hits hard, or for a last-minute gathering. It’s also incredibly COST-EFFECTIVE. The ingredients are all pantry staples, nothing fancy or expensive. You likely have most of them already! And the VERSATILITY is amazing. While it’s perfect on its own, I love how it pairs with so many things. What I love most about this cake, though, is that it’s pure comfort. It’s the kind of dessert that brings people together and sparks genuine smiles. It’s less about presentation and more about the sheer joy of a really, really good Chocolate Cake. It’s definitely a crowd-pleaser, and I’ve never had anyone not ask for the recipe!
How do I make Texas sheet cake?
Quick Overview
This recipe is all about effortless chocolate bliss. We’ll start by whisking together a few dry ingredients, then add some wet ingredients, and bring it all together for a quick batter. The best part? No creaming butter and sugar for ages! We’ll pour this into a prepared pan and bake it until it’s just set. While it’s baking, we’ll whip up a simple, luscious chocolate glaze that gets poured over the warm cake. It’s a straightforward process that guarantees a moist, rich chocolate cake with minimal effort. This method is a lifesaver when you’re short on time but big on chocolate cravings.
Ingredients
For the Main Batter:
All-purpose flour: About 2 cups. I usually just scoop and level mine. You want it to be light and fluffy, not packed down. Sifting it beforehand can make an even lighter cake, but I often skip that step when I’m in a hurry and it still turns out beautifully. Don’t worry too much about getting it absolutely perfect for this cake.
Granulated sugar: 2 cups. This is the standard for sweetness and structure. You could try reducing it by a quarter cup if you prefer a less sweet cake, but I find this balance is just right with the chocolate.
Unsweetened cocoa powder: 3/4 cup. Use a good quality one! It really makes a difference in the depth of chocolate flavor. Natural unsweetened works wonderfully here. I’ve tried Dutch-process, and it’s good too, but has a slightly different, milder flavor.
Baking soda: 1 teaspoon. This is crucial for leavening and helps tenderize the cake.
Salt: 1/2 teaspoon. Just a little bit to balance out the sweetness and enhance the chocolate.
Butter: 1 cup (2 sticks). Unsalted is best so you can control the salt. Make sure it’s softened to room temperature – this makes it much easier to cream with the other ingredients.
For the Filling:
Buttermilk: 1 cup. This is the secret weapon for a Super Moist cake! If you don’t have buttermilk, you can make your own by adding 1 tablespoon of white vinegar or lemon juice to 1 cup of milk and letting it sit for 5-10 minutes. It sounds weird, but it works like a charm and adds that lovely tang and tenderness.
Eggs: 2 large. Room temperature eggs incorporate better. Just a quick hack: if you forget to take them out, pop them in a bowl of warm water for 5 minutes.
Vanilla extract: 2 teaspoons. Pure vanilla extract, of course! It really rounds out the chocolate flavor.
For the Glaze:
Butter: 1 cup (2 sticks). Yep, another stick of butter! It melts into the glaze and makes it extra rich.
Unsweetened cocoa powder: 6 tablespoons. This is where we build that intense chocolate topping.
Granulated sugar: 3 cups. This will create a lovely, slightly crystalline texture once set.
Milk: 1/3 cup. Any milk will do – whole, 2%, or even almond milk works in a pinch.
Vanilla extract: 1 teaspoon. Just to finish off that glorious glaze.
Step-by-Step Instructions
Step 1: Preheat & Prep Pan
First things first, let’s get that oven preheated to 350°F (175°C). And grab a 9×13 inch baking pan. You don’t want your beautiful cake sticking, so give it a good greasing with butter or cooking spray, and then a light dusting of flour or cocoa powder. I usually just use cooking spray, and then wipe it down with a paper towel to get rid of any excess. This ensures an even coating. Make sure you get into all the corners!
Step 2: Mix Dry Ingredients
In a large mixing bowl, whisk together your flour, sugar, cocoa powder, baking soda, and salt. You want to make sure everything is really well combined and there are no clumps of cocoa powder or baking soda hanging around. A good whisking here ensures even distribution, which means your cake will bake up beautifully uniform. This step is super quick!
Step 3: Mix Wet Ingredients
In a separate, medium-sized bowl, whisk together your buttermilk, eggs, and vanilla extract. Just get them all nicely combined. I usually give it a good 30 seconds of whisking to ensure the eggs are fully incorporated and the mixture is smooth.
Step 4: Combine
Now, pour the wet ingredients into the bowl with the dry ingredients. Using your mixer on low speed (or a whisk if you’re feeling strong!), mix until just combined. Be careful not to overmix! Overmixing develops the gluten in the flour, which can lead to a tough cake. Stop as soon as you don’t see any dry streaks of flour. It’s okay if the batter looks a little thick or a bit lumpy; that’s exactly what we’re going for.
Step 5: Prepare Filling
This is the best part! In a medium saucepan, melt the butter for the glaze over medium heat. Once melted, whisk in the cocoa powder and stir until it’s smooth. Then, stir in the sugar and milk. Bring the mixture to a boil, stirring constantly, and let it boil for about 1 minute. Take it off the heat and stir in the vanilla extract. This glaze is so gloriously rich and fudgy!
Step 6: Layer & Swirl
Okay, here’s where things get a little different. This isn’t a traditional layering cake. You’ll pour the batter directly into your prepared 9×13 inch pan. Spread it out evenly with a spatula. The batter might seem a bit thick, that’s perfectly normal!
Step 7: Bake
Pop that pan into your preheated oven. Bake for about 30-35 minutes. You’ll know it’s done when a wooden skewer or toothpick inserted into the center comes out with a few moist crumbs attached, but no wet batter. I always check mine around the 30-minute mark just to be sure. Ovens can vary, so it’s good to know your own!
Step 8: Cool & Glaze
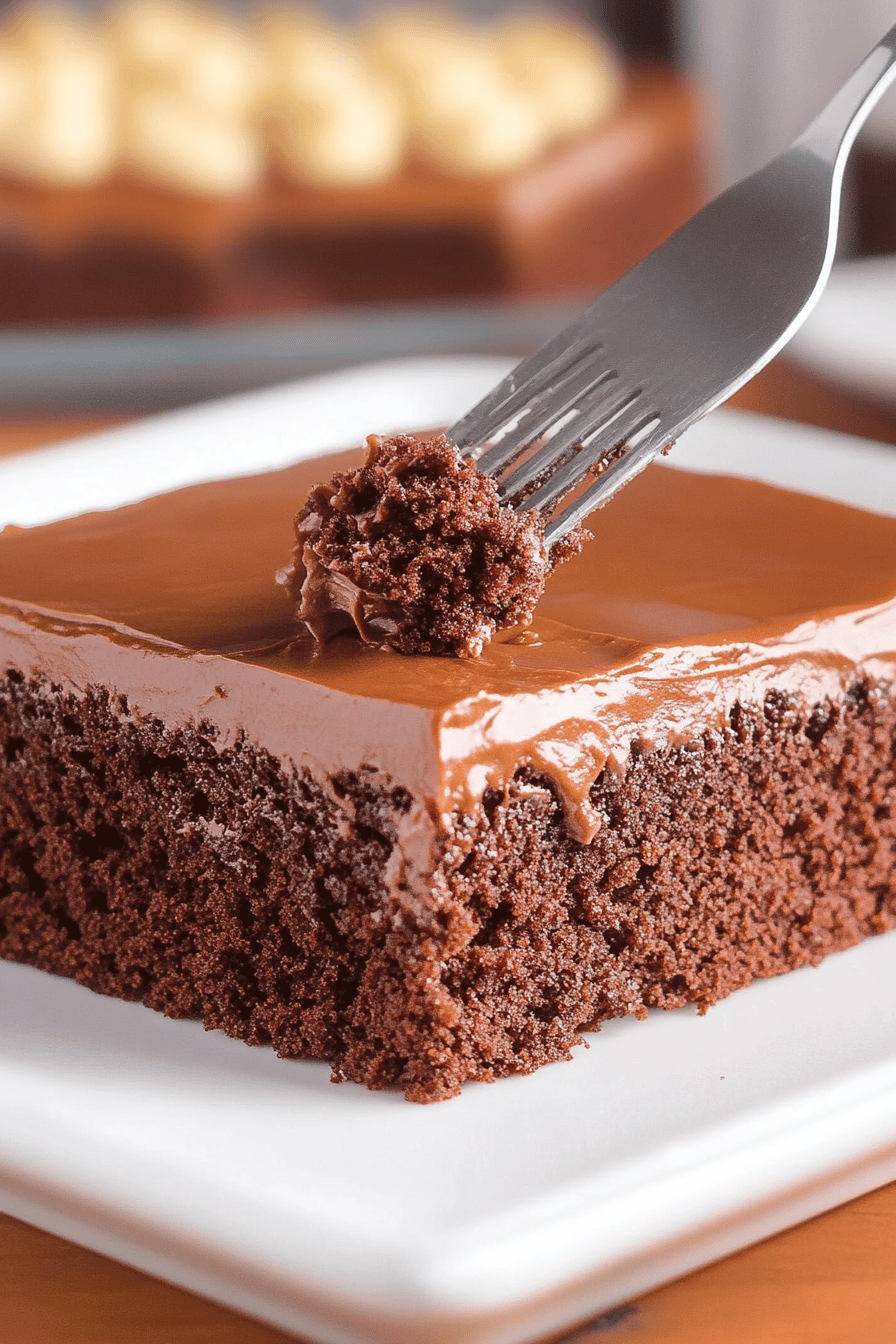
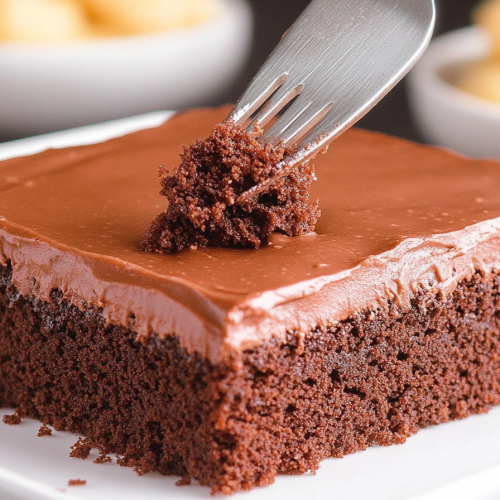
This is where the magic happens and why it’s called a sheet cake! As soon as the cake comes out of the oven, while it’s still hot, carefully pour the warm glaze evenly over the entire surface. The heat from the cake helps the glaze melt and spread beautifully. Let it sit for a few minutes to soak in, then gently spread it to cover the whole cake if needed. It will set up as it cools. Resist the urge to dive in immediately!
Step 9: Slice & Serve
Let the cake cool in the pan on a wire rack. Once it’s cooled to at least lukewarm (or even completely cool if you can wait!), slice it into squares. I like to use a sharp knife, and sometimes I’ll dip it in hot water and wipe it dry between cuts for super clean slices. The glaze will be slightly fudgy and wonderfully rich. Serve it as is – it’s perfect!
What to Serve It With
Honestly, this Texas sheet cake is so good on its own, it barely needs anything else. But if you want to elevate it or pair it with something, here are some of my favorite ways to serve it:
For Breakfast: While it might seem decadent, a small, thin slice of this cake with your morning coffee is pure heaven. It’s like a chocolatey, comforting start to the day. I sometimes cut it into very small, almost bite-sized pieces to make it feel a bit more breakfast-appropriate. It’s also surprisingly good with a glass of cold milk first thing in the morning, especially if you’ve got little ones who want a treat!
For Brunch: Serve it as a dessert option alongside fresh berries or a dollop of whipped cream. A sprig of mint can make it look extra fancy. It’s a wonderful contrast to lighter brunch fare. I also find it pairs beautifully with a slightly tart Fruit Salad – the brightness of the fruit cuts through the richness of the cake wonderfully.
As Dessert: This is its starring role, of course! Serve it with a scoop of vanilla bean Ice Cream or a drizzle of raspberry sauce. A dusting of powdered sugar can add a touch of elegance if you’re feeling fancy. It’s also fantastic with a hot cup of coffee or even a small glass of red wine for a more adult treat. The boldness of a dark roast coffee really brings out the chocolate notes.
For Cozy Snacks: This is where this cake truly shines in its casual glory. Just cut a square, grab a fork, and enjoy it while curled up on the couch with a good book or a movie. It’s the ultimate comfort food for a rainy afternoon or a late-night craving. I’ve even packed a square in my lunch bag for a mid-day pick-me-up. It travels well and always brings a smile to my face.
Top Tips for Perfecting Your Texas Sheet Cake
I’ve made this cake more times than I can count, and over the years, I’ve picked up a few tricks that make it even better. These are the things I always do now, and they’ve made a world of difference:
Zucchini Prep: Wait, zucchini? You might be asking! Yes, that’s right! The original recipe for Texas Sheet Cake actually *doesn’t* have zucchini, but I find that adding a cup or so of finely grated zucchini (about 1 medium zucchini) to the batter makes it unbelievably moist without changing the flavor one bit. You can’t taste it, I promise! Just be sure to squeeze out as much excess moisture as you can from the grated zucchini. I usually grate it into a fine mesh sieve, press down on it, and then even give it a good squeeze with my hands. This prevents your cake from getting too wet.
Mixing Advice: The golden rule for this cake, like most cakes, is *don’t overmix*. Once you add the wet ingredients to the dry, mix only until they’re just combined. A few small lumps are perfectly fine and actually preferable to a tough cake. Overmixing develops gluten, which makes cakes chewy or rubbery, and we want tender, melt-in-your-mouth goodness here.
Swirl Customization: While this is a sheet cake, and not usually swirled, if you *were* to add something like a cream cheese swirl (a common variation), make sure your cream cheese is very soft and that you don’t swirl too much. Over-swirling can make the cake dense in those areas. For this classic version, just spreading the batter evenly is key.
Ingredient Swaps: For the buttermilk, as I mentioned, making your own with milk and vinegar is a fantastic substitute. If you’re out of eggs, a flax egg (1 tablespoon flaxseed meal + 3 tablespoons water, let sit for 5 mins) can work in a pinch, though the texture might be slightly different. For the butter in the glaze, you could try a good quality margarine, but butter truly gives the best flavor and texture.
Baking Tips: Always use the middle rack of your oven for even baking. If your oven tends to run hot, you might want to reduce the temperature by about 10-15 degrees Fahrenheit and check for doneness a few minutes earlier. The toothpick test is your best friend – moist crumbs, not wet batter!
Glaze Variations: If you want to add a little something extra to the glaze, a pinch of instant espresso powder dissolved in a teaspoon of hot water before adding to the glaze really intensifies the chocolate flavor. You could also add a touch of almond extract along with or instead of some of the vanilla for a different nutty nuance.
Storing and Reheating Tips
This cake is quite forgiving when it comes to storage, which is another reason I love it so much!
Room Temperature: Once the cake has completely cooled (important!), you can store it at room temperature. I usually cover the pan tightly with plastic wrap or transfer the cake to an airtight container. It will stay fresh and delicious for about 3-4 days. The glaze actually helps to seal in moisture, so it remains wonderfully moist.
Refrigerator Storage: If your kitchen is particularly warm, or if you’ve added any perishable toppings like whipped cream, it’s best to refrigerate the cake. Again, make sure it’s cooled and stored in an airtight container. It should keep well in the fridge for up to a week. Just note that refrigeration can sometimes slightly dry out cakes, so be sure to let it come to room temperature before serving for the best texture.
Freezer Instructions: This cake freezes surprisingly well! After it’s completely cooled, you can cut it into squares and wrap each square individually and tightly in plastic wrap, then place them in a freezer-safe bag or container. It should last for about 2-3 months. To thaw, simply unwrap each piece and let it come to room temperature on a plate. You can also gently reheat slices in the microwave for a few seconds for that “freshly baked” warm and gooey experience.
Glaze Timing Advice: The key to storing this cake is to let it cool *completely* before covering it, especially if storing at room temperature or freezing. If you glaze a warm cake and then immediately cover it tightly, the steam can make the glaze sticky and the cake soggy. For refrigeration, glazing while warm is fine, but let it cool before sealing the container to prevent condensation.
Frequently Asked Questions
Final Thoughts
There you have it – my absolute favorite Texas sheet cake! It’s a recipe that has brought so much joy and deliciousness to my table, and I truly hope it does the same for yours. It’s proof that you don’t need complicated techniques or exotic ingredients to create something truly spectacular. The combination of that impossibly moist chocolate cake and the rich, fudgy glaze is just unbeatable. It’s perfect for birthdays, potlucks, or simply when you need a little slice of chocolate heaven in your day. If you love this cake, you might also enjoy my Easy Chocolate Chip Cookies or my famous Fudgy Brownies for more chocolatey adventures!
I can’t wait to hear what you think! If you give this Texas sheet cake a try, please leave a comment below and let me know how it turned out, or share your own special tips. Happy baking!
Texas Sheet Cake
Ingredients
Cake Ingredients
- 2 cups all-purpose flour
- 2 cups granulated sugar
- 0.5 cup unsweetened cocoa powder
- 1 teaspoon baking soda
- 1 teaspoon salt
- 2 teaspoons vanilla extract
- 0.5 cup vegetable oil
- 1 cup buttermilk
- 2 large eggs
- 1 cup boiling water
Frosting Ingredients
- 0.5 cup butter
- 4 tablespoons unsweetened cocoa powder
- 6 tablespoons milk
- 1 teaspoon vanilla extract
- 1 box powdered sugar
- 0.5 cup pecans chopped, optional
Instructions
Cake Preparation
- Preheat oven to 350°F (175°C). Grease and flour a 9x13 inch baking pan.
- In a large bowl, whisk together flour, sugar, cocoa powder, baking soda, and salt.
- Add vanilla, oil, buttermilk, and eggs. Beat on medium speed for 2 minutes.
- Carefully stir in boiling water. The batter will be thin.
- Pour batter into the prepared pan.
- Bake for 20-25 minutes, or until a wooden skewer inserted into the center comes out clean.
Frosting Preparation
- While the cake is baking, make the frosting. In a medium saucepan, melt butter over medium heat.
- Stir in cocoa powder and milk. Bring to a boil and cook for 1 minute, stirring constantly.
- Remove from heat and stir in vanilla.
- Gradually beat in powdered sugar until smooth. Stir in pecans, if using.
- Pour the frosting over the warm cake and spread evenly.