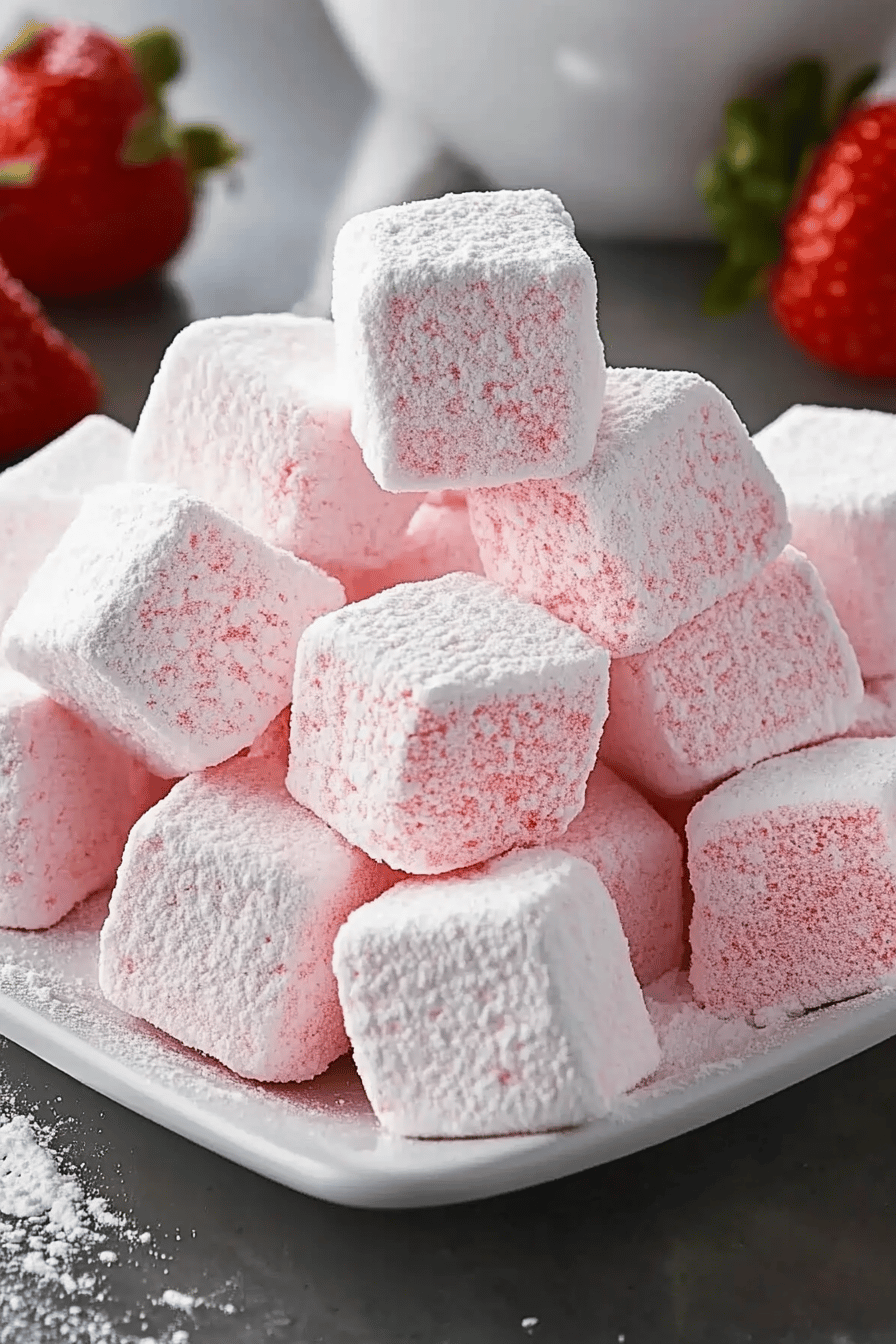
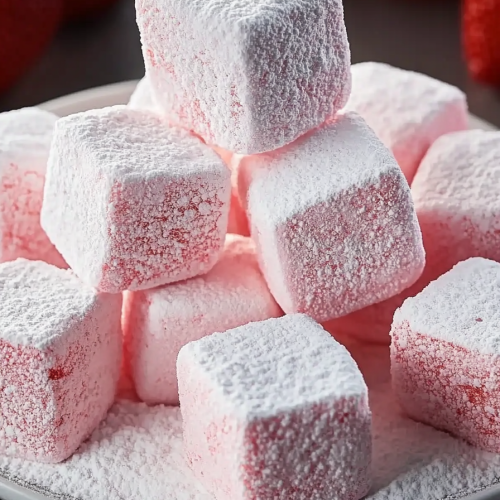
Oh, friends, I’m so thrilled to finally share this with you! You know those days when you just need a little burst of happiness? For me, that always comes in the form of something sweet, something bright, and something that reminds me of summer afternoons. And that, my darlings, is where these incredible strawberry marshmallows come in. They’re not just any marshmallows; they’re like little bites of pure joy, bursting with fresh strawberry flavor and that melt-in-your-mouth, fluffy texture we all crave. I know, I know, marshmallows might sound like something you just buy at the store, right? But trust me, making them from scratch is an absolute game-changer, and it’s surprisingly not as daunting as you might think. Think of them as a slightly more elegant, infinitely more delicious cousin to the campfire classic, but without any of the fuss. If you’ve ever loved a good strawberry shortcake or a fluffy pink dessert, these strawberry marshmallows are going to be your new obsession. They truly capture that vibrant, sweet, and ever-so-slightly tart essence of ripe strawberries in the most delightful way.
What are strawberry marshmallows?
So, what exactly *are* strawberry marshmallows, you ask? Well, imagine the cloud-like, bouncy goodness of your favorite classic marshmallows, but infused with the bright, unmistakable flavor of fresh strawberries. We’re talking about a confection that’s both nostalgic and wonderfully new. It’s essentially a carefully cooked sugar syrup, combined with gelatin to create that signature airy, yielding texture. Then, we fold in a vibrant strawberry puree and maybe a touch of strawberry extract to really make that flavor sing. The result? A treat that’s less about being sticky and more about being enchantingly soft and flavorful. Think of it as turning that perfect, juicy strawberry into a fluffy dream. It’s essentially a sophisticated candy that feels wonderfully homemade and made with love, a far cry from the standard vanilla or even flavored store-bought options. They’re the kind of treat that makes people say, “Wait, you *made* these?!”
Why you’ll love this recipe?
What are some of the reasons why this recipe has become a staple in my kitchen, and why I just *know* you’re going toflavor. Oh my goodness, the flavor! It’s like capturing the essence of a perfect summer strawberry, all sweet and slightly tangy, but in this incredibly soft, ethereal bite. It’s so much more vibrant and fresh than anything you can buy in a bag. Then there’s the simplicity. I know making marshmallows from scratch sounds intimidating, but I promise you, once you try this method, you’ll be hooked. It’s mostly hands-off time, letting the mixer do all the hard work, which is a lifesaver when things are busy. And speaking of busy, these are surprisingly cost-effectiveWhat are some great homemade marshmallows for a fraction of the price?versatility is just amazing. You can use them in so many ways! I’ll get into that more later, but imagine them melting into a hot chocolate, tucked into a mug cake, or just enjoyed on their own for that ultimate sweet craving. What I love most about this recipe is the sheer delight it brings. It’s a little bit magical, and it always makes people smile. It’s a step up from your everyday sweets, but still approachable enough for a weekend project that feels incredibly rewarding.
How to Make Strawberry Marshmallows
Quick Overview
Making these strawberry marshmallows is a two-part magical process: creating the stable, fluffy base and then infusing it with vibrant strawberry goodness. You’ll start by blooming your gelatin, then cooking a sugar syrup to a precise temperature – this is key for the right texture! Once that’s ready, it gets whipped into a snowy white, incredibly light mixture, into which we’ll gently fold in the luscious strawberry puree. The whole thing then sets up in a prepared pan, and after a few hours, you’ll have beautiful, soft, strawberry-kissed clouds ready to be cut and enjoyed. It’s surprisingly straightforward once you get the hang of the syrup temperature; the rest is just patient waiting and a little bit of magic from your stand mixer!
Ingredients
For the Main Marshmallow Base:
1/2 cup (120ml) Cold Water: This is for blooming your gelatin. Make sure it’s cold; it helps the gelatin dissolve evenly.
3 envelopes (about 7g each) Unflavored Gelatin: The backbone of our marshmallow! Don’t skimp on quality here; it makes a difference.
1 1/2 cups (300g) Granulated Sugar: Our primary sweetener. We need a good amount to get to that soft-ball stage.
1/2 cup (120ml) Light Corn Syrup: This is crucial for preventing crystallization and ensuring a smooth, chewy texture. You can sometimes find it labeled as glucose syrup.
1/2 cup (120ml) Water: For the sugar syrup. Make sure to use this amount precisely!
Pinch of Salt: Just a little bit to balance the sweetness. Don’t skip it!
For the Strawberry Flavor:
1 cup (about 150g) Fresh or Frozen Strawberries: I love using fresh when they’re in season for the brightest flavor, but frozen work perfectly too! Just thaw them before pureeing.
1 tablespoon Fresh Lemon Juice: This helps to enhance the strawberry flavor and adds a lovely hint of tartness.
Optional: 1/2 teaspoon Strawberry Extract: If you want a really intense strawberry punch, a little extract goes a long way. I sometimes add it if my strawberries aren’t super flavorful.
For Dusting:
1/4 cup (30g) Powdered Sugar: To keep them from sticking to everything.
1/4 cup (30g) Cornstarch: This is the secret to that beautiful, non-sticky finish. The combination of powdered sugar and cornstarch is key!
Step-by-Step Instructions
Step 1: Preheat & Prep Pan
First things first, let’s get our workspace ready. Lightly grease an 8×8 inch baking pan with a neutral oil (like vegetable or canola) or cooking spray. Then, line it with parchment paper, leaving some overhang on the sides – this makes lifting the set marshmallows out so much easier. You can also lightly grease the parchment paper itself. While you’re at it, dust the bottom and sides of the pan generously with a mixture of powdered sugar and cornstarch. You want a good, even coating so the marshmallows don’t stick later. Set this aside. Now, get your stand mixer ready with the whisk attachment. In the bowl of your stand mixer, pour in the 1/2 cup of cold water and sprinkle the unflavored gelatin evenly over the top. Let it sit for about 5-10 minutes until it’s bloomed and looks like a thick, jelly-like mass. Don’t stir it yet!
Step 2: Mix Dry Ingredients
Okay, this step is actually more about getting the *wet* components ready and understanding the temperature. The “dry” ingredients here are really just the sugar and corn syrup that will be cooked. In a medium saucepan, combine the granulated sugar, light corn syrup, and the 1/2 cup of water. Add that tiny pinch of salt. Give it a gentle stir just to make sure the sugar is moistened. This is the base for our sugar syrup, which will become the fluffy marshmallow. We’re not mixing anything else right now; the magic happens when this syrup cooks!
Step 3: Mix Wet Ingredients
Now it’s time to cook our sugar syrup. Place the saucepan with the sugar, corn syrup, and water over medium heat. Stir continuously until the sugar has completely dissolved. Once dissolved, stop stirring! You can use a wet pastry brush to gently wipe down the sides of the pan if any sugar crystals form – this is really important to prevent crystallization later. Let the syrup boil gently and use a candy thermometer. We’re looking for it to reach 240°F (115°C), which is the soft-ball stage. This temperature is critical for the marshmallow’s texture, so don’t rush it and definitely use a thermometer!
Step 4: Combine
Once your sugar syrup reaches that perfect 240°F (115°C), carefully remove the saucepan from the heat. It’s going to be extremely hot, so be cautious! With your stand mixer running on low speed (you’ll switch it to medium-high shortly), slowly and carefully pour the hot sugar syrup in a thin, steady stream down the side of the mixer bowl, into the bloomed gelatin mixture. Be careful not to pour it directly onto the whisk, as it can splash. Once all the syrup is added, increase the mixer speed to medium-high and whip for about 10-15 minutes. The mixture will become thick, glossy, and incredibly voluminous, turning a beautiful snow-white color. It should hold stiff peaks.
Step 5: Prepare Filling
While your marshmallow base is whipping away, let’s get that gorgeous strawberry flavor ready. If you’re using fresh strawberries, wash them, remove the stems, and roughly chop them. If using frozen, just make sure they’re thawed. Place the strawberries in a small blender or food processor and blend until you have a smooth puree. You might want to strain this through a fine-mesh sieve if you prefer a smoother marshmallow without any tiny seeds, but I usually don’t bother – it adds to the rustic charm! Stir in the lemon juice and the optional strawberry extract into the strawberry puree. This is our flavor bomb!
Step 6: Layer & Swirl
Once the marshmallow mixture is thick and fluffy, it’s time to add our strawberry goodness. Gently fold about half of the strawberry puree into the marshmallow mixture. Be careful not to overmix; you want streaks of pink and white, not a uniform pale pink. You can use a spatula to create gentle swirls. Pour about half of this swirled marshmallow mixture into your prepared pan. Dollop the remaining strawberry puree over the top, then carefully spoon the remaining marshmallow mixture over that. Use a skewer or a knife to gently swirl the colors together, creating beautiful marbled patterns. Don’t over-swirl, or you’ll lose the distinct marbling!
Step 7: Bake
Actually, we don’t bake marshmallows! After you’ve swirled the mixture in the pan, spread the top as evenly as possible with an offset spatula or the back of a spoon. You want a relatively smooth surface so they set evenly. Now, dust the top generously with a bit more of the powdered sugar and cornstarch mixture. This prevents the top from getting sticky while it sets. Cover the pan loosely with plastic wrap (or a clean kitchen towel) and let it sit at room temperature for at least 4 hours, or preferably overnight, to set completely. You’ll know they’re ready when they’re firm to the touch and no longer sticky.
Step 8: Cool & Glaze
As mentioned in the previous step, the “cooling” is actually the setting process. Once the marshmallows have set for at least 4 hours, or overnight, you’re ready to cut them. This is the fun part! Lift the marshmallow slab out of the pan using the parchment paper overhang. Place it onto a cutting board that has been generously dusted with more of the powdered sugar and cornstarch mixture. Use a sharp knife, lightly oiled or dusted with the coating mixture, or kitchen shears to cut the marshmallow into your desired shapes – squares are traditional, but I sometimes cut them into little hearts or rectangles. As you cut each piece, toss it in the dusting mixture to coat all sides and prevent sticking. This is your “glaze” in a way – the coating that makes them irresistible to handle!
Step 9: Slice & Serve
Once all your beautiful strawberry marshmallows are cut and coated, they’re ready to be admired and, of course, devoured! Arrange them on a pretty serving platter. They look absolutely stunning just as they are, with their delicate pink swirls and fluffy texture. I love them as a simple, elegant treat for guests or just for a little afternoon indulgence. You can also use them in so many ways – they melt beautifully into hot chocolate, add a delightful chewiness to baked goods, or are just perfect on their own with a cup of tea or coffee.
What to Serve It With
These strawberry marshmallows are truly versatile little gems, and they add a special touch to so many occasions! For Breakfast, they’re a delightful surprise to have alongside a fresh cup of coffee or tea. Imagine a single, perfect marshmallow sitting next to your morning pastry – it’s just a little bit of sunshine to start the day. For Brunch, they can elevate your presentation significantly. You could arrange them on a tiered stand with other pastries, or even use them to garnish a fruit salad for a pop of color and sweetness. They pair wonderfully with mimosa or sparkling rosé! As a Dessert, they’re pure indulgence. They are absolutely divine melted into a rich hot chocolate, creating a strawberry-infused wonderland. You can also use them to top individual chocolate lava cakes or even as a delightful element on a dessert board alongside berries and cookies. For Cozy Snacks, well, this is where they truly shine for me! They are the ultimate companion to a good book and a warm mug of something comforting. They satisfy that sweet craving without being overly heavy, and they just feel like a hug in edible form. My family absolutely loves them when we have movie nights; they’re so much more fun than popcorn sometimes!
Top Tips for Perfecting Your Strawberry Marshmallows
Over the years, I’ve definitely learned a few tricks to ensure these strawberry marshmallows turn out perfectly every single time. One of the most important things is Zucchini Prep – oh wait, that’s my zucchini bread! For marshmallows, it’s all about the sugar syrup. So, for Mixing Advice, the biggest tip I can give you is patience and precision with that sugar syrup temperature. If it’s not hot enough, your marshmallows won’t set properly; too hot, and they can become tough. Trust your candy thermometer! When you’re whipping the mixture, make sure it goes from translucent to opaque white and gets super fluffy – that’s your sign it’s ready. For Swirl Customization, don’t be afraid to get a little artistic! I find that gentle, sweeping motions with a skewer create the prettiest marbled effects. You want to see distinct ribbons of strawberry and marshmallow, not a uniform pink color. If you want more intense color, you can add a drop of pink food coloring to your strawberry puree, but I love the natural hue. For Ingredient Swaps, I haven’t personally experimented much with different sugars for the main syrup, as the classic granulated sugar and corn syrup combo really works best for stability and texture. However, if you’re feeling adventurous, some people have success using honey or maple syrup, but be aware that these can affect the final color and flavor profile, and might require slight adjustments to the cooking temperature. For Baking Tips, remember, no baking! The setting time is key. Letting them sit at room temperature for 4-6 hours, or overnight, is crucial. Don’t try to rush it in the fridge; it can sometimes make them too firm or wet. My biggest Glaze Variations tip is the coating! That powdered sugar and cornstarch mix is your friend. Coat them generously as you cut them. You can experiment with adding a tiny bit of freeze-dried strawberry powder to the coating for extra flavor and color, but the classic dusting is perfect on its own. And one last thing I learned the hard way: make sure your stand mixer bowl and whisk are *spotlessly* clean before you start – any grease can mess with the gelatin!
Storing and Reheating Tips
These beautiful strawberry marshmallows are best enjoyed fresh, but they do store quite well if you follow a few simple rules. For Room Temperature storage, keep them in an airtight container, layered between sheets of parchment paper or wax paper to prevent sticking, for up to 1-2 weeks. Just make sure your kitchen isn’t too warm and humid, as that can cause them to get sticky. I find they keep their best texture when stored this way. For Refrigerator Storage, while it’s not my preferred method for maintaining the ideal soft texture, you can store them in the fridge for up to 2-3 weeks if you live in a very humid climate or need them to last longer. Again, an airtight container is essential, and make sure to let them come to room temperature for about 30 minutes before serving to soften up. Freezer Instructions are also an option if you want to make a big batch to enjoy over a longer period. Wrap the cut marshmallows tightly in plastic wrap, then place them in a freezer-safe bag or container. They can be stored in the freezer for up to 3 months. To thaw, unwrap them and place them on a parchment-lined tray at room temperature for a few hours until they reach their perfect fluffy state. The Glaze Timing Advice is simple: the dusting is applied *after* they are cut and set, and it’s what keeps them from sticking to each other. It’s not really a “glaze” in the traditional sense, but this coating is what you’ll reapply slightly if they start to feel a bit tacky.
Frequently Asked Questions
Final Thoughts
There you have it, my friends! My absolute favorite recipe for strawberry marshmallows. I really hope you give these a try. They’re more than just candy; they’re little bursts of handcrafted happiness that can brighten any day. Whether you’re looking for a fun kitchen project, a unique treat for a special occasion, or just a way to satisfy that sweet craving with something homemade and utterly delicious, these strawberry marshmallows are the answer. They’re a testament to how simple ingredients can be transformed into something truly magical with a little bit of care and patience. If you love these, you might also enjoy my fluffy vanilla marshmallows or my vibrant raspberry gummies – they use similar techniques and bring that same homemade charm! I can’t wait to hear how yours turn out, so please, leave a comment below and tell me all about it, or share a photo on social media! Happy baking (or, in this case, happy setting)!
Strawberry Marshmallows
Ingredients
Main Ingredients
- 0.25 cup Strawberry puree
- 3 large Egg whites room temperature
- 1.5 cup Granulated sugar
- 0.5 cup Corn syrup
- 0.25 cup Water
- 1 tablespoon Vanilla extract
- 0.5 teaspoon Cream of tartar
- 1 cup Powdered sugar for dusting
- 0.5 cup Cornstarch for dusting
Instructions
Preparation Steps
- Line an 8x8 inch baking pan with parchment paper, leaving an overhang on all sides. Lightly grease the parchment paper.
- In a small saucepan, combine granulated sugar, corn syrup, and water. Heat over medium heat, stirring until sugar dissolves. Cook without stirring until the mixture reaches 240°F (115°C) on a candy thermometer.
- While the syrup is cooking, whip the egg whites with cream of tartar in a clean, dry bowl of a stand mixer until soft peaks form.
- Once the syrup reaches 240°F, slowly and carefully pour it in a thin stream into the whipping egg whites while the mixer is running on medium-high speed. Continue to whip until the mixture is thick, glossy, and has cooled to room temperature (about 10-15 minutes).
- Fold in the strawberry puree and vanilla extract until just combined.
- Pour the marshmallow mixture into the prepared pan and spread evenly. Let it set at room temperature for at least 4 hours, or preferably overnight.
- Combine powdered sugar and cornstarch in a small bowl. Dust your work surface and a sharp knife or pizza cutter with the mixture.
- Lift the marshmallow slab out of the pan using the parchment paper overhang. Cut into desired shapes. Dust all sides of the marshmallows with the powdered sugar-cornstarch mixture to prevent sticking.