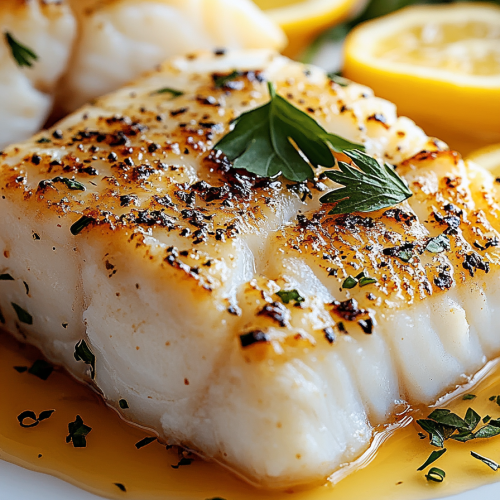
You know those nights? The ones where you get home, the fridge looks a bit sad, and the thought of a complicated meal feels utterly impossible? Yeah, I know them well. That’s precisely when this seared cod recipe becomes my absolute superhero. It’s the dish I pull out when I need something healthy, incredibly flavorful, and ridiculously quick. Forget those fussy restaurant-style fish dishes; this is the real deal, the kind of meal that makes you feel like you’ve accomplished something amazing without breaking a sweat. It’s so simple, yet the results are genuinely stunning. Honestly, the first time I made this, my partner just looked at me with wide eyes and said, “Is this restaurant-quality?” And that, my friends, is high praise indeed in our house! It’s the perfect answer to the age-old question: “What’s for dinner?” without the accompanying sigh.
What is seared cod?
So, what exactly are we talking about with this seared cod recipe? At its heart, it’s about taking beautiful, flaky cod fillets and cooking them in a hot pan with just the right touch of fat until they develop this gorgeous, golden-brown crust. The inside stays tender, moist, and practically melts in your mouth. Think of it as the most elegant, simple preparation for fish you can imagine. It’s not fried, it’s not baked in a sauce (though you *can* add sauce later!), it’s just pure, unadulterated goodness from the sea, enhanced by a few simple flavorings and a good sear. The “searing” part is key; it creates a lovely texture contrast and locks in all those delicious juices. It’s essentially a celebration of fresh fish, proving that sometimes, the simplest things are truly the best.
Why you’ll love this recipe?
There are so many reasons why this seared cod recipe has earned a permanent spot in my weekly rotation, and I just know you’re going to feel the same way. First off, the flavor. Oh, the flavor! Even with just a few basic seasonings, the cod itself has this delicate, slightly sweet taste that just sings. When you get that perfect sear, you have these little crispy bits on the edges that are just divine. It’s so much more exciting than just steaming or baking fish plain. Then there’s the sheer simplicity. I’m talking about a meal that can go from fridge to table in under 20 minutes, and that’s not an exaggeration! This is a lifesaver on those crazy weeknights when you’re juggling work, kids, and just about everything else. Plus, cod is generally quite affordable, especially when you buy it in larger fillets. It makes for a healthy, protein-packed meal that doesn’t break the bank, which is always a win in my book. And talk about versatility! This seared cod is fantastic on its own, but it’s also a perfect canvas for so many other flavors. You can top it with a fresh salsa, a creamy lemon-dill sauce, or even serve it over a bed of rice or quinoa. It’s the kind of dish that feels special enough for company but is also perfectly comforting for a quiet night in. Honestly, what I love most about this recipe is that it takes humble ingredients and transforms them into something truly remarkable with minimal effort. It’s a confidence booster in the kitchen!
How do you make seared cod?
Quick Overview
This recipe is all about getting a beautiful sear on your cod fillets quickly and efficiently. We’ll start by patting the fish dry to ensure a good crust, season it generously, and then sear it in a hot pan with a bit of oil or butter. The whole process, from start to finish, takes less time than it takes to decide what to watch on streaming! The key is not to overcrowd the pan and to let the fish cook undisturbed for a few minutes to achieve that golden-brown perfection. It’s truly one of the most straightforward ways to prepare fish and guarantees a delicious, flaky result every single time.
Ingredients
For the Cod:
Cod fillets: I usually go for about 6-ounce fillets, but any size works. Look for fillets that are thick and uniform in thickness so they cook evenly. Fresh is always best, but good quality frozen cod that’s been properly thawed works too. Just make sure to pat it really, really dry! The drier the surface, the better the sear you’ll get.
Olive oil or butter: About 1-2 tablespoons. I often use a mix of both! The olive oil has a higher smoke point, and the butter adds a wonderful richness and flavor. Don’t be shy with it – it’s crucial for getting that crust.
Salt: Kosher salt is my go-to. Season generously right before cooking. It draws out just enough moisture to help with browning without
Black Pepper: Freshly ground, of course. Adds a nice little kick.
For the Simple Seasoning Blend (Optional but Recommended):
Garlic powder: About 1/2 teaspoon. Adds a subtle garlic note without the risk of burning fresh garlic.
Paprika: 1/4 teaspoon. For a touch of color and a very mild flavor.
Lemon zest: From about half a lemon. This is my secret weapon! It adds a bright, zesty aroma that elevates the whole dish. You can skip it if you don’t have a lemon, but it really does make a difference.
Fresh herbs: A tablespoon or two, finely chopped, like parsley, dill, or chives. Added at the very end for freshness.
Step-by-Step Instructions
Step 1: Preheat & Prep Pan
First things first, grab your cod fillets. The most crucial step for a good sear is to pat them completely dry with paper towels. I can’t stress this enough! Water is the enemy of a good crust. Get into all the nooks and crannies. Once they’re nice and dry, set them aside. Now, grab a good quality skillet – a cast iron or stainless steel pan is ideal because they heat evenly and hold their temperature well. Place the pan over medium-high heat. Let it get nice and hot before you add any fat. This takes a few minutes, so don’t rush it!
Step 2: Mix Dry Ingredients
While your pan is heating up, let’s get our seasoning ready. In a small bowl, combine your salt, freshly ground black pepper, garlic powder, paprika, and lemon zest if you’re using it. Give it a good whisk or stir to make sure everything is evenly distributed. This simple blend adds a lovely depth of flavor without overpowering the delicate taste of the cod. If you’re not using the blend, just have your salt and pepper handy.
Step 3: Mix Wet Ingredients
This step is more about having your fat ready than mixing anything. Have your olive oil and/or butter measured out and within easy reach of the stove. If you’re using a mix of both, you can melt the butter gently in a small saucepan just before you’re ready to add it to the hot pan, or just add it directly to the hot pan if you’re using it with oil.
Step 4: Combine
Now it’s time to season the cod. Sprinkle your prepared seasoning blend evenly over both sides of the dried cod fillets. Gently press it in so it adheres. Don’t season too far in advance, as the salt can start to draw out moisture from the fish, which is the opposite of what we want for searing. As soon as your pan is hot (a drop of water should sizzle and evaporate immediately), add your olive oil or butter. Let the fat heat up for about 30 seconds until it’s shimmering. Carefully place the seasoned cod fillets into the hot pan. Make sure not to crowd the pan; cook in batches if necessary. Overcrowding will steam the fish instead of searing it!
Step 5: Prepare Filling
This recipe is designed to be simple, so there isn’t a traditional “filling” in the way you might think of for a pie. The “filling” is really the gorgeous, moist cod itself, enhanced by the seasonings and the sear. If you were to adapt this into something more substantial, you might consider a flavorful pan sauce or a simple topping that you prepare while the fish sears.
Step 6: Layer & Swirl
This step isn’t applicable to this seared cod recipe, as we’re focusing on a direct sear. The magic happens in the pan, not through layering and swirling.
Step 7: Bake
Actually, we’re not baking this seared cod recipe! The beauty of searing is that it’s done entirely on the stovetop. Place the seasoned cod fillets into the hot, oiled pan. Let them cook undisturbed for about 3-5 minutes per side, depending on the thickness of your fillets. You’ll know it’s ready to flip when the edges look opaque and golden brown. Use a thin spatula to gently flip the fillets. Cook for another 3-5 minutes on the second side until the fish is cooked through and flakes easily with a fork. You can also check the thickest part with a thermometer; it should register around 140-145°F (60-63°C).
Step 8: Cool & Glaze
Once your cod is perfectly seared and cooked through, remove it from the pan immediately. You want to stop the cooking process so it doesn’t become dry. You can let it rest on a plate for just a minute or two. If you’re using fresh herbs, sprinkle them over the top right after removing it from the pan, while it’s still warm. There’s no glaze involved in this basic seared cod recipe, but if you wanted to add a little something extra, you could certainly drizzle a little melted butter or a squeeze of fresh lemon juice over the top before serving.
Step 9: Slice & Serve
This seared cod is best served immediately while it’s hot and flaky. You don’t need to slice it; just serve the fillets whole. A gentle nudge with a fork will show you just how perfectly it flakes apart. It looks so elegant on the plate, especially with those beautiful golden-brown edges. The aroma alone is enough to make your mouth water!
What to Serve It With
This seared cod recipe is so wonderfully versatile; it genuinely fits into any meal occasion. For a speedy and healthy breakfast, I sometimes serve a smaller fillet alongside some scrambled eggs and a slice of avocado. It’s surprisingly satisfying and keeps me full all morning. On a weekend morning, when I’m feeling a bit more leisurely, this seared cod is a star at brunch. Imagine it nestled on a bed of fluffy quinoa or couscous, perhaps topped with a vibrant pico de gallo or a dollop of Greek yogurt with fresh dill. It feels so elevated! As a light and healthy dessert option – yes, you heard me right! – it’s perfect with a squeeze of lemon and a side of steamed asparagus. It’s a delightful way to end a meal without feeling weighed down. And for those cozy, impromptu snacks or light dinners, I love serving this cod with a simple side salad or some roasted root vegetables. It’s comforting yet incredibly healthy. My family loves it when I serve it with my lemon-herb roasted potatoes, or sometimes we just keep it super simple with a big green salad and some crusty bread to sop up any delicious pan juices. It’s the kind of dish that makes even a simple meal feel like a special occasion.
Top Tips for Perfecting Your Seared Cod
Let’s talk about making this seared cod recipe absolutely foolproof. First, the absolute golden rule: Pat your cod DRY. I cannot say this enough! Moisture is the enemy of a good sear. Use paper towels and really get in there. The drier the surface, the better the crust you’ll achieve. Don’t be afraid to give it a good press. Second, don’t overcrowd the pan. This is a common mistake that leads to steamed fish instead of seared. If you’re cooking more than two fillets at once (depending on your pan size), cook them in batches. It might add a minute or two to your cooking time, but the result is so worth it. Third, let it sear. Resist the urge to poke and prod the fish. Once it’s in the hot pan, let it sit undisturbed for at least 3-5 minutes to develop that beautiful golden crust. You’ll see the opaque color creeping up the sides of the fillet, which tells you it’s time to flip. My biggest mistake when I first started searing fish was flipping it too early, resulting in a pale, sad piece of cod. Trust me on this one – patience pays off! Regarding ingredient swaps, if you don’t have olive oil, a neutral vegetable oil works fine, but olive oil and butter together are my favorite for flavor and browning. If you don’t have lemon zest, a tiny pinch of lemon pepper seasoning can add a similar bright note. For those who like a little heat, a pinch of cayenne pepper in your seasoning blend is fantastic. Baking tips aren’t relevant here, as this is a stovetop sear, but oven variations are important if you were to adapt this for baking – always go by the fish’s internal temperature. For glaze variations, while this recipe doesn’t use one, a simple lemon-butter sauce drizzled over the top right before serving is divine, or a quick homemade tartar sauce.
Storing and Reheating Tips
Ah, leftovers! While this seared cod recipe is best enjoyed fresh off the pan, it does store reasonably well. If you happen to have any (which is rare in my house!), it’s best to let it cool completely before storing. For room temperature storage, it’s really only safe for about two hours, so I’d recommend refrigerating it promptly. In the refrigerator, store the cooled cod in an airtight container. It should keep well for about 1-2 days. The texture might change slightly upon reheating, becoming a little less firm, but it will still be quite tasty. When it comes to reheating, the gentlest method is usually best. You can gently warm it in a non-stick skillet over low heat for a few minutes, adding a tiny splash of water or broth to keep it moist. Alternatively, you can reheat it in the oven at a low temperature (around 275°F or 135°C) for about 5-10 minutes, again, perhaps with a little liquid. Microwaving is also an option, but be careful not to overdo it, as it can make the fish tough and rubbery. I usually just microwave it for 30-60 second intervals, checking frequently. For freezer instructions, I’d actually advise against freezing seared cod if possible, as the texture tends to suffer quite a bit. However, if you absolutely must, wrap the cooled fillets tightly in plastic wrap, then in foil, and freeze for up to a month. Thaw overnight in the refrigerator before reheating. Since there’s no glaze in this recipe, you don’t have to worry about storing that separately.
Frequently Asked Questions
Final Thoughts
So there you have it – my go-to, absolutely foolproof seared cod recipe. It’s the kind of meal that proves you don’t need to spend hours in the kitchen to create something truly delicious and impressive. It’s healthy, it’s quick, and it’s just plain satisfying. The beautiful golden crust, the flaky, tender fish inside – it’s a culinary trifecta that never disappoints. I really hope you give this seared cod recipe a try. It’s become a staple for me, and I’m betting it will become one for you too. If you love this simple yet effective way of preparing fish, you might also enjoy my recipe for Lemon Herb Baked Salmon or my Garlic Butter Shrimp Scampi. They’re all about maximizing flavor with minimal fuss. Please, let me know how yours turns out in the comments below! I love hearing your stories, your variations, and seeing how this recipe comes to life in your kitchens. Happy cooking!
Seared Cod Recipe
Ingredients
Main Ingredients
- 4 filets Cod about 6 oz each, skin on
- 2 tablespoons Olive Oil
- 0.5 teaspoon Salt
- 0.25 teaspoon Black Pepper
- 1 tablespoon Butter
- 2 cloves Garlic minced
- 1 tablespoon Lemon Juice freshly squeezed
Instructions
Preparation Steps
- Pat the cod filets very dry with paper towels. This is crucial for crispy skin.
- Season both sides of the cod filets generously with salt and black pepper.4 filets Cod
- Heat the olive oil in a large, oven-safe skillet over medium-high heat until shimmering.4 filets Cod
- Carefully place the cod filets, skin-side down, into the hot skillet. Press down gently with a spatula for the first 30 seconds to prevent curling.4 filets Cod
- Sear for about 4-5 minutes, undisturbed, until the skin is golden brown and crispy. You'll see the flesh turn opaque about halfway up the filet.
- Flip the cod filets. Add the butter and minced garlic to the skillet. As the butter melts, tilt the pan and spoon the melted butter and garlic over the fish for about 1-2 minutes, or until the cod is cooked through and flakes easily with a fork.4 filets Cod
- Remove from heat and squeeze fresh lemon juice over the cod. Serve immediately.4 filets Cod