You know those recipes that just feel like a warm hug? The ones that transport you back to childhood, where the biggest worry was whether you’d get the last crispy square? For me, that’s always been Rice Krispie Treats. I’ve tinkered with them for years, trying to find that perfect balance of chewy and crispy, that sweet, buttery goodness that just makes you happy. Forget fancy cakes or complicated cookies; when I need a guaranteed crowd-pleaser that takes mere minutes, this is my go-to. It’s the ultimate comfort food, and honestly, it’s so simple, it feels almost like cheating! This isn’t just any Rice Krispie Treat recipe; this is the one that’s earned the title of “The Best” in my kitchen.
What Are Rice Krispie Treats?
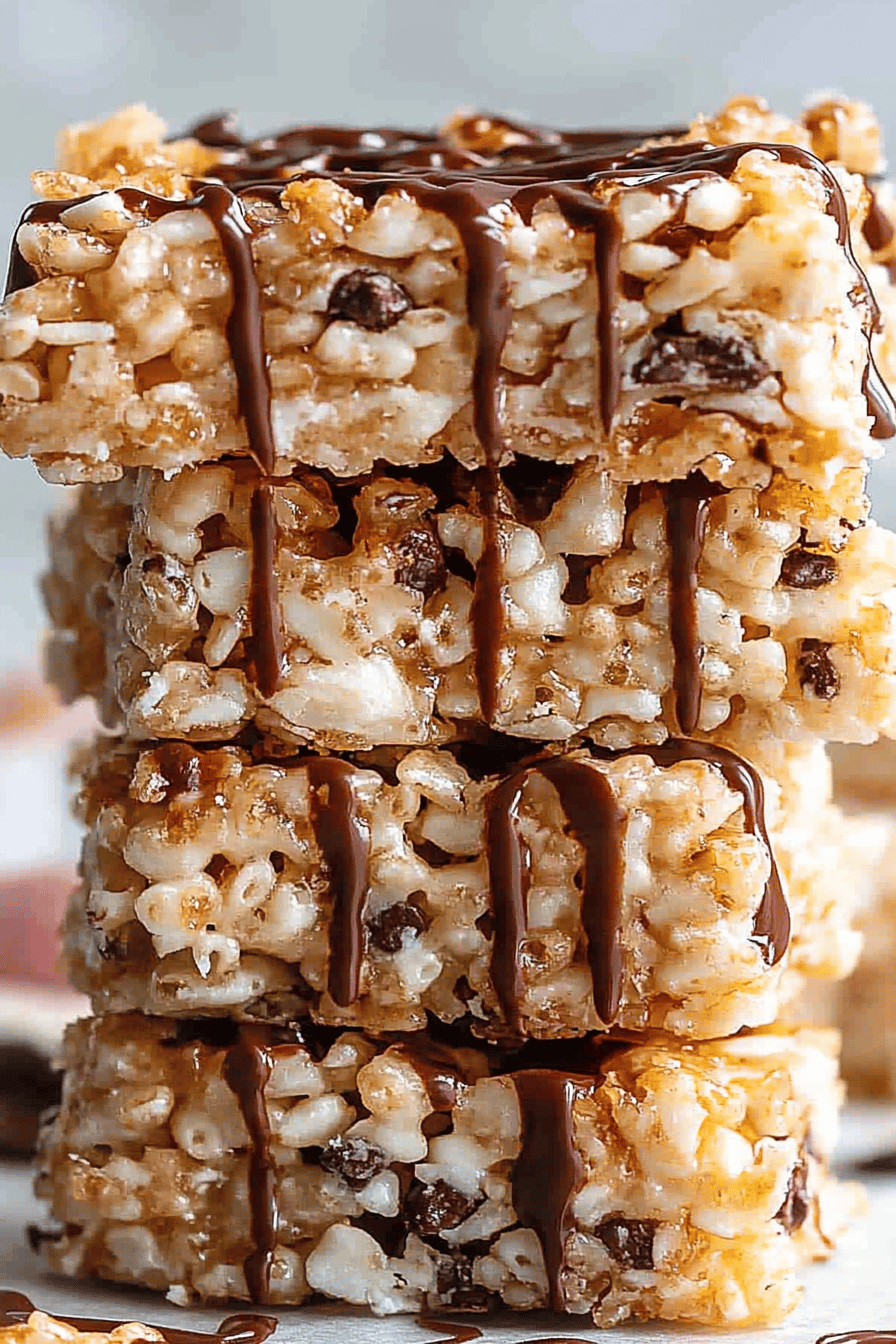
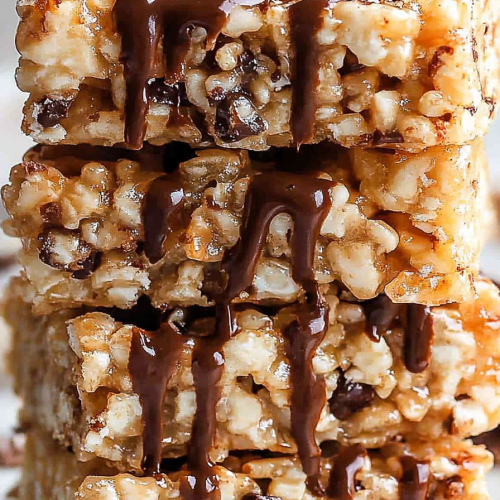
So, what exactly are these magical little squares? At their core, Rice Krispie Treats are incredibly simple: crispy rice cereal, melted marshmallows, and butter. That’s it! You melt the butter, stir in the marshmallows until they’re gooey and glorious, then fold in the cereal until it’s all coated in that sweet, sticky goodness. Press it all into a pan, let it set, and voilà! They’re named after the Kellogg’s Rice Krispies cereal, of course, which gives them that signature crunch. Think of them as no-bake cookies meets sweet cereal bars. They’re the ultimate nostalgic treat, the kind of thing you’d find at birthday parties, school bake sales, or just made on a rainy afternoon because the craving hit.
Why you’ll love this recipe?
There are a million ways to make Rice Krispie Treats, but I truly believe this version is special. First off, the flavor is just out of this world. We’re talking a rich, buttery base with perfectly melted marshmallows that give it this incredible chewiness without being overly sticky. It’s that perfect sweet bite that’s satisfying without being too heavy. Then there’s the simplicity. I’m talking about a recipe you can whip up in under 10 minutes, from start to finish, before the kettle has even finished boiling for your tea. It’s seriously a lifesaver on busy weeknights when everyone needs a little something sweet. And let’s talk Cost-efficiency: What is the best way to! Cereal, butter, marshmallows – these are pantry staples that won’t break the bank, making this a fantastic budget-friendly option for feeding a crowd or just treating yourself. What I love most about this particular recipe is its versatility. While the classic is amazing, you can easily jazz it up. I’ve added a splash of vanilla extract, a sprinkle of sea salt to cut the sweetness, or even a handful of mini chocolate chips when I’m feeling extra decadent. It’s the perfect base for endless customization. Seriously, this recipe is my secret weapon for when those sweet cravings strike hard and fast!
How to Make Rice Krispie Treats
Quick Overview
This recipe is all about speed and simplicity. We’re melting butter and marshmallows together to create a gooey binder for our crispy rice cereal. The key is to work quickly once the cereal is added to ensure even coating and the perfect texture. It’s a no-bake wonder that requires minimal effort for maximum deliciousness. You’ll be amazed at how quickly you can go from ingredients to mouthwatering treats.
Ingredients
For the Main Treat:
- 6 cups Crispy Rice Cereal: Make sure it’s fresh! Stale cereal just won’t give you that signature crunch. Any brand of crispy rice cereal works, but I find the classic ones have the best texture.
- 1/4 cup (1/2 stick) Unsalted Butter: Using unsalted butter gives you better control over the saltiness. I always opt for a good quality butter; it really does make a difference in the overall flavor.
- 10 ounces Mini Marshmallows: Using mini marshmallows melts much faster and more evenly than the large ones. I usually buy a couple of bags so I don’t run out!
- 1 teaspoon Vanilla Extract (Optional but highly recommended!): This is my secret ingredient for taking these treats from good to GREAT. It adds a warmth and depth of flavor that complements the sweetness of the marshmallows beautifully.
- 1/4 teaspoon Sea Salt (Optional, but oh-so-good): Just a pinch of salt really balances out the sweetness and makes all the flavors pop. Trust me on this one!
Step-by-Step Instructions
Step 1: Preheat & Prep Pan
First things first, grab a 9×13 inch baking pan. You want to get this ready before you start melting anything. Lightly grease it with butter, cooking spray, or line it with parchment paper. I prefer using parchment paper because it makes lifting the treats out so much easier, and cleanup is a breeze! Set that aside.
Step 2: Melt the Butter
In a large pot or Dutch oven over low heat, melt the butter. Keep the heat low! We’re not trying to brown the butter here, just gently melt it until it’s liquid gold. This usually takes just a couple of minutes.
Step 3: Add Marshmallows and Stir
Once the butter is melted, add the mini marshmallows to the pot. Stir them constantly with a rubber spatula or wooden spoon. Keep stirring until the marshmallows are completely melted and the mixture is smooth and creamy. This is where that low heat really pays off – you don’t want any scorching!
Step 4: Stir in Flavorings (Optional but Recommended!)
If you’re using vanilla extract and salt, stir them into the melted marshmallow mixture now. Give it a good mix to ensure they’re fully incorporated. The aroma at this stage is just heavenly!
Step 5: Add the Cereal
Remove the pot from the heat. Add the crispy rice cereal to the melted marshmallow mixture. Gently fold the cereal into the marshmallow mixture using your spatula until every single piece is coated. This part happens fast, so have your cereal ready! You want to coat the cereal evenly without crushing it too much.
Step 6: Press into Pan
Quickly transfer the coated cereal mixture into your prepared pan. You want to get it in there while it’s still warm and pliable. Use your greased spatula, a piece of wax paper, or even lightly buttered hands to gently press the mixture evenly into the pan. Don’t press too hard, or your treats will be dense and tough. Just a gentle, even press is all you need to get them to hold their shape.
Step 7: Let Them Set
Now comes the hardest part: waiting! Let the Rice Krispie Treats cool and set at room temperature for at least 30 minutes, or until firm. Resist the urge to cut into them too soon, or they might just fall apart!
Step 8: Slice and Serve
Once they’re firm, use a sharp knife (you might want to grease it slightly) to cut the treats into squares. Lift them out of the pan using the parchment paper, if you used it, and cut them into your desired size. Enjoy them right away!
What to Serve It With
These classic Rice Krispie Treats are so wonderfully versatile! For a simple breakfast treat, they’re fantastic on their own with a warm cup of coffee – it’s like a sweet, crunchy cereal bar to start your day. If you’re hosting brunch, they add a fun, whimsical touch to the spread. I like to cut them into smaller, bite-sized squares and arrange them on a tiered stand. They’re also a huge hit as a simple dessert, especially after a big meal. They’re light enough not to feel overwhelming but satisfying enough to hit that sweet spot. I often serve them with a glass of cold milk, which is practically mandatory for Rice Krispie Treats in my book! For cozy snacks, they’re just perfect. Imagine curling up on the couch with a good book and a warm treat – pure bliss! My kids absolutely love them after school, and they disappear in minutes. Sometimes, I’ll even serve them alongside a scoop of vanilla Ice Cream for an extra special treat. One of my favorite family traditions is making them during holiday movie marathons; they’re always the first snack to go!
Top Tips for Perfecting Your Rice Krispie Treats
Over the years, I’ve learned a few tricks that I think make all the difference in achieving that perfect Rice Krispie Treat. For starters, freshness is key. Always use fresh cereal! If your cereal box has been open for a while, the treats might turn out a bit stale and less enjoyable. For the marshmallows, mini marshmallows melt the quickest and most evenly. If you only have large ones, just be patient and keep stirring until they’re fully dissolved. My absolute favorite tip, though, is the addition of vanilla extract and a pinch of sea salt. It sounds so simple, but it elevates the flavor profile immensely. The vanilla adds a warm complexity, and the salt cuts through the sweetness just enough to make you crave another bite. When you’re mixing the cereal, be gentle! You don’t want to crush the cereal into tiny pieces. Just fold it in until it’s coated. This ensures that signature crispy texture. If your marshmallow mixture seems too stiff, you can always add a tiny bit more butter to loosen it up. When it comes to pressing the mixture into the pan, this is crucial. Don’t pack it down too hard! This is a common mistake that leads to dense, hard treats. Use a lightly greased spatula or wax paper and just gently press it into an even layer. You want them to be tender and chewy, not brick-like. And remember, patience is a virtue! Let them cool and set completely before slicing. Trying to cut them too soon is a recipe for a messy disaster!
Storing and Reheating Tips
These Rice Krispie Treats are best enjoyed fresh, but they do store pretty well! If you’ve got leftovers (which is rare in my house!), you can store them at room temperature in an airtight container for up to 3 days. Just make sure they are completely cooled before sealing them up. I usually line the container with parchment paper to prevent sticking. If you need them to last a bit longer, you can store them in the refrigerator for up to a week. They might firm up a bit in the fridge, so if you prefer a softer treat, you can gently reheat them. For reheating, I like to pop them in the microwave for about 10-15 seconds. This just softens them up perfectly. You can also pop them in a low oven (around 300°F or 150°C) for a few minutes. For freezer instructions, these treats freeze surprisingly well! Wrap individual squares tightly in plastic wrap, then place them in a freezer-safe bag or container. They’ll keep in the freezer for up to 2 months. To thaw, just leave them at room temperature for a few hours. I usually don’t glaze them if I know I’m freezing them, as the glaze can sometimes get a bit sticky when frozen and thawed.
Frequently Asked Questions
Final Thoughts
Honestly, if you’re looking for a foolproof, ridiculously delicious treat that takes almost no time at all, you HAVE to try this Rice Krispie Treats recipe. It’s the kind of recipe that brings smiles to faces, whether it’s for a party, a bake sale, or just because. It’s a reminder that sometimes, the simplest things are the most wonderful. The perfect balance of chewy and crispy, with that comforting buttery sweetness – it’s pure magic. I truly hope this recipe becomes a favorite in your kitchen, just like it is in mine. If you give it a whirl, please let me know how it turns out in the comments below! I’d love to hear about your variations or any fun memories these treats bring back for you. Happy treating!
Rice Krispie Treats
Ingredients
Main Ingredients
- 3 tablespoons butter
- 10 ounces mini marshmallows
- 6 cups Rice Krispies cereal
Instructions
Preparation Steps
- Melt butter in a large saucepan over low heat.
- Add marshmallows and stir until completely melted and smooth.
- Remove from heat and stir in the Rice Krispies cereal until well coated.
- Press the mixture evenly into a greased 9x13 inch pan.
- Let cool and cut into squares.