Oh, you absolutely HAVE to try these Reindeer Pretzel Rods! Seriously, they’re not just a treat; they’re pure, unadulterated holiday joy on a stick. Every time I whip up a batch, it feels like I’m bottling up the essence of Christmas morning and letting it spill out into my kitchen. They’re the perfect little edible decorations that disappear faster than Santa’s sleigh on Christmas Eve. If you’ve ever made chocolate-covered pretzels, these are like their festive, slightly more elaborate cousins. But don’t let that scare you! They’re surprisingly simple, and the kids go absolutely bonkers for them. It’s one of those recipes that instantly makes everything feel a little more special, a little more like a storybook.
What are Reindeer Pretzel Rods?
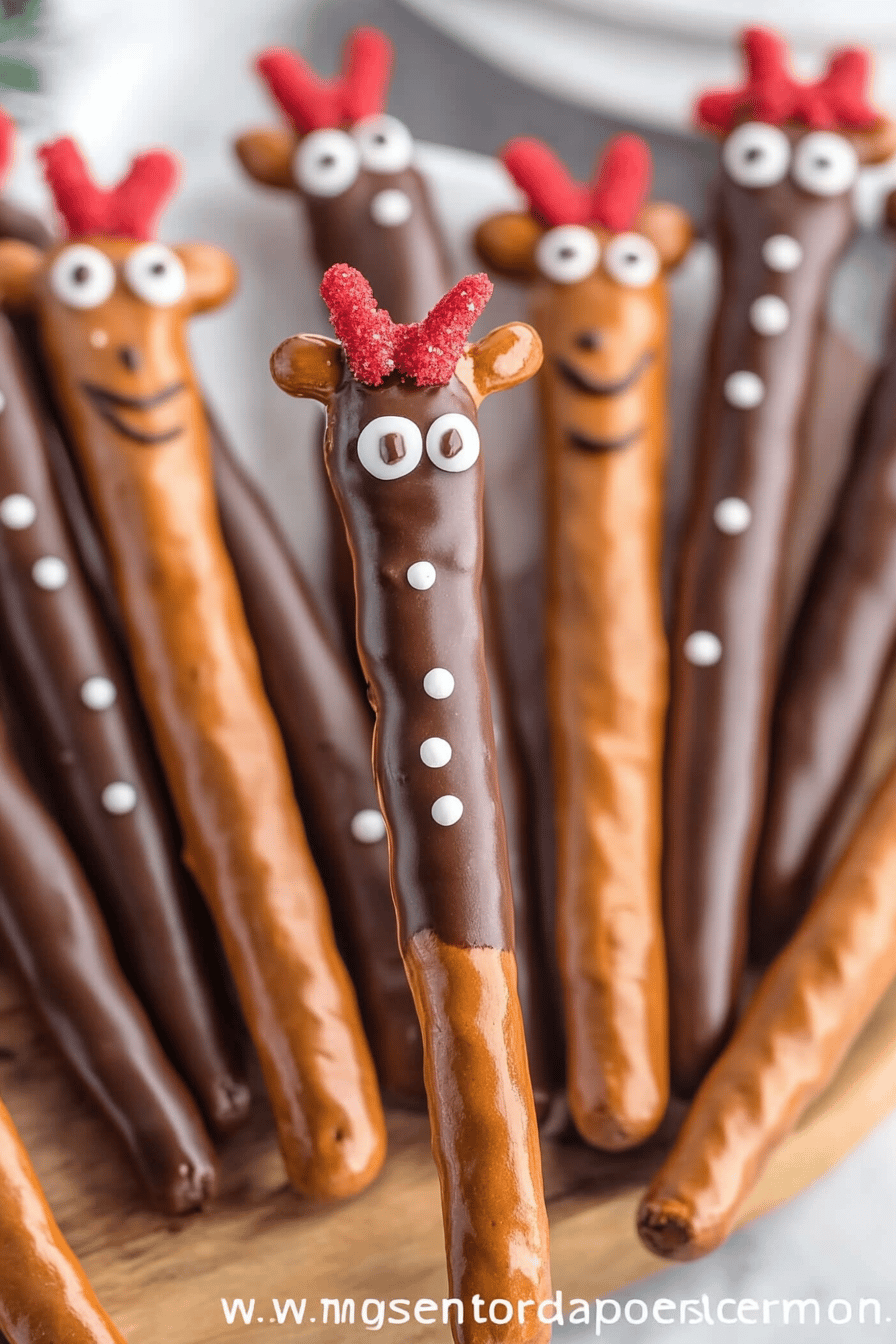
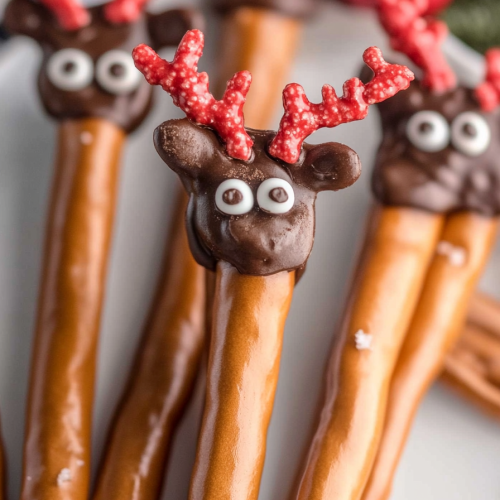
So, what exactly are these magical Reindeer Pretzel Rods? Think of them as a classic chocolate-covered pretzel, but with a whimsical, festive twist that screams “Holidays!” The base is a simple, crunchy pretzel rod, which we’ll dip in rich, melted chocolate. The real fun begins with the decorating, where we transform these into adorable little reindeer. We use candy eyes, little red candy noses (usually M&M’s or red Sixlets work perfectly!), and strategically placed chocolate chips or brown candies for antlers. It’s like building little edible characters, and the process itself is half the fun. They’re essentially a delightful, no-bake treat that brings a smile to everyone’s face, from the littlest elves to the grown-up Grinches.
Why you’ll love this recipe?
There are so many reasons why this Reindeer Pretzel Rods recipe has become a staple in my holiday baking rotation, and I just know you’re going to fall in love with it too! First off, the flavor is just divine. You get that salty crunch from the pretzel, perfectly balanced by the sweet, creamy chocolate. It’s that classic, irresistible combination that always hits the spot. But what I truly adore about these is their sheer simplicity. In a season that can get pretty hectic, these are a lifesaver. They don’t require any complicated baking, just a bit of melting, dipping, and decorating. And speaking of decorating, the kids absolutely adore helping with this part! It’s a fantastic activity to keep them entertained and feeling involved in the holiday preparations. They’re also incredibly cost-effective. A bag of pretzel rods and a few bags of chocolate chips can go a really long way, making them a budget-friendly way to create a big impact. Plus, their versatility is fantastic. They’re perfect for cookie platters, party favors, classroom treats, or just a sweet little pick-me-up on a cold afternoon. What I love most is how they transform a simple pretzel into something so charming and festive, without requiring professional pastry chef skills!
How do you make Reindeer Pretzel Rods?
Quick Overview
Making these adorable Reindeer Pretzel Rods is a delightful breeze! You’ll start by melting your chocolate until it’s smooth and glossy. Then, it’s simply a matter of dipping the pretzel rods, letting the excess drip off, and then carefully arranging your reindeer features before the chocolate sets. It’s a straightforward process that yields incredibly charming results, proving that you don’t need to be a master baker to create something truly special for the holidays.
Ingredients
For the Pretzel Bases:
You’ll need a bag of your favorite pretzel rods. I find the thicker, sturdier ones hold up best to the dipping and decorating. They provide a great crunch and a solid foundation for our reindeer. You can find these in most grocery stores, usually in the snack aisle.
For the Chocolate Coating:
This is where the magic happens! I usually opt for good quality melting wafers or chocolate chips. Milk chocolate is always a crowd-pleaser, but dark chocolate or even White Chocolate can be fun for different looks. If you’re using regular chocolate chips, a little bit of vegetable shortening (like Crisco) can help them melt smoother and give them a nice sheen. I typically use about 1 to 1.5 cups of chocolate for 10-12 pretzel rods, but it’s always good to have a little extra on hand.
For the Reindeer Decorations:
This is where your inner artist comes out! You’ll need:
- Candy eyes: These are essential for bringing your reindeer to life! Small candy eyes are readily available at craft stores or the baking aisle of your supermarket.
- Red candies: For the iconic Rudolph nose! I love using red M&M’s or red Sixlets for a vibrant pop of color.
- Brown candies or chocolate chips: For the antlers. Mini chocolate chips work well, or you can use small brown candies like mini Reese’s Pieces or even little brown sprinkles. I’ve also used small brown candies that look like little twigs.
Step-by-Step Instructions
Step 1: Melt the Chocolate
Start by melting your chocolate. The easiest way is in a microwave-safe bowl. Heat in 30-second intervals, stirring well after each interval, until the chocolate is smooth and glossy. Be patient – you don’t want to scorch it! Alternatively, you can use a double boiler. Just make sure the water doesn’t touch the bottom of the bowl holding the chocolate. Stir constantly until melted and smooth.
Step 2: Prepare Your Workspace
Line a baking sheet or a large platter with parchment paper or wax paper. This is where your decorated pretzel rods will rest as they dry. Have all your decorative candies laid out and ready to go nearby, as the chocolate sets pretty quickly once it starts cooling.
Step 3: Dip the Pretzel Rods
Hold a pretzel rod by the end and carefully dip it into the melted chocolate, turning it to coat about two-thirds to three-quarters of the rod. Let any excess chocolate drip back into the bowl. You can use a spoon to help smooth out any drips or bare spots if needed.
Step 4: Add the Reindeer Features (While Chocolate is Wet!)
This is the fun part! Before the chocolate sets, immediately place two candy eyes where you want the reindeer’s face to be. Then, add your red nose right below the eyes. For the antlers, carefully place two brown candies or chocolate chips on either side of the top of the pretzel, above the eyes. I like to angle them outwards a bit to look like antlers.
Step 5: Let Them Set
Carefully place the decorated pretzel rod onto your prepared parchment-lined baking sheet. Repeat this process with the remaining pretzel rods. Let them sit undisturbed at room temperature until the chocolate has fully hardened. This usually takes about 20-30 minutes, depending on how thick your chocolate coating is and your kitchen’s temperature. You can speed this up slightly by placing the baking sheet in the refrigerator for about 10-15 minutes, but be careful not to let them get too cold, as this can sometimes cause the chocolate to bloom (get white streaks).
Step 6: Admire Your Handiwork
Once the chocolate is completely set, your adorable Reindeer Pretzel Rods are ready to be admired… and devoured! They look so cute all lined up.
Step 7: Gifting or Serving
You can serve these immediately, or package them up for gifts. They’re best enjoyed within a few days of making them for optimal freshness.
What to Serve It With
These Reindeer Pretzel Rods are so versatile, they fit into almost any holiday gathering! For a festive **Breakfast**, I love placing a few on a plate alongside pancakes or waffles. They add a fun, sweet element that the kids go wild for. Imagine their little faces lighting up seeing a reindeer peeking out from their breakfast plate! For a more elegant **Brunch**, these can be a delightful addition to a dessert bar. I often arrange them in a tall vase or jar, almost like edible floral arrangements, and they look so sophisticated and charming. They pair wonderfully with a mimosa or a good cup of coffee. As a simple **Dessert**, they’re a fantastic standalone treat. After a big holiday meal, offering these alongside some warm cookies or a slice of pie is just perfect. They offer that satisfying sweet and salty crunch without being too heavy. And for those **Cozy Snacks** on a chilly afternoon, when you just need a little something to lift your spirits, these are ideal. Serve them with a mug of hot chocolate – the combination is pure bliss! My own family tradition is to have a “decorating party” with these pretzel rods, and we’ll often just enjoy them with whatever festive drinks we have on hand, like spiced cider or eggnog. They’re just happy treats!
Top Tips for Perfecting Your Reindeer Pretzel Rods
I’ve made these Reindeer Pretzel Rods more times than I can count, and over the years, I’ve picked up a few tricks that really make a difference. So, let’s dive into some of my best tips to help you achieve pretzel rod perfection!
Chocolate Melting Mastery: The key to a smooth, glossy coating is gentle heat. Don’t rush the melting process. If you microwave, stir frequently and use short bursts of power. If you overheat chocolate, it can become stiff and seize up, making it difficult to work with. A double boiler is my preferred method when I have the time, as it offers more control. And remember that little bit of vegetable shortening if you’re using standard chocolate chips – it’s a game-changer for achieving that perfect smooth consistency and shine!
Dipping Technique: When dipping, try to get a nice, even coat. Submerge the rod and give it a gentle swirl to ensure all sides are covered. Before lifting, let the excess chocolate drip back into the bowl for a good 10-15 seconds. This prevents thick, gloppy bottoms that can make the pretzels unstable. You can also gently tap the pretzel rod against the rim of the bowl to encourage drips to fall off.
Placement is Key for Reindeer Features: Work quickly but precisely when adding the candy eyes, nose, and antlers. The chocolate needs to be wet enough to hold them in place. For the antlers, I find that placing them at a slight outward angle looks most natural. If your chocolate starts to set before you’ve added the decorations, you can very gently warm the back of the candy piece with your finger or a tiny bit of extra melted chocolate to help it stick.
Paper Choice Matters: Parchment paper is your best friend here. It’s non-stick, so your finished pretzel rods will lift off cleanly without breaking or sticking. Wax paper can also work, but parchment is generally more reliable. Make sure your baking sheet is large enough to accommodate all your pretzel rods without them touching, as they’ll need space to dry undisturbed.
The “Antler Illusion”: Sometimes, I like to create a slightly more defined “face” area. After dipping the rod, I’ll let it set slightly, then add a small dollop of chocolate where the face will be, and then immediately place the eyes and nose into that dollop. This creates a slightly raised, defined area for the facial features, making the reindeer look even more distinct. For antlers, if you’re using small chocolate chips, sometimes placing them slightly apart and then drizzling a tiny bit of melted chocolate between them can help them adhere better and look more like individual tines.
Temperature Control for Setting: While you can refrigerate to speed up the setting process, I often prefer to let them set at room temperature. This helps prevent condensation from forming on the chocolate, which can sometimes lead to white streaks (blooming) and affect the appearance. If your kitchen is very warm, however, a short stint in the fridge is a good idea.
Practice Makes Perfect: Don’t be discouraged if your first few attempts aren’t magazine-perfect. The beauty of these is their homemade charm! The slight imperfections are what make them unique and lovable. It’s all about the fun and the festive spirit they bring.
Storing and Reheating Tips
Keeping your delicious Reindeer Pretzel Rods fresh is pretty straightforward, but a few things can help maintain their quality. Generally, these are best enjoyed within a few days of making them. They’re not really a recipe that benefits from “reheating” in the traditional sense, but proper storage is key!
Room Temperature Storage: For the first 1-2 days, storing them at room temperature is usually ideal. Keep them in an airtight container on your counter. Make sure they are completely cooled and set before sealing the container. This prevents any moisture from accumulating inside, which could make the pretzels soggy or the chocolate melt. I’ve found that laying them in a single layer in a cookie tin or a plastic food storage container works best. If you stack them, make sure there’s a layer of parchment paper between each layer.
Refrigerator Storage: If you need them to last a bit longer, say up to a week, the refrigerator is your best bet. Again, an airtight container is crucial. However, be aware that chocolate can sometimes absorb odors from other foods in the fridge, so a well-sealed container is extra important. When you take them out of the fridge, it’s a good idea to let them sit at room temperature for about 15-20 minutes before serving. This allows the chocolate to come back to its intended texture and prevents that “too hard” feel. Sometimes, if it’s very humid, you might notice a bit of condensation when they first come out; just wipe them gently with a paper towel.
Freezer Instructions: While I don’t typically freeze these (they’re usually gone too fast!), you *can* freeze them if you need to make them well in advance. Wrap them tightly in plastic wrap, then place them in a freezer-safe airtight container or a heavy-duty freezer bag. They should last for up to 2-3 months. Thawing is similar to bringing them in from the fridge: let them sit in their packaging at room temperature for at least an hour, or even longer, to allow the chocolate to adjust slowly and avoid condensation.
Glaze Timing Advice: If you choose to add any extra glazes or drizzles (which I often do with White Chocolate for extra flair), make sure those have fully set before packing them away. For any of these storage methods, it’s best to add any decorative glazes just before serving if you’re concerned about them softening or sticking together, especially in warmer conditions.
Frequently Asked Questions
Final Thoughts
There you have it – my absolute favorite Reindeer Pretzel Rods! I really hope you give them a try. They’re more than just a sweet treat; they’re a little burst of holiday magic that’s genuinely fun to make, especially with loved ones. The joy on everyone’s faces when they see these little guys is honestly priceless. They prove that you don’t need to spend hours in the kitchen or be a gourmet chef to create something truly memorable and festive. If you love this recipe, you might also enjoy my Grinch Pretzel Rods or my simple Chocolate-Dipped Shortbread Cookies for even more easy holiday fun. I can’t wait to hear how yours turn out and what creative reindeer faces you come up with! Please leave a comment below and share your experience, or even your own unique decorating ideas. Happy baking, and more importantly, happy holidays!
Reindeer Pretzel Rods
Ingredients
Main Ingredients
- 12 pretzel rods pretzel rods
- 12 ounces dark chocolate chips or melting wafers
- 4 ounces white chocolate chips or melting wafers
- 1 cup mini red candies for noses (e.g., M&M's Minis)
- 1 cup pretzel sticks or small pretzel twists broken into small pieces for antlers
- 0.5 cup edible candy eyes
Instructions
Preparation Steps
- Line a baking sheet with parchment paper.
- Melt the dark chocolate chips according to package directions (microwave or double boiler). Stir until smooth. Dip each pretzel rod into the melted dark chocolate, coating about two-thirds of the rod. Let any excess chocolate drip off.12 pretzel rods pretzel rods
- Place the chocolate-dipped pretzel rods on the prepared baking sheet. While the dark chocolate is still wet, attach a mini red candy to the upper part of the chocolate-dipped section to create the reindeer's nose.12 pretzel rods pretzel rods
- For the antlers, carefully place two small pretzel stick pieces on either side of the top of the chocolate-dipped section, pressing them gently into the wet chocolate.12 pretzel rods pretzel rods
- Melt the white chocolate chips. Using a piping bag with a small tip or a fork, draw two small white circles above the reindeer's nose for eyes. Alternatively, attach edible candy eyes before the dark chocolate fully sets.12 pretzel rods pretzel rods
- Allow the chocolate to set completely. This can be done at room temperature or in the refrigerator for about 15-20 minutes. Once set, your reindeer pretzel rods are ready to be enjoyed!