Oh, you guys, I am SO excited to share this recipe with you today! It’s one of those that just feels like pure holiday magic, and honestly, it’s become a staple in my kitchen every December. I’m talking about Reindeer Cupcakes. Now, I know what you might be thinking – reindeer? Cupcakes? Sounds complicated, right? But trust me, these are surprisingly simple and SO much fun to make, especially with kids. They’re way easier than trying to wrangle an actual reindeer (ha!), and the result is just as delightful. Think of them as your secret weapon for bringing a little extra sparkle and deliciousness to any holiday gathering or even just a cozy afternoon. They’re not quite a full-blown cake, but they have that same incredible, comforting flavor that’s just perfect for this time of year. I first whipped these up years ago when my youngest was obsessed with all things Christmas, and they’ve been a family favorite ever since. They’re truly the perfect little treat to get everyone in the festive spirit!
What is Reindeer Magic?
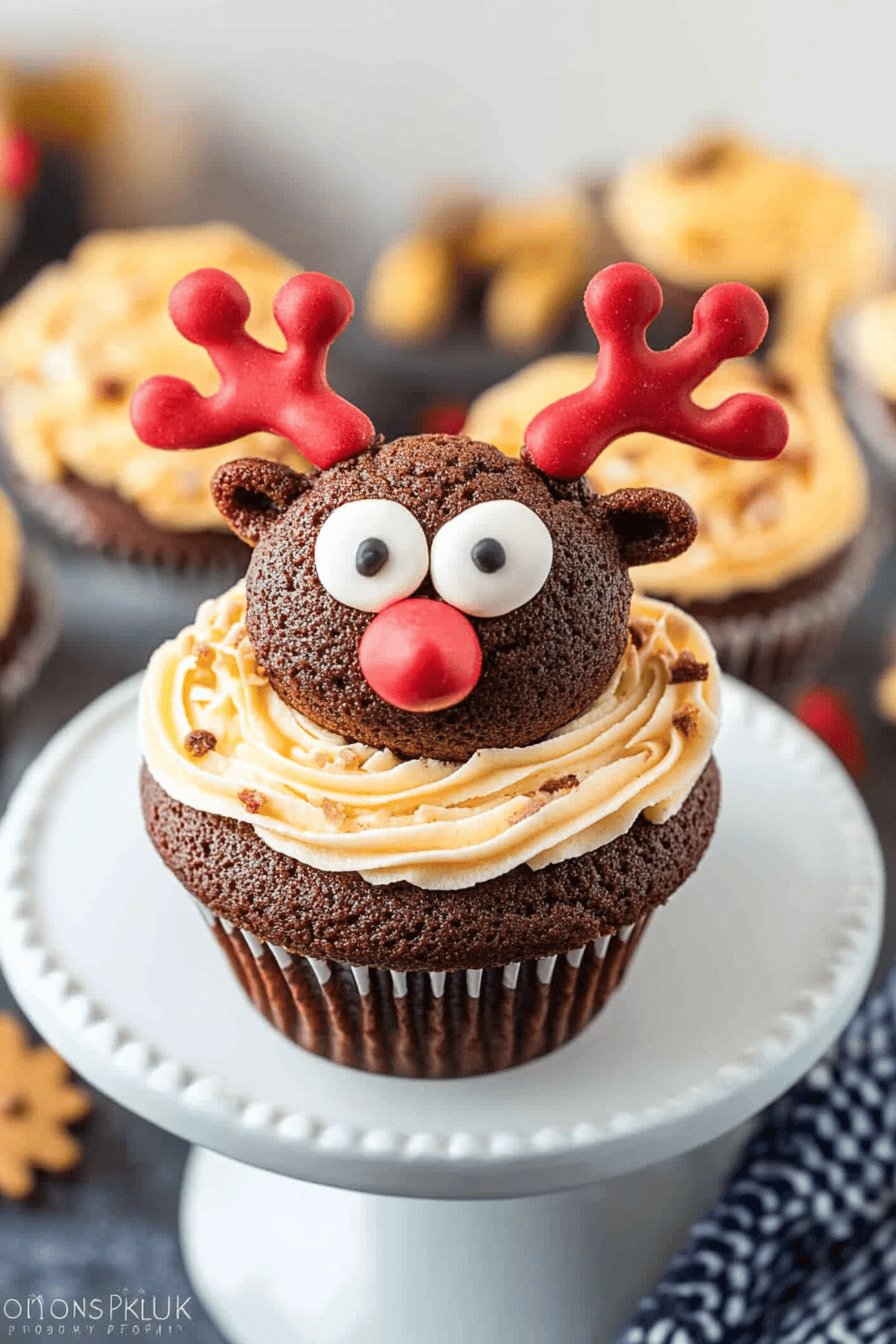
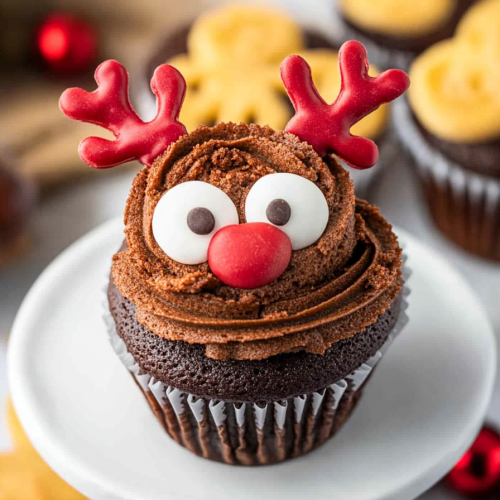
So, what exactly are these Reindeer Cupcakes? At their heart, they’re wonderfully moist and tender cupcakes with a subtle spice that just screams “winter comfort.” The magic really happens with the decoration, though! We turn these simple, delicious treats into adorable little reindeer faces using some clever tricks and easy-to-find goodies. Imagine a rich, flavorful cupcake base, topped with a creamy frosting and then adorned with little pretzel antlers, candy eyes, and a bright red nose. It’s essentially a classic, well-loved cupcake recipe given a playful, festive makeover. It’s not about reinventing the wheel; it’s about taking something familiar and making it extra special and a whole lot more fun. They’re the kind of cupcakes that make people smile the moment they see them, and that’s a pretty fantastic feeling for any baker, right?
Why Do You Love Reindeer Cupcakes?
Let me tell you, there are a million reasons why these Reindeer Cupcakes have earned a permanent spot in my baking repertoire, and I bet you’ll fall in love with them too. First off, the flavor is just *chef’s kiss*. The cupcake itself is incredibly moist and has this lovely, warm spice profile – think cinnamon and a hint of nutmeg. It’s not overpowering at all; it’s just enough to make you feel cozy and festive. It’s the kind of flavor that reminds you of baking cookies with grandma. And the simplicity? Oh my goodness, they are surprisingly straightforward. Even if you’re not a seasoned baker, you can totally nail these. I’ve had friends who’ve never baked a thing before make these and get rave reviews! They’re also wonderfully budget-friendly. You likely have most of the ingredients in your pantry already, and the decorative elements are all super affordable. Plus, they’re so versatile! Serve them at a holiday party, pack them in a lunchbox for a special surprise, or just enjoy them with a cup of hot cocoa on a snowy afternoon. What I love most about these Reindeer Cupcakes is that they bring a sense of joy and whimsy without demanding a whole day in the kitchen. They’re a perfect example of how a little creativity can turn a simple bake into something truly memorable. They honestly stand out from other holiday desserts because of their charming presentation; who doesn’t love a cute reindeer?
How do I make my own Reindeer cupcakes?
Quick Overview
Making these Reindeer Cupcakes is a delightful process that breaks down into three main parts: baking the perfect cupcakes, whipping up a creamy frosting, and then, the most fun part, decorating them into adorable reindeer! We’ll start by mixing up a simple batter that bakes up incredibly moist. While those are cooling, we’ll get our frosting ready. The real showstopper, though, is the assembly. Using pantry staples and a few fun treats, we’ll transform each cupcake into a cheerful reindeer. It’s a step-by-step process that’s incredibly rewarding, and you’ll end up with a batch of treats that are almost too cute to eat. Almost!
Ingredients
For the Main Batter:
You’ll need all-purpose flour, granulated sugar, baking soda, baking powder, and salt for the dry ingredients. For the wet, we’re using eggs, vegetable oil (or melted butter for a richer flavor – I’ve tried both!), buttermilk (this is key for moisture, but regular milk with a tablespoon of lemon juice or vinegar works in a pinch!), and vanilla extract. And the secret ingredient for that tender crumb and subtle spice? A touch of cinnamon and nutmeg. I always find that using good quality vanilla makes a noticeable difference, so if you can, go for the pure stuff!
For the Filling:
While these cupcakes are delicious on their own, you can add a surprise filling if you’re feeling fancy! A dollop of chocolate ganache, a swirl of caramel, or even a bit of CREAM CHEESE filling works wonderfully. For this recipe, we’ll focus on the frosting, but if you want to add a hidden treasure, make your favorite filling and add a spoonful to the bottom of each cupcake liner before filling it with batter.
For the Frosting:
We’re making a classic buttercream frosting. You’ll need unsalted butter, softened, powdered sugar, a splash of milk or heavy cream, and more vanilla extract. The key to a good buttercream is making sure your butter is truly softened but not melted. This helps it cream up nicely and creates a smooth, luscious texture. For the reindeer effect, we’ll also need candy eyes (or mini chocolate chips!), pretzel twists (broken in half for antlers), and a red candy or M&M for the nose. These are readily available in most grocery stores during the holiday season.
Step-by-Step Instructions
Step 1: Preheat & Prep Pan
First things first, let’s get our oven preheated to 350 degrees Fahrenheit (175 degrees Celsius). Line a standard 12-cup muffin tin with pretty cupcake liners. I love using festive ones this time of year! Make sure you have all your ingredients measured out and ready to go. This makes the whole process so much smoother, trust me.
Step 2: Mix Dry Ingredients
In a large bowl, whisk together the flour, sugar, baking soda, baking powder, salt, cinnamon, and nutmeg. Whisking them together thoroughly ensures that all the leavening agents and spices are evenly distributed, which means no surprises with dense spots or pockets of spice later on. You’re looking for a nice, uniform mixture.
Step 3: Mix Wet Ingredients
In a separate medium bowl, whisk together the eggs, buttermilk, vegetable oil (or melted butter), and vanilla extract until well combined. If you’re using regular milk with a bit of lemon juice or vinegar, let it sit for about 5 minutes to curdle slightly before using – this mimics buttermilk and adds that wonderful tenderness.
Step 4: Combine
Pour the wet ingredients into the bowl with the dry ingredients. Mix on low speed with an electric mixer (or whisk by hand) just until combined. Be careful not to overmix! Overmixing develops the gluten in the flour, which can lead to tough cupcakes. A few small lumps are perfectly okay. The batter should be smooth but not overly worked. I learned this lesson the hard way years ago with a batch of super rubbery muffins!
Step 5: Prepare Filling (Optional)
If you’re adding a filling, now’s the time. Spoon about a teaspoon of your chosen filling into the bottom of each cupcake liner. Don’t overfill, as it can make the cupcakes bake unevenly.
Step 6: Fill Liners & Bake
Divide the batter evenly among the prepared muffin cups, filling each about two-thirds full. This allows room for the cupcakes to rise without overflowing. Pop them into the preheated oven and bake for 18-22 minutes, or until a toothpick inserted into the center of a cupcake comes out clean. The exact time will depend on your oven, so start checking around the 18-minute mark.
Step 7: Cool
Once baked, let the cupcakes cool in the muffin tin for about 5-10 minutes before transferring them to a wire rack to cool completely. This is crucial! Trying to frost warm cupcakes is a recipe for a melty, messy disaster. Patience is your friend here.
Step 8: Make the Frosting
While the cupcakes cool, make your frosting. In a large bowl, beat the softened butter until creamy. Gradually add the powdered sugar, alternating with the milk or cream, beating until smooth and fluffy. Stir in the vanilla extract. If the frosting is too thick, add a tiny bit more milk; if it’s too thin, add a little more powdered sugar.
Step 9: Decorate!
This is where the fun really begins! Once the cupcakes are completely cool, frost them. I like to use a simple swirl or spread. Then, it’s time to create our reindeer! Gently insert two pretzel halves into the top of the cupcake to create antlers. Place two candy eyes just below the antlers, and then top it off with a red candy or M&M for the nose. Voila! Instant reindeer.
Step 9: Slice & Serve
These Reindeer Cupcakes are best served at room temperature, allowing all those wonderful flavors to come through. They slice beautifully, and if you’ve added a filling, it makes for a lovely surprise when you cut into them. They look fantastic displayed on a platter, ready for everyone to admire (and devour!).
What to Serve Your Reindeer Cupcakes With
These charming Reindeer Cupcakes are incredibly versatile and can be the star of any occasion! For a festive breakfast, they’re surprisingly delightful alongside a steaming mug of coffee or a warm glass of milk. The hint of spice in the cupcake is just enough to feel special without being overly sweet for the morning. For a more elaborate brunch spread, imagine these little guys adding a pop of holiday cheer to your table. They pair wonderfully with fruit salads, quiches, and other brunch favorites. As a dessert, well, they’re an absolute showstopper! They’re perfect for topping off any holiday meal, perhaps served with a scoop of vanilla bean Ice Cream or a drizzle of chocolate sauce. And for those cozy, chilly afternoons when you just need a little pick-me-up? These are your go-to. Pair them with hot chocolate, apple cider, or even a chai latte for the ultimate comfort snack. My family tradition is to have one (or two!) with hot cocoa while we watch our favorite Christmas movies – it just makes the whole experience feel even more magical.
Top Tips for Perfecting Your Reindeer Cupcakes
Over the years, I’ve learned a few tricks that I think can really elevate your Reindeer Cupcakes. When it comes to the batter, I always, always recommend sifting your dry ingredients. It might seem like an extra step, but it prevents those pesky lumps and ensures a lighter, more tender crumb. Don’t be afraid to give your batter a good whisking initially, but once the wet and dry meet, ease up! Overmixing is the number one culprit for tough cupcakes, and nobody wants that. For the frosting, the temperature of your butter is key. It needs to be soft enough to cream but not so soft that it’s melted. If it’s too cold, you’ll have a lumpy frosting; too warm and it’ll be greasy. My secret for super smooth frosting is to add the powdered sugar gradually and beat it well between additions. It takes a little longer, but the texture is worth it. When it comes to decorating, don’t stress about perfection! The slightly askew antlers or uneven eyes just add to their handmade charm. If your pretzels are too big, simply snap them into smaller pieces to fit your cupcake size. For the nose, I’ve used everything from red M&Ms and red jelly beans to a dab of red frosting with a sprinkle of edible glitter – get creative! If you find your frosting is spreading too much, pop the bowl in the fridge for about 15 minutes before frosting. And a little tip I learned when I was in a pinch: if you don’t have buttermilk, regular milk with a tablespoon of lemon juice or white vinegar, left to sit for 5 minutes, is a perfect substitute. It’s a lifesaver on busy baking days!
Storing and Reheating Tips
Storing your adorable Reindeer Cupcakes is pretty straightforward, and thankfully, they keep well, so you can make them ahead of time! If you’ve frosted them without any filling that needs refrigeration, they can sit happily at room temperature for about 2-3 days. Just make sure they’re in an airtight container or covered loosely with plastic wrap to prevent them from drying out. If you added a cream cheese filling or used a cream cheese frosting, then they definitely need to be stored in the refrigerator. They’ll be good for about 4-5 days in the fridge, but I like to let them come to room temperature for about 20-30 minutes before serving so they’re not too hard. Can you freeze them? Yes, you can! It’s best to freeze them unfrosted, or at least without the pretzel antlers attached, as they can get a bit brittle. Wrap them tightly in plastic wrap, then place them in a freezer-safe container or bag. They’ll keep for about 2-3 months. To thaw, unwrap them and let them come to room temperature. For the glaze, if you’re making a separate glaze for drizzling, it’s best to apply it just before serving, especially if you’re storing them at room temperature, as it can become sticky. For these decorated cupcakes, the buttercream is pretty stable.
Frequently Asked Questions
Final Thoughts
There you have it, my friends – the secret to bringing a little bit of reindeer magic right into your kitchen! These Reindeer Cupcakes are more than just a treat; they’re a reminder of the joy and fun that the holiday season brings. They’re simple enough for even the newest baker, but special enough to impress your guests. I truly believe that food has a way of connecting us, and sharing these cupcakes with loved ones is one of my favorite ways to spread holiday cheer. If you love these, you might also enjoy my festive Sugar Cookie Cutouts or my Gingerbread House recipe – they all bring that same homemade warmth and holiday spirit! I can’t wait to hear how your Reindeer Cupcakes turn out! Please feel free to leave a comment below with your own tips, variations, or any funny decorating stories. And if you snap a photo, be sure to tag me – I’d love to see your creations! Happy baking, and may your holidays be merry and bright!
Reindeer Cupcakes
Ingredients
For the Cupcakes
- 2.5 cups all-purpose flour
- 1.5 cups granulated sugar
- 0.75 cup unsweetened cocoa powder
- 1.5 teaspoons baking soda
- 0.75 teaspoon baking powder
- 1 teaspoon salt
- 2 large eggs
- 1 cup buttermilk
- 0.5 cup vegetable oil
- 1 teaspoon vanilla extract
- 1 cup hot water
For the Frosting
- 8 ounces cream cheese, softened
- 0.5 cup unsalted butter, softened
- 4 cups powdered sugar
- 1 teaspoon vanilla extract
- 0.1 cup milk or heavy cream as needed for consistency
For Decoration
- 12 pairs mini pretzels for antlers
- 24 units mini chocolate chips for eyes
- 24 units red candies (like M&Ms) for noses
Instructions
Preparation Steps
- Preheat your oven to 350°F (175°C). Line a 12-cup muffin tin with cupcake liners.
- In a large bowl, whisk together the flour, sugar, cocoa powder, baking soda, baking powder, and salt.
- In a separate medium bowl, whisk together the eggs, buttermilk, vegetable oil, and vanilla extract.
- Add the wet ingredients to the dry ingredients and mix until just combined. Be careful not to overmix.
- Slowly pour in the hot water and mix until the batter is smooth and thin. The batter will be quite liquidy.
- Pour the batter evenly into the prepared muffin cups, filling each about two-thirds full.
- Bake for 18-22 minutes, or until a wooden skewer inserted into the center of a cupcake comes out clean.
- Let the cupcakes cool in the muffin tin for 5-10 minutes before transferring them to a wire rack to cool completely.
- While the cupcakes are cooling, prepare the frosting. In a large bowl, beat the softened cream cheese and butter together until smooth and creamy.
- Gradually add the powdered sugar, mixing until combined. Add the vanilla extract and mix again.
- Add milk or cream, one tablespoon at a time, until the frosting reaches your desired spreading consistency.
- Once the cupcakes are completely cool, frost them generously with the cream cheese frosting.
- Decorate each cupcake to look like a reindeer: Insert two mini pretzel halves into the top of the frosting for antlers. Place two mini chocolate chips for eyes and one red candy for the nose.