Oh, this Reese’s Cheesecake recipe! It’s one of those desserts that just makes everyone happy. I remember the first time I made it, it was for my husband’s birthday. He’s a huge fan of anything chocolate and peanut butter, and I was a little nervous because I hadn’t tackled a cheesecake in a while. But honestly, this one is surprisingly forgiving and the payoff is HUGE. It’s like taking everything you love about a Reese’s peanut butter cup – that perfect blend of creamy, sweet, and salty – and amplifying it into a rich, decadent cheesecake. It’s way better than just buying a regular cheesecake and slapping some Peanut Butter Cups on top, you know? This is the real deal, a symphony of flavors that will have people begging for the recipe. If you’re anything like me and crave that ultimate comfort dessert, especially when a chocolate and peanut butter craving hits hard, then you’ve found your match. This Reese’s Cheesecake is pure bliss!
What is Reese’s Cheesecake?
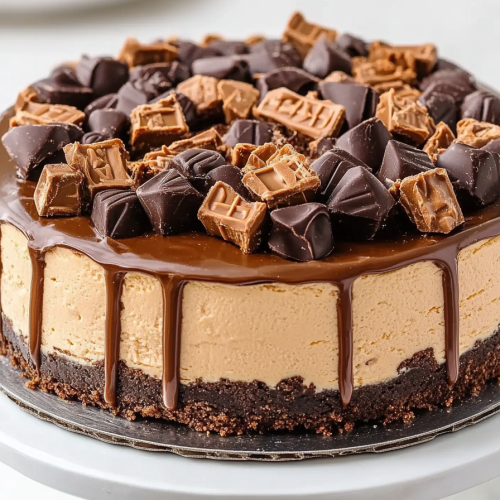
So, what exactly *is* Reese’s Cheesecake? Think of it as the most glorious marriage between a classic New York-style cheesecake and the irresistible allure of Reese’s Peanut Butter Cups. It’s not just a cheesecake that *looks* like a Reese’s; it’s infused with that signature chocolate and peanut butter flavor right through the creamy filling and often topped with a rich, ganache-like topping studded with chopped peanut butter cups. The base is usually a chocolate cookie crust, which just amplifies the chocolatey goodness. It’s essentially a dessert designed for pure indulgence, hitting all the right notes for anyone who believes that chocolate and peanut butter are a match made in heaven. It’s the kind of dessert that makes a special occasion truly special, or a regular Tuesday feel like a party.
Why you’ll love this recipe?
Honestly, there are so many reasons why this Reese’s Cheesecake Recipe has become a staple in my kitchen and why I just *know* you’re going to adore it. First off, let’s talk about the FLAVOR. It’s beyond incredible. The smooth, tangy cheesecake filling is perfectly balanced by the sweet, slightly salty peanut butter and rich chocolate. Every single bite is a little piece of heaven. It’s not overly sweet, which I really appreciate. Then there’s the SIMPLICITY. Now, I know cheesecake can sound intimidating, but this recipe is designed to be foolproof. I’ve taken the guesswork out of it, so even if you’re a beginner baker, you can totally nail this. Plus, it’s surprisingly COST-EFFECTIVE! You don’t need super fancy ingredients, and the result is a dessert that looks and tastes like it came from a gourmet bakery. And let’s not forget the VERSATILITY. While it’s amazing as is, you can totally play around with it. Want a different crust? Go for it! Want to add more peanut butter cups to the filling? Absolutely! What I love most about this recipe is that it’s a guaranteed crowd-pleaser. Whether I’m bringing it to a potluck, a holiday gathering, or just making it for my family on a random weekend, it always disappears within minutes. It’s the kind of dessert that gets rave reviews and lots of “wow” reactions, and that’s always a win in my book!
How do you make Reese’s Cheesecake?
Quick Overview
This Reese’s Cheesecake recipe is all about building layers of deliciousness. We start with a simple chocolate cookie crust, then whip up a creamy, peanut butter-infused cheesecake filling. After a gentle bake, it gets a luscious chocolate glaze, and the whole thing is crowned with glorious chopped Reese’s Peanut Butter Cups. The key is patience during the cooling process to ensure that perfect, crack-free top. It’s truly a straightforward process that yields an absolutely show-stopping dessert.
Ingredients
For the Chocolate Cookie Crust:
You’ll need about 2 cups of finely crushed chocolate sandwich cookies (like Oreos, minus the cream filling, or just use them whole!). I usually toss them in a food processor, but you can also put them in a ziplock bag and go to town with a rolling pin – that’s what I do when I’m feeling cathartic! You’ll also need about 6 tablespoons of melted unsalted butter to bind it all together. Make sure your cookies are finely crushed for the best texture.
For the Creamy Peanut Butter Filling:
This is the heart of our Reese’s Cheesecake! You’ll need three 8-ounce packages of CREAM CHEESE, softened to room temperature. This is super important, or you’ll end up with lumps! Also, grab 1 ¼ cups of granulated sugar, 1/3 cup of creamy peanut butter (Jif or Skippy are my go-to’s here, nothing too fancy!), 1 teaspoon of vanilla extract, and 1/2 teaspoon of salt. For that extra silky texture, we’ll add 3 large eggs, plus 1 large egg yolk, all at room temperature. And for a touch of extra flavor and richness, ½ cup of sour cream. I’ve found that using full-fat sour cream really makes a difference in the final texture.
For the Chocolate Ganache Glaze:
This is what really elevates the whole experience. You’ll need 4 ounces of good quality semi-sweet chocolate, finely chopped. You can use chocolate chips, but chopped chocolate melts more smoothly. Then, ½ cup of heavy cream. For a little extra flair, you can add 1 tablespoon of corn syrup if you have it – it makes the glaze super shiny, but it’s totally optional! And of course, about 1 cup of chopped Reese’s Peanut Butter Cups for that irresistible topping. I like to chop them in various sizes for visual appeal.
Step-by-Step Instructions
Step 1: Preheat & Prep Pan
First things first, let’s get our oven and pan ready. Preheat your oven to 350°F (175°C). Grab a 9-inch springform pan. I always like to grease the sides of my springform pan with a little butter or non-stick spray, even though the crust goes up the sides. It just gives me extra peace of mind. Then, wrap the bottom of your springform pan tightly with a couple of layers of heavy-duty aluminum foil. This is crucial if you’re using a water bath (which I highly recommend for a super creamy cheesecake!), to prevent any water from seeping into the crust. If you’re not using a water bath, it’s still a good habit to get into.
Step 2: Mix Dry Ingredients
In a medium bowl, combine your finely crushed chocolate cookie crumbs with the melted butter. Give it a good stir until all the crumbs are moistened. It should resemble wet sand. This is the magic ingredient that holds our delicious crust together. If it seems too dry, add a tiny bit more melted butter. If it’s too wet, add a few more crumbs. It’s all about that perfect consistency!
Step 3: Mix Wet Ingredients
In a large bowl, using an electric mixer (handheld or stand mixer with paddle attachment), beat the softened cream cheese until it’s completely smooth and creamy, with no lumps. This is where you want to be patient! Scrape down the sides of the bowl often. Then, gradually beat in the granulated sugar until just combined. Add the peanut butter, vanilla extract, and salt. Beat on low speed until everything is incorporated and smooth. Finally, add the sour cream, and mix until just combined. Don’t overmix at this stage!
Step 4: Combine
Now it’s time to add the eggs. Add them one at a time, beating on low speed just until each egg is incorporated before adding the next. Scrape down the bowl after each addition. Be careful not to overbeat the batter once the eggs are in; we don’t want to introduce too much air, which can lead to cracks. The batter should be smooth, thick, and luscious. It’s already smelling amazing at this point, isn’t it?
Step 5: Prepare Filling
This step refers to assembling the filling *into* the prepared crust. Gently tap the crust on the counter a couple of times to settle the crumbs evenly. Now, pour the luscious cheesecake batter over the crust. Use a spatula to spread it evenly. If you’re using a water bath, carefully place the foil-wrapped springform pan into a larger roasting pan. Then, pour hot water into the roasting pan until it comes about halfway up the sides of the springform pan.
Step 6: Layer & Swirl
For this particular Reese’s Cheesecake, we’re not really layering or swirling in the traditional sense of a marbled cheesecake. However, if you *wanted* to swirl in some melted chocolate or peanut butter sauce, this would be the time! For this recipe, we’re keeping it simple and letting the rich peanut butter cheesecake shine. Just ensure the batter is evenly distributed in the crust.
Step 7: Bake
Carefully place the springform pan (in its water bath, if using) into the preheated oven. Bake for 50-65 minutes. The edges of the cheesecake should be set, but the center will still be slightly jiggly. It’s like a very gentle wobble. This is the sign of a perfectly baked cheesecake! If you’re not using a water bath, keep an eye on it and it might bake a little faster. It’s always best to check with a thermometer; you’re looking for an internal temperature of about 150°F (65°C).
Step 8: Cool & Glaze
Once baked, turn off the oven, crack the oven door open slightly, and let the cheesecake cool inside the oven for about 1 hour. This gradual cooling process is key to preventing cracks. After that hour, carefully remove the cheesecake from the oven and remove it from the water bath (if used). Let it cool completely on a wire rack at room temperature. Once it’s fully cooled, cover it loosely with plastic wrap and refrigerate for at least 6 hours, or preferably overnight. For the glaze, gently heat the heavy cream in a small saucepan until it just begins to simmer. Pour it over the chopped chocolate in a heatproof bowl. Let it sit for 5 minutes, then whisk until smooth and glossy. Stir in the corn syrup if using. Let the ganache cool slightly until it’s thickened but still pourable. Pour the slightly cooled ganache over the chilled cheesecake, spreading it evenly to the edges. Immediately sprinkle the chopped Reese’s Peanut Butter Cups over the top before the ganache sets. Let the glaze set for about 15-20 minutes at room temperature, then refrigerate for another 30 minutes before slicing.
Step 9: Slice & Serve
To get those beautiful, clean slices, dip a sharp knife into hot water, wipe it dry, and then slice. Repeat this process for each slice. This helps the knife glide through the cheesecake smoothly. Serve chilled. The contrast between the cold, creamy cheesecake and the slightly softened peanut butter cups is just divine. It’s perfect on its own, but a dollop of whipped cream or a drizzle of extra chocolate sauce never hurt anyone!
What to Serve It With
This Reese’s Cheesecake is so decadent and satisfying that it truly shines all on its own, but I do love to pair it with a few things to make the experience even more special. For breakfast or brunch, I often serve it with a strong cup of coffee. The bitterness of the coffee really cuts through the sweetness of the cheesecake beautifully. If you’re feeling fancy for brunch, a small slice alongside some fresh berries, like raspberries or strawberries, adds a lovely pop of color and a touch of tartness that complements the rich chocolate and peanut butter. It’s also a fantastic addition to an Easter or holiday spread; it always impresses guests! For a more casual setting, like a cozy night in, I might serve it with a tall glass of cold milk – a classic for a reason! My kids absolutely adore it this way. As a dessert, it’s already the star. I sometimes like to serve it with a scoop of vanilla bean Ice Cream or a light, not-too-sweet whipped cream. The combination of textures and temperatures is just wonderful. Honestly, the best thing to serve it with is a group of people who appreciate good dessert!
Top Tips for Perfecting Your Reese’s Cheesecake
I’ve made this Reese’s Cheesecake more times than I can count, and through trial and error (and yes, a few cracks!), I’ve picked up some tricks that I’m happy to share. When it comes to the cookie crust, make sure those crumbs are super fine. If they’re too coarse, your crust can crumble when you slice. A food processor is your best friend here, but the rolling pin method works too, it just takes a bit more elbow grease! For the cream cheese filling, I cannot stress enough the importance of softened cream cheese. Leave it out on the counter for at least 2-3 hours, or until it yields easily to gentle pressure. Cold cream cheese equals lumpy cheesecake, and nobody wants that! When you’re mixing the batter, especially after adding the eggs, resist the urge to beat on high speed. Low and slow is the mantra for cheesecake. Overmixing incorporates too much air, which leads to that dreaded cracking. For the baking process, the water bath is truly a lifesaver. It creates a humid environment, ensuring the cheesecake cooks evenly and gently, resulting in that silky smooth texture. If you don’t have a roasting pan big enough, don’t despair; you can skip it, but you might need to adjust your baking time slightly and be extra vigilant about preventing cracks. I’ve learned that checking the doneness with an instant-read thermometer is the most reliable method – aim for 150°F (65°C) in the center. The cooling process is just as important as the baking. Let it cool gradually in the oven with the door ajar, then at room temperature, and finally in the fridge. Rushing this step is a recipe for disaster (and cracks!). When it comes to the chocolate ganache glaze, the key is letting it cool just enough so it’s pourable but not too hot, or it will melt the top of your cheesecake. If it’s too thick, a quick whisk over a double boiler (or even a few seconds in the microwave, stirring frequently) can loosen it up. And for the peanut butter cup topping, chop them unevenly! Those different sizes add a lovely textural contrast and make it look more homemade and appealing. I once tried using a store-bought chocolate frosting instead of ganache, and while it was okay, it just didn’t have that same rich, deep chocolate flavor. Trust me on the ganache!
Storing and Reheating Tips
Storing this glorious Reese’s Cheesecake is pretty straightforward, but a few things can help keep it in tip-top shape. Once it’s completely cooled and the glaze has set, you can store it covered at room temperature for up to 2 hours. After that, it’s best to refrigerate it. For refrigerator storage, cover the cheesecake tightly with plastic wrap, or transfer slices to an airtight container. It will stay delicious in the fridge for up to 3-4 days. The flavors actually meld and deepen overnight, so it’s often even better the next day! If you plan to freeze it, I recommend freezing it *before* you add the ganache and peanut butter cup topping. Wrap the plain cheesecake tightly in a layer of plastic wrap, followed by a layer of aluminum foil. It can be frozen for up to 2-3 months. To thaw, place the frozen cheesecake in the refrigerator overnight. Once thawed, you can then prepare the ganache and topping and add it. If you’ve already topped it, it’s best to just store it in the fridge. When it comes to reheating, I rarely need to as it’s best served chilled. However, if you find a slice is too cold for your liking, you can gently warm it for a few seconds in the microwave, but be very careful not to overheat it, as it can become soft or melt. I usually just let it sit out for about 15-20 minutes to take the chill off. The glaze timing is important – always add it to a *chilled* cheesecake for the best results and to prevent it from melting off. If freezing, add the topping *after* thawing to keep the texture of the peanut butter cups optimal.
Frequently Asked Questions
Final Thoughts
So there you have it – my absolute favorite Reese’s Cheesecake recipe! I truly believe this is the ultimate treat for any chocolate and peanut butter lover. It’s got that perfect balance of creamy, rich, and decadent flavors that just makes you feel good. It might seem like a lot of steps at first glance, but trust me, each one is simple and leads you to that incredible final product. It’s a recipe that has brought so much joy to my table, and I’m so excited for you to try it and create your own sweet memories. If you love this, you might also enjoy my decadent Chocolate Fudge Cake recipe or my easy No-Bake Peanut Butter Pie – both perfect for satisfying those sweet cravings! I can’t wait to hear how your Reese’s Cheesecake turns out, so please leave a comment below and share your thoughts, or even your own special twists! Happy baking, and enjoy every delicious bite!
Reese's Cheesecake Recipe
Ingredients
Crust
- 2.5 cups crushed chocolate sandwich cookies
- 6 tablespoons unsalted butter, melted
Cheesecake Filling
- 4 packages cream cheese, softened
- 1.5 cups granulated sugar
- 4 large eggs
- 1 cup sour cream
- 0.5 cup heavy cream
- 1 teaspoon vanilla extract
- 12 pieces Reese's Peanut Butter Cups, chopped
Topping
- 1 cup chocolate chips
- 0.25 cup peanut butter
- 1 tablespoon vegetable oil
- Reese's Peanut Butter Cups, for garnish
Instructions
Preparation Steps
- Preheat oven to 350°F (175°C). Grease a 9-inch springform pan.
- For the crust, combine crushed cookies and melted butter. Press evenly into the bottom of the prepared pan.
- Bake the crust for 10 minutes. Let cool completely.
- In a large bowl, beat cream cheese and sugar until smooth.
- Beat in eggs one at a time, then stir in sour cream, heavy cream, and vanilla extract.
- Fold in the chopped Reese's Peanut Butter Cups.
- Pour the filling over the cooled crust.
- Bake for 50-60 minutes, or until the center is almost set.
- Turn off the oven and let the cheesecake cool in the oven with the door ajar for 1 hour. This helps prevent cracking.
- Remove from oven and let cool completely on a wire rack. Chill in the refrigerator for at least 4 hours, or preferably overnight.
- For the topping, melt chocolate chips, peanut butter, and vegetable oil in a microwave-safe bowl in 30-second intervals, stirring until smooth.
- Pour the chocolate peanut butter ganache over the chilled cheesecake and spread evenly. Garnish with whole Reese's Peanut Butter Cups.
- Slice and serve chilled.