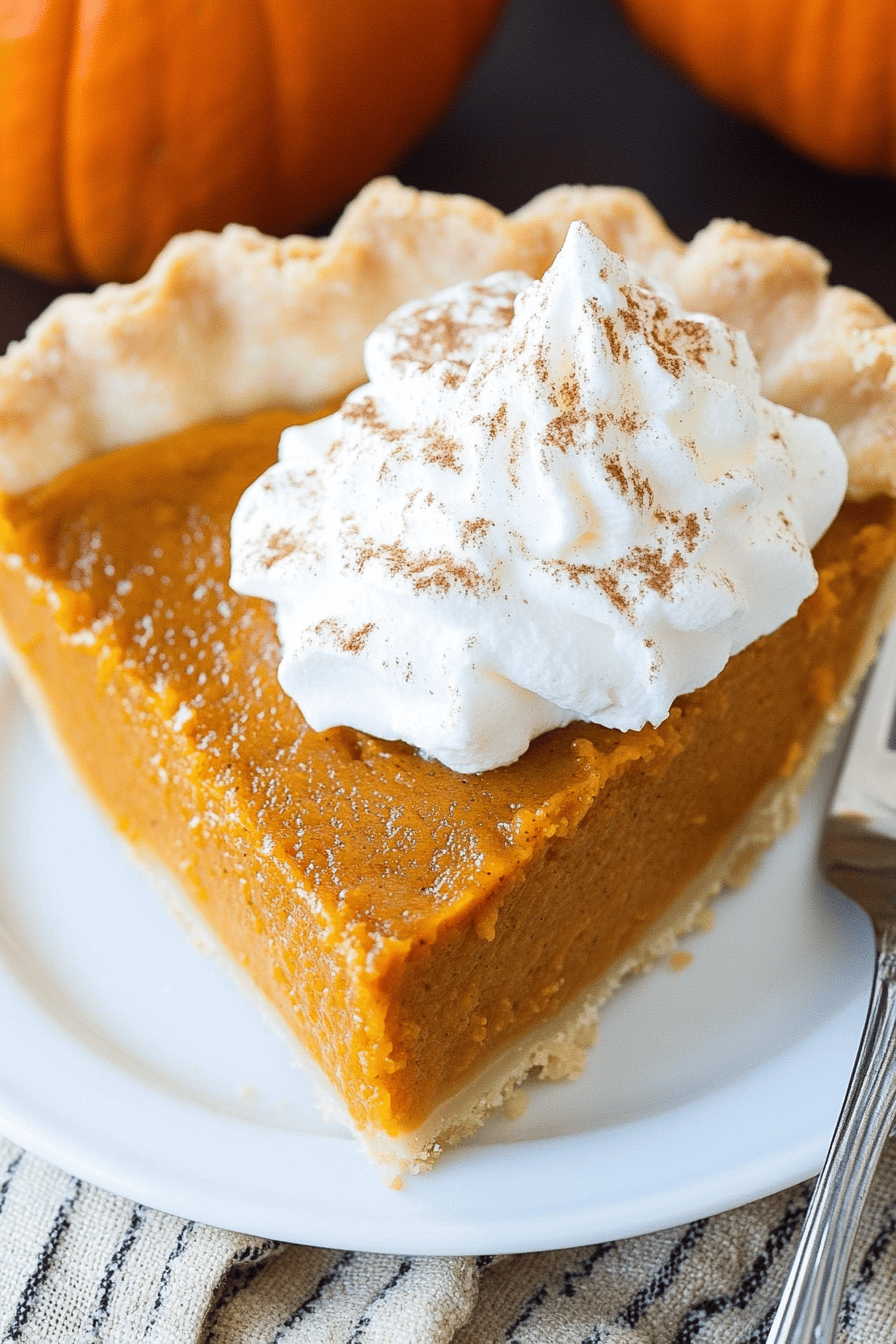
You know those recipes that just feel like home? The ones you pull out when you need a little comfort, a guaranteed crowd-pleaser, or when that irresistible craving for something sweet and cozy hits? For me, that’s this pumpkin Pie Recipe. It’s not just any pumpkin pie; it’s *my* pumpkin pie. The one that smells incredible baking in the oven, the one that makes my kitchen feel like the warmest place on earth. I’ve tinkered with so many over the years, searching for that perfect balance of creamy filling, flaky crust, and just the right hint of spice. And honestly, sometimes I think it’s the simple, traditional approach that wins out every single time. Forget those fancy, over-complicated versions; this pumpkin pie recipe is the real deal, the one that tastes like autumn itself and has earned its permanent spot in my recipe binder. It’s the kind of dessert that makes people close their eyes in bliss with the first bite, and isn’t that what good food is all about?
What is Pumpkin Pie?
So, what exactly *is* this magical pumpkin pie? At its heart, it’s a classic, old-fashioned pumpkin pie. Think of it as the comforting hug you get on a crisp fall day. It’s a rich, custardy filling made primarily from pumpkin puree and a blend of warming spices, all nestled in a tender, buttery Pie Crust. We’re talking pure pumpkin goodness, not too sweet, not too bland, just right. The name itself, “Pumpkin Pie,” is pretty straightforward, but for me, it conjures up images of Thanksgiving tables laden with delicious food, cozy evenings by the fire, and the joyful anticipation of a holiday feast. It’s a dessert that feels both timeless and utterly perfect for the season. Unlike some pies that can be fussy or require a million ingredients, this one relies on quality, simple ingredients coming together to create something truly spectacular. It’s essentially the essence of fall in a pie dish.
Why you’ll love this recipe?
Okay, let’s get down to why this pumpkin pie recipe is about to become your new best friend. First off, the flavor. Oh, the flavor! It’s a symphony of sweet pumpkin, warm cinnamon, nutmeg, and a hint of ginger that just sings. It’s deeply satisfying without being heavy. What I love most about this recipe is how incredibly *easy* it is to make. Seriously, you can whip up the filling in minutes, and if you use a store-bought crust (no judgment here!), it’s practically effortless. I’ve had friends who swore they couldn’t bake a pie, and they nailed this one on their first try! It’s also wonderfully cost-effective. Canned pumpkin, a few pantry staples, and a pie crust – you’re good to go. This makes it a lifesaver when you need a dessert for a potluck or a spontaneous get-together without breaking the bank. And the versatility! While it’s divine on its own, you can jazz it up with a dollop of whipped cream, a sprinkle of toasted pecans, or even a drizzle of caramel. It’s also fantastic served slightly warm or chilled, making it adaptable to your mood and schedule. Compared to, say, a complicated fruit galette or a multi-layered cake, this pumpkin pie offers a simpler path to a truly impressive dessert. It’s the perfect sweet treat when you’re craving something comforting but don’t have hours to spend in the kitchen.
How do I make my famous pumpkin pie?
Quick Overview
This pumpkin pie recipe is all about simple, delicious perfection. We’ll start by getting our crust ready, then whisk together a smooth, spiced pumpkin filling, pour it into the crust, and bake it until it’s perfectly set. The beauty lies in its straightforward approach – minimal fuss, maximum flavor. You’ll be amazed at how quickly you can go from basic ingredients to a stunning, homemade pie that tastes like it came from a professional bakery. It’s a foolproof method that consistently delivers that wonderful, comforting pumpkin pie experience everyone adores.
Ingredients
For the Pie Crust: What is the recipe?
1 pre-made 9-inch pie crust (or your favorite homemade recipe)
I always recommend a good quality, flaky pie crust. If you’re making your own, ensure it’s well-chilled before you start. A homemade crust adds an extra layer of love, but a store-bought one is a true time-saver and works beautifully.
For the Filling:
1 can (15 ounces) pumpkin puree (NOT pumpkin pie filling)
This is crucial! Make sure you grab plain pumpkin puree. The pre-spiced stuff has different flavorings and can throw off the balance of your pie. Look for brands that are 100% pumpkin. I usually grab a couple of cans just to be sure I have extra if needed for testing other recipes!
2 large eggs
Eggs are key to giving our pie that luscious, custardy texture. They bind everything together and create that signature creamy consistency. Make sure they’re at room temperature for easier mixing.
3/4 cup granulated sugar
This provides the sweetness. I’ve experimented with reducing it slightly, but 3/4 cup strikes the perfect balance for me, allowing the pumpkin flavor to shine without being overly sweet.
1 teaspoon ground cinnamon
The quintessential fall spice! Use fresh cinnamon for the best flavor. It really makes a difference.
1/2 teaspoon ground ginger
Adds a little warmth and zing.
1/4 teaspoon ground nutmeg
Freshly grated nutmeg is always a bonus if you have it, but pre-ground works wonderfully too. It adds a lovely depth.
1/4 teaspoon ground cloves
Just a pinch here brings out the other spices and adds a subtle complexity.
1/2 teaspoon salt
Salt enhances all the other flavors and balances the sweetness.
1 1/4 cups evaporated milk
This is my secret weapon for an extra creamy filling! Evaporated milk is richer and more concentrated than regular milk, giving the pie a silky-smooth texture that’s just divine. You can substitute heavy cream for an even more decadent result, but evaporated milk is my go-to for that perfect consistency.
Step-by-Step Instructions
Step 1: Preheat & Prep Pan
First things first, let’s get that oven warmed up. You’ll want to preheat your oven to 425 degrees Fahrenheit (about 220 degrees Celsius). While it’s heating, grab your pie crust. If you’re using a pre-made crust, gently unroll it and press it into your 9-inch pie plate. Crimp the edges if you like, or just leave them rustic. If you’re making your own, now’s the time to carefully press it into the dish. Having the crust ready before you mix the filling makes everything flow so much smoother.
Step 2: Mix Dry Ingredients
In a medium-sized bowl, combine your sugar, cinnamon, ginger, nutmeg, cloves, and salt. Give it a good whisk with a fork or a small whisk. The goal here is to distribute all those lovely spices evenly. This ensures that every bite of your pie gets that perfect warm spice blend. It’s a simple step, but it really sets the stage for that amazing aroma that’s about to fill your kitchen.
Step 3: Mix Wet Ingredients
In a larger bowl, whisk together the pumpkin puree and the room temperature eggs until they’re smooth and well combined. Then, slowly pour in the evaporated milk while whisking. Continue whisking until the mixture is completely uniform and has a lovely, smooth consistency. No lumps allowed here!
Step 4: Combine
Now, it’s time to bring those dry and wet ingredients together. Gradually add the dry spice mixture to the pumpkin mixture, whisking constantly until everything is fully incorporated. Don’t overmix; just mix until you don’t see any streaks of dry spice. The batter should be smooth, thick, and a beautiful orange color. This is where the magic really starts to happen!
Step 5: Prepare Filling
The filling is already mostly prepared in the previous steps, so this step is more about ensuring it’s ready to go. Make sure your pumpkin mixture is smooth and well-combined. It should have a rich, creamy texture, ready to be poured into the pie crust. If for some reason it seems a little too thick or thin, a tiny splash more evaporated milk or a pinch more pumpkin puree can help, but usually, the ratios are spot on.
Step 6: Layer & Swirl
Carefully pour the pumpkin filling into your prepared pie crust. Pour it gently to avoid making a mess. You want the filling to reach almost to the top of the crust. There’s no swirling involved in this particular recipe; it’s all about that pure, unadulterated pumpkin goodness in every slice.
Step 7: Bake
Now, it’s time for the bake! Place your pie on a baking sheet (this catches any potential drips and makes it easier to get in and out of the oven). Bake at 425 degrees Fahrenheit (220 degrees Celsius) for 15 minutes. Then, without opening the oven door if possible, reduce the temperature to 350 degrees Fahrenheit (175 degrees Celsius) and continue baking for another 35-45 minutes. How do you know it’s done? The edges of the filling should be set, and the center should be slightly wobbly, like Jell-O. You can also insert a knife about an inch from the center; it should come out clean. Be careful not to overbake, or it can become rubbery.
Step 8: Cool & Glaze
Once it’s baked to perfection, carefully remove the pie from the oven and place it on a wire rack to cool completely. This is super important! Letting it cool allows the filling to set up properly. Rushing this step can lead to a messy, unset pie. I usually let it cool for at least 2-3 hours. Once it’s cooled, you can optionally add a glaze, but honestly, it’s so good on its own, you might not need it! If you do want a glaze, a simple dusting of powdered sugar or a drizzle of caramel sauce works beautifully. For this particular recipe, I find a dollop of freshly whipped cream is the perfect topping!
Step 9: Slice & Serve
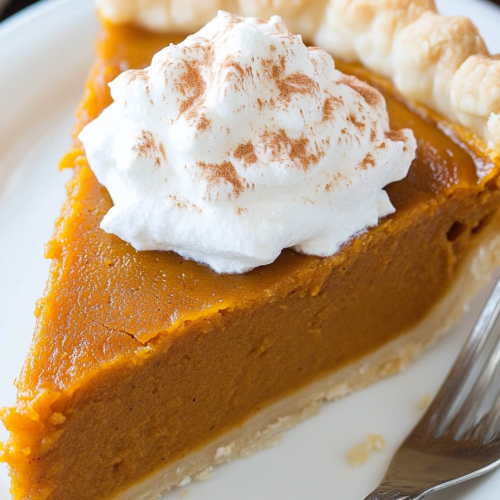
The moment of truth! Once completely cooled, slice your beautiful pumpkin pie. Use a sharp knife and a gentle sawing motion for clean cuts. Serve at room temperature or slightly chilled. A generous dollop of homemade whipped cream is, in my humble opinion, the absolute best way to enjoy this. A sprinkle of cinnamon on top is also a lovely touch. This pie is perfect for any occasion, but especially as a finale to a hearty meal.
What to Serve It With
This pumpkin pie is a star on its own, but let’s talk about how to make it shine even brighter. For breakfast, especially on a crisp fall weekend morning, a slice of this pie alongside a hot mug of coffee is pure bliss. It’s not too heavy, so it’s a nice treat to start the day. At brunch, it feels elegant and festive. I love serving it with a side of fresh fruit salad and perhaps some mini quiches. It adds a touch of sweetness and spice that complements savory dishes perfectly. As a dessert, well, it’s a no-brainer! It’s fantastic after a big Thanksgiving dinner, a hearty roast chicken, or a comforting pasta bake. I always like to offer a bowl of freshly whipped cream or a scoop of vanilla bean Ice Cream on the side. And for those cozy, spontaneous snack attacks? A small sliver with a glass of milk or a mug of spiced apple cider is just about the most comforting thing you can imagine. My family also loves having it with a side of candied pecans for added crunch and sweetness. It’s versatile enough to fit any meal or craving!
Top Tips for Perfecting Your Pumpkin Pie
I’ve made this pumpkin pie more times than I can count, and over the years, I’ve picked up a few tricks that really elevate it from good to absolutely spectacular. Let’s talk about the crust. If you’re using a pre-made one, sometimes they can get a bit soggy on the bottom, especially with a wet filling. A little trick I learned is to lightly brush the bottom of the crust with a beaten egg white before adding the filling. It creates a tiny barrier and helps keep it from getting mushy. When it comes to mixing the filling, the key is to combine those wet and dry ingredients just until they’re incorporated. Overmixing can develop the gluten in the eggs too much, leading to a slightly tougher texture. You want it smooth, but not overworked. For that perfect, jiggly-but-set center, don’t be afraid of the baking time variation. Ovens can be quirky! My best advice is to trust the visual cues: set edges and a slightly wobbly center. It will firm up beautifully as it cools. And speaking of cooling, patience is a virtue here! Trying to slice a warm pie is like trying to catch smoke – it just won’t cooperate. Letting it cool completely for at least 2-3 hours (or even overnight in the fridge!) is essential for that clean slice and perfect texture. If you’re feeling adventurous with ingredient swaps, I’ve actually tested this with a splash of almond extract instead of a bit of the vanilla, and it added a wonderful nutty depth. Also, for those who prefer a dairy-free option, I’ve had success using full-fat coconut milk (the kind in the can) instead of evaporated milk – it makes it incredibly rich and creamy, though it does lend a subtle coconut flavor. Just remember to chill it in the fridge for a few hours before serving if you use coconut milk to ensure it’s fully set!
Storing and Reheating Tips
So, you’ve made an amazing pumpkin pie and there are leftovers (a rare but happy problem!). Storing it correctly is key to keeping it delicious. At room temperature, this pie is generally safe to sit out for about two hours. If you’re serving it at a gathering and it’s not going to be eaten within that time, it’s best to pop it in the fridge. For refrigerator storage, cover the pie loosely with plastic wrap or foil, or better yet, use a pie carrier. It will stay fresh and delicious in the fridge for about 3-4 days. The texture is actually quite lovely when it’s chilled, so don’t hesitate to enjoy it cold! If you want to freeze your pumpkin pie, it’s definitely doable. Let the pie cool completely, then wrap it very well in a couple of layers of plastic wrap, followed by a layer of aluminum foil. It can be frozen for up to 2-3 months. To thaw, unwrap it and let it sit at room temperature for a few hours, or transfer it to the refrigerator overnight. Reheating is simple: if you prefer it warm, gently reheat individual slices in a low oven (around 300°F / 150°C) for about 10-15 minutes until warmed through. Be careful not to overheat, as it can dry out. If you’ve added whipped cream or glaze *after* cooling and storing, I recommend adding that just before serving for the freshest results.
Frequently Asked Questions
Final Thoughts
I really hope you give this pumpkin pie recipe a try. It’s more than just a dessert; it’s a little slice of autumn comfort that I’ve come to rely on and adore. The way the warm spices mingle with the creamy pumpkin, all held together by that flaky crust – it’s just pure magic. It’s the kind of recipe that makes you feel good about spending time in the kitchen and even better when you see the smiles on the faces of the people you share it with. If you’re a fan of classic, comforting flavors, or you’re just looking for that perfect, no-fuss holiday dessert, this one’s a winner. I truly believe it has the power to make any meal feel special. Don’t be afraid to make it your own, either – maybe add a touch more cinnamon, or try a different topping. I’d absolutely love to hear how yours turns out, or if you have any special traditions you enjoy with your pumpkin pie! Feel free to leave a comment below and share your baking adventures. Happy baking, and enjoy every delicious bite!
Classic Pumpkin Pie
Ingredients
For the Crust
- 1.5 cup all-purpose flour
- 0.5 teaspoon salt
- 0.5 cup unsalted butter, cold and cut into cubes
- 3 tablespoon ice water
For the Filling
- 1 can (15 ounce) pumpkin puree
- 0.75 cup granulated sugar
- 0.5 teaspoon ground cinnamon
- 0.25 teaspoon ground ginger
- 0.125 teaspoon ground cloves
- 0.5 teaspoon salt
- 2 large eggs
- 1.5 cup evaporated milk
Instructions
Preparation Steps
- Preheat oven to 425°F (220°C).
- In a large bowl, whisk together flour and salt for the crust. Cut in the cold butter with a pastry blender or your fingertips until the mixture resembles coarse crumbs.1.5 cup all-purpose flour
- Gradually add ice water, 1 tablespoon at a time, mixing until the dough just comes together. Do not overmix.1.5 cup all-purpose flour
- On a lightly floured surface, roll out the dough into a 12-inch circle. Carefully transfer the dough to a 9-inch pie plate. Crimp the edges as desired.
- In a separate large bowl, combine pumpkin puree, granulated sugar, cinnamon, ginger, cloves, and salt. Stir until well blended.1.5 cup all-purpose flour
- Whisk in the eggs one at a time, then stir in the evaporated milk until smooth.1.5 cup all-purpose flour
- Pour the filling into the prepared pie crust.
- Bake for 15 minutes at 425°F (220°C). Then reduce oven temperature to 350°F (175°C) and bake for another 35-40 minutes, or until a knife inserted near the center comes out clean.
- Let the pie cool completely on a wire rack before slicing and serving.