You know those days when a craving hits, and it’s for something rich, decadent, and utterly satisfying, but you also want to be a little mindful of what you’re eating? Yeah, me too. For the longest time, those cravings would send me straight to the bakery or guiltily scrolling through online dessert menus. But then, a little culinary magic happened in my own kitchen, and I discovered this absolute gem: the protein cheesecake. It sounds a bit surprising, doesn’t it? Cheesecake, but with a protein punch? I honestly wasn’t sure what to expect the first time I tinkered with this idea, but oh boy, am I glad I did. It’s become my secret weapon for those moments when I want pure indulgence without the heavy aftermath. It’s like having your cake and eating it too, but with a healthy twist that actually tastes amazing. Forget those dry, chalky protein bars; this is the real deal, folks!
What is protein cheesecake?
So, what exactly is this mythical protein cheesecake? Think of it as your classic, creamy, dreamy cheesecake’s slightly more health-conscious cousin. We’re talking about all the delightful tanginess and velvety texture you’d expect from a traditional cheesecake, but with a clever boost of protein incorporated right into the batter. It’s not about making it taste like a protein shake – heavens no! The goal here is to create a dessert that’s incredibly satisfying, keeps you feeling fuller for longer, and offers a little something extra in the nutrition department. I’ve found that by using specific ingredients, you can achieve that iconic cheesecake flavor and texture while sneaking in some beneficial protein. It’s essentially a guilt-free indulgence that feels like a treat but supports your body’s needs. It’s the kind of dessert that makes you feel good from the inside out.
Why you’ll love this recipe?
Oh, where do I even begin with why this protein cheesecake is a total game-changer? First off, the FLAVOR. It’s rich, creamy, and has that perfect slight tanginess that just melts in your mouth. It doesn’t taste “healthy” in the least; it tastes like pure, unadulterated dessert bliss. But the real magic is in its SIMPLICITY. I’ve made this countless times, and it genuinely surprises me how little effort it requires for such a show-stopping result. You don’t need a water bath, you don’t need a million fancy gadgets, and it comes together surprisingly quickly. For all its deliciousness, it’s also surprisingly COST-EFFICIENT. Many of the ingredients are pantry staples, and the protein powder itself can stretch quite a way. And let’s talk about VERSATILITY! This base recipe is fantastic on its own, but it’s also a brilliant canvas for so many other flavors. My absolute favorite thing about this recipe, though, is that it hits that sweet spot of being a genuine treat without leaving you feeling sluggish or regretful afterward. It’s perfect for a weekend treat, a special occasion, or even just a Tuesday evening when you deserve something special. It’s honestly one of the most requested things in my house!
How do I make protein cheesecake?
Quick Overview
Making this protein cheesecake is surprisingly straightforward. You’ll basically mix up a simple crust, whip together a luscious, creamy filling with your protein boost, pour it into the pan, and bake. The whole process from start to finish, including baking and cooling, is much less daunting than you might think. The key is in the careful blending of ingredients to ensure that signature smooth texture. It’s truly a no-fuss dessert that delivers big on flavor and satisfaction.
Ingredients
For the Crust:
1 12 cups graham cracker crumbs (or almond flour for a lower-carb option) (or 1 cup gra
¼ cup melted butter (or coconut oil)
2 tablespoons granulated sugar (or your preferred sweetener)
Pinch of salt
For the Filling:
3 (8-ounce) blocks CREAM CHEESE, softened
1 cup plain Greek yogurt (full-fat or 2% works best)
⅔ cup sweetener of choice (I like a blend of erythritol and stevia, but granulated sugar works too)
2 scoops vanilla or unflavored protein powder (whey, casein, or plant-based all work well!)
2 large eggs, at room temperature
1 teaspoon vanilla extract
1 tablespoon lemon juice (optional, but adds a lovely brightness)
For the Glaze (Optional but Recommended!):
½ cup powdered sugar (or a sugar-free alternative)
2-3 tablespoons milk (dairy or non-dairy)
½ teaspoon vanilla extract
Step-by-Step Instructions
Step 1: Preheat & Prep Pan
First things first, let’s get that oven prepped. I like to set my oven to 325°F (160°C). While it’s heating up, grab a 9-inch springform pan. I always give mine a good greasing with a little cooking spray or butter to make sure nothing sticks, especially around the edges. You can also line the bottom with parchment paper if you’re feeling extra cautious, though it’s usually not strictly necessary if you’ve greased it well.
Step 2: Mix Dry Ingredients
In a medium bowl, combine your graham cracker crumbs (or almond flour), melted butter, sugar, and a tiny pinch of salt. Give it all a good stir until the crumbs are evenly moistened. It should look and feel like wet sand. This mixture will form the base of our delicious cheesecake.
Step 3: Mix Wet Ingredients
Now for the creamy part! In a large bowl, beat the softened cream cheese until it’s nice and smooth. This is where you want to make sure your cream cheese is truly at room temperature; it makes a world of difference in achieving that silky texture. Add in the Greek yogurt, your chosen sweetener, protein powder, vanilla extract, and lemon juice (if using). Beat everything together until it’s thoroughly combined and smooth. Don’t worry if the protein powder seems a little clumpy at first; just keep mixing.
Step 4: Combine
This is where the magic really starts to happen. Add the eggs to the cream cheese mixture, one at a time, beating on low speed until just combined after each addition. Overmixing at this stage can lead to cracks, so be gentle! You want a smooth, luscious batter that looks absolutely divine. Scrape down the sides of the bowl as needed to ensure everything is incorporated.
Step 5: Prepare Filling
Actually, the filling *is* what we just made in Step 4! The beauty of this recipe is how the protein powder integrates directly into the main cheesecake batter, so there’s no separate filling to fuss with. What you’ve created is the luscious, creamy filling itself!
Step 6: Layer & Swirl
Press the crust mixture evenly into the bottom of your prepared springform pan. Then, gently pour the cheesecake batter over the crust. Now, if you want to get fancy, you can add a swirl! Sometimes I’ll reserve a little of the batter, mix it with a bit of cocoa powder or berry puree, and then dollop it on top before swirling gently with a toothpick. But honestly, it’s just as delicious with a smooth top.
Step 7: Bake
Pop that pan into your preheated oven. Bake for about 50-60 minutes. You’ll know it’s ready when the edges are set, but the center still has a slight wobble – like Jell-O. Don’t be tempted to overbake it; that’s another common cause of cracks!
Step 8: Cool & Glaze
This is a crucial step for achieving that perfect cheesecake texture. Once baked, turn off the oven, but leave the cheesecake inside with the door slightly ajar for about an hour. This gradual cooling process prevents sudden temperature changes that can lead to cracks. After that hour, remove it from the oven and let it cool completely on a wire rack. Once it’s fully cooled, cover it and refrigerate for at least 4 hours, or preferably overnight. For the glaze, whisk together powdered sugar, milk, and vanilla extract until smooth and drizzly. Pour it over the chilled cheesecake just before serving.
Step 9: Slice & Serve
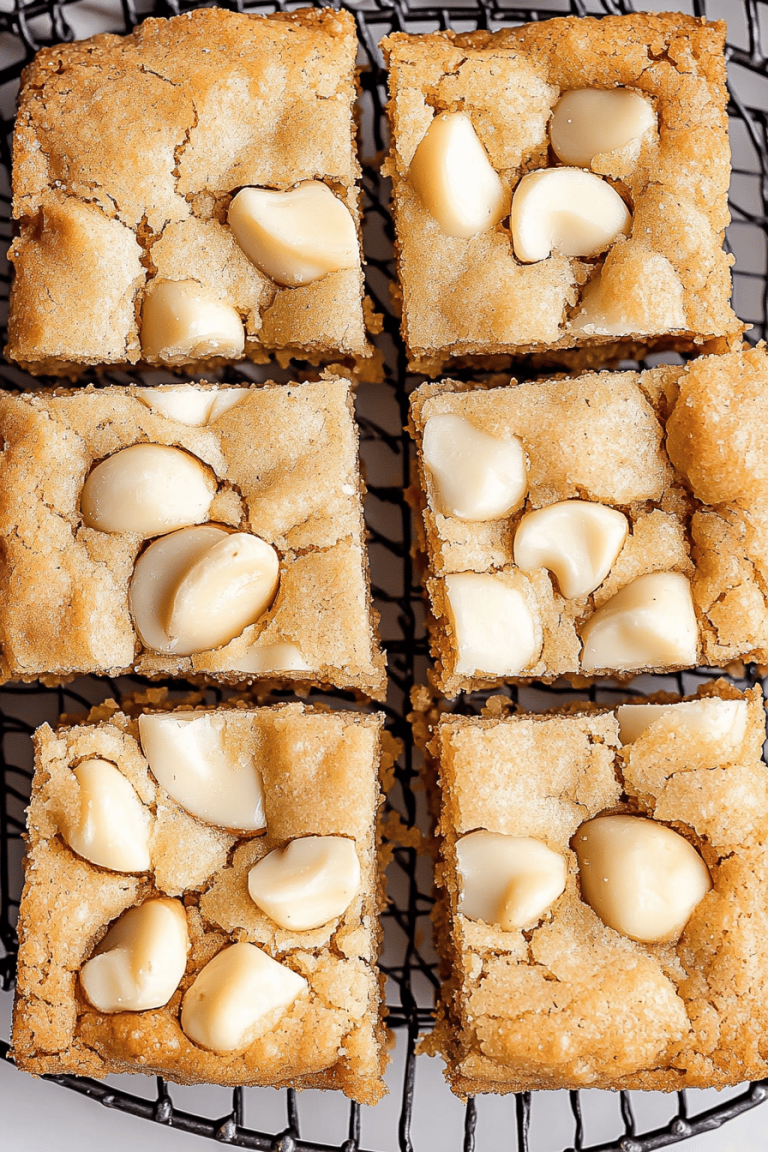
Once chilled and glazed (if you opted for it), carefully release the sides of the springform pan. Use a sharp knife dipped in hot water and wiped dry between each slice for the cleanest cuts. Serve and enjoy this amazing creation!
What to Serve It With
This protein cheesecake is so versatile, it truly fits in anywhere! For a satisfying BREAKFAST, I love to serve a smaller slice with a strong black coffee. The creaminess is surprisingly filling, and it’s a much nicer way to start the day than a quick granola bar. If you’re planning a BRUNCH, this definitely elevates the spread. Serve it alongside fresh berries, maybe a dollop of whipped cream or a drizzle of fruit coulis. It looks so elegant on a brunch table! As a decadent DESSERT, it’s a showstopper. Pair it with a raspberry sauce, some chocolate shavings, or even a scoop of your favorite (healthy-ish) Ice Cream. And for those COZY SNACKS when you just need something comforting, a simple slice with a glass of milk or a cup of herbal tea is pure bliss. My family often requests this after dinner, and it’s always a hit. I’ve found that a simple drizzle of melted dark chocolate or a sprinkle of toasted almonds also adds a lovely touch when I’m feeling a bit more ambitious.
Top Tips for Perfecting Your Protein Cheesecake
I’ve learned a few tricks over the years of making this protein cheesecake, and I’m happy to share them with you! For the crust, make sure your butter is fully melted and coats all the crumbs evenly; this helps it hold together beautifully. If you’re using almond flour, you might need slightly less butter as it can be a bit drier. When it comes to mixing the filling, the most crucial tip is to ensure your cream cheese and eggs are at room temperature. Cold ingredients just won’t blend as smoothly, and you can end up with a lumpy texture that’s hard to fix. Speaking of mixing, resist the urge to overbeat once the eggs are in! That’s a surefire way to introduce too much air, which can cause those dreaded cracks. For the swirl, don’t go too crazy trying to make intricate patterns; a few simple swirls with a toothpick will look stunning and add a lovely visual element. Baking is all about patience. Trust the wobble in the center; it will set up as it cools. If you’re worried about cracking, try placing a baking sheet on the rack below your cheesecake pan to catch any potential drips, though this recipe is generally well-behaved. And remember that gradual cooling process after baking – it’s a game-changer for texture!
Storing and Reheating Tips
One of the best things about this protein cheesecake is how well it stores. At ROOM TEMPERATURE, it’s best to keep it covered for no more than 2-3 hours, especially if it’s warm out, as the dairy needs to stay cool. For REFRIGERATOR STORAGE, this is where it truly shines. Once it’s completely cooled and set, wrap the whole cheesecake tightly with plastic wrap, or store slices in an airtight container. It will keep beautifully in the fridge for up to 5 days, and honestly, I think it tastes even better on day two! If you’re looking to FREEZE it, your best bet is to freeze it before you add the glaze. Wrap individual slices very well in plastic wrap, then in a layer of aluminum foil, or place them in a freezer-safe bag. It can stay frozen for about 1-2 months. To thaw, let it sit in the refrigerator overnight. The glaze is best applied just before serving, whether it’s fresh or thawed from frozen, to keep it looking its best.
Frequently Asked Questions
Final Thoughts
I truly hope you give this protein cheesecake a try. It’s more than just a dessert for me; it’s a testament to how you can enjoy rich, satisfying flavors while still making choices that feel good. It’s become such a staple in my kitchen, and I know you’ll love it just as much as my family and I do. It’s the perfect balance of indulgence and smart eating. If you find yourself craving something sweet and decadent but want to keep things a little lighter, this is your answer. For those of you who enjoyed this recipe, you might also like my [link to another healthy dessert recipe, e.g., Healthy Chocolate Mousse] or my [link to another protein-packed recipe, e.g., Protein Pancakes]. I’m always so excited to hear how your creations turn out, so please leave a comment below and let me know your thoughts, your variations, or any questions you have! Happy baking!
protein cheesecake
Ingredients
Crust
- 1.5 cup graham cracker crumbs
- 6 tablespoon melted butter
- 2 tablespoon sugar
Cheesecake Filling
- 24 oz cream cheese, softened
- 1 cup Greek yogurt
- 0.75 cup whey protein powder vanilla or unflavored
- 0.5 cup sweetener e.g., erythritol, stevia, to taste
- 2 teaspoon vanilla extract
- 3 large eggs
Instructions
Preparation Steps
- Preheat oven to 350°F (175°C). Line a 9-inch springform pan with parchment paper.
- For the crust: In a bowl, mix graham cracker crumbs, melted butter, and sugar until combined. Press the mixture evenly into the bottom of the prepared springform pan.
- Bake the crust for 8-10 minutes. Remove from oven and let cool slightly.
- For the filling: In a large bowl, beat the softened cream cheese until smooth. Add Greek yogurt, protein powder, sweetener, and vanilla extract. Beat until well combined.
- Add the eggs one at a time, beating well after each addition until just combined. Do not overmix.
- Pour the filling over the prepared crust.
- Bake for 35-45 minutes, or until the edges are set and the center is slightly jiggly.
- Turn off the oven, crack the oven door open, and let the cheesecake cool in the oven for 1 hour. This helps prevent cracking.
- Remove from oven and let cool completely on a wire rack. Then, cover and refrigerate for at least 4 hours, or preferably overnight, before serving.