Oh, hello there! Come on in, grab a mug. I was just about to tell you about a recipe that, frankly, has saved my sanity more times than I can count. It’s my absolute go-to for those moments when a serious craving hits, but the thought of a full-blown baking project feels overwhelming. These Oatmeal Chocolate Chip Peanut Butter Bars. Seriously, they’re a game-changer. Think of them as the love child of a classic chocolate chip cookie and a perfectly chewy oatmeal bar, with a generous swirl of peanut butter goodness running through it all. They’re incredibly satisfying, delightfully sweet, and that combination of oats, melty chocolate, and rich peanut butter? Pure magic. They’re way easier than making a big batch of cookies, and honestly, they have this wonderful, slightly dense chew that I just adore. If you’re a fan of anything chocolate and peanut butter, and let’s be honest, who isn’t? – you’re going to want to bookmark this one. They’re a staple in my kitchen, especially when the school lunchboxes need filling or when I just need a little something sweet to get me through the afternoon slump.
What are Oatmeal Chocolate Chip Peanut Butter Bars?
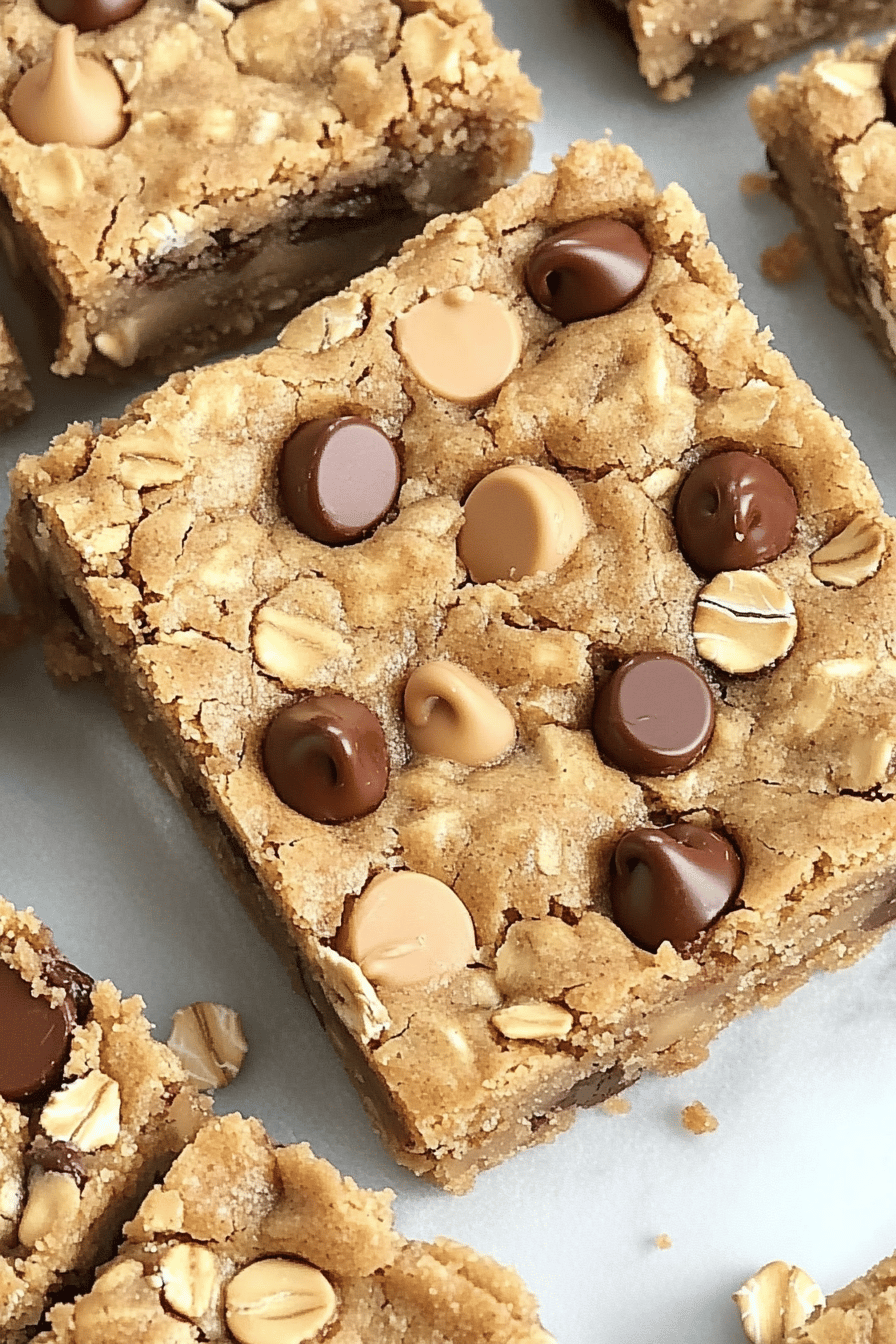
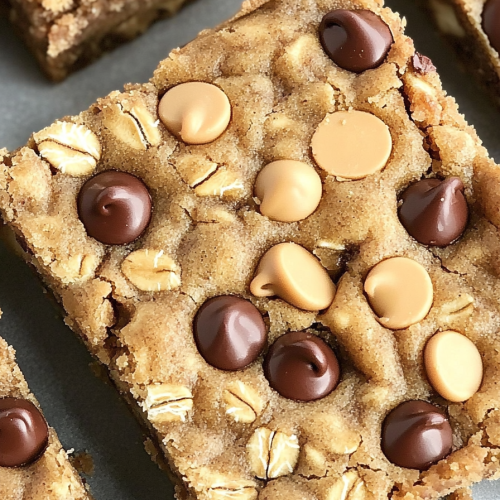
So, what exactly are these wondrous things I keep raving about? Well, imagine this: a base layer that’s hearty and chewy, thanks to good old rolled oats, studded with plenty of melty chocolate chips. Then, we’ve got this irresistible ripple of creamy Peanut Butter, swirled artfully (or, let’s be real, sometimes a bit haphazardly in my kitchen!) through that oat base. And to top it all off, a light, sweet drizzle that just ties everything together. It’s essentially a baked treat that’s soft, chewy, and packed with those irresistible flavors we all love. They’re not fussy, they’re not complicated, and they come together pretty quickly. Think of them as a sophisticated, yet totally approachable, snack bar that happens to be incredibly delicious. It’s the kind of thing that feels special enough for company but is also perfectly happy being your secret indulgence with a cup of tea after everyone’s gone to bed. They’re the kind of portable deliciousness that makes sense for busy lives!
Why you’ll love this recipe?
Honestly, where do I even begin with why this recipe is so special? Let’s start with the flavor explosion. You get that comforting, wholesome taste of oats, the rich, decadent sweetness of chocolate chips that melt just perfectly, and that unmistakable, creamy, salty hug of peanut butter. It’s a trifecta of yumminess that hits all the right notes. And the texture! It’s that perfect balance of chewy and slightly tender, not too crumbly, not too cakey. It’s just… right. Then there’s the sheer simplicity of it all. This isn’t a recipe that requires fancy equipment or a culinary degree. You can whip up the batter in one bowl, layer in the peanut butter, swirl, and bake. It’s a lifesaver on busy weeknights when you need a quick dessert or a satisfying after-school treat. And speaking of budget-friendly, the ingredients are all pantry staples for most of us, making it a cost-effective way to satisfy a sweet tooth. What I love most about these bars is their versatility. They’re fantastic on their own, of course, but they’re also wonderful served warm with a scoop of vanilla Ice Cream for a truly decadent dessert. They’re like a hug in bar form, and who doesn’t need more of that? They’re also a huge hit with my family; my kids practically inhale them, and they always ask for more. That’s the best kind of endorsement, right?
How do I make Oatmeal Chocolate Chip Peanut Butter Bars?
Quick Overview
This recipe is beautifully straightforward. We’re basically making a thick, chewy Cookie Dough, layering it into a pan, adding a gooey peanut butter swirl, and baking it until golden and delicious. It’s all about combining simple ingredients with minimal fuss to create maximum flavor. The whole process, from mixing to getting them into the oven, usually takes me about 15-20 minutes. The baking time is pretty standard, and then there’s the hardest part: waiting for them to cool enough to slice! The beauty of this method is that it’s forgiving and designed for home bakers of all levels. You don’t need to worry about chilling dough or perfectly even layering; the rustic swirl is part of its charm!
Ingredients
For the Main Batter:
You’ll need about 1 ½ cups of all-purpose flour, sifted if you want them extra tender, though I often skip that step and they’re still amazing. Make sure your butter is softened, not melted! About 1 cup (two sticks) of unsalted butter is perfect. For sweetness, ½ cup of granulated sugar and 1 cup of packed light brown sugar work wonders for that classic chewy texture and flavor. I always use large eggs, and 2 of them will bind everything together beautifully. A good teaspoon of pure vanilla extract really brings out all the flavors. And of course, the star of the show for chewiness: 3 cups of old-fashioned rolled oats. Not the instant kind, please! They really do give you the best texture. A teaspoon of baking soda is crucial for that perfect lift, and ½ teaspoon of salt balances out all that sweetness. And don’t forget 1 cup of your favorite chocolate chips – I love a mix of semi-sweet and milk chocolate!
For the Filling:
This is where the magic happens! You’ll need about ¾ cup of creamy peanut butter. Natural peanut butter works well, but make sure it’s well-stirred to avoid an oily layer. If you’re using a super natural, oily one, you might want to give it an extra good whisk. Some people like to add a tablespoon or two of melted butter to their peanut butter filling to make it even more pourable and luxurious, but I often find it’s not strictly necessary. A couple of tablespoons of the brown sugar from your pantry will add just a touch more sweetness and help it set up a bit.
For the Glaze:
This is optional, but highly recommended! It adds a professional touch and extra deliciousness. You’ll want about ½ cup of powdered sugar, a tablespoon or two of milk (or even a little heavy cream for extra richness!), and a ½ teaspoon of vanilla extract. You can adjust the milk to get your desired drizzling consistency. If you’re feeling fancy, a tiny pinch of salt in the glaze can really make the flavors pop.
Step-by-Step Instructions
Step 1: Preheat & Prep Pan
First things first, let’s get our oven preheated to 350°F (175°C). This is a pretty standard baking temperature that works for most ovens. While that’s heating up, grab an 8×8 inch baking pan. I like to line mine with parchment paper, leaving an overhang on the sides. This makes lifting the bars out SO much easier later on, and it means way less cleanup! Just press the parchment into the pan, making sure it covers the bottom and goes up the sides. It makes your life a lot simpler, trust me on this one.
Step 2: Mix Dry Ingredients
In a large bowl, whisk together your sifted all-purpose flour, baking soda, and salt. Give it a good whisk just to make sure everything is evenly distributed. This ensures your leavening agent (the baking soda) and salt are spread throughout the batter, so you don’t get any weird pockets of saltiness or uneven rise. It’s a simple step, but it really does help create a consistent texture throughout your bars.
Step 3: Mix Wet Ingredients
In a separate, even larger bowl (or the bowl of your stand mixer if you’re fancy!), cream together the softened unsalted butter, granulated sugar, and packed light brown sugar until it’s light and fluffy. This usually takes a few minutes. Then, beat in the eggs, one at a time, making sure to scrape down the sides of the bowl after each addition. Stir in the pure vanilla extract. You want this mixture to be nice and smooth, almost like a paste.
Step 4: Combine
Now, we’re going to gently combine the dry ingredients into the wet. Add the dry ingredients to the wet ingredients in three additions, mixing on low speed (or by hand with a spatula) until just combined. Be careful not to overmix! Overmixing can develop the gluten in the flour, which can lead to tough bars. We’re aiming for a thick, doughy consistency. Once it’s just combined, stir in those lovely chocolate chips. Fold them in gently until they’re evenly distributed throughout the dough.
Step 5: Prepare Filling
In a small bowl, mix together your creamy peanut butter and the couple of tablespoons of brown sugar. You want it to be smooth and spreadable. If your peanut butter is very stiff, you can warm it up for about 10-15 seconds in the microwave, just until it’s a bit more pliable. This makes it much easier to swirl into the batter. You’re not trying to melt it, just soften it a touch. It should be like a thick paste.
Step 6: Layer & Swirl
Take about two-thirds of your oat mixture and press it evenly into the bottom of your prepared baking pan. It might feel a bit sticky, so dampening your fingers or using the back of a spoon can help. Then, dollop spoonfuls of the peanut butter mixture over the oat base. Now comes the fun part: swirl it! You can use a knife, a skewer, or even the handle of a wooden spoon to gently swirl the peanut butter through the oat layer. Don’t overdo it; you want distinct ribbons of peanut butter, not a muddy mess. Finally, crumble the remaining one-third of the oat mixture evenly over the top of the swirled peanut butter layer. Gently press it down so it adheres to the peanut butter.
Step 7: Bake
Pop that pan into your preheated oven. Bake for about 25-30 minutes, or until the edges are golden brown and the center looks set. You can test for doneness by inserting a toothpick into the center – it should come out with moist crumbs attached, but not wet batter. Keep an eye on it during the last few minutes, as ovens can vary. If the top starts to brown too quickly, you can loosely tent it with foil.
Step 8: Cool & Glaze
This is arguably the hardest step: patience! Let the bars cool completely in the pan on a wire rack. I know, I know, the smell is torture! But this is super important. If you try to cut them while they’re warm, they’ll just fall apart. Once they’re completely cooled, you can prepare the glaze. Whisk together the powdered sugar, milk, vanilla, and that tiny pinch of salt until smooth. It should be thick enough to drizzle but thin enough to flow. Drizzle this over the cooled bars. Let the glaze set for about 15-20 minutes before slicing.
Step 9: Slice & Serve
Once the glaze is set, use those parchment paper overhangs to lift the entire slab out of the pan and onto a cutting board. Now you can slice them into bars! I usually aim for 12-16 bars, depending on how big I’m feeling. A sharp knife works best. Serve them at room temperature for the Best Chewy texture. If you want to go all out, a little scoop of vanilla ice cream alongside is pure bliss!
What to Serve It With
These Oatmeal Chocolate Chip Peanut Butter Bars are so wonderfully versatile, they fit into almost any occasion! For breakfast, they’re a fantastic grab-and-go option. Pair one with a hot cup of coffee or a tall glass of milk, and you’ve got a satisfying start to your day that feels like a treat. I often have one with my morning tea when I need a little pick-me-up. For brunch, they add a comforting, homemade touch to the spread. You could arrange them on a platter alongside fresh fruit, yogurt parfaits, and maybe some mini quiches. They look so inviting and everyone loves a bit of chocolate and peanut butter. As a dessert, oh my goodness! Serve them slightly warm with a scoop of good quality vanilla bean ice cream. The contrast of the warm bar and cold ice cream is divine, and the chocolate and peanut butter flavors just sing. For cozy snacks, they’re simply perfect. Enjoy one with a glass of cold milk while you’re curled up with a good book, or share them with friends during a casual movie night. They’re also brilliant for potlucks and picnics because they travel so well and are always a crowd-pleaser. My family loves them after dinner, especially when we’ve had a lighter meal and still want something sweet without being too heavy.
Top Tips for Perfecting Your Oatmeal Chocolate Chip Peanut Butter Bars
I’ve made these countless times, and along the way, I’ve picked up a few tricks that make all the difference. For the oats, always use old-fashioned rolled oats. The quick-cooking or instant varieties tend to break down too much and can make your bars mushy rather than wonderfully chewy. You want that distinct oat texture! When mixing the batter, seriously, don’t overmix once you add the flour. Just mix until it’s combined. A few streaks of flour are better than overmixing and ending up with tough bars. It’s a common mistake, but once you get the feel for it, you’ll nail it every time. For the peanut butter swirl, if you’re using natural peanut butter, make sure it’s well-stirred before you start. If it’s still a bit stiff, a quick 10-second zap in the microwave makes it much easier to work with and creates those beautiful, defined ribbons. Don’t try to make it too perfect; a slightly rustic swirl looks more homemade and inviting! For baking, know your oven. Ovens can be temperamental, so keep an eye on the bars during the last 5-10 minutes of baking. If they’re browning too fast on top but the center is still gooey, a loose tent of aluminum foil will do the trick. The toothpick test is your best friend here – moist crumbs, not wet batter! For ingredient swaps, if you don’t have chocolate chips, chopped chocolate bars work wonderfully. You can also mix in nuts like chopped peanuts or pecans for added crunch. If you’re out of regular milk for the glaze, a splash of heavy cream or even a dairy-free milk like almond or oat milk works just fine. Just adjust the amount until you get that perfect drizzling consistency.
Storing and Reheating Tips
Storing these bars is thankfully quite simple, and they maintain their deliciousness quite well. At room temperature, they’ll stay fresh in an airtight container for about 3-4 days. I usually just keep them in the pan they were baked in, covered tightly with plastic wrap, or transfer them to a good quality container. Make sure they are completely cool before covering, otherwise, condensation can make them a bit soggy. If you’re not going to eat them within those few days, or if your kitchen tends to be warm, refrigerating them is a great option. They’ll last even longer in the fridge, usually up to a week. Just pop them into an airtight container. The texture might firm up a bit in the fridge, but that’s easily fixed. If you want to reheat them slightly, a few seconds in the microwave (about 10-15 seconds per bar) will bring back that lovely chewy, gooey texture. For longer storage, these bars freeze exceptionally well! Let them cool completely, then wrap individual bars or stacks of them tightly in plastic wrap, followed by a layer of aluminum foil or a freezer-safe bag. They can be stored in the freezer for up to 2-3 months. To thaw, simply unwrap them and let them come to room temperature, or give them that quick microwave zap. I usually wait to add the glaze until after they’ve been thawed if I’m freezing them, or I just freeze them plain and glaze them once they’re ready to be served. This helps the glaze stay looking its best!
Frequently Asked Questions
Final Thoughts
So there you have it – my absolute favorite Oatmeal Chocolate Chip Peanut Butter Bars! They’re more than just a recipe to me; they’re a little slice of comfort and joy that’s always there when I need it. The combination of textures and flavors is just heavenly, and the fact that they’re so easy to whip up makes them a true kitchen hero. Whether you’re looking for a quick dessert, a lunchbox treat, or just something to make your afternoon brighter, these bars deliver every single time. They’re a testament to how simple ingredients can create something truly spectacular. If you love this recipe, you might also want to check out my Fudgy Brownies or my Chewy Ginger Molasses Cookies – they’re in a similar vein of comforting, classic baked goods! I really hope you give these bars a try. I can’t wait to hear what you think, and I’d absolutely love to see your creations! Tag me or leave a comment below with your experience and any fun variations you discover. Happy baking!
Oatmeal Chocolate Chip Peanut Butter Bars
Ingredients
Main Ingredients
- 1 cup all-purpose flour
- 1 teaspoon baking soda
- 0.5 teaspoon salt
- 1 cup unsalted butter, softened
- 0.75 cup granulated sugar
- 0.75 cup packed brown sugar
- 2 large eggs
- 1 teaspoon vanilla extract
- 3 cups rolled oats
- 1 cup semi-sweet chocolate chips
- 0.5 cup peanut butter chips
Instructions
Preparation Steps
- Preheat oven to 350°F (175°C). Grease and flour a 9x13 inch baking pan.
- In a medium bowl, whisk together the flour, baking soda, and salt. Set aside.
- In a large bowl, cream together the softened butter, granulated sugar, and brown sugar until light and fluffy.
- Beat in the eggs one at a time, then stir in the vanilla extract.
- Gradually add the dry ingredients to the wet ingredients, mixing until just combined.
- Stir in the rolled oats, chocolate chips, and peanut butter chips until evenly distributed.
- Spread the batter evenly into the prepared baking pan.
- Bake for 25-30 minutes, or until the edges are golden brown and the center is set.
- Let cool completely in the pan on a wire rack before cutting into bars.