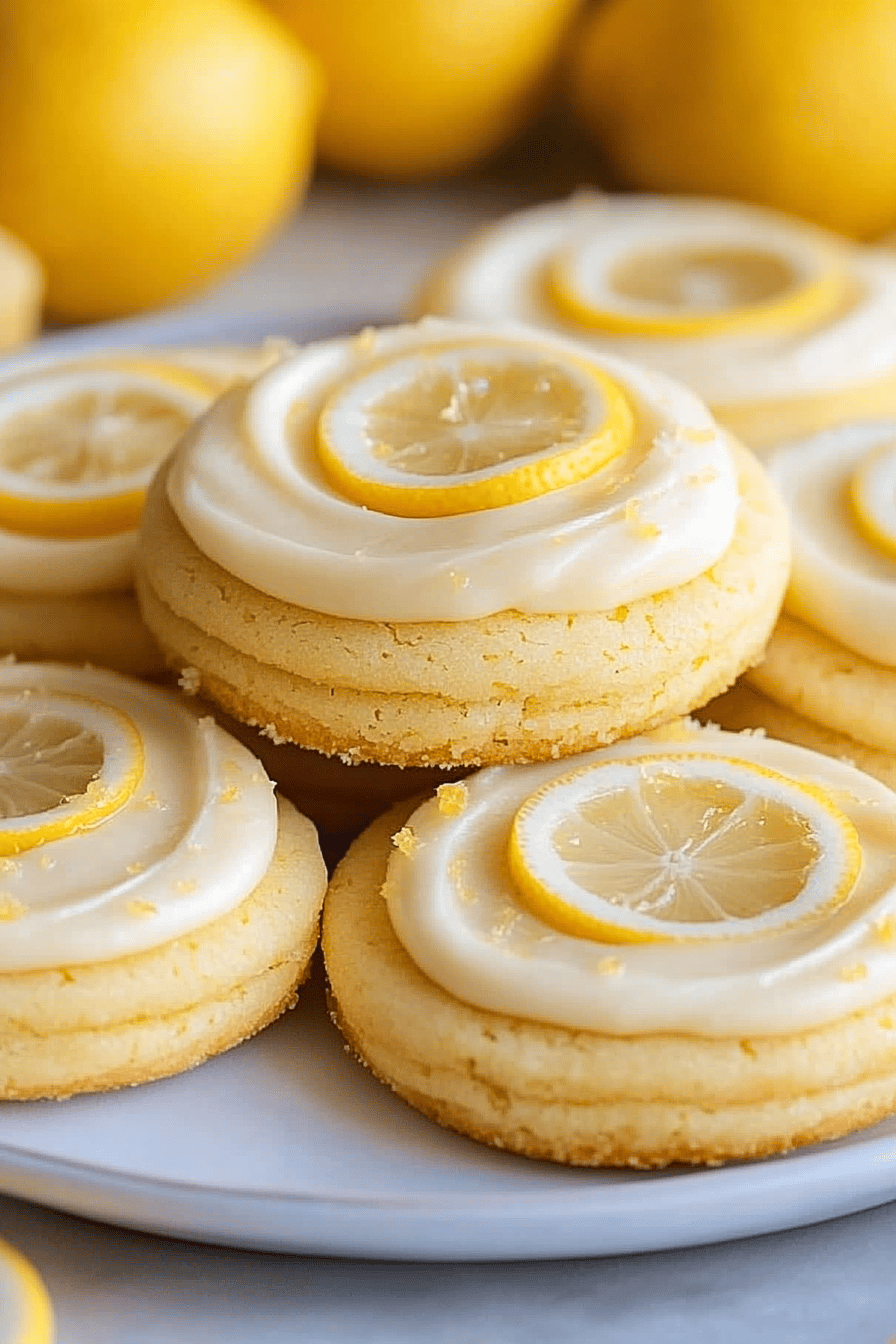
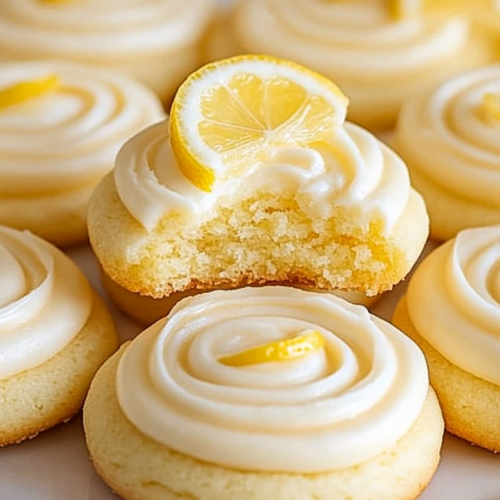
Oh, hello there! Come on in, kick off your shoes. I’ve been just *dying* to share this recipe with you. You know how sometimes you just need a little something sweet, something bright and happy to lift your spirits? That’s exactly what these Lemon Frosted Cookies are for me. They’re like little bites of sunshine, seriously! I first whipped these up years ago when my best friend was going through a rough patch, and the way they just seemed to make everyone smile… well, it stuck with me. They’re not overly fussy, but they taste like you’ve spent hours in the kitchen. If you’ve ever had those bakery-style lemon bars that are a bit too tart or a bit too cakey, these are definitely *not* that. They’re soft, with just the right amount of chew, and that dreamy lemon glaze? Pure magic. I always make a double batch around spring, and let me tell you, they disappear faster than you can say “second cookie.”
What is lemon frosted cookie?
So, what exactly are these little delights? Think of them as the perfect happy medium between a chewy cookie and a tender cake. They’ve got that wonderful soft texture that just melts in your mouth, and the star of the show is, of course, that bright, zesty lemon flavor. The name itself, “Lemon Frosted Cookies,” just tells you what you’re getting – a delicious cookie with a sweet, tangy lemon glaze drizzled all over. It’s not a heavy buttercream or a complicated royal icing; it’s a simple, pourable glaze that hardens just slightly, giving you that perfect balance of soft cookie and delicate frosting. They’re really the best of both worlds, and honestly, I can’t get enough of them, especially when I need a little pick-me-up. They’re wonderfully versatile too – perfect with a cup of tea on a quiet afternoon or as a sweet finish to a family dinner.
Why you’ll love this recipe?
Okay, let’s talk about why you absolutely *need* to make these Lemon Frosted Cookies. First off, the FLAVOR! It’s this incredible burst of sunshine, not overwhelmingly sweet, but with this delightful tartness from the fresh lemon zest and juice that just sings. It’s so refreshing! And the TEXTURE… oh my goodness. They’re perfectly soft and chewy in the center with slightly crisp edges, which is my absolute favorite kind of cookie. Plus, the simplicity of this recipe is a lifesaver. Seriously, you can whip up a batch in under an hour from start to finish, and most of that is just passive waiting time. They’re incredibly budget-friendly too. You probably already have most of the ingredients in your pantry, and the star, lemon, is usually pretty inexpensive. What I love most, though, is their versatility. They’re fantastic for potlucks, bake sales, or just a random Tuesday when you need a treat. They pair wonderfully with a cup of black coffee, a glass of milk for the kids, or even a light dessert wine if you’re feeling fancy. If you’re a fan of my other recipes like my “Easy Chocolate Chip Blondies” or my “Zesty Orange Scones,” I promise you’ll fall head over heels for these. They’re just universally loved and always a crowd-pleaser. They’re the kind of cookie that makes people ask, “What’s your secret?” and you can just smile knowingly!
How do you make lemon frosted cookies?
Quick Overview
Making these beauties is surprisingly straightforward! You’ll cream some butter and sugar, add in your eggs and lemon, then gently fold in your dry ingredients. We’ll bake them until they’re just golden, let them cool a bit, and then drench them in a simple, luscious lemon glaze. The whole process is really quite forgiving, and even if you’re new to baking, you’ll find this super manageable. It’s the kind of recipe that makes your kitchen smell absolutely divine and leaves you with a tray of pure happiness.
Ingredients
For the Main Batter:
- 1 cup (2 sticks) unsalted butter, softened to room temperature (I always use unsalted so I can control the salt level perfectly)
- 1 1/2 cups granulated sugar (you can reduce this slightly if you prefer a less sweet cookie, but I find this ratio just right)
- 2 large eggs, at room temperature (this helps them emulsify better!)
- 1/4 cup fresh lemon juice (from about 1-2 lemons – always use fresh for the best flavor!)
- 1 tablespoon finely grated lemon zest (this is where all that amazing lemon aroma comes from!)
- 1 teaspoon vanilla extract (enhances all the other flavors)
- 2 3/4 cups all-purpose flour (spooned and leveled, not scooped!)
- 1 teaspoon baking powder (gives them that lovely lift)
- 1/2 teaspoon salt (balances the sweetness)
For the Glaze:
- 2 cups powdered sugar, sifted (sifting is key for a smooth glaze!)
- 3-4 tablespoons fresh lemon juice (adjust to your desired consistency and tanginess)
- 1/2 teaspoon lemon zest (optional, for an extra pop of flavor and visual appeal)
Step-by-Step Instructions
Step 1: Preheat & Prep Pan
First things first, get your oven preheated to 375°F (190°C). I like to line my baking sheets with parchment paper. This not only prevents sticking but also makes cleanup a breeze, which is always a win in my book! This simple step ensures your cookies bake evenly and don’t get stuck to the pan.
Step 2: Mix Dry Ingredients
In a medium bowl, whisk together the flour, baking powder, and salt. Just a gentle whisking to combine everything evenly. This ensures the leavening agent and salt are distributed throughout, leading to a consistent bake. Don’t overmix; we just want them happily acquainted.
Step 3: Mix Wet Ingredients
In a large bowl, cream together the softened butter and granulated sugar using an electric mixer (or a whisk and some serious arm power!) until light and fluffy. This usually takes about 3-4 minutes. Then, beat in the eggs one at a time, ensuring each one is fully incorporated before adding the next. Stir in the fresh lemon juice, lemon zest, and vanilla extract. The mixture will look a little curdled at this stage because of the lemon juice, but don’t worry, that’s totally normal!
Step 4: Combine
Gradually add the dry ingredients to the wet ingredients, mixing on low speed until just combined. Be careful not to overmix here! Overmixing can lead to tough cookies, and nobody wants that. Stop mixing as soon as you no longer see streaks of flour. A little bit of visible flour is okay; the final folding will take care of it. We’re aiming for a soft, slightly sticky dough.
Step 5: Prepare Filling
There isn’t a separate “filling” for these cookies in the traditional sense, as the lemon flavor is integrated into the batter and the glaze. However, if you wanted to add something extra, you could fold in some finely chopped candied lemon peel or even a few White Chocolate chips for a different texture and flavor profile!
Step 6: Layer & Swirl
This step is more about shaping the cookies. Drop rounded tablespoons of dough onto the prepared baking sheets, about 2 inches apart. I like to use a cookie scoop for consistency, but spoons work just fine. They’ll spread a bit as they bake, so give them a little room to do their thing. They won’t spread into flat discs, they’ll stay nicely puffed.
Step 7: Bake
Bake for 9-12 minutes, or until the edges are lightly golden and the centers are set but still look slightly soft. Ovens can be so finicky, so start checking around the 9-minute mark. You don’t want to overbake these; they should be soft and chewy. Let them cool on the baking sheets for a few minutes before transferring them to a wire rack to cool completely. This is super important because they’re delicate when hot!
Step 8: Cool & Glaze
Once the cookies are completely cool (and I mean *completely* cool – warm cookies and glaze make a mess!), it’s time for the best part: the glaze! In a medium bowl, whisk together the sifted powdered sugar and 3 tablespoons of lemon juice. Stir until smooth. If the glaze is too thick, add more lemon juice a teaspoon at a time until you reach your desired drizzling consistency. If it’s too thin, add a little more powdered sugar. Stir in the optional lemon zest if you’re using it. Drizzle the glaze generously over the tops of the cooled cookies using a spoon or a piping bag fitted with a small round tip. Let the glaze set for about 15-20 minutes before stacking or serving.
Step 9: Slice & Serve
These are best served as is, with their beautiful glaze! You can slice them with a knife, but I find they’re perfect just as they are. They’re wonderful served at room temperature. The contrast between the soft cookie and the slightly set glaze is just divine. They look so pretty stacked on a plate, especially with a few extra flecks of zest on top.
What to Serve It With
These Lemon Frosted Cookies are so versatile, they fit in pretty much anywhere!
For Breakfast: Honestly, I’ve been known to grab one (or two!) with my morning coffee. They’re not overly sweet, so they don’t feel too indulgent first thing. I love pairing them with a strong black coffee that cuts through the sweetness of the glaze, or a nice calming herbal tea. They make a simple breakfast feel a little bit special.
For Brunch: These are a brunch superstar! Arrange them on a pretty platter alongside fresh berries and a fruit salad. They look absolutely lovely and add a burst of color and sunshine to any spread. They also pair wonderfully with a mimosa or a refreshing glass of iced tea. I often make them for Easter or Mother’s Day brunches, and they’re always a hit.
As Dessert: While they’re fantastic on their own, they can also be a delightful accompaniment to a light dessert. Think about serving them alongside a lemon mousse or a simple vanilla panna cotta. The extra lemon kick is divine! They’re also a perfect “little something sweet” after a heavier meal when you don’t want a full slice of cake.
For Cozy Snacks: This is my favorite casual way to enjoy them. Whenever that 3 pm slump hits, or I’m just craving something sweet but don’t want to commit to a whole dessert, these are my go-to. They are perfect with a cold glass of milk, a warm mug of tea, or even a scoop of vanilla Ice Cream if you’re feeling extra decadent. My kids absolutely love them after school with a glass of milk – it’s a little treat that makes their day.
Top Tips for Perfecting Your Lemon Frosted Cookies
I’ve made these Lemon Frosted Cookies more times than I can count, and over the years, I’ve picked up a few tricks that I think really make a difference. These aren’t complicated steps, but they’re the little things that take your cookies from good to absolutely fantastic!
Zucchini Prep: Actually, for these cookies, we don’t use zucchini! My apologies if that was a bit confusing. These are pure lemon cookie magic. But if you were making something like zucchini bread, you’d definitely want to squeeze out as much moisture as possible to avoid a soggy baked good!
Mixing Advice: The biggest thing I’ve learned is to *not* overmix the dough once you add the flour. This is the golden rule for tender cookies. Mix until *just* combined, and you’ll achieve that perfect soft, chewy texture. If you see a tiny bit of flour still, that’s fine; it’ll incorporate as you shape the dough. Overmixing develops the gluten too much, resulting in a tough cookie, and that’s the last thing we want here!
Swirl Customization: With these cookies, there aren’t really swirls to worry about in the dough itself. However, when it comes to the glaze, don’t be afraid to get creative! You can do a simple drizzle back and forth, or use a fork to create little zigzags. For a more decorative look, you can pipe thin lines of glaze and then drag a toothpick through them to create a swirled effect. And don’t forget a little extra zest sprinkled on top for visual appeal and an extra punch of lemon!
Ingredient Swaps: While I absolutely adore the classic lemon flavor, I’ve experimented a bit! You can swap out some of the lemon juice for lime juice for a different citrusy kick. For a sweeter, more floral note, a touch of orange zest can be lovely, though I’d keep the lemon juice. If you’re out of granulated sugar, light brown sugar can be used, but it will change the texture and flavor slightly, making them a bit more caramel-y and chewier. Just make sure all your ingredients are at room temperature for the smoothest batter.
Baking Tips: Pay attention to your oven! Mine tends to run a little hot, so I always set my timer for the lower end of the baking time (around 9 minutes) and then check. You’re looking for edges that are just starting to turn golden brown, but the centers should still look soft and a little underdone. They’ll continue to bake a bit on the hot baking sheet after you take them out. Don’t overbake them; they’ll firm up as they cool and you’ll end up with dry, crumbly cookies instead of lovely, chewy ones.
Glaze Variations: The glaze is super adaptable! If you find it too tangy, just add a bit more powdered sugar. If you want it thinner for a more delicate drizzle, add a *tiny* bit more lemon juice or even a splash of milk. For a touch of elegance, you could even add a drop of yellow food coloring for a brighter hue, though I personally love the natural color. You can also experiment with other extracts – a tiny bit of almond extract can add a surprising depth of flavor.
Storing and Reheating Tips
Storing these Lemon Frosted Cookies is pretty simple, and they stay wonderfully fresh if you do it right. They’re honestly best eaten within a day or two of making them, but they can last longer if you’re careful!
Room Temperature: Once the glaze has set completely (this usually takes about 20-30 minutes after glazing), you can store the cookies in an airtight container at room temperature for up to 3-4 days. I like to place a piece of parchment paper between layers of cookies if I’m stacking them, just to prevent the glaze from sticking too much. They maintain their soft texture beautifully this way.
Refrigerator Storage: I generally don’t recommend refrigerating these cookies, as the moisture from the fridge can make the cookie a bit too soft and gummy, and can cause the glaze to become sticky or melt. If you absolutely must, store them in an airtight container, but be prepared for a slight change in texture. They’ll last about the same amount of time, 3-4 days.
Freezer Instructions: You can absolutely freeze these cookies, but I recommend doing it *before* glazing. Bake the cookies and let them cool completely. Then, wrap them tightly in plastic wrap, followed by a layer of aluminum foil, or place them in a freezer-safe container. They’ll keep well in the freezer for up to 2-3 months. To thaw, unwrap them and let them come to room temperature on a wire rack. Once they’re fully thawed and dry, you can make your glaze and decorate them!
Glaze Timing Advice: For room temperature storage, always let the glaze set completely before sealing the container. If you’re freezing them, definitely glaze them *after* thawing. Trying to freeze a glazed cookie can lead to condensation issues, and the glaze might become messy. So, bake, freeze unglazed, thaw, and then glaze for the best results!
Frequently Asked Questions
Final Thoughts
So there you have it – my tried-and-true recipe for Lemon Frosted Cookies! I truly hope you give these a try. They’re more than just a cookie to me; they’re a little piece of happiness that I love sharing. They’re perfect for those days when you need a burst of sunshine, or when you want to make someone’s day a little brighter. The combination of soft, chewy cookie with that tangy, bright lemon glaze is just unbeatable. If you’re someone who loves citrus flavors, or just wants a reliably delicious and easy cookie recipe, this is the one for you. And if you enjoy recipes that bring a little sparkle to your kitchen, you might also want to check out my “Sparkling Raspberry Scones” or my “Sunny Lemon Blueberry Bread.” They’ve all got that cheerful vibe! I can’t wait to hear what you think of these Lemon Frosted Cookies. Please leave a comment below and let me know how yours turned out, or if you’ve found any fun variations! Happy baking, everyone!
Lemon Frosted Cookies
Ingredients
Cookie Dough
- 1 cup unsalted butter softened
- 1.5 cup granulated sugar
- 2 large eggs
- 1 teaspoon vanilla extract
- 3 cups all-purpose flour
- 1 teaspoon baking soda
- 0.5 teaspoon salt
- 1 tablespoon lemon zest
Lemon Frosting
- 2 cups powdered sugar
- 2 tablespoons lemon juice
- 1 tablespoon milk
- 0.5 teaspoon lemon extract optional
Instructions
Preparation Steps
- Preheat your oven to 350°F (175°C). Line baking sheets with parchment paper.
- In a large bowl, cream together the softened butter and granulated sugar until light and fluffy.1 cup unsalted butter
- Beat in the eggs one at a time, then stir in the vanilla extract.1 cup unsalted butter
- In a separate bowl, whisk together the flour, baking soda, and salt.1 cup unsalted butter
- Gradually add the dry ingredients to the wet ingredients, mixing until just combined. Stir in the lemon zest.1 cup unsalted butter
- Drop rounded tablespoons of dough onto the prepared baking sheets, about 2 inches apart.
- Bake for 8-10 minutes, or until the edges are lightly golden. Let the cookies cool on the baking sheets for a few minutes before transferring them to a wire rack to cool completely.
- To make the frosting, whisk together the powdered sugar, lemon juice, and milk until smooth. Add lemon extract if using.1 cup unsalted butter
- Once the cookies have cooled completely, spread or drizzle the frosting over them.