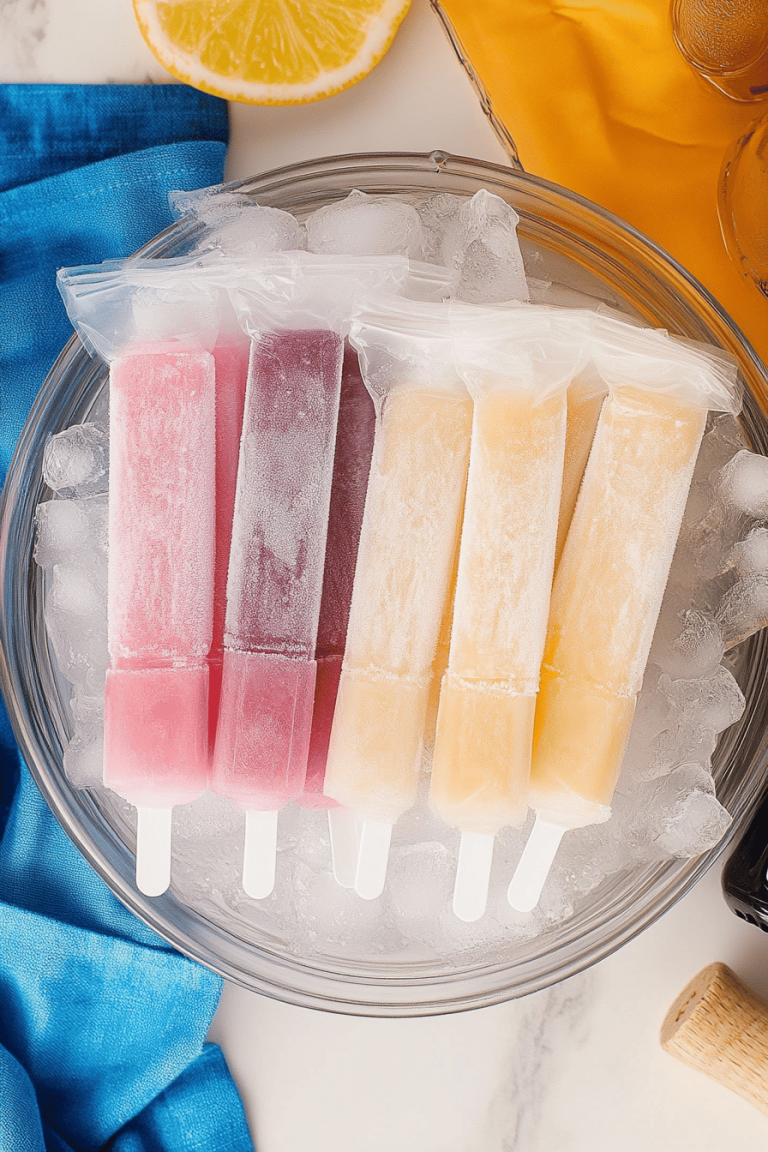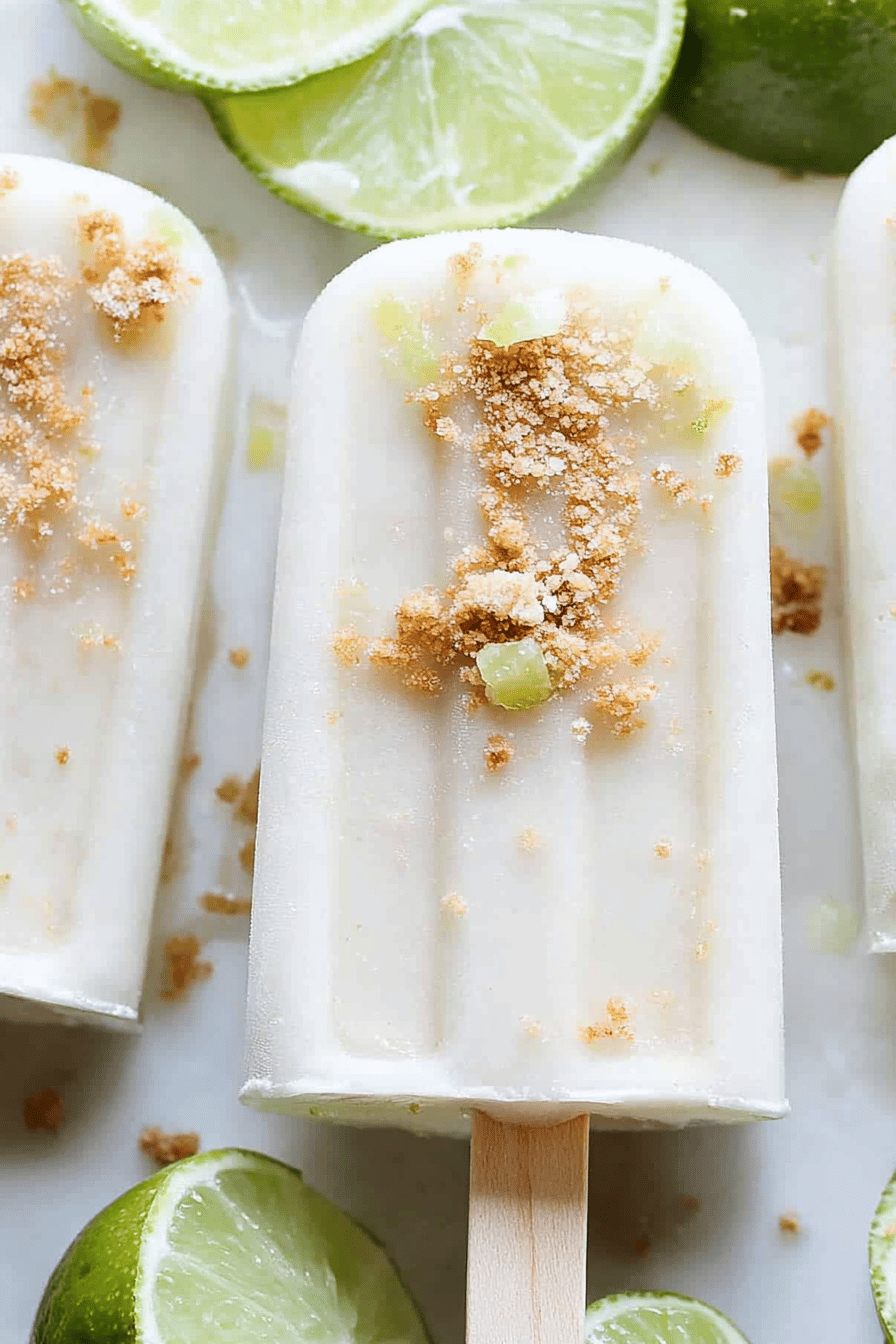
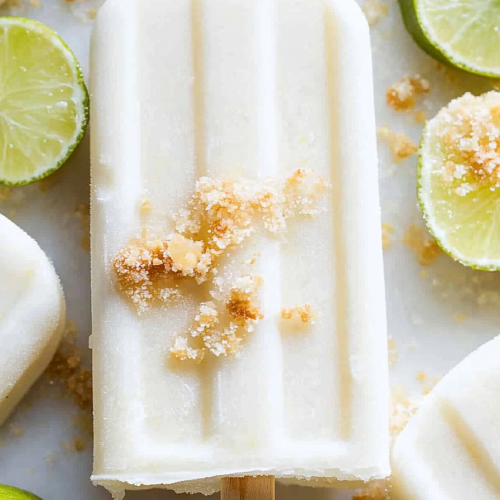
You know those scorching hot summer days when you just *need* something cool, refreshing, and utterly delicious? The kind of day where the air feels thick and the only thing that sounds appealing is a one-way ticket to the nearest beach? Well, I’ve got something that’s pretty much the next best thing, right in your own freezer! I’m talking about Key lime pie popsicles. Seriously, if you’re a fan of that classic tangy, sweet, creamy Key lime pie, but you want it in a fun, grab-and-go format, these popsicles are going to be your new best friend. They taste *exactly* like biting into a chilled slice of Key lime pie, but without all the fuss of baking a whole pie. My kids discovered these last summer and now it’s a non-negotiable request every time the temperature hits 80 degrees. They’re so simple, so bright, and just… pure sunshine in frozen form.
What is a Key Lime Pie
So, what exactly are these magical little treats? Think of them as a deconstructed Key lime pie, transformed into a frozen popsicle. We’re taking all those wonderful flavors – the zesty punch of Key lime juice, the sweet creaminess of condensed milk, and a hint of graham cracker crust – and turning them into a dreamy, icy delight. It’s essentially a no-bake, frozen version of the beloved dessert, designed to be enjoyed without a fork or plate. The name itself, “Key lime pie popsicles,” really says it all, doesn’t it? It’s meant to be that familiar, comforting taste of Key lime pie, but in a cool, convenient, and totally portable format. Perfect for chasing away the heat or just satisfying that sweet craving!
Why You’ll Love This Recipe
Oh, where do I even begin with why you’ll absolutely adore these Key lime pie popsicles? First and foremost, the FLAVOR. It’s just spot-on. That perfect balance of tart and sweet, with the unmistakable bright zing of Key limes. It’s so refreshing, it practically wakes up your taste buds. And the creamy texture? It’s surprisingly smooth for a popsicle, thanks to the condensed milk which keeps it from getting icy and hard. Plus, the simplicity of this recipe is a total game-changer. You don’t need to be a master baker to whip these up. It’s more like assembling a delicious puzzle, and the payoff is HUGE for the amount of effort you put in. I always feel so accomplished when I pull a batch of these out of the freezer. They’re incredibly cost-efficient too – a few basic ingredients and you’ve got a whole dozen of these gourmet-feeling treats. And the versatility! You can totally customize them. Want a little crunch? Add some finely crushed graham crackers. Prefer a sweeter profile? Adjust the condensed milk. They’re perfect for a spontaneous backyard BBQ, a quick after-school treat, or even a fun dessert for a summer party. Honestly, they’re my go-to when I want something special without turning on the oven. It’s like a little slice of Florida sunshine, no matter where you are!
How do I make a Key Lime
Quick Overview
Making these Key lime pie popsicles is ridiculously easy, I promise! You basically just whisk together a few simple ingredients until smooth and creamy, pour them into popsicle molds, and freeze. That’s it! No baking, no complicated steps. It’s the kind of recipe you can whip up in under 10 minutes and then let the freezer do all the hard work. The result is a vibrant, creamy, and incredibly refreshing treat that tastes just like your favorite Key lime pie.
Ingredients
For the Main Batter:
You’ll need about 1 (14-ounce) can of sweetened condensed milk. Make sure it’s the sweetened kind, that’s key for that classic pie sweetness! Then, grab about 1/2 cup of fresh Key lime juice. I always, *always* recommend using fresh juice. Bottled just doesn’t have that same bright, floral punch. You can usually find Key limes in the produce section, and they’re worth the hunt! If you absolutely can’t find them, regular lime juice will work in a pinch, but it won’t be quite the same. And for that extra creamy texture, we’ll use about 1 cup of heavy cream. Make sure it’s cold when you whip it; it’ll incorporate better. I’ve tried it with half-and-half, and it’s just not as rich, so I stick with the heavy cream.
For the Filling (Optional, but highly recommended!):
This is where we get that little hint of crust. About 1/4 cup of finely crushed graham cracker crumbs. You can crush them yourself in a Ziploc bag with a rolling pin, or just buy them pre-crushed. For a little extra flavor and moisture, I like to mix these crumbs with about 1 tablespoon of melted unsalted butter. It makes them clump together a bit, which is perfect for a little texture surprise in your popsicle.
For the Glaze (Optional, for that extra pizzazz!):
This is totally for show and an extra pop of flavor. A simple drizzle of melted White Chocolate. About 1/4 cup of white chocolate chips, melted gently. You can do this in the microwave in 30-second bursts, stirring in between, or over a double boiler. Sometimes I’ll add a tiny drop of green food coloring to the white chocolate to make it look a bit more like the lime filling, but that’s entirely up to you!
Step-by-Step Instructions
Step 1: Prepare Your Popsicle Molds
First things first, make sure your popsicle molds are clean and ready to go. I like to have them all lined up on a small baking sheet or a sturdy tray. This makes it so much easier to transfer them to the freezer without sloshing everything. If you’re using those plastic molds, give them a quick rinse and dry. If they’re new, sometimes a wash with warm, soapy water is a good idea. Having everything prepped means less fumbling when your delicious mixture is ready.
Step 2: Mix the Creamy Base
In a medium-sized bowl, pour in your sweetened condensed milk. Then, add your fresh Key lime juice. This is where the magic starts to happen! Whisk them together really well. You’ll notice the mixture will start to thicken slightly as the lime juice reacts with the condensed milk. It’s like a little preview of the deliciousness to come.
Step 3: Whip the Cream
Now, in a separate, clean bowl, pour in your cold heavy cream. Using an electric mixer (or a whisk and a LOT of arm power!), whip the cream until it forms soft peaks. You don’t want it to be stiff like for meringue, just soft and fluffy. This is going to give our popsicles that wonderfully smooth, almost creamy texture that you just can’t beat.
Step 4: Gently Combine
Carefully fold the whipped cream into the condensed milk and lime juice mixture. Use a spatula and a gentle folding motion. You want to keep as much air in the whipped cream as possible, as this contributes to the smooth texture of the popsicles. Don’t overmix; just fold until it’s *just* combined and you don’t see any streaks of white cream. It should look like a smooth, pale green custard.
Step 5: Prepare the Graham Cracker Crumble (if using)
If you’re adding that delightful graham cracker crunch, now’s the time to prepare it. In a small bowl, combine your finely crushed graham cracker crumbs with the melted butter. Stir it all together until the crumbs are moistened. This will help them hold together a little bit so you get nice little pockets of crust in your popsicles.
Step 6: Layer and Swirl
This is the fun part where you assemble your popsicles! If you’re using the graham cracker crumble, spoon a small amount into the bottom of each popsicle mold. Then, pour your creamy Key lime mixture over the crumbs, filling the molds almost to the top. If you want to create a more integrated swirl effect, you can alternate layers of the Key lime mixture and the graham cracker crumble, or just dollop some crumble on top and use a skewer to gently swirl it down into the mixture. Be careful not to over-swirl, or you’ll lose the definition. You want little pockets of texture, not a uniform sandy mix.
Step 7: Insert Sticks and Freeze
Now, carefully insert your popsicle sticks into the molds. If your molds have little slots for the sticks, use those! If not, you might want to freeze them for about an hour until they’re partially set, then insert the sticks. This helps them stand up straight. Place the tray with the filled molds into the freezer and let them freeze completely. This usually takes at least 4-6 hours, but I often leave them overnight to be sure they’re super firm.
Step 8: Melt the White Chocolate (if using for glaze)
While your popsicles are getting nice and frozen, you can get your White Chocolate glaze ready. Melt your white chocolate chips as described in the ingredients section. Stir it until it’s smooth and pourable. If it gets too thick, you can add a tiny bit more melted white chocolate or even a *drop* of coconut oil to loosen it up. You want it to be easy to drizzle.
Step 9: Unmold and Drizzle (Optional)
Once your popsicles are fully frozen and solid, it’s time to unmold them! This can sometimes be a little tricky. The easiest way is to run the outside of the mold under warm water for a few seconds. Don’t let water get *into* the popsicle, just on the outside of the mold. Then, gently pull the popsicle out. If you’re drizzling with white chocolate, you can dip the top of the popsicle into the melted chocolate or just drizzle it artfully across the top. Let the chocolate set for a few minutes in the freezer before serving. You can also sprinkle a few extra graham cracker crumbs over the wet chocolate for even more texture!
What to Serve It With
These Key lime pie popsicles are pretty much a standalone star, but they can certainly play well with others! For breakfast (yes, I’m one of *those* moms!), they’re a fun treat after a bowl of yogurt or some fruit. I love pairing them with a strong, iced coffee for a little energy boost. For brunch, imagine serving these alongside some mini quiches or a fresh Fruit Salad. They add a bright, cheerful pop of color and a refreshing counterpoint to richer brunch items. As a dessert, they are heavenly after a casual BBQ or a light summer meal. They’re so much lighter than a heavy cake, but still feel indulgent. I’ve also found they’re perfect for those “I need something sweet but don’t want to commit to a whole dessert” moments. Just grab one from the freezer! My family loves them as a “special snack” after playing outside. Honestly, their versatility is one of the best parts – they fit into any part of the day where a little burst of cool, tangy sweetness is welcome.
Top Tips for Perfecting Your Key Lime Pie Popsicles
Over the years, I’ve definitely learned a few tricks to make these Key lime pie popsicles absolutely perfect every time. For the Key lime juice, I can’t stress enough: fresh is best! If you can get your hands on actual Key limes, do it. Their flavor is delicate and distinct. Bottled lime juice, while convenient, often has a harsher, more artificial taste. If you’re using regular limes, you might need to adjust the sugar slightly, but taste as you go! When you’re folding in the whipped cream, go gently. The air you whip into it is what gives the popsicles that lovely creamy, smooth texture. If you beat them too much, they can end up a bit icy. Trust me, I learned that the hard way early on! For the graham cracker crumble, I like to make sure it’s not too coarse. Really fine crumbs will distribute better and give you those little textural surprises without being chunky. If you’re using the optional white chocolate drizzle, make sure your popsicles are *fully* frozen before you dip or drizzle. A slightly softened popsicle will just melt the chocolate too fast and make a mess. And don’t be afraid to experiment with your flavors! A tiny bit of lime zest added to the mixture can give an extra layer of intense lime flavor. Some people even add a whisper of vanilla extract to the cream base, which is also lovely. For storing, I always make sure to wrap them tightly. A good freezer bag works wonders to prevent freezer burn and keep them tasting fresh. And if they’re stuck in the mold, just a quick dip in warm water is usually all it takes. I’ve even tried adding a tiny bit of green food coloring to the main mixture for a more vibrant color, and while it’s not traditional, it’s super fun for kids!
Storing and Reheating Tips
Storing these Key lime pie popsicles is pretty straightforward, but a few things can help them last their best. At room temperature, well, they don’t last long at all, do they? Ha! But seriously, once unmolded, they are best enjoyed within an hour or so. If you need to keep them for a little longer, pop them back into the freezer. For refrigerator storage, this isn’t really applicable as they are frozen treats. They really need to stay frozen! When it comes to freezer instructions, this is where you can really extend their life. Once they’re completely frozen and unmolded, wrap each popsicle individually in plastic wrap, then place them in a freezer-safe bag or an airtight container. This double layer of protection is key to preventing freezer burn and keeping that creamy texture. Properly stored, they should stay delicious for about 1-2 months. Beyond that, they’ll still be safe to eat, but the texture might start to degrade slightly. If you’ve added the white chocolate glaze, it’s a good idea to let the chocolate harden completely in the freezer before wrapping to prevent it from smudging. And remember, the longer they’re in the freezer, the harder they’ll be, so you might want to let them sit out for just a minute or two before biting in after a long freezer stay!
Frequently Asked Questions
Final Thoughts
So there you have it – a super simple, incredibly delicious way to enjoy the iconic taste of Key lime pie, all summer long! These Key lime pie popsicles are proof that you don’t need a fancy degree in pastry to create something truly special. They’re bright, they’re tangy, they’re creamy, and they’re just plain fun. I love knowing that I can whip up a batch in minutes and have a delightful frozen treat ready to go. They’ve become a staple in my summer freezer, and I have a feeling they will in yours too. If you love these, you might also enjoy my recipes for [Link to another recipe, e.g., “No-Bake Lemon Mousse”] or [Link to another recipe, e.g., “Creamy Raspberry Sorbet”] for more cool and refreshing ideas! I can’t wait to hear what you think, so please leave a comment below and let me know how your Key lime pie popsicles turn out. And if you share them on social media, be sure to tag me – I’d love to see your creations! Happy freezing!
key lime pie popsicles
Ingredients
Main Ingredients
- 2 cups graham cracker crumbs
- 0.25 cup melted butter
- 14 oz sweetened condensed milk
- 0.5 cup key lime juice
- 1 tsp lime zest
- 1 cup heavy cream
Instructions
Preparation Steps
- In a small bowl, combine graham cracker crumbs and melted butter. Press mixture into the bottom of popsicle molds.
- In a medium bowl, whisk together sweetened condensed milk, key lime juice, and lime zest until smooth.
- In a separate bowl, whip heavy cream until stiff peaks form.
- Gently fold the whipped cream into the key lime mixture until just combined.
- Spoon the key lime mixture over the graham cracker crust in the popsicle molds.
- Insert popsicle sticks and freeze for at least 4-6 hours, or until firm.
- To unmold, run the molds under warm water for a few seconds.