Oh, where do I even begin with these jello popsicles? They’re not just a treat; they’re pure, unadulterated joy in frozen form. I swear, just looking at them makes me feel a little bit lighter, a little more ready to tackle whatever the day throws at me. They remind me of those endless summer days when I was a kid, sticky fingers and all, completely oblivious to anything but the next popsicle. We’re talking about something so simple, so ridiculously easy, yet it brings out the biggest smiles. Forget those fancy layered cakes or elaborate cookies for a minute; sometimes, what we all really need is a blast of bright, fruity flavor that’s as easy to make as it is to devour. These jello popsicles are that perfect little pick-me-up, especially when the heat is on and you need something cool and quick. They’re the unsung heroes of summer, really, and I’m so thrilled to finally share this little gem with you all.
What is a Jello Popsic
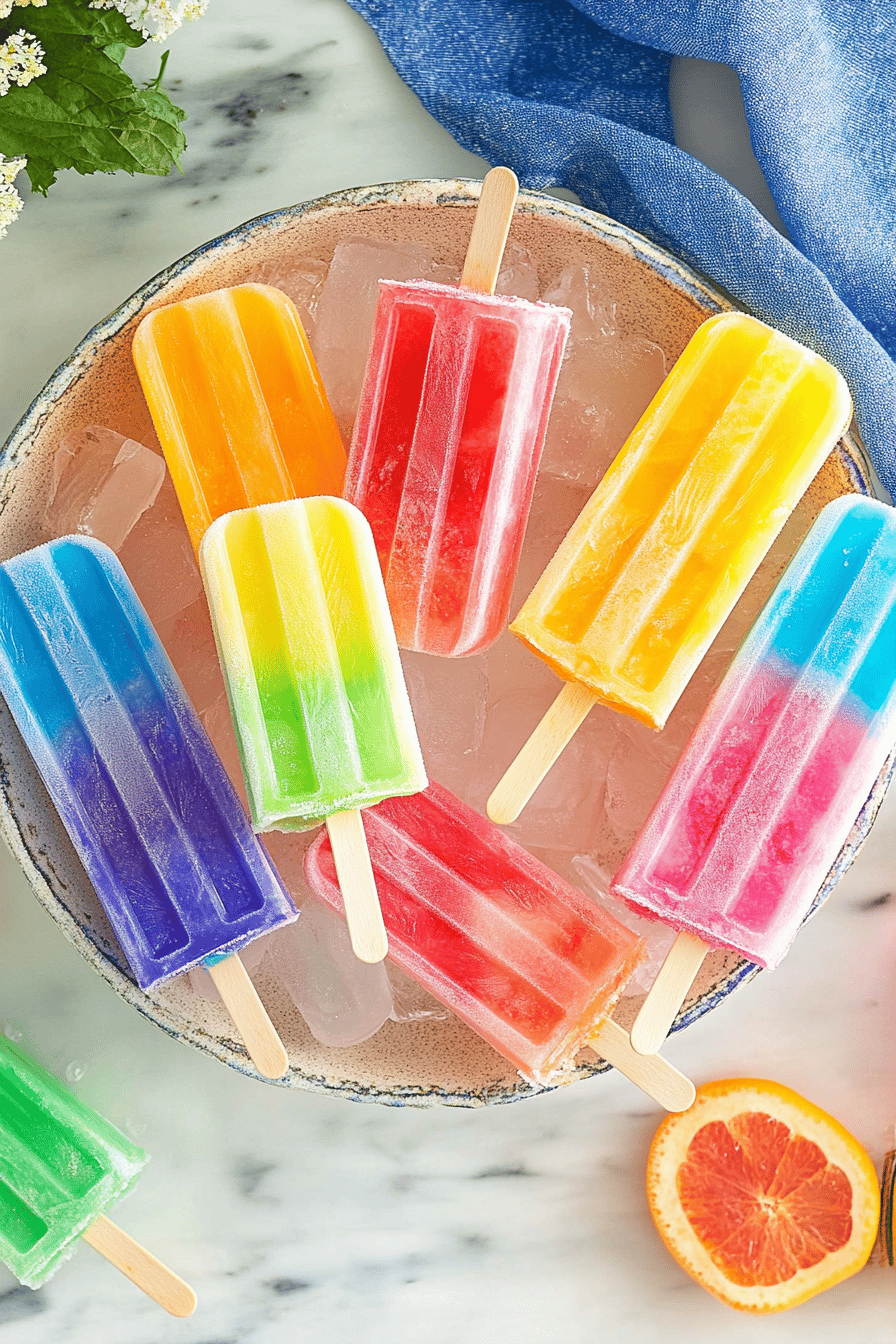
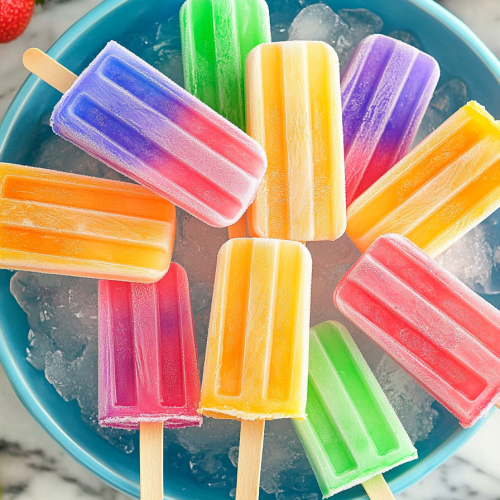
So, what exactly are these magical little creations we’re talking about? Think of them as the ultimate upgrade to the classic ice pop. Instead of just plain juice or sugary water, we’re using vibrant, flavorful Jell-O (or any similar brand you love, of course!) to create a texture that’s just a little bit more substantial, a little more interesting. It’s that jiggly, wobbly goodness we all know and love, transformed into a refreshing, portable treat. The name itself, “jello popsicles,” is pretty straightforward, isn’t it? It tells you exactly what you’re getting: the delightful, fruity essence of Jell-O, frozen solid on a stick. There’s no complicated cooking involved, no fancy equipment. It’s essentially taking a beloved pantry staple and giving it a cool, summery makeover. It’s the perfect blend of nostalgic childhood fun and grown-up ease, proving that sometimes, the simplest ideas are the most brilliant.
Why you’ll love
I’ve kept this j flavor. Oh, the flavor! You can choose any Jell-O flavor you fancy – cherry, lime, strawberry, tropical punch – and the result is just an explosion of pure, unadulterated fruitiness. It’s intensely flavorful without being overpowering, like biting into a perfectly ripe piece of fruit, but even better because it’s frozen!
What is the second category?simplicity. Honestly, you guys, this is about as easy as it gets. If you can boil water and stir, you can make these. It’s the kind of recipe I turn to when I’m short on time but still want to make something special for my family, or even just for myself when a sweet craving hits hard. No baking skills required, no complicated steps to mess up. It’s a true lifesaver.
And let’s not forget about cost-efficiency. Jell-O packets are incredibly budget-friendly, and you probably already have most of the other ingredients on hand. This is a fantastic way to create a crowd-pleasing treat without breaking the bank. It’s amazing what you can whip up with just a few dollars and a little bit of creativity.
What truly makes this recipe shine for me, though, is its versatility. You can mix and match flavors, add fruit pieces, layer them for a rainbow effect – the possibilities are endless! It’s perfect for kids’ parties, a quick afternoon cool-down, or even a fun dessert for adults. I’ve found that making these is almost as fun as eating them, and that’s saying something! They’re just so darn cheerful. If you’re looking for something refreshing, fun, and fuss-free, these jello popsicles are absolutely the way to go.
How to Make Jello Popsicles
Quick Overview
Making these vibrant jello popsicles is incredibly straightforward, perfect for even the busiest days. You’ll simply dissolve your chosen Jell-O flavor in hot water, then add cold water to help it set faster and achieve that perfect jiggly texture. Once slightly cooled, you’ll pour the mixture into popsicle molds, add your sticks, and let them freeze until solid. It’s a three-step process that guarantees a delightful, refreshing treat. What I love most is how little active time it takes; the freezer does most of the work for you, leaving you with a beautiful, colorful batch of frozen goodness ready to enjoy in just a few hours.
Ingredients
For the Jello Base:
1 package (3 oz) Jell-O (any flavor you love! Cherry, lime, and strawberry are classics!)
1 cup boiling water
1 cup cold water
Optional Add-ins:
Fresh fruit pieces (berries, diced peaches, kiwi slices)
A splash of fruit juice for extra flavor (e.g., cranberry juice with raspberry Jell-O)
Step-by-Step Instructions
Step 1: Prepare Your Molds
First things first, get your popsicle molds ready. If you’re using silicone molds, you don’t need to do anything special. If you’re using plastic molds that might stick a bit, a quick rinse with cold water can sometimes help them release more easily later. Make sure they’re clean and dry before you start filling them.
Step 2: Dissolve the Jell-O
In a heatproof bowl, pour the contents of your Jell-O package. Carefully add the boiling water. Stir the mixture continuously with a whisk or spoon for about 2-3 minutes, or until all the Jell-O powder has completely dissolved. This is important – you don’t want any grainy bits at the bottom!
Step 3: Add Cold Water
Once the Jell-O is fully dissolved, stir in the cold water. This step helps to slightly cool down the mixture, making it safe to handle and pour into your molds sooner, plus it helps the Jell-O set up properly. Give it another good stir to combine everything evenly.
Step 4: Add Optional Ingredients (If Using)
Now’s the fun part if you’re adding extras! If you want to include fresh fruit pieces, gently place them into the bottom of your popsicle molds. You can also add a small splash of fruit juice here if you want an extra flavor boost. Be careful not to overfill with solids, as you still need room for the liquid Jell-O mixture.
Step 5: Fill the Molds
Carefully pour the slightly cooled Jell-O mixture into your prepared popsicle molds. If you’re using molds with individual stick holders, fill them almost to the top, leaving just a tiny bit of space for expansion as they freeze. If you have molds that require you to add the sticks later, fill them about two-thirds of the way full for now.
Step 6: Insert Popsicle Sticks
If your molds don’t have built-in stick holders, now is the time to add them. Place the popsicle sticks into the partially filled molds. They should stand upright in the mixture. If the Jell-O is still very liquidy, the sticks might lean a bit, which is usually fine.
Step 7: Freeze
Carefully transfer the filled molds to your freezer. Let them freeze for at least 4-6 hours, or until they are completely solid. The exact time will depend on your freezer and the size of your molds. Patience is key here – nobody likes a melty popsicle before it’s meant to be!
Step 8: Release the Popsicles
Once completely frozen, it’s time for the grand reveal! To easily remove the popsicles from their molds, run the outside of the mold under warm (not hot!) water for about 10-15 seconds. This will gently loosen them. If using silicone molds, you can usually just peel the sides away. If using plastic molds, carefully wiggle the popsicle stick until it slides out.
Step 9: Enjoy Immediately!
And there you have it! Your beautiful, homemade jello popsicles are ready to be enjoyed. Serve them right away to beat the heat and savor that burst of fruity flavor. They’re perfect for a sunny afternoon or a sweet ending to any meal.
What to Serve It With
These jello popsicles are honestly perfect on their own, but sometimes it’s fun to think about what they pair with! For breakfast, I love having one alongside a cup of strong, hot coffee on a lazy weekend morning. It feels a little decadent, a sweet start to the day that’s still super refreshing. The vibrant color is also a nice contrast to a simple muffin or a piece of toast.
When it comes to brunch, these little popsicles can add a playful touch to the spread. Imagine a colorful platter with mini quiches, Fruit Salad, and a bowl of these bright jello popsicles. They’re a fun, unexpected element that kids and adults alike will adore. Serve them in a chilled glass filled with crushed ice to keep them extra cold.
As a dessert, they’re fantastic for a casual get-together. After a BBQ or a summer dinner, these are lighter than cake but just as satisfying for a sweet craving. I sometimes serve them with a small bowl of fresh whipped cream or a drizzle of condensed milk for a little extra indulgence. They’re also a great palate cleanser before moving on to something richer, or a light sweet treat if you’re just not feeling a heavy dessert.
And for those cozy snacks moments? Oh, these are the best! They’re my go-to when the kids get home from school and are starving, or when I’m just lounging around with a good book. They’re the perfect sweet companion for a movie night too. My family tradition is to have them while watching fireworks on the Fourth of July – it’s just not the same without that colorful, fruity coolness. Honestly, they pair best with sunshine and good company!
Top Tips for Perfecting Your Jello Popsicles
I’ve made enough jello popsicles to fill a small freezer, and over the years, I’ve picked up a few tricks that really make a difference. For starters, when it comes to dissolving the Jell-O, don’t rush it. Make sure every single grain of powder is gone before you move on. I’ve had batches that weren’t fully dissolved, and you end up with a slightly gritty texture, which is… well, it’s okay, but not ideal! Stirring for a good 2-3 minutes with boiling water is your best bet.
Mixing advice is pretty simple here, but it’s crucial. When you add the cold water, make sure it’s truly cold. Some people even use ice water, which helps it set up a bit faster. Also, don’t over-stir after adding fruit or other goodies; you don’t want to mush them up too much. The goal is gentle mixing to incorporate everything without compromising the clean flavors.
For swirl customization, this is where you can get really creative! If you want a layered look, pour one color almost to the top, let it set partially in the freezer (about 30-45 minutes, until it’s jiggly but not liquid), then pour your next color. For a swirled effect, pour your layers and then use a toothpick or skewer to gently swirl them together before freezing completely. You can also make a lighter version by mixing a bit of Jell-O with yogurt or whipped cream for a creamy swirl.
Ingredient swaps are totally possible! While Jell-O is the classic, you can use other gelatin-based desserts. If you’re looking to cut back on sugar, some brands offer sugar-free options, and they work just as well. For extra flavor, instead of just cold water, try using an equal amount of fruit juice. For example, using pineapple juice with the lime Jell-O is absolutely delicious and adds a tropical twist. I’ve even experimented with adding a tiny bit of coconut milk for creaminess, and it was surprisingly good, though it changes the texture slightly.
Baking tips aren’t really applicable here since we’re freezing, but freezing tips are key! Make sure your freezer is at a consistent temperature. If you live in a very humid climate, sometimes condensation can form on the outside of the molds, making them a little sticky to handle. Try to place them on a flat, stable surface in the freezer so they don’t tip over. And for the love of all that is frozen, make sure they are *completely* frozen before you try to unmold them. I’ve learned that lesson the hard way a few too many times!
Glaze variations aren’t usually a thing for jello popsicles, but if you’re thinking of serving them alongside something that *does* have a glaze, make sure it’s complementary. For example, a simple fruit glaze for a vanilla cake would be lovely. But for the popsicles themselves, the “glaze” is really just the smooth, frozen surface of the Jell-O. Keeping them properly covered in the freezer will help maintain that nice finish.
Storing and Reheating Tips
Storing these delightful jello popsicles is pretty straightforward, but a few things can help keep them at their best. If you’re planning to eat them within a day or two, you can keep them in their molds in the refrigerator. This is handy if you want to quickly unmold a few at a time. However, for longer storage, freezing is the way to go.
Room Temperature: Honestly, these don’t last long at room temperature! They’re meant to be enjoyed immediately or kept frozen. If you take one out, plan to eat it within 10-15 minutes before it starts to get truly messy.
Refrigerator Storage: As mentioned, you can store them in their molds in the fridge for a day or two. If you’ve already unmolded them, they won’t stay solid in the fridge. They’ll become soft and jiggly again, which is fine if you want that consistency, but they won’t be popsicles anymore.
Freezer Instructions: This is where they truly shine for storage. Once your jello popsicles are completely frozen and unmolded, you have a couple of options. The best way is to wrap each popsicle individually in plastic wrap, then place them all together in a freezer-safe bag or airtight container. This prevents freezer burn and keeps them from sticking together. They should stay delicious for about 2-3 months this way. Thawing is simple: just take them out of the freezer and let them sit for a minute or two before enjoying.
Glaze Timing Advice: Since jello popsicles don’t typically have a glaze applied to them, this doesn’t really apply. The “finish” on a jello popsicle is its frozen, slightly glossy surface. Keeping them well-wrapped in the freezer will help maintain this finish.
Frequently Asked Questions
Final Thoughts
So there you have it – the easiest, happiest, most wonderfully simple jello popsicles you’ll ever whip up! I really hope you give these a try. They’re a reminder that sometimes, the most delightful treats don’t need to be complicated or fancy. They’re all about bringing a bit of bright, fruity fun into your day. What I love most is seeing the pure delight on faces, big and small, as they take that first cold, flavorful bite. They’re perfect for those warm afternoons, for cooling down after a busy day, or just for when you need a little burst of cheer.
If you enjoy this recipe, you might also like exploring other easy frozen treats like homemade fruit popsicles or even some simple Ice Cream variations. There’s so much joy to be found in simple, homemade goodness!
I can’t wait to hear how your jello popsicles turn out! Please share your favorite flavors or any fun additions you tried in the comments below. And if you loved them as much as we do, a little rating would be wonderful! Happy freezing!
Jello popsicles
Ingredients
Main Ingredients
- 3 boxes Jell-O any flavor
- 3 cups boiling water
- 1.5 cups cold water
Instructions
Preparation Steps
- In a large bowl, dissolve Jell-O in boiling water.
- Stir in cold water. Pour into popsicle molds.
- Freeze until solid, about 2-3 hours.