Oh, I am SO excited to share this one with you today! You know those nights when you’re craving something truly spectacular, something that tastes like it took hours of slow-cooking and tender loving care, but you *really* don’t have that kind of time? Yeah, me too. That’s exactly when this recipe for Instant Pot Baby Back Ribs. becomes my absolute superhero. Forget everything you thought you knew about making ribs at home. This method is a game-changer, turning those sometimes-tough cuts of meat into fall-off-the-bone perfection in a fraction of the time. Honestly, the smell that fills my kitchen when these are cooking is just heavenly, and my family starts hovering like little buzzy bees the moment they catch a whiff. It’s way easier than grilling and leagues better than any oven-baked ribs I’ve ever tried. If you’ve ever been intimidated by making ribs, or just want a reliable, stress-free way to get that barbecue restaurant flavor at home, you are in the right place.
What are Instant Pot Baby Back Ribs?
So, what exactly are we talking about when we say “Instant Pot Baby Back Ribs”? Think of it as a magical shortcut to incredibly tender and flavorful ribs, without all the fuss. Traditionally, making ribs that are fall-off-the-bone tender usually involves hours in a smoker or a low and slow oven bake. This recipe uses the power of the Instant Pot (or any electric pressure cooker, really!) to dramatically cut down that cooking time. We’re essentially pressure-cooking the ribs in a flavorful liquid and seasonings until they’re unbelievably succulent. Then, we’ll give them a quick finish, usually under the broiler or on the grill, to get that perfect sticky, slightly caramelized exterior. It’s essentially a brilliant hack that delivers all the deliciousness of slow-cooked ribs with the speed and convenience of pressure cooking. It’s my go-to for a reason, and I think you’ll see why!
Why you’ll love this recipe?
Why is there so many reasons for this.Instant Pot Baby Back Ribs recipe has earned a permanent spot in my recipe rotation, and I just know you’re going to fall head over heels for it too. First and foremost, let’s talk about the flavor. The way the pressure cooker steams and infuses the ribs with the liquid and seasonings is pure magic. You get this deep, savory, slightly sweet flavor that coats every inch of the meat. It’s seriously like barbecue restaurant quality, but you’re doing it in your own kitchen. And the texture? Oh my goodness. They are so incredibly tender, the meat just glides right off the bone. It’s that melt-in-your-mouth goodness that makes you close your eyes with every bite.
Then there’s the sheer simplicity of it all. I mean, we’re talking about a recipe that’s mostly hands-off once you get everything into the Instant Pot. It’s a lifesaver on busy weeknights when you want something impressive but don’t have hours to babysit a grill or oven. My kids honestly ask for these ribs all the time, and I can whip them up without breaking a sweat. Plus, it’s incredibly cost-effective. Buying a rack of baby back ribs and using pantry staples to flavor them is so much more budget-friendly than eating out. What I love most about this is the versatility. Once they’re cooked in the pot, you can finish them under the broiler for that sticky glaze, or even give them a quick char on the grill if you have one. You can also play around with the seasonings and the sauce, making it your own. It’s just an all-around winner that delivers big on flavor, tenderness, and ease. It’s a recipe that makes you feel like a kitchen rockstar without all the actual effort!
How to Make Instant Pot Baby Back Ribs
Quick Overview
The beauty of these Instant Pot Baby Back Ribs lies in its elegant simplicity. We’re going to season up a rack of ribs, nestle them into the Instant Pot with a flavorful liquid, and let the magic of pressure cooking do its thing. They’ll come out unbelievably tender in under an hour of active cooking time. Then, a quick brush of your favorite barbecue sauce and a few minutes under the broiler (or on the grill!) to caramelize and get that irresistible sticky finish. It’s the perfect blend of minimal effort and maximum deliciousness, delivering restaurant-quality ribs right on your table. You won’t believe how easy it is!
Ingredients
For the Ribs:
1-2 racks baby back ribs (about 2-3 lbs each)
2 tablespoons brown sugar (light or dark, both work beautifully)
1 tablespoon smoked paprika
1 teaspoon garlic powder
1 teaspoon onion powder
1 teaspoon Black Pepper
1/2 teaspoon salt (adjust to your preference)
1/4 teaspoon cayenne pepper (optional, for a little kick)
1.5 cups liquid (chicken broth, beef broth, or even apple cider vinegar work well)
For the Finishing Glaze:
1 cup your favorite barbecue sauce
1-2 tablespoons honey or maple syrup (optional, for extra sweetness and shine)
Step-by-Step Instructions
Step 1: Prepare the Ribs
First things first, we need to get our ribs ready. Take your racks of baby back ribs out of their packaging. There’s usually a thin membrane on the bone side of the ribs that can make them a bit tough and chewy if left on. You can usually get your fingers or a butter knife under one end of it, near the middle of the rack, and then peel it off. It often comes off in one piece, like a little skin. Don’t worry if you can’t get it all off, a little bit left won’t ruin the dish. Pat the ribs dry with paper towels – this helps the seasonings stick better.
Step 2: Mix the Dry Rub
Now, let’s make our flavor magic! In a small bowl, mix together the brown sugar, smoked paprika, garlic powder, onion powder, black pepper, salt, and cayenne pepper (if you’re using it). Give it a good whisk to make sure everything is well combined. This blend is my go-to, but feel free to play around with it! You could add a pinch of cumin or a little chili powder if you like. The brown sugar is key here; it helps create a beautiful crust when we finish them off.
Step 3: Season the Ribs
Generously sprinkle this dry rub all over both sides of the ribs. Really get in there and press it onto the meat so it adheres well. Don’t be shy with the rub; you want every bite to be packed with flavor. I like to do this right on a cutting board or a baking sheet to make cleanup easier. Make sure to coat the edges and between the bones as best you can. The meat will absorb these flavors beautifully during the pressure cooking.
Step 4: Prepare the Instant Pot
Pour your chosen liquid (chicken broth, beef broth, or apple cider vinegar – I usually go for broth for more savory flavor) into the inner pot of your Instant Pot. If you have a trivet or a rack that fits inside your pot, now’s the time to place it in. This helps keep the ribs elevated and prevents them from sitting directly in the liquid, which can make them steam instead of pressure cook properly. If you don’t have a trivet, it’s okay, you can carefully arrange them, but a trivet is definitely preferred.
Step 5: Load the Ribs
Now, carefully arrange the seasoned ribs inside the Instant Pot. You can usually fit one full rack by curving it into a ‘C’ shape, or if you have two racks, you might need to cut them in half or stack them carefully if your pot is large enough and you have a tall trivet. I usually cut a larger rack into two or three pieces to fit them more easily and ensure even cooking. Make sure they’re not completely submerged in the liquid; the steam is what does the work here.
Step 6: Pressure Cook
Secure the lid on your Instant Pot and set the vent to “Sealing.” Cook on high pressure for about 25-30 minutes. This time is for a standard rack of baby back ribs; if yours are particularly thick, you might go up to 35 minutes. Once the cooking time is up, let the pressure release naturally for at least 10-15 minutes. This natural release is crucial for keeping the ribs tender and juicy. After that, you can carefully do a quick release for any remaining pressure. This part is important for texture!
Step 7: Broil or Grill for Glaze
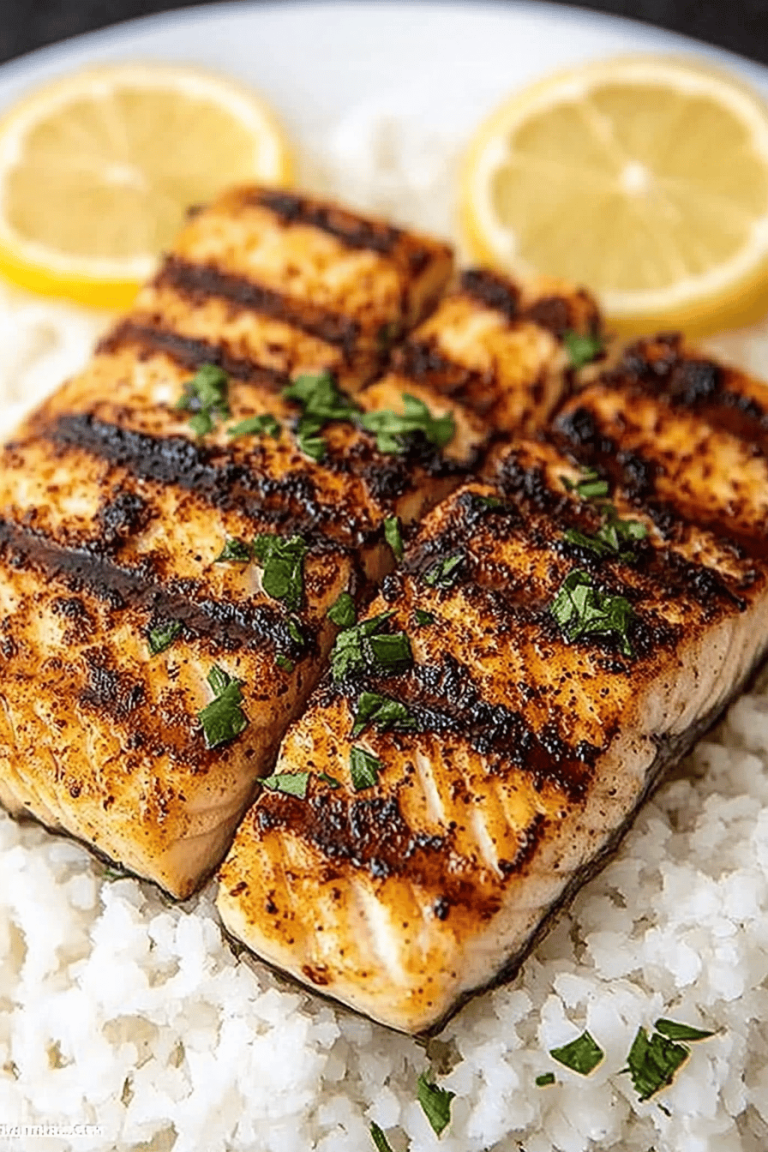
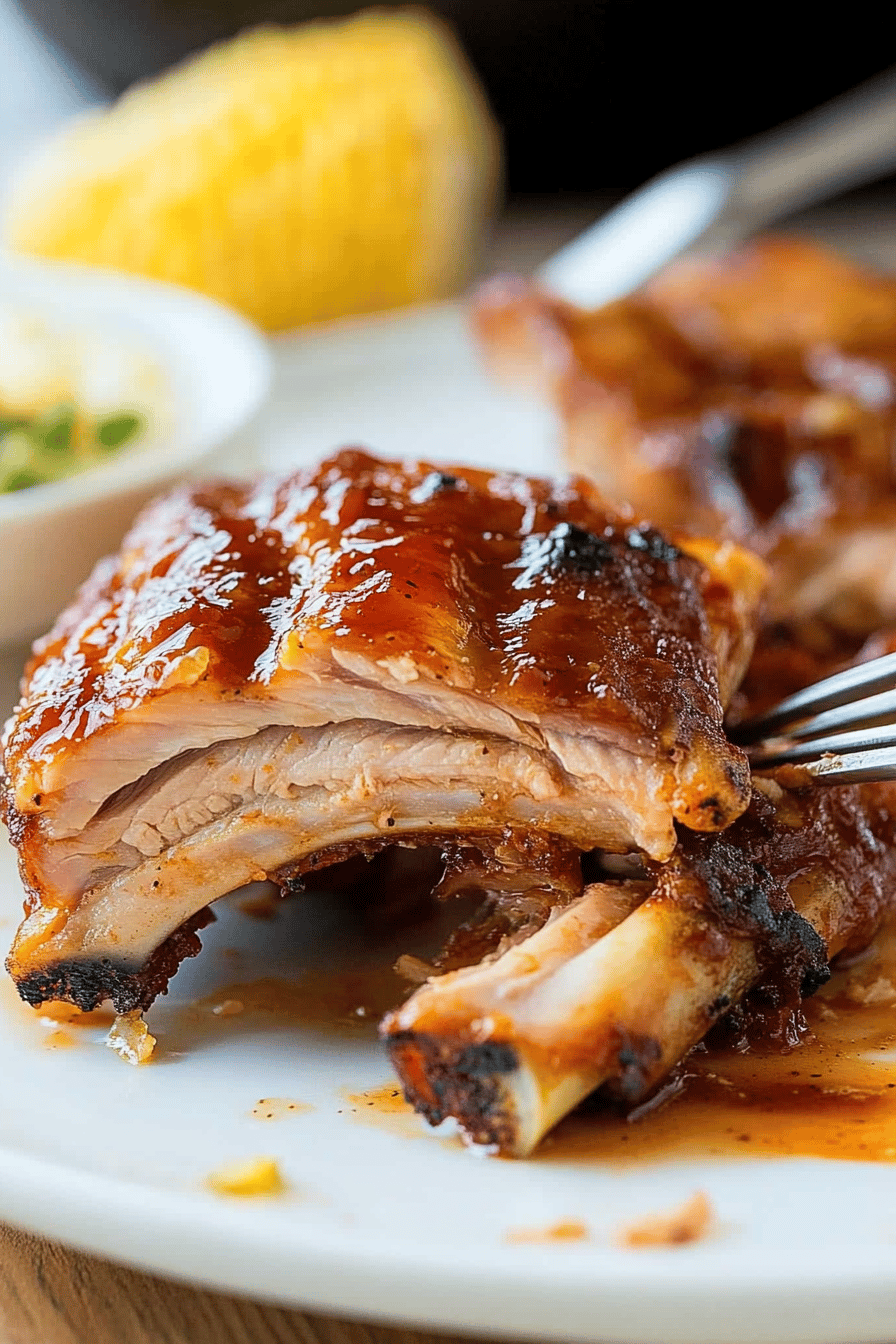
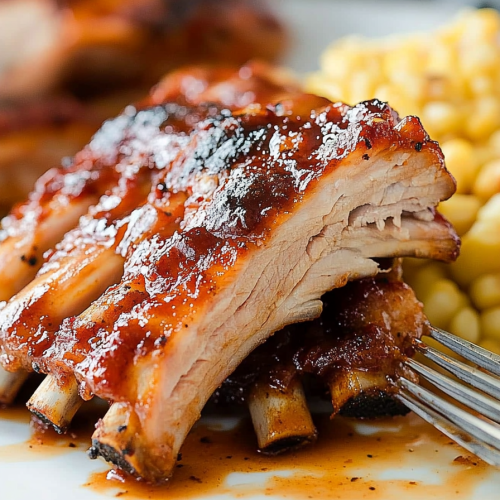
Once the cooking cycle is done and the pressure is released, carefully remove the ribs from the Instant Pot onto a foil-lined baking sheet or a grill-safe pan. They will be incredibly tender at this stage. Now, for that irresistible finish! Mix your favorite barbecue sauce with a touch of honey or maple syrup if you like a sweeter, glossier glaze. Brush this mixture generously all over the ribs. Then, place them under a preheated broiler for 2-4 minutes, watching them *very* carefully, until the sauce is bubbly and slightly caramelized. Alternatively, if you have a grill, you can do this on medium heat for a few minutes per side. The goal is to get that sticky, delicious exterior without burning the sauce.
Step 8: Rest and Slice
Let the glazed ribs rest for about 5-10 minutes after they come out of the broiler or off the grill. This allows the juices to redistribute, making them even more tender and flavorful. Use a sharp knife to slice the ribs between the bones. They should be so tender that the knife glides through them with hardly any effort. This is the moment of truth, and trust me, it’s glorious!
Step 9: Serve and Enjoy
Serve these gorgeous Instant Pot Baby Back Ribs immediately while they’re hot and sticky. They are absolutely phenomenal on their own, but they also pair wonderfully with classic barbecue sides. Prepare for happy sighs and maybe even some sticky fingers around the table!
What to Serve It With
Honestly, these Instant Pot Baby Back Ribs are so good, they’re practically a meal on their own! But if you want to round out your feast, I’ve got some favorite pairings that work beautifully, no matter the occasion. For a classic breakfast or brunch situation, I love serving a few sliced ribs alongside some fluffy scrambled eggs and crispy home fries. It’s a decadent start to the day that always feels special. If you’re going for a full-on brunch spread, these ribs are a fantastic addition to a buffet alongside deviled eggs, a fresh Fruit Salad, and maybe some biscuits. The sweet and savory notes of the ribs cut through richer dishes wonderfully.
As a proper dinner, they are just stellar. My family’s go-to is with a big scoop of creamy coleslaw (the tanginess is a perfect contrast to the rich ribs!) and some classic baked beans. Corn on the cob in the summer is also a must. If we’re feeling a bit more upscale, I might serve them with some garlic mashed potatoes and a simple green salad. And for those cozy snack nights when you just want something incredibly satisfying? A few ribs with some potato chips and maybe a cold drink are pure comfort. My personal family tradition is to make these on a Sunday afternoon when we’re all home. The smell is intoxicating, and it just feels like a real celebration, even if it’s just a regular Sunday. We always end up with sticky faces and everyone asking for seconds, which is the best compliment I could ask for!
Top Tips for Perfecting Your Instant Pot Baby Back Ribs
Over the years, I’ve learned a few tricks that really elevate these Instant Pot Baby Back Ribs from great to absolutely unforgettable. First, about that membrane I mentioned earlier – if you can get it off cleanly, do it! It makes a world of difference in tenderness. If it tears, don’t stress too much; just do your best. When it comes to the dry rub, don’t be afraid to be generous. The ribs are quite large, and they need a good coating of flavor. I always make sure to press it in well, especially after patting the ribs dry. This helps it adhere and creates a better crust during the finishing step.
Now, for the liquid in the Instant Pot. While broth adds a nice savory depth, don’t discount apple cider vinegar! A cup and a half of that adds a subtle tang that tenderizes the meat beautifully and complements the barbecue sauce later. Just be sure to choose one with good quality. When you’re loading the ribs into the pot, if you’re using two racks, I often find it works best to cut them into smaller sections (like thirds) so they fit more snugly and cook more evenly. If you don’t have a trivet, it’s okay, but try to prop them up a bit so they aren’t fully submerged. Trust me on the natural pressure release (NPR) for at least 10-15 minutes; it’s essential for tender, juicy ribs. Rushing this step can result in tougher meat.
For the finishing glaze, experiment with your favorite barbecue sauce. Some sauces are already quite sweet, so you might not need to add much honey or maple syrup. If you want a really sticky, caramelized finish, a little bit of sugar (like brown sugar or molasses) mixed into the sauce can help with that. And please, *please* watch those ribs like a hawk under the broiler! They can go from perfectly caramelized to burnt in mere seconds. I’ve definitely learned that the hard way! If you’re using a grill, medium heat is your friend – you want to warm the sauce and get a little char, not incinerate the meat. Finally, let them rest! It seems counterintuitive when you’re hungry, but that short rest makes a huge difference in how moist and tender the ribs are when you slice them. These little tweaks will make your Instant Pot Baby Back Ribs truly shine.
Storing and Reheating Tips
I know these ribs disappear fast in my house, but when I do manage to have leftovers, I’ve found the best ways to store and reheat them to keep them tasting almost as good as they were fresh. For short-term storage, I usually let them cool completely, then wrap them tightly in plastic wrap or place them in an airtight container. They’ll keep well in the refrigerator for up to 3-4 days. The flavors actually tend to meld and deepen overnight, which can be a good thing!
If you’re planning to freeze them, it’s best to do so before you’ve applied the final glaze, if possible. However, even glazed leftovers freeze reasonably well. Wrap them very tightly in a double layer of plastic wrap, then a layer of aluminum foil, or place them in a heavy-duty freezer bag, squeezing out as much air as possible. They can stay in the freezer for about 2-3 months. When you’re ready to thaw, the best method is to transfer them from the freezer to the refrigerator overnight. For reheating, I usually like to warm them up gently in the oven. You can place them on a baking sheet (add a little bit of water or broth to the bottom of the pan, covered loosely with foil) and heat at around 300°F (150°C) for 10-15 minutes, or until heated through. If they were unglazed, this is the perfect time to apply a fresh glaze and give them a quick broil for a few minutes to revive that sticky finish. If they were already glazed, just reheat until warmed, and be mindful of the sauce potentially becoming too dark.
For glazed ribs, be a little cautious about reheating them multiple times, as the sugar in the sauce can burn more easily. If they are just lightly glazed, a quick warm-up is usually fine. Storing them properly is key to enjoying them for days to come!
Frequently Asked Questions
Final Thoughts
I really hope you give these Instant Pot Baby Back Ribs a try. They’ve become such a staple in my kitchen because they deliver such incredible flavor and tenderness with surprisingly little effort. It’s one of those recipes that makes you feel like you’ve accomplished something truly special, even on a busy weeknight. The fact that you can get that fall-off-the-bone perfection from a pressure cooker is just mind-blowing, and it’s certainly made my life easier and my family’s meals a whole lot tastier.
If you love the convenience and amazing results of this recipe, you might also enjoy my Slow Cooker Pulled Pork or my Grilled Pork Chops. They’re in a similar vein of delicious, approachable pork dishes. I can’t wait to hear how your ribs turn out! Please leave a comment below and tell me what you thought, or share any amazing variations you come up with. Don’t forget to rate the recipe if you loved it! Happy cooking, and I hope you and your loved ones enjoy every single, saucy bite!
Instant Pot Baby Back Ribs
Ingredients
Main Ingredients
- 1 rack baby back ribs
- 0.5 cup BBQ sauce
- 2 tablespoons brown sugar
- 1 tablespoon paprika
- 1 teaspoon garlic powder
- 1 teaspoon onion powder
- 0.5 teaspoon salt
- 0.25 teaspoon black pepper
- 1 cup water
Instructions
Preparation Steps
- Remove the membrane from the back of the ribs if present. Pat the ribs dry with paper towels.
- In a small bowl, mix together the brown sugar, paprika, garlic powder, onion powder, salt, and black pepper. Rub this mixture all over the ribs.
- Pour the water into the Instant Pot. Place the seasoned ribs on a trivet inside the Instant Pot.
- Secure the lid and set the valve to the sealing position. Cook on high pressure for 30 minutes.
- Once the cooking time is complete, allow for a natural pressure release for 10 minutes, then carefully perform a quick release for any remaining pressure.
- Carefully remove the ribs from the Instant Pot. Brush the ribs generously with BBQ sauce.
- Optional: For a more caramelized glaze, place the brushed ribs on a baking sheet and broil for 2-3 minutes until the sauce is bubbly and slightly browned. Watch carefully to prevent burning.
- Let the ribs rest for a few minutes before slicing and serving.