Oh my goodness, if there’s one thing that instantly transports me back to my childhood Halloweens, it’s the smell of baking cookies. And when those cookies look like little eight-legged critters ready to scurry off the plate? Pure magic! These Halloween Spider Cookies are, without a doubt, my absolute favorite holiday treat. They’re not just “good” for a Halloween recipe; they are genuinely fantastic, all on their own. Imagine a perfectly chewy cookie, with just the right amount of sweetness, and then BAM – a cute, edible spider staring back at you. They’re a little bit whimsical, a little bit spooky, and totally irresistible. Forget those fancy, complicated Halloween desserts that require architectural skills; this recipe is your secret weapon for a fun and festive table that actually tastes incredible. Honestly, if you love a good Chocolate Chip cookie, you’re going to adore these, with a spooky twist that’ll have everyone talking.
What are spider cookies?
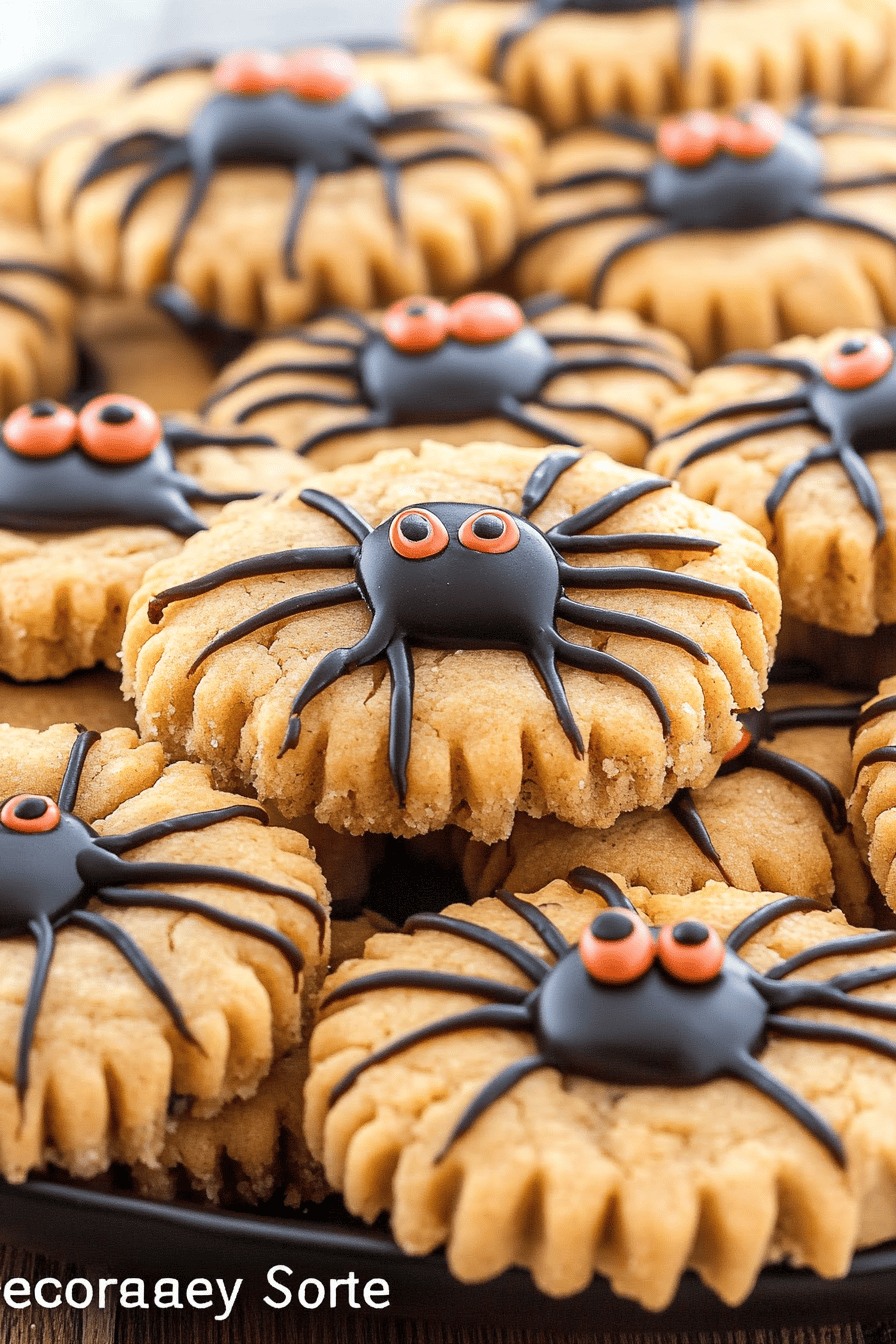
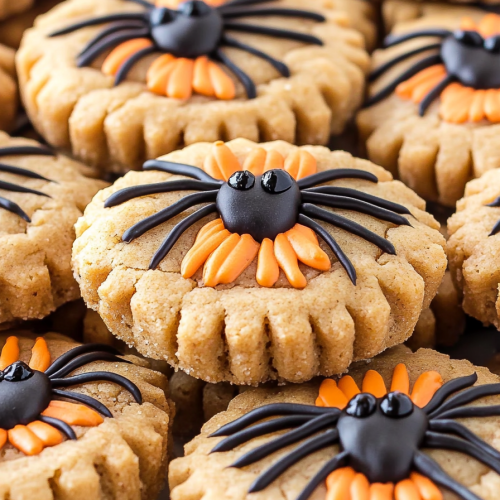
So, what exactly are these little guys? Think of them as your favorite classic Chocolate Chip cookie, but with a Halloween makeover. The “spider” effect is created using simple ingredients that give the illusion of a spider sitting right on top of your cookie. We’re talking about a perfectly baked cookie base, often with chocolate chips or chunks baked right in, and then a simple, elegant (and totally adorable) spider design. The body is usually a chocolate candy or a dollop of frosting, and the legs are made from pretzel sticks or piped icing. It’s like a tiny edible masterpiece! The beauty of these Halloween Spider Cookies lies in their adaptability – you can customize the cookie base and the spider’s details to your heart’s content. They’re essentially a fun, festive way to celebrate the season, bringing smiles (and maybe a tiny shriek or two!) to everyone who tries them.
Why you’ll love this recipe?
Okay, let’s get down to why you *need* to make these Halloween Spider Cookies. First and foremost: the flavor. These aren’t just pretty faces; they are genuinely delicious cookies. The cookie base is wonderfully soft and chewy in the center with slightly crisp edges – that perfect cookie texture we all crave. It’s got that comforting, classic flavor that pairs perfectly with milk. Then there’s the simplicity. Seriously, if you can cream butter and sugar, you can make these. There’s no fancy equipment needed, and the “spider” decorating is so straightforward that even the littlest bakers can get involved and feel like they’ve made something spectacular. For a busy mom like me, that’s a huge win! They’re also surprisingly budget-friendly. Most of the ingredients are pantry staples, and even the little candy eyes or pretzel legs are inexpensive. And the versatility! You can easily adapt the cookie recipe to your liking – add different chips, nuts, or even a touch of spice. These Halloween Spider Cookies are perfect for bake sales, classroom parties, or just making a regular Tuesday feel a little more magical. What I love most about this recipe is the pure joy it brings. It’s simple, it’s delicious, and it captures that fun, spooky spirit of Halloween without being overly complicated or scary for the little ones.
How do you make spider cookies?
Quick Overview
This recipe is delightfully straightforward. We’ll start by creaming our butter and sugars, adding in our wet ingredients, then gently combining with our dry. After a quick chill, we’ll form Cookie Dough balls, bake them to golden perfection, and then, the fun part – decorating them into spooky, adorable spiders! The whole process, from start to finish, is really quite manageable, even on a weeknight. The key is not to overmix the dough and to let the cookies cool properly before decorating, ensuring your spider creations stay put. It’s a rewarding process that results in cookies that look and taste amazing.
Ingredients
For the Cookie Base: For the Cookie Base: For the Cookie Base: For the Cookie Base
2 ¼ cups all-purpose flour
1 teaspoon baking soda
½ teaspoon salt
1 cup (2 sticks) unsalted butter, softened
¾ cup granulated sugar
¾ cup packed light brown sugar
2 large eggs
1 teaspoon vanilla extract
1 ½ cups chocolate chips (semi-sweet or milk chocolate work wonderfully)
For the Spider Decorations:
Round chocolate candies (like M&M’s, chocolate kisses, or chocolate wafer cookies) for the body
Pretzel sticks, broken into pieces, or black licorice laces for the legs
Small candy eyes, or tiny dots of black icing for eyes
Step-by-Step Instructions
Step 1: Preheat & Prep Pan
First things first, let’s get our oven ready. Preheat it to 375°F (190°C). While the oven heats up, line your baking sheets with parchment paper. This is a lifesaver, trust me! It prevents sticking and makes cleanup a breeze. You want to be ready to go as soon as your dough is mixed.
Step 2: Mix Dry Ingredients
In a medium bowl, whisk together the flour, baking soda, and salt. Whisking them together now ensures that the baking soda and salt are evenly distributed throughout the flour, which helps the cookies rise evenly and have a consistent texture. You don’t want pockets of salt or baking soda!
Step 3: Mix Wet Ingredients
In a large bowl, cream together the softened butter, granulated sugar, and brown sugar until light and fluffy. This usually takes about 2-3 minutes with an electric mixer. Then, beat in the eggs one at a time, making sure each is fully incorporated before adding the next. Finally, stir in the vanilla extract. The mixture should look smooth and creamy.
Step 4: Combine
Gradually add the dry ingredients to the wet ingredients, mixing on low speed (or by hand with a sturdy spoon) until just combined. Be careful not to overmix here! Overmixing develops the gluten in the flour, which can lead to tough cookies. Once the flour is mostly incorporated, gently fold in the chocolate chips. The dough will be thick and wonderful.
Step 5: Prepare Filling
This step is actually for the decorating! Get your chocolate candies (for the bodies), pretzel pieces (for the legs), and candy eyes ready. If you’re using licorice, you might want to cut it into leg-sized pieces. Having everything prepped and within reach makes the decorating process so much smoother and more enjoyable.
Step 6: Layer & Swirl
This isn’t a “swirl” recipe in the traditional sense, but we’ll be “layering” our decorations. Take about 1.5 to 2 tablespoonfuls of cookie dough and roll them into balls. Place them about 2 inches apart on your prepared baking sheets. We’re not swirling anything into the dough itself, but we’ll soon be adding our spider elements!
Step 7: Bake
Bake for 9 to 11 minutes, or until the edges are lightly golden brown and the centers are still slightly soft. They will continue to cook a bit on the baking sheet after you take them out of the oven. For a chewier cookie, err on the side of underbaking slightly. For a crispier cookie, bake them a minute or two longer.
Step 8: Cool & Glaze
Let the cookies cool on the baking sheets for about 5 minutes before transferring them to a wire rack to cool completely. This is crucial! Decorating warm cookies will cause your candy bodies to melt and your pretzel legs to get all gooey. Once they are completely cool, it’s time to create our spiders!
Step 9: Slice & Serve
Once decorated, your Halloween Spider Cookies are ready to be devoured! Arrange them on a festive platter. They are best served at room temperature. Cutting isn’t really necessary as they’re already perfectly sized, but presentation is everything! Serve them up with a glass of cold milk for the ultimate treat.
What to Serve It With
These Halloween Spider Cookies are stars on their own, but they also pair wonderfully with a variety of drinks and occasions. For breakfast? Honestly, I’ve been known to sneak one (or two!) with my morning coffee. They’re a little sweet indulgence that makes waking up feel a bit more festive. For brunch, they make a delightful addition to a spread of pastries or fruit. Imagine a platter of these alongside some mini quiches or pancakes – the kids (and adults!) will adore the cute touch. As dessert, they are a guaranteed hit. Serve them after a hearty meal, perhaps alongside a scoop of vanilla Ice Cream for an extra special treat, or simply on their own with a hot cup of cocoa. And for those cozy, spooky movie nights? These are the ultimate companion. They’re perfect for little hands reaching for a treat while watching a not-too-scary Halloween flick. My family loves having these with warm apple cider during October. They just scream fall and cozy vibes!
Top Tips for Perfecting Your Halloween Spider Cookies
I’ve made these Halloween Spider Cookies more times than I can count, and I’ve definitely learned a few tricks along the way. First, about the butter: make sure it’s *softened*, not melted. If it’s too soft or melted, your cookies will spread too much and might end up thin and crispy, which isn’t the chewy texture we’re aiming for. For the flour, spoon it into your measuring cup and level it off with a knife; don’t scoop directly from the bag, as this can lead to too much flour and dry cookies. When it comes to mixing the dough, I can’t stress enough: *do not overmix* once you add the flour. Just mix until you don’t see any dry streaks of flour left. Overmixing is the silent killer of soft, chewy cookies. For the spider decorations, I’ve found that using a dab of melted chocolate or a small dot of royal icing can help secure the candy eyes if they seem loose, especially if you plan to store them for a few days. If you’re using pretzel sticks for legs, breaking them into pieces about 1.5 to 2 inches long usually works best for most cookie sizes. You can even get creative and use black piping icing to draw the legs if you don’t have pretzels or licorice on hand – it gives a slightly different look but is just as effective. And a word on baking: every oven is a little different, so keep an eye on your first batch. If they’re browning too quickly, you can lower the oven temperature by 10-15 degrees. The best doneness test for me is when the edges are set and lightly golden, but the center still looks slightly underbaked. They firm up as they cool!
Storing and Reheating Tips
One of the best things about these Halloween Spider Cookies is how well they store. If you’re planning on serving them within a few days, you can keep them at room temperature. Just make sure they are completely cooled, then store them in an airtight container. They should stay fresh and delicious for about 3-5 days. I usually layer them between sheets of parchment paper in a cookie tin. If you need them to last longer, or if your kitchen tends to be warm, refrigerator storage is a good option. Pop them in an airtight container and they’ll be good for up to a week. The texture might become slightly firmer in the fridge, but they’ll still be tasty. And yes, you can freeze these cookies! For the best quality, I recommend freezing them *before* decorating. Once baked and completely cooled, wrap them tightly in plastic wrap, then place them in a freezer-safe bag or container. They can be frozen for up to 2-3 months. To thaw, let them come to room temperature while still wrapped. Once they’re thawed and at room temperature, you can then add your spider decorations. If you’ve already decorated them, you can freeze them too, but be a little gentler when handling them to avoid smudging the decorations. Just ensure they are in a sturdy container. For reheating, if you want to bring them back to a slightly warmed state (especially if they’ve been in the fridge), a few seconds in the microwave or a very low oven for a minute or two can do the trick, but honestly, they’re usually perfect at room temperature!
Frequently Asked Questions
Final Thoughts
There you have it – my beloved Halloween Spider Cookies! They’re a recipe that truly embodies the spirit of the season: fun, a little bit spooky, and utterly delicious. I just know you’re going to love the balance of that chewy, chocolate-chippy cookie with the adorable spider on top. It’s the kind of treat that brings smiles and happy memories, and that’s what baking is all about, right? If you’re looking for other festive treats, you might also enjoy my [Link to another Halloween recipe if available]. Give these Halloween Spider Cookies a try, and please, please let me know in the comments below how they turned out for you! I love hearing your stories and seeing your creations. Don’t forget to share your cookie photos if you post them on social media! Happy baking, and have a wonderfully spooky Halloween!
Halloween Spider Cookies
Ingredients
Cookie Dough
- 0.75 cup unsalted butter, softened
- 1 cup granulated sugar
- 2 large eggs
- 1 teaspoon vanilla extract
- 2.5 cup all-purpose flour
- 0.5 teaspoon baking soda
- 0.25 teaspoon salt
Spider Decorations
- 1 tube black decorating gel
- 0.5 cup chocolate chips for melting
- 1 tablespoon vegetable oil optional, for smoother melting
Instructions
Preparation Steps
- Preheat oven to 350°F (175°C). Line baking sheets with parchment paper.
- In a large bowl, cream together the softened butter and granulated sugar until light and fluffy.0.75 cup unsalted butter, softened
- Beat in the eggs one at a time, then stir in the vanilla extract.0.75 cup unsalted butter, softened
- In a separate bowl, whisk together the flour, baking soda, and salt.0.75 cup unsalted butter, softened
- Gradually add the dry ingredients to the wet ingredients, mixing until just combined. Do not overmix.
- Roll the dough into 1-inch balls and place them on the prepared baking sheets, about 2 inches apart. Flatten each ball slightly with the palm of your hand.
- Bake for 8-10 minutes, or until the edges are lightly golden. Let the cookies cool on the baking sheets for a few minutes before transferring them to a wire rack to cool completely.
- Melt the chocolate chips (with optional vegetable oil) in a microwave-safe bowl in 30-second intervals, stirring between each, until smooth.0.75 cup unsalted butter, softened
- Once the cookies are completely cool, use the black decorating gel to draw a circular body on each cookie. Then, draw six to eight short lines radiating from the body to create the spider legs.0.75 cup unsalted butter, softened
- Use a small dab of melted chocolate to "glue" two mini chocolate chips or candy eyes onto the spider's body for eyes, if desired.