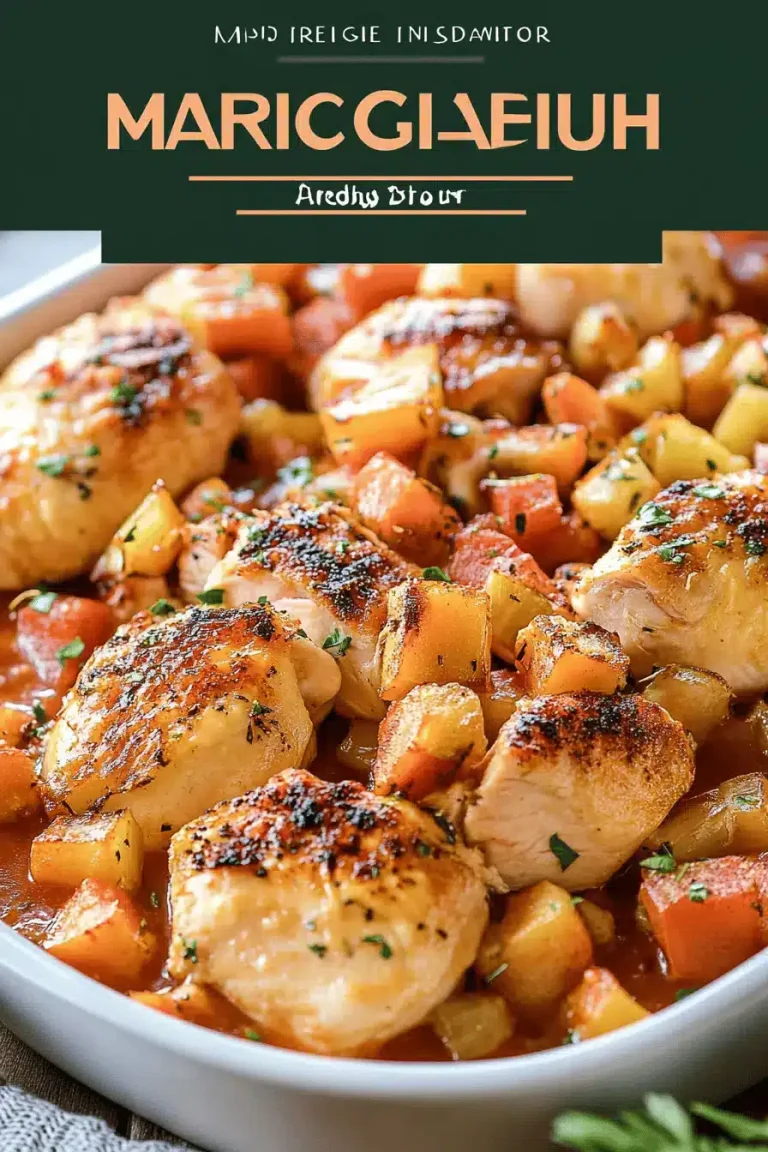
Oh, where do I even start with this grilled BBQ chicken? It’s more than just a recipe for me; it’s a memory. It’s the smell of summer evenings in our backyard, the sound of my kids laughing as they try to catch fireflies, and the taste of pure, unadulterated happiness. This isn’t your average, boring chicken. This is the kind of grilled BBQ chicken that makes people ask for seconds (and then thirds!), the kind that makes you want to savor every single bite. I remember the first time I perfected it – it was a chaotic July 4th barbecue, and I was juggling burgers, corn on the cob, and about a million other things. I needed something that was foolproof, bursting with flavor, and could handle a little bit of char without drying out. This recipe was born out of that very need, and let me tell you, it’s been a lifesaver ever since. Forget those bland, rubbery Chicken Breasts you might have encountered elsewhere. This is juicy, tender, and coated in a smoky-sweet glaze that’s utterly irresistible. It’s the undisputed champion of our summer cookouts, and I’m so excited to finally share it with you!
What is grilled chicken?
So, what exactly is this masterpiece we’re talking about? Think of it as your go-to, crowd-pleasing, backyard barbecue essential. It’s grilled chicken, yes, but elevated. We’re talking about chicken pieces – usually thighs and drumsticks because they stay incredibly juicy on the grill – marinated in a tangy, slightly sweet, and smoky blend, then grilled to perfection with a sticky, irresistible BBQ glaze. The name “grilled BBQ chicken” might sound simple, but the magic is in the details: the balance of flavors in the marinade, the technique for grilling that ensures tenderness without burning, and that glorious, caramelized glaze that just sings. It’s essentially the ultimate comfort food, delivered straight from your grill. It’s the kind of dish that makes you feel like a culinary rockstar, even if you’ve only been grilling for a few years. It’s approachable for beginners and satisfying for seasoned grill masters.
Why you’ll love this recipe?
There are so many reasons why this grilled BBQ chicken has become a staple in my kitchen, and I just know you’re going to love it too. First and foremost, the flavor is absolutely out of this world. We’re talking about a beautiful harmony of smoky, sweet, tangy, and savory notes that dance on your palate. The marinade infuses the chicken with so much depth, and then that glaze… oh, that glaze is pure magic. It caramelizes on the grill, creating these little crispy bits that are pure heaven. Beyond the taste, this recipe is incredibly simple to make. Seriously, I’ve whipped this up on weeknights when I’m short on time, and it’s always a huge hit. You don’t need fancy equipment or gourmet ingredients; everything is readily available at your local grocery store. It’s also surprisingly cost-effective, especially if you use chicken thighs and drumsticks, which are often more budget-friendly and deliver superior results in terms of juiciness. What I love most about this recipe, though, is its versatility. It’s not just for barbecues; it’s perfect for picnics, potlucks, or even just a special weeknight dinner. You can serve it as is, chop it up for sandwiches, or add it to salads. It truly is a winner in every sense of the word, and I’m confident it will become your favorite way to make grilled BBQ chicken too.
How do I make grilled chicken?
Quick Overview
This grilled BBQ Chicken Recipe is all about building layers of flavor and achieving that perfect balance of juicy meat and sticky, caramelized glaze. We’ll start with a simple yet potent marinade that tenderizes and infuses the chicken. Then, we’ll grill it to a beautiful char and finish it off with our signature BBQ glaze that gets beautifully sticky under the heat. It’s a straightforward process that guarantees delicious results every time. The key is patience during the marinating and grilling stages, allowing the flavors to develop and the chicken to cook through perfectly.
Ingredients
For the Marinade:
This is where all the initial flavor magic happens. I like to make a good batch because it really lets the chicken soak up all those delicious notes before hitting the grill. Using chicken thighs and drumsticks is key here – they have enough fat to stay incredibly moist and flavorful, even with a bit of char. If you can find bone-in, skin-on pieces, even better for maximum flavor and juiciness!
- 1/4 cup olive oil: This helps distribute the flavors and prevents the chicken from sticking.
- 1/4 cup soy sauce (or tamari for gluten-free): Adds that essential umami depth.
- 2 tablespoons honey (or maple syrup): For a touch of sweetness that caramelizes beautifully.
- 2 tablespoons apple cider vinegar: Provides a nice tang to cut through the richness.
- 1 tablespoon Worcestershire sauce: Another layer of savory goodness.
- 4 cloves garlic, minced: Because what’s grilled chicken without garlic?
- 1 teaspoon smoked paprika: This is crucial for that smoky BBQ flavor without needing a smoker.
- 1/2 teaspoon black pepper: Freshly ground is always best.
- Optional: A pinch of cayenne pepper for a little heat.
For the BBQ Glaze:
This glaze is what takes it over the top. It’s thick, sticky, and has that perfect sweet and tangy balance. You can use your favorite store-bought BBQ Sauce as a base, but doctoring it up just a bit makes all the difference.
- 1.5 cups your favorite BBQ sauce: Start with a good quality sauce you love.
- 2 tablespoons brown sugar (packed): For extra caramelization and sweetness.
- 1 tablespoon apple cider vinegar: To balance the sweetness with a bit of zip.
- 1 teaspoon liquid smoke (optional): If you want an even deeper smoky flavor.
Step-by-Step Instructions
Step 1: Preheat & Prep Pan
Alright, first things first: get your grill fired up! You want it to be medium-high heat. If you’re using a charcoal grill, you’ll want the coals to be mostly covered in gray ash. For a gas grill, aim for around 400-450°F (200-230°C). While the grill is preheating, make sure your chicken is ready to go. I like to pat it dry with paper towels – this helps the marinade adhere better and promotes nice browning on the grill.
Step 2: Mix Dry Ingredients
This step is super quick. In a medium bowl, whisk together the smoked paprika and Black Pepper. If you’re adding cayenne, toss that in here too. This ensures the spices are evenly distributed before they hit the wet ingredients.
Step 3: Mix Wet Ingredients
In a separate, larger bowl or a large zip-top bag, combine the olive oil, soy sauce, honey (or maple syrup), apple cider vinegar, Worcestershire sauce, and minced garlic. Give it a good whisk until everything is well combined. The garlic should be fragrant and the mixture should be well emulsified.
Step 4: Combine
Now, add your patted-dry chicken pieces to the bowl with the wet ingredients. Toss them around really well to make sure every piece is coated. Then, add the dry spice mixture from Step 2 and toss again until the chicken is thoroughly coated in the marinade. This is the part where I usually seal the bag (if using) or cover the bowl and let it hang out in the fridge for at least 2 hours, but honestly, overnight is even better if you have the time! The longer it marinates, the more flavor it will absorb. I’ve learned that patience here really pays off.
Step 5: Prepare Filling
While the chicken is marinating, let’s whip up that glorious BBQ glaze. In a small saucepan over medium heat, combine your favorite BBQ sauce, brown sugar, and apple cider vinegar. If you’re using liquid smoke, add that in now too. Stir everything together until the brown sugar is dissolved and the glaze is smooth. Bring it to a gentle simmer, then reduce the heat to low and let it cook for about 5-10 minutes, stirring occasionally, until it thickens slightly. You want it to be thick enough to coat the back of a spoon, but still pourable. Remove from heat and set aside. I sometimes taste it at this stage and add a tiny pinch more sugar or vinegar depending on my mood!
Step 6: Layer & Swirl
This step is more about getting the chicken ready for the grill. Once your chicken has marinated, carefully remove the pieces from the marinade (discard the used marinade – it’s done its job!). If you’re using chicken thighs, you might want to trim any excess skin or fat if you prefer, but I usually leave it on for flavor and crispiness. Arrange the chicken pieces on a clean plate or tray, ready for the grill.
Step 7: Bake
Now for the fun part: grilling! Place the marinated chicken pieces directly onto the preheated grill grates. For chicken thighs and drumsticks, you’re looking at about 6-8 minutes per side over medium-high heat. You want to get those nice grill marks and let the chicken cook through. Start by searing them for a few minutes on each side to get those beautiful char marks, then move them to a slightly cooler part of the grill (if you have one) or just keep an eye on them to prevent burning. The internal temperature should reach 165°F (74°C).
Step 8: Cool & Glaze
During the last 10-15 minutes of grilling, it’s time for the glaze! Brush the BBQ glaze generously over the chicken pieces on both sides. Let it cook for another couple of minutes on each side, allowing the glaze to caramelize and get sticky. Be careful here, as the sugars in the glaze can burn quickly. If you see it browning too fast, you can move the chicken to a cooler spot on the grill. This is where the real magic happens – that beautiful, sticky, lacquered finish!
Step 9: Slice & Serve
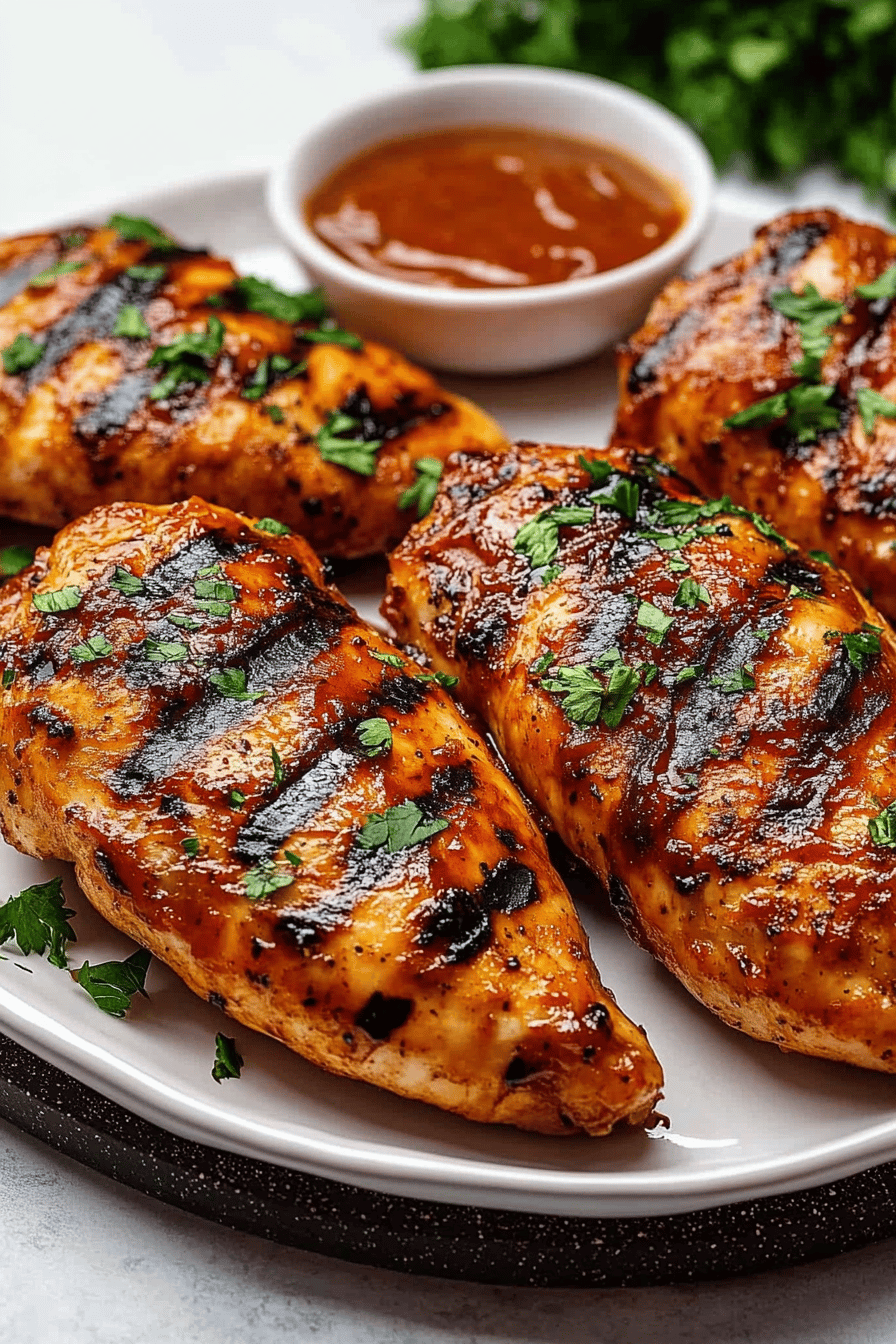
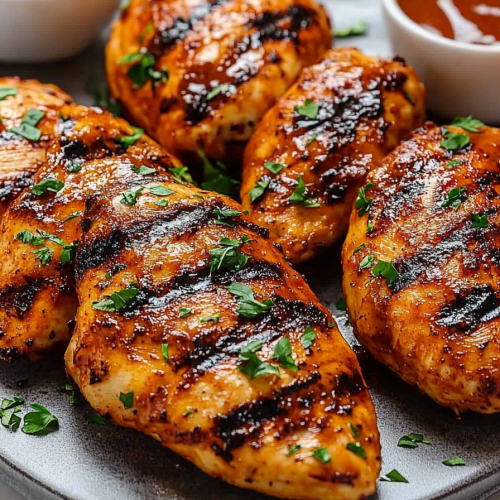
Once the chicken is cooked through, beautifully glazed, and has reached an internal temperature of 165°F (74°C), remove it from the grill. Let it rest for about 5-10 minutes before serving. This resting period is super important as it allows the juices to redistribute throughout the meat, ensuring maximum tenderness and moisture. Arrange on a platter, perhaps with a few extra dollops of glaze on top, and get ready for the rave reviews!
What to Serve It With
This grilled BBQ chicken is a star on its own, but it truly shines when paired with the right accompaniments. For a classic breakfast or brunch, I love serving it alongside some fluffy scrambled eggs and crispy home fries. The savory chicken is a delightful addition to any morning meal! When we’re going for a full-on brunch spread, think elegance meets comfort. I’ll often serve it alongside a fresh fruit salad, some avocado toast, and maybe even a light, lemony potato salad. It’s hearty enough for a crowd but still feels a bit special. As a dessert, this isn’t typically a dessert item for us, but if you’re feeling adventurous, a small, finely diced portion could be added to a savory corn pudding or even a creative sweet potato bake. For those cozy snack moments, this chicken is perfect. I’ll shred some of the meat and pile it onto slider buns with a bit of extra slaw, or simply serve it with some cool, crisp coleslaw and pickles. My family also loves it chopped up and tossed into a big, hearty green salad for a satisfying lunch. We often have it with classic potato salad, baked beans, and grilled corn on the cob – you know, the full summer barbecue experience! It’s incredibly versatile and always a hit.
Top Tips for Perfecting Your Grilled BBQ Chicken
Over the years, I’ve picked up a few tricks that have made this grilled BBQ chicken recipe even better. When it comes to the chicken itself, I always opt for bone-in, skin-on thighs and drumsticks. They just hold up so much better on the grill, staying juicy and flavorful. If you’re using boneless, skinless breasts, you’ll need to be extra vigilant with your cooking time and potentially a thermometer to avoid drying them out – they’re just not as forgiving! For the marinade, don’t skimp on the marinating time. I’ve tested this extensively, and the difference between a 30-minute marinade and an overnight one is huge. At least 4 hours is my minimum recommendation for a truly flavorful chicken. If you find your marinade isn’t sticking well to the chicken, try patting the chicken completely dry with paper towels before you add it. This seems counterintuitive, but it really helps the marinade cling better and promotes better searing. When it comes to the glaze, the key is to apply it in layers during the last bit of cooking. Adding it too early can cause it to burn. I usually apply 2-3 thin coats, letting each one caramelize slightly before adding the next. If your glaze seems too thick, you can thin it out with a tablespoon of water or even a bit of your base BBQ sauce. If it’s too thin, let it simmer a little longer in the saucepan until it reaches the desired consistency. Trust me on this one: a little patience with the glaze goes a long way! For grilling, preheating your grill thoroughly is non-negotiable. A hot grill sears the chicken beautifully, creating those coveted grill marks and locking in juices. I also like to clean my grill grates well before cooking and give them a quick oiling with a paper towel dipped in vegetable oil and held with tongs. This prevents sticking and ensures your chicken releases cleanly. If you’re worried about flare-ups (which can happen with marinades containing sugar and oil), have a spray bottle of water handy or know where to move the chicken to a cooler zone on the grill. My kids actually ask for this chicken all the time, and the feedback I get most often is about how perfectly tender and flavorful it is, and that’s down to these little things.
Storing and Reheating Tips
This grilled BBQ chicken is so delicious, you’ll likely have leftovers – if you’re lucky! For storing it at room temperature, it’s best to let it cool completely first. Once cooled, you can leave it covered loosely for up to two hours, but I wouldn’t push it much longer than that, especially in warmer weather, to avoid any food safety concerns. For refrigerator storage, this is where it really shines. Once the chicken has cooled down, transfer it to an airtight container. It will stay delicious and retain its moisture for about 3-4 days in the fridge. Make sure it’s properly sealed to prevent it from drying out. I’ve found that storing it in its own juices or with a little extra of the BBQ glaze really helps keep it moist. If you plan on freezing it, make sure the chicken is completely cool. Wrap individual pieces tightly in plastic wrap, then in aluminum foil, or place them in a freezer-safe bag. It can last in the freezer for up to 2-3 months. When it comes to reheating, the goal is to bring back that juicy tenderness and sticky glaze. For refrigerated chicken, the best method is often in a low oven (around 300°F / 150°C) for about 10-15 minutes, or until heated through. You can also reheat it gently on the stovetop in a skillet over medium-low heat, perhaps with a splash of extra BBQ sauce or water to prevent drying. For frozen chicken, thaw it in the refrigerator overnight before reheating using one of these methods. If the glaze has dulled during storage, you can always brush on a little extra BBQ sauce during the last few minutes of reheating to give it that fresh-off-the-grill shine back. I’ve learned that reheating at a lower temperature is key to keeping it from drying out!
Frequently Asked Questions
Final Thoughts
So there you have it – my absolute favorite way to make grilled BBQ chicken! It’s a recipe that’s stood the test of time in my kitchen, consistently delivering incredible flavor and happy faces. What I love most is that it’s not overly complicated, but the results are just spectacular. It’s the kind of dish that brings people together, sparking conversations and creating lasting memories. Whether you’re a seasoned grill master or just starting out, I truly believe you’ll find success and joy in making this. If you love this recipe, you might also enjoy my Smoked Paprika Rubbed Pork Chops or my Easy Sheet Pan Lemon Herb Chicken – they’re other simple, flavorful dishes that are perfect for weeknight dinners and entertaining. I can’t wait for you to try this grilled BBQ chicken and hear all about how much you and your family love it. Please feel free to leave a comment below with your thoughts, any variations you try, or how it turned out. Happy grilling!
Grilled BBQ Chicken
Ingredients
Main Ingredients
- 4 piece Chicken breasts
- 0.5 cup BBQ sauce Your favorite brand
- 2 tablespoon Olive oil
- 1 teaspoon Garlic powder
- 0.5 teaspoon Paprika
- 0.25 teaspoon Salt
- 0.25 teaspoon Black pepper
Instructions
Preparation Steps
- Preheat your grill to medium-high heat.
- In a small bowl, mix together olive oil, garlic powder, paprika, salt, and pepper.4 piece Chicken breasts
- Rub the spice mixture all over the chicken breasts.4 piece Chicken breasts
- Place the chicken breasts on the preheated grill.4 piece Chicken breasts
- Grill for about 6-8 minutes per side, or until the chicken is cooked through and reaches an internal temperature of 165°F (74°C).4 piece Chicken breasts
- During the last 5 minutes of grilling, brush the chicken breasts generously with BBQ sauce.4 piece Chicken breasts
- Remove the chicken from the grill and let it rest for a few minutes before serving.4 piece Chicken breasts