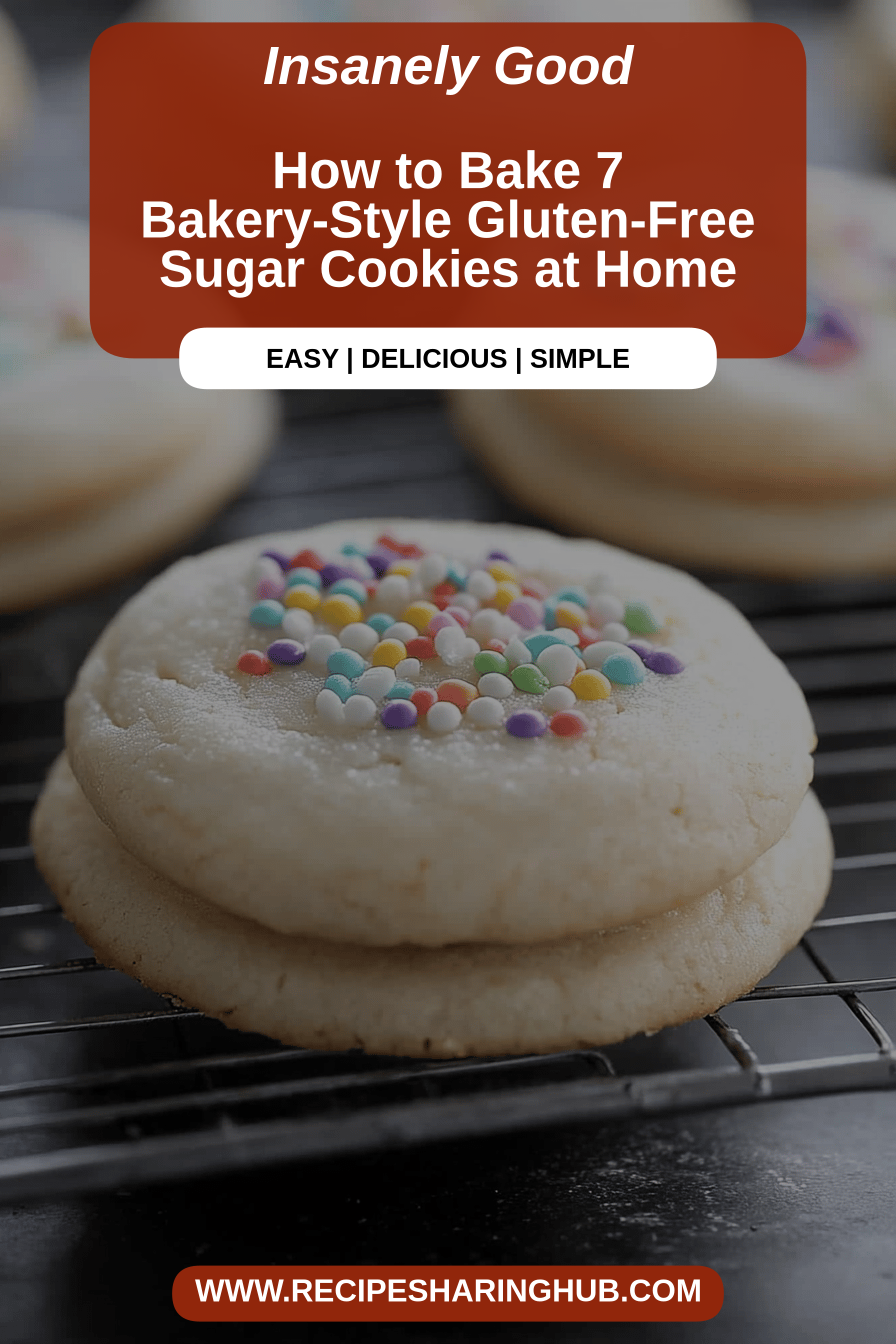
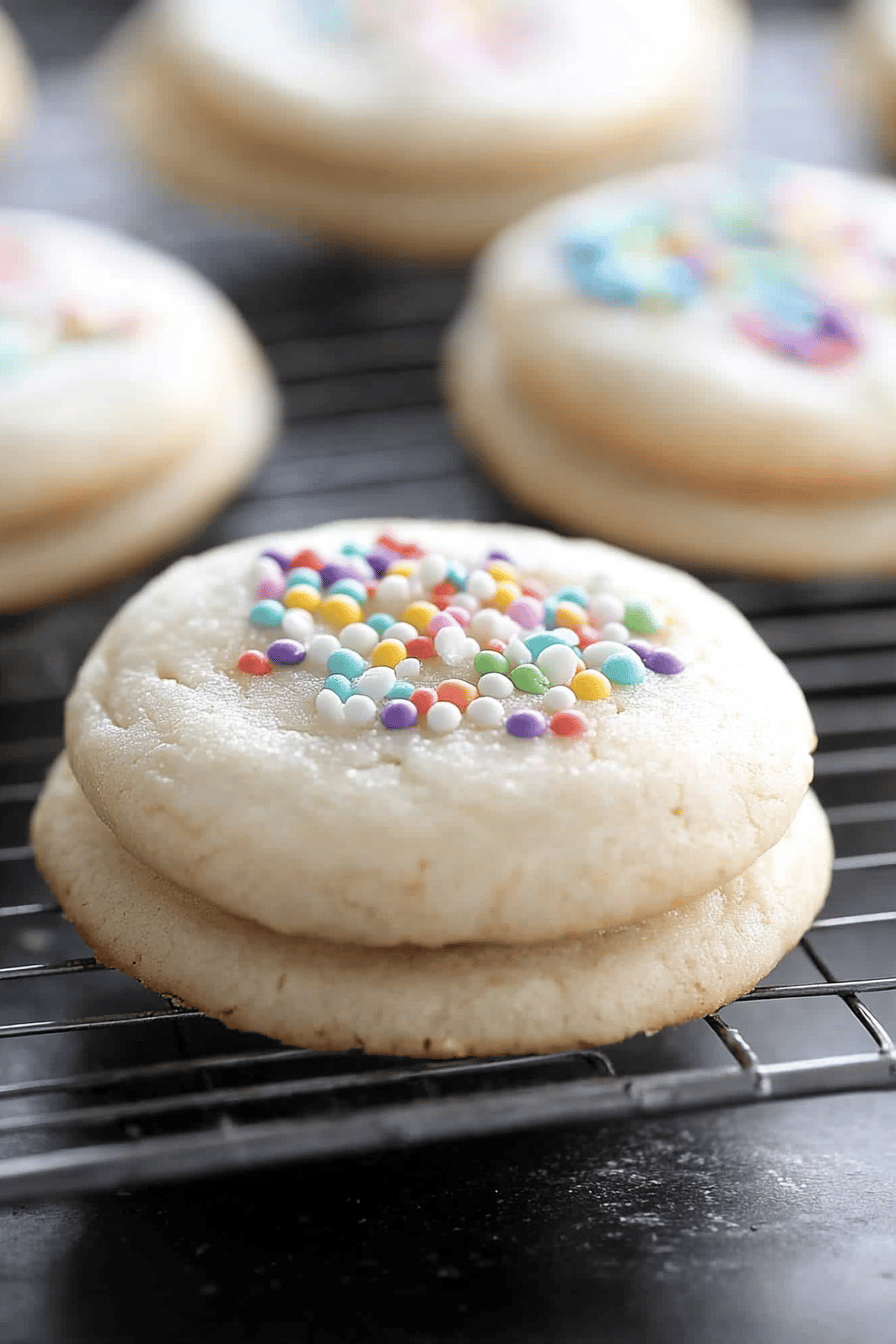
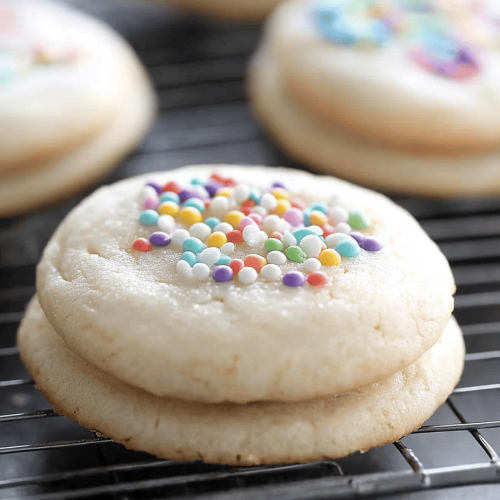
Oh, where do I even begin with these gluten-free Sugar Cookies? They’re not just cookies; they’re little bites of pure joy. You know how sometimes you crave something sweet, something comforting, something that just *feels* like home? That’s what these are. I remember the first time I perfected this recipe, it was during a particularly chaotic holiday season. I had guests coming, and I was determined to have something everyone could enjoy, including my niece who has a gluten sensitivity. I’d tried other gluten-free sugar cookies before, and honestly, some of them were… well, let’s just say they were *fine*. But these? These are something else entirely. They’re soft, they’re chewy, they have that perfect hint of sweetness, and they hold their shape beautifully if you want to decorate them. They’re genuinely the closest thing to a traditional sugar cookie I’ve ever had, and that’s saying a lot! If you’ve ever felt discouraged by gluten-free baking, please, let these cookies be your turning point. They’re a lifesaver on busy nights and a guaranteed crowd-pleaser.
What are gluten-free sugar cookies?
So, what exactly are these wonderful gluten-free Sugar Cookies? Think of them as the ultimate crowd-pleasing cookie, but with a special twist: they’re made entirely without gluten. Traditionally, sugar cookies rely on all-purpose wheat flour, which gives them their characteristic tender crumb and slightly crisp edges. But for these, we’re swapping out that gluten-containing flour for a carefully selected blend of gluten-free flours. It’s not just about dumping in a pre-made gluten-free mix, though that can work in a pinch! I’ve found that combining a few different flours gives you the best texture and flavor – a mix of something like almond flour for richness and moisture, a bit of tapioca starch for chewiness, and maybe some rice flour for structure. The result is a cookie that’s incredibly soft and flavorful, without that sometimes-gritty or crumbly texture that can plague lesser gluten-free baked goods. They’re essentially the classic, beloved sugar cookie, made accessible and delicious for everyone.
Why you’ll love this recipe?
There are so many reasons why this gluten-free Sugar Cookie Recipe has become my absolute go-to, and I just know you’re going to fall in love with it too. First off, the FLAVOR. Oh my goodness, the flavor! They’re perfectly sweet, with a lovely vanilla aroma that just fills your kitchen. They aren’t overly sweet, which I really appreciate, allowing the subtle vanilla and buttery notes to shine. Then there’s the SIMPLICITY. Honestly, these are surprisingly easy to whip up. Even if you’re new to gluten-free baking, I promise you won’t feel intimidated. The dough comes together beautifully, and it’s very forgiving. I’ve made them on weeknights when I’ve had exactly zero energy but a serious craving for something sweet. And COST-EFFICIENCY? Absolutely! The ingredients are pretty standard pantry staples, and when you consider you’re making a batch that satisfies everyone, it’s incredibly budget-friendly compared to buying specialty gluten-free treats. The VERSATILITY is another huge win. You can chill the dough and cut out shapes for holidays, or just drop spoonfuls onto a baking sheet for simple, rustic cookies. They’re also fantastic for decorating if you’re feeling artistic! What I love most about this recipe, beyond all those practical points, is that it just *works*. It delivers that nostalgic, comforting sugar cookie experience that so many of us miss when going gluten-free. They don’t taste like a “compromise”; they just taste like a darn good cookie, period.
How do I make gluten-free sugar cookies?
Quick Overview
The magic of these gluten-free sugar cookies lies in their straightforward preparation. We’ll be creaming butter and sugar until light and fluffy, then incorporating eggs and vanilla for richness and flavor. Next, we’ll combine our special gluten-free flour blend with leavening agents and salt, then gradually add it to the wet ingredients. A brief chill time helps the dough firm up, making it easy to handle for rolling or dropping. Bake until the edges are just golden, and you’ll have a batch of perfectly tender, delicious cookies in no time. It’s a simple, rewarding process that yields incredible results, proving that gluten-free baking can be just as joyful and delicious.
Ingredients
For the Main Batter:
1 cup (2 sticks) unsalted butter, softened: Make sure it’s truly softened, not melted. This is key for getting that light, fluffy texture when creaming. I always take my butter out about an hour before I plan to bake.
1 ½ cups granulated sugar: For that classic sweetness. Don’t skimp here! It also helps with the texture and crisp edges.
2 large eggs: Room temperature eggs incorporate better into the batter. If you forget to take them out, a quick dip in warm water for a few minutes does the trick.
2 teaspoons pure vanilla extract: Use the good stuff! It makes a huge difference in flavor. You can even add a tiny bit more if you’re a big vanilla fan like me.
3 cups gluten-free all-purpose flour blend (ensure it contains xanthan gum): I’ve had the best luck with blends that contain a mix of rice flour, tapioca starch, and potato starch. If your blend doesn’t have xanthan gum, you’ll need to add about 1 teaspoon separately.
1 teaspoon baking powder: Make sure it’s fresh! Old baking powder won’t give you the lift you need.
½ teaspoon salt: Balances the sweetness and brings out all the flavors.
For the Filling:
½ cup softened butter: We’ll use this for a lovely, rich cookie.
¾ cup powdered sugar: Sifted to avoid lumps.
1 teaspoon vanilla extract: For an extra hint of flavor.
2-4 tablespoons milk (dairy or non-dairy): To get the right consistency for spreading.
For the Glaze:
1 cup powdered sugar: Again, sifted is best.
2-3 tablespoons milk or water: Start with 2 and add more slowly until you reach your desired drizzling consistency.
½ teaspoon vanilla extract (optional): For added flavor.
Step-by-Step Instructions
Step 1: Preheat & Prep Pan
First things first, get your oven preheating to 375°F (190°C). Line your baking sheets with parchment paper. This is a step I never skip because it ensures the cookies won’t stick and makes cleanup a breeze. If you don’t have parchment, you can lightly grease your baking sheets, but parchment is truly the way to go for perfect, easy cookie removal.
Step 2: Mix Dry Ingredients
In a medium bowl, whisk together the gluten-free flour blend, baking powder, and salt. Whisking them together thoroughly ensures that the leavening agents and salt are evenly distributed throughout the flour, which is crucial for consistent baking. You want everything to be well combined; no clumps allowed!
Step 3: Mix Wet Ingredients
In a large bowl, or the bowl of your stand mixer fitted with the paddle attachment, cream together the softened butter and granulated sugar. Beat them on medium-high speed for about 3-5 minutes, until the mixture is pale yellow and looks really light and fluffy. This is where a lot of the magic happens for a tender cookie! Scrape down the sides of the bowl occasionally. Then, beat in the eggs one at a time, making sure each is fully incorporated before adding the next. Stir in the vanilla extract.
Step 4: Combine
Gradually add the dry ingredients to the wet ingredients, mixing on low speed until just combined. Be careful not to overmix here! Overmixing gluten-free dough can sometimes make it tough or gummy. You want to see just a few streaks of flour remaining, then you can finish incorporating it with a spatula. The dough will be soft but should hold its shape.
Step 5: Prepare Filling
In a separate bowl, beat the softened butter for the filling until creamy. Gradually add the sifted powdered sugar and vanilla extract, mixing until combined. Add the milk, one tablespoon at a time, until you reach a smooth, spreadable consistency. You want it firm enough to hold its shape but soft enough to spread easily. You can adjust the amount of milk to get it just right.
Step 6: Layer & Swirl
This is the fun part! Take about half of the Cookie Dough and spread it thinly on a piece of parchment paper. Then, spread about half of the filling mixture over the dough. Top with the remaining cookie dough and spread it out. Then, spread the remaining filling over the top. Using your parchment paper, carefully roll the dough and filling up into a log, about 1.5 to 2 inches in diameter. You can also get creative and make swirls! Once rolled, wrap the log tightly in plastic wrap and chill in the refrigerator for at least 1 hour, or until firm. This step is crucial for making the cookies easy to slice and preventing them from spreading too much.
Step 7: Bake
Once the dough log is firm, unwrap it and slice it into ½-inch thick rounds. Place the cookies on your prepared baking sheets, leaving about 2 inches between them. Bake for 10-12 minutes, or until the edges are lightly golden brown and the centers look set. They might look a little soft in the middle, but they’ll continue to set as they cool.
Step 8: Cool & Glaze
Let the cookies cool on the baking sheets for about 5 minutes before transferring them to a wire rack to cool completely. This prevents them from breaking. While the cookies are cooling, prepare the glaze. Whisk together the powdered sugar, vanilla (if using), and milk or water until smooth and pourable. If it’s too thick, add a tiny bit more liquid; if it’s too thin, add a bit more powdered sugar. Once the cookies are completely cool, drizzle the glaze over them. You can use a spoon or a piping bag for more intricate designs.
Step 9: Slice & Serve
Once the glaze has set, your beautiful gluten-free sugar cookies are ready to be enjoyed! Slice them into perfect rounds, admire the lovely swirl, and take that first delicious bite. They’re best served at room temperature. Enjoy them with a cup of coffee or a cold glass of milk!
What to Serve It With
These gluten-free sugar cookies are wonderfully versatile, fitting into any part of your day or any gathering you might have. For a relaxed start to the day, they’re fantastic with a strong cup of coffee or a frothy cappuccino. I love placing one or two on a small plate next to my morning brew, a little treat to make the morning feel special. For a more elegant brunch, imagine them arranged artfully on a tiered stand, perhaps alongside fresh fruit salad and mini quiches. They look so pretty, especially if you’ve gone a little fancy with the glaze or added some edible sprinkles. As a dessert, they’re perfect for rounding off a meal, especially if you’ve served something rich and savory. They offer a sweet, comforting finish without being too heavy. And for those spontaneous cozy snack moments? They’re just the ticket. I often find myself reaching for one (or two!) in the afternoon with a glass of milk, or even a warm herbal tea. My kids particularly love them as an after-school treat. They’re also wonderful alongside a scoop of vanilla ice cream for a simple yet divine dessert!
Top Tips for Perfecting Your Gluten-Free Sugar Cookies
I’ve been making these gluten-free sugar cookies for ages, and through lots of trial and error (and delicious tasting!), I’ve picked up a few tricks that I think really make a difference. First off, **dough consistency is key**. If your dough feels too sticky to handle after chilling, don’t be afraid to add just a tablespoon more of your gluten-free flour blend at a time until it’s manageable. Conversely, if it seems too dry, a tiny splash of milk or even a little extra softened butter can help. For the **swirls**, I’ve found that using a ruler to measure the thickness of the dough log before slicing ensures even cookies that bake uniformly. Also, don’t over-roll the log when you’re making the swirl; you want to capture those distinct layers. When it comes to **mixing**, I can’t stress enough to be gentle once you add the flour. Overmixing is the enemy of tender baked goods, especially gluten-free ones. Just mix until it *just* comes together. I’ve learned this the hard way by ending up with cookies that were a bit too dense from overworking the dough. For **baking**, ovens can be so finicky! Keep an eye on your cookies. The edges should be lightly golden, but the centers should still look soft. They will firm up beautifully as they cool. If your oven tends to run hot, consider reducing the temperature by 10-15 degrees and baking for a minute or two longer. For **ingredient swaps**, I’ve had success using a different gluten-free flour blend, but always ensure it contains xanthan gum or add it yourself. You can also experiment with extract flavors; a touch of almond extract or even lemon zest can add a delightful twist to the dough. And finally, for the **glaze**, remember that consistency is everything. It should be thick enough to coat the cookie but thin enough to drizzle easily. If it’s too thick, add milk or water a teaspoon at a time. If it’s too thin, whisk in more powdered sugar. A piping bag with a fine tip is great for decorative swirls, but a simple spoon works perfectly too for a rustic charm.
Storing and Reheating Tips
These gluten-free sugar cookies are pretty forgiving when it comes to storage, which is a huge plus! At **room temperature**, they’ll stay wonderfully fresh for about 3-4 days. The trick is to store them in an airtight container. I usually wait until they’re completely cool, then layer them between sheets of parchment paper to prevent sticking and place them in a cookie tin or a good quality plastic container. If they’re glazed, make sure the glaze is fully set before sealing the container. For **refrigerator storage**, you can keep them for up to a week, though I find the texture changes slightly – they might become a bit firmer. Again, an airtight container is your best friend here. I don’t often store them in the fridge unless it’s unusually warm, as I prefer the soft, chewy texture they have at room temp. Now, for **freezer instructions**, these cookies actually freeze really well! You can freeze the baked and cooled cookies for up to 2-3 months. I like to wrap individual cookies or small stacks in plastic wrap, then place them in a freezer-safe bag or airtight container. When you’re ready to enjoy them, just let them thaw at room temperature for about 30-60 minutes. They’ll taste almost as good as fresh. You can also freeze the dough logs! Wrap them tightly in plastic wrap, then in foil, and freeze for up to 2 months. When ready to bake, let the log sit at room temperature for about 15-20 minutes until it’s sliceable, then slice and bake as usual. Just remember to add a minute or two to the baking time since the dough will be colder. For the **glaze**, it’s always best to glaze the cookies *after* they’ve been thawed if they were frozen, or once they are completely cool if storing at room temperature. Glazing before freezing can sometimes result in a less appealing texture after thawing.
Frequently Asked Questions
Final Thoughts

I truly hope you give these gluten-free sugar cookies a try. They’re more than just a recipe; they’re a little piece of baking happiness that I’m so excited to share. They’ve brought so much joy to my kitchen, and I know they’ll do the same for yours. Whether you’re baking for a special occasion, a holiday, or just because you deserve a treat, these cookies deliver that comforting, familiar taste of a perfect sugar cookie, made accessible for everyone. If you love this recipe, you might also enjoy my Gluten-Free Chocolate Chip Cookies or my Chewy Gluten-Free Oatmeal Raisin Cookies for more delightful gluten-free baking adventures. I can’t wait to hear how yours turn out! Please leave a comment below and let me know what you think, or share your own creative twists. Happy baking!
Gluten-Free Sugar Cookies
Ingredients
Dough Ingredients
- 1 cup unsalted butter softened
- 1.5 cup granulated sugar
- 2 large eggs
- 1 teaspoon vanilla extract
- 2.5 cup all-purpose gluten-free flour blend with xanthan gum
- 0.5 teaspoon baking soda
- 0.25 teaspoon salt
Instructions
Preparation Steps
- In a large bowl, cream together the softened butter and granulated sugar until light and fluffy.
- Beat in the eggs one at a time, then stir in the vanilla extract.
- In a separate bowl, whisk together the gluten-free flour blend, baking soda, and salt.
- Gradually add the dry ingredients to the wet ingredients, mixing until just combined.
- Divide the dough in half, flatten each half into a disc, wrap in plastic wrap, and refrigerate for at least 1 hour.
- Preheat your oven to 350°F (175°C). Line baking sheets with parchment paper.
- On a lightly floured surface, roll out one disc of dough to about 1/4-inch thickness.
- Cut out shapes with cookie cutters and carefully transfer them to the prepared baking sheets.
- Bake for 8-10 minutes, or until the edges are lightly golden.
- Let the cookies cool on the baking sheets for a few minutes before transferring them to a wire rack to cool completely.