You know, there are some things in life that just make you feel *good*. Like the first warm day of spring, or finding that perfect song you can’t stop humming. For me, one of those things is a truly amazing ice cream cone. But let’s be real, finding one that’s both delicious and free from gluten can be a real challenge. I’ve had my fair share of crumbly, flavorless disappointments, and honestly, who has time for that? That’s why I am SO excited to share this recipe with you today. These aren’t just *any* gluten-free ice cream cones; they’re the kind that make you forget you’re eating anything other than the best darn cone you’ve ever had, period. They’re crispy, they’re slightly sweet, and they hold up beautifully to even the most generous scoop of your favorite frozen treat. My family devours these, and it’s a constant source of joy knowing everyone can enjoy them. If you’re like me and love a good homemade treat, get ready, because this one’s a keeper. We’re talking about making gluten-free ice cream cones from scratch, and trust me, it’s way easier than you think!
What are gluten-free ice cream cones?
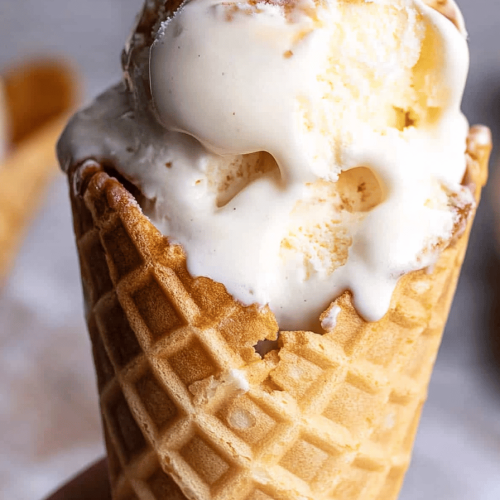
So, what exactly are these magical little wonders we’re making? Think of them as your classic ice cream cone, but completely reimagined for anyone navigating the gluten-free life. They’re essentially a delicate, crisp wafer, baked into that iconic cone shape, but without any wheat, barley, or rye. The name itself, “Gluten-Free Ice Cream Cones,” is pretty straightforward, but the magic is in how they achieve that perfect balance of crunch and subtle sweetness that complements ice cream without overpowering it. I’ve always been fascinated by the science behind baking, and creating a gluten-free version that mimics the texture and flavor of a traditional cone was a fun challenge. It’s essentially a carefully balanced batter that, when baked and shaped correctly, transforms into a delightful vessel for all your favorite frozen creations. No more sad, brittle cones that shatter in your hand!
Why you’ll love this recipe?
I could rave about these gluten-free ice cream cones all day, but let me give you the highlights.flavor is just spot on. They have a delicate vanilla-almond essence that’s not too sweet, which is exactly what you want when you’re pairing it with rich ice cream. The texture? Oh my goodness, the texture! They are perfectly crisp, with just the slightest chewiness if you catch them right out of the oven, but they firm up beautifully as they cool. And the simplicity of it all! I know baking from scratch can sound intimidating, but this recipe is surprisingly straightforward. Once you get the hang of shaping them, it’s a breeze. My kids actually love helping with the rolling part, which is a bonus! Financially, this is a huge win too. Buying good quality gluten-free cones can get expensive, and making them yourself is so much more cost-effective. You’re using basic pantry staples, and the results are infinitely better. And the ingredients are all natural.versatility! While they’re obviously perfect for ice cream, I’ve also used them as a base for mini fruit tarts, broken them up for a crunchy topping on yogurt parfaits, or even served them with a dollop of whipped cream and berries for a simple dessert. They’re a lifesaver when unexpected guests pop over or when a sweet craving hits hard and you don’t want to turn on the oven for a full cake. Compared to some other gluten-free baked goods I’ve tried, these truly stand out. What I love most about this recipe is the pure joy it brings to my family. Seeing everyone, gluten-free or not, happily munching on these makes all the effort completely worth it.
How to Make Gluten-Free Ice Cream Cones
Quick Overview
The process for these gluten-free ice cream cones is simpler than you might think! It involves whisking together a few dry ingredients, then incorporating the wet ones to form a smooth batter. We’ll then carefully spoon this batter onto a baking sheet, spread it super thin, bake until golden, and quickly shape them while they’re still warm and pliable. It’s all about that precise timing and a bit of speed once they come out of the oven. This method ensures you get that classic cone shape without any fuss, and the result is a wonderfully crisp treat that’s ready to be filled with your favorite ice cream.
Ingredients
For the Main Batter:
Here’s what you’ll need for the actual cone batter. I always try to use good quality ingredients for the best flavor. For the flour, I’ve found that a good gluten-free all-purpose blend that already contains xanthan gum works best. If yours doesn’t, you’ll want to add about 1/2 teaspoon. The almond flour adds a lovely richness and helps with that tender crispness. Don’t skip the vanilla extract; it’s crucial for that classic ice cream cone flavor! I usually get my vanilla beans from a local spice shop because the aroma is just divine.
- 1 cup Gluten-Free All-Purpose Flour Blend (with xanthan gum)
- 1/4 cup Almond Flour
- 1/2 cup Granulated Sugar
- 1/4 teaspoon Salt
- 1/2 cup Unsalted Butter, melted and slightly cooled
- 2 large Eggs, at room temperature
- 1 teaspoon Vanilla Extract
- 2 tablespoons Milk (dairy or non-dairy alternative like almond milk works great here)
For the Filling:
This isn’t a traditional filling in the way you’d think of a cake, but rather the delicious ice cream that goes *inside* the cone! So, choose your absolute favorite flavors here. I’m partial to a good classic vanilla bean or a rich chocolate, but a tart raspberry swirl is also divine.
- Your favorite ice cream!
For the Glaze:
This glaze is optional, but I think it adds a lovely finishing touch and extra crunch. It’s super simple to whip up. You can adjust the consistency by adding more or less powdered sugar. I love using a good quality dark chocolate for this, but White Chocolate is also fantastic if you prefer something sweeter. If you want to get fancy, you can add a tiny pinch of sea salt to the chocolate glaze for a salted chocolate vibe!
- 1/2 cup Powdered Sugar
- 2-3 tablespoons Milk or Water
- Optional: 1/4 cup melted chocolate (for dipping the rims)

Step-by-Step Instructions
Step 1: Preheat & Prep Pan
First things first, let’s get our oven ready. Preheat it to 350°F (175°C). You’ll need a couple of baking sheets for this, and it’s super important to line them with parchment paper. This is non-negotiable! Parchment paper is your best friend here; it prevents sticking and makes cleanup a breeze. Some people like to use silicone baking mats, but I find parchment paper gives the best crisp. Make sure the paper is completely flat, with no wrinkles, as this can affect how the cones bake.
Step 2: Mix Dry Ingredients
In a medium-sized bowl, whisk together the gluten-free all-purpose flour, almond flour, granulated sugar, and salt. Whisking them together thoroughly at this stage helps to ensure everything is evenly distributed, which is key for consistent texture. You don’t want pockets of sugar or flour. Give it a good whisk until it all looks uniform and sandy.
Step 3: Mix Wet Ingredients
In a separate, larger bowl, whisk together the melted butter, eggs, and vanilla extract until well combined and slightly pale. Then, gradually whisk in the milk until you have a smooth, cohesive mixture. I always make sure my butter isn’t piping hot when I add it to the eggs, otherwise, you risk scrambling them – nobody wants that! Room temperature eggs also emulsify much better.
Step 4: Combine
Now, pour the dry ingredients into the wet ingredients. Using a whisk or a rubber spatula, gently mix until just combined. Be careful not to overmix! Overmixing can lead to a tougher cone. You’re looking for a smooth batter, similar in consistency to pancake batter, but perhaps a touch thicker. If it seems too thick, you can add another tablespoon of milk; if it seems too thin, a tablespoon more of the GF flour blend. It’s a delicate balance!
Step 5: Prepare Filling
This is the fun part! Make sure your ice cream is softened just enough to scoop easily but not melting into a puddle. Having it at the perfect consistency will make filling the cones much easier. You can take it out of the freezer about 10-15 minutes before you plan to assemble. If you’re using multiple flavors, have them ready to go.
Step 6: Layer & Swirl
This isn’t for the batter itself, but for the ice cream assembly. Once your cones are baked and cooled, you’ll add your ice cream. For layering, if you’re using multiple flavors, you can alternate scoops or dollops. For a swirl effect, you can gently marble the flavors together with a toothpick or small knife. The key is to work relatively quickly so the ice cream doesn’t melt too much before you get it into the cone and then into the freezer.
Step 7: Bake
Drop about 2 tablespoons of batter onto the prepared baking sheet, spacing them at least 3-4 inches apart. Using the back of a spoon or an offset spatula, gently spread the batter into a thin, even circle, about 4-5 inches in diameter. The thinner you spread it, the crispier your cone will be! Bake for 8-10 minutes, or until the edges are golden brown and the center is set. Keep an eye on them, as ovens can vary!
Step 8: Cool & Glaze
This is the crucial step for shaping. As soon as the circles come out of the oven, they are incredibly hot and pliable. You need to work quickly! Using a thin spatula, carefully lift each baked circle off the parchment paper. Immediately shape it into a cone by wrapping it around a cone mold or even a sturdy wooden spoon handle. Hold it in place for about 30 seconds to help it set. If you’re using the optional glaze, melt your chocolate in a double boiler or microwave. Once the cones are completely cooled and firm, dip the rims into the melted chocolate. For the powdered sugar glaze, whisk together powdered sugar with milk or water until smooth and drizzly, then drizzle over the cooled cones.
Step 9: Slice & Serve
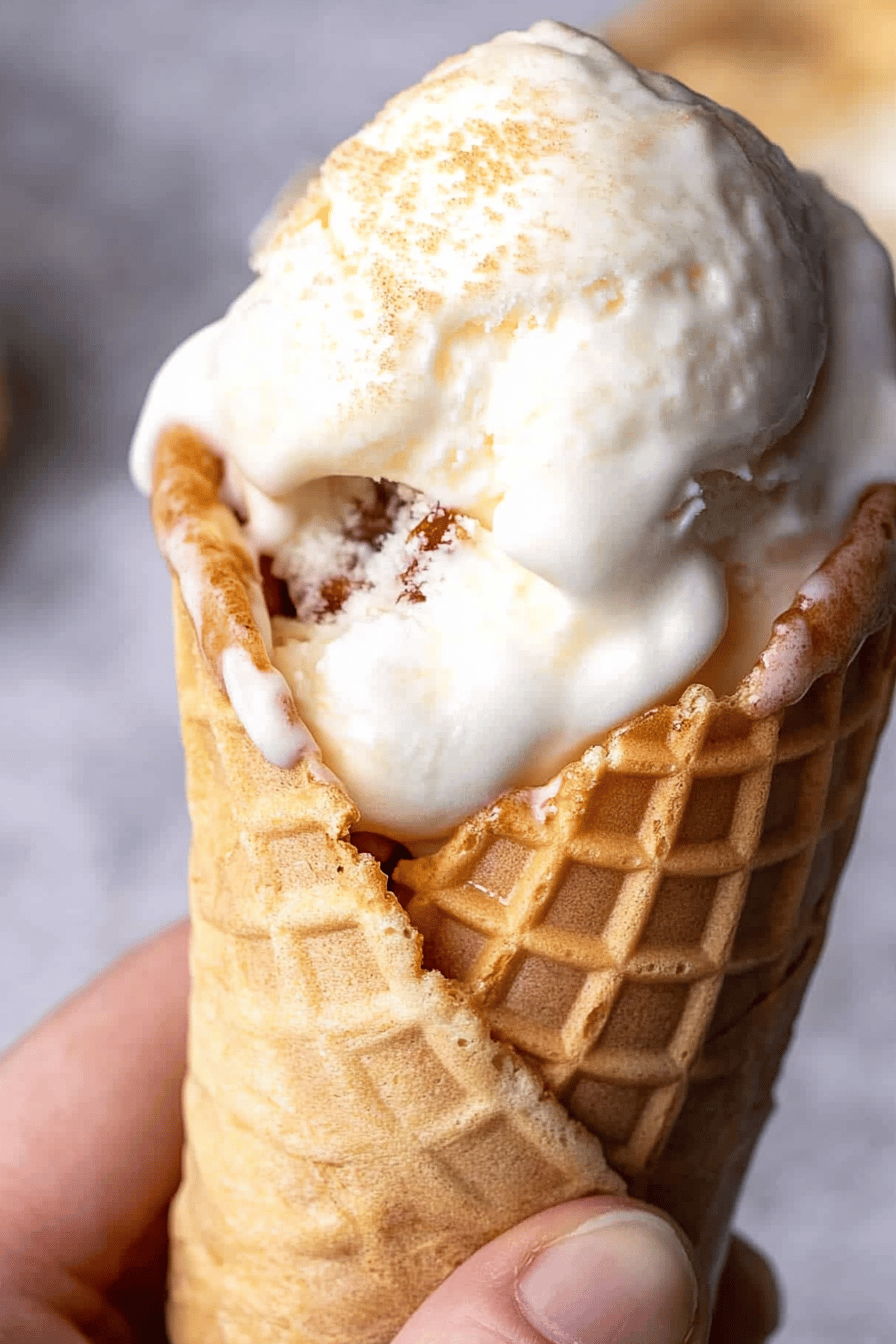
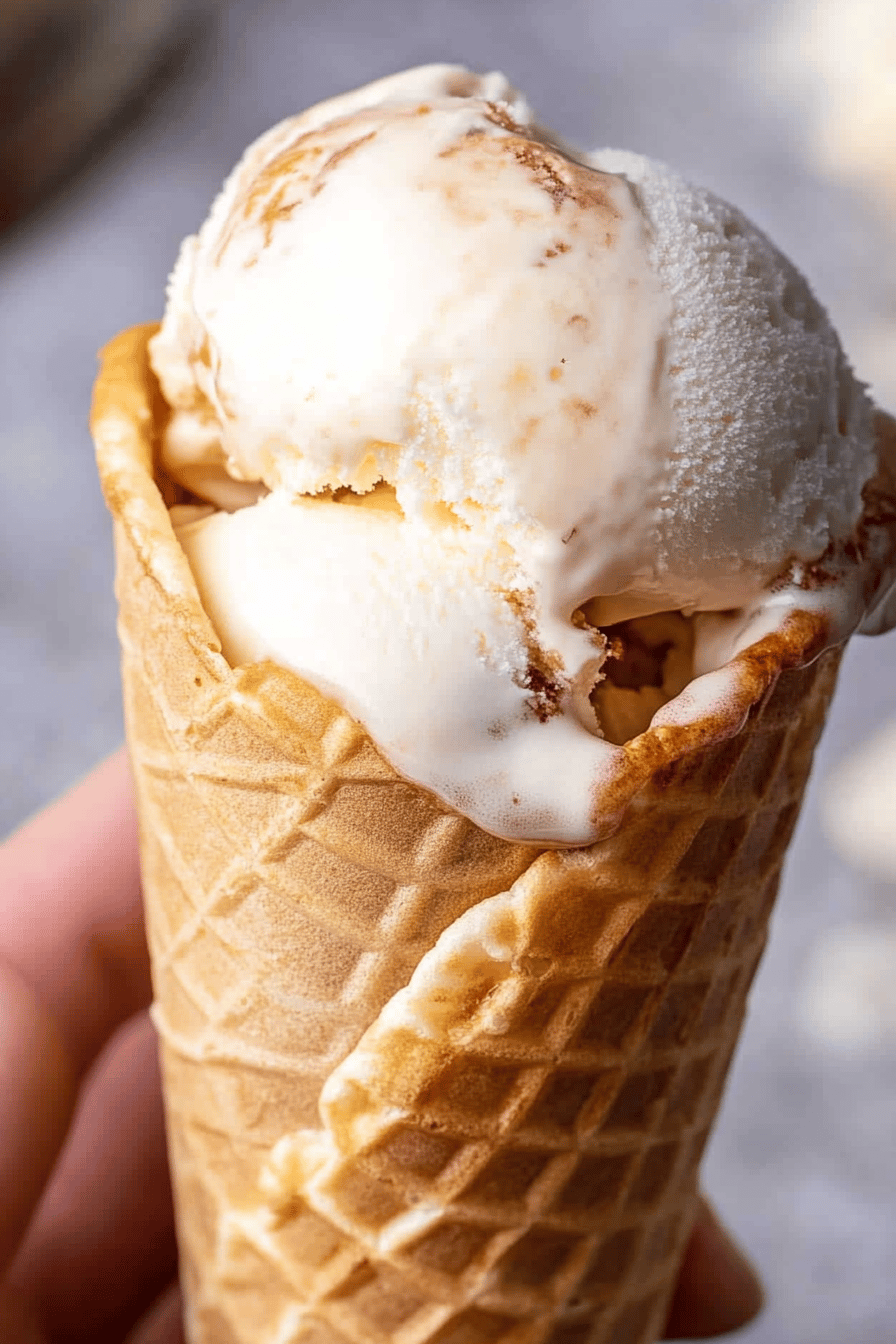
Once the cones are shaped and cooled (and glazed, if you’re using it!), they are ready for their delicious filling. Scoop your favorite ice cream generously into each cone. If you’ve glazed them, let the chocolate set completely before serving. These are best enjoyed immediately after filling so you get that perfect contrast of cold, creamy ice cream and crisp cone. For a truly spectacular presentation, you can serve them on a pretty platter.
What to Serve It With
These gluten-free ice cream cones are pretty much a blank canvas for deliciousness! For breakfast, imagine a warm, slightly spiced cone filled with a scoop of vanilla ice cream and topped with some fresh berries. A strong cup of coffee on the side? Perfection. For brunch, you could elevate them by filling them with a lemon-mascarpone ice cream and garnishing with a sprig of mint or a few edible flowers. It feels so fancy! As dessert, the possibilities are endless. My go-to is always a rich dark chocolate ice cream, maybe with some salted caramel drizzled over the top. For cozy snacks, I love a simple chocolate chip Cookie Dough ice cream cone. It’s pure comfort in a cone! My family also loves having these on a hot summer evening. We’ll often make a “cone bar” where everyone can choose their ice cream and toppings. It’s become a cherished tradition, and knowing everyone can participate makes it extra special. I’ve also tried filling them with a small scoop of homemade gelato, and it’s divine!
Top Tips for Perfecting Your Gluten-Free Ice Cream Cones
Okay, let’s get into the nitty-gritty. I’ve made these gluten-free ice cream cones more times than I can count, and I’ve learned a few things along the way that I’m happy to pass on. For the batter consistency, it’s really important. If it’s too thick, it won’t spread thin enough and might be too cakey. If it’s too thin, it will spread too much and might become brittle. I aim for a batter that’s pourable but holds its shape for a second when you stop stirring. When you’re spreading the batter, really aim for that thinness. Use the back of a spoon or an offset spatula, and go gently. You want it almost translucent in the center. The thinner it is, the crispier it will be. Don’t be afraid if the circles aren’t perfectly round; they’ll still shape up! My biggest piece of advice for shaping is to have your molds or your shaping tool ready *before* the cookies come out of the oven. They go from molten to firm in about 30 seconds. I keep a small bowl of ice water nearby to dip my fingers if they get too hot. For baking, watch them closely. The edges should be a beautiful golden brown, but the center should still be slightly soft. They’ll continue to crisp up as they cool. If you bake them too long, they’ll become too brittle to shape. If you’re new to this, I recommend baking just one test circle first to get your oven’s timing just right. For ingredient swaps, I’ve experimented quite a bit. If you’re nut-free, you can try replacing the almond flour with more of your gluten-free all-purpose blend, but you might need to add a bit more liquid or bake for a minute or two longer. I’ve also tried different types of sweeteners, but granulated sugar seems to provide the best texture and crispness for these. And about the glaze, don’t be afraid to get creative! You can add a little cocoa powder to the powdered sugar glaze for a chocolate version, or even a pinch of cinnamon for a spiced kick. The key is to let the cones cool completely before glazing, otherwise, the glaze will just melt off.
Storing and Reheating Tips
Alright, let’s talk about keeping these glorious gluten-free ice cream cones fresh. If you’re lucky enough to have any leftovers (which, let’s be honest, is rare in my house!), storing them is pretty straightforward. At room temperature, they’ll stay crispy for a good 2-3 days as long as they are stored in an airtight container. Make sure they are completely cooled before you put them in the container, or condensation can make them go soft. I usually put a piece of parchment paper between layers if I’m stacking them. For refrigerator storage, I don’t usually recommend it for the cones themselves, as the humidity can make them lose their crispness very quickly. However, if you’ve filled them with ice cream, then the refrigerator (or freezer!) is your best bet, of course. If you need to freeze unfilled cones, wrap them very tightly in plastic wrap, then place them in an airtight container or freezer bag. They should last for about 1-2 months. When you want to use them, just let them thaw at room temperature for about 15-20 minutes. You can even pop them in a low oven (around 250°F or 120°C) for a few minutes to re-crisp them if they’ve softened. When it comes to the glaze, it’s best to add it just before serving, especially if you’re planning to store the cones for more than a day. Glazed cones tend to absorb moisture more readily, so if you want maximum crispiness, glaze them right before you fill them with ice cream.
Frequently Asked Questions
Final Thoughts
So there you have it – a recipe for gluten-free ice cream cones that are truly special. These little beauties are more than just a vehicle for ice cream; they’re a testament to the fact that deliciousness doesn’t have to come with a side of gluten. They’re crisp, they’re flavorful, and they’re surprisingly easy to make, proving that you can create something wonderful from scratch without a lot of fuss. I really hope you give these a try. They’ve brought so much joy to my family’s dessert time, and I think they’ll do the same for yours. If you’re looking for other delicious gluten-free treats, you might also enjoy my recipe for Gluten-Free Brownies or my Easy Gluten-Free Chocolate Chip Cookies. They’re family favorites too! I can’t wait to hear how your gluten-free ice cream cones turn out! Please leave a comment below and tell me what ice cream flavors you used. Sharing your variations makes this whole process so much more fun!
Gluten-Free Ice Cream Cones
Ingredients
Main Ingredients
- 0.75 cup Gluten-free all-purpose flour blend
- 0.25 cup Almond flour
- 0.5 cup Powdered sugar
- 0.25 teaspoon Salt
- 0.5 cup Unsalted butter, softened
- 2 large Eggs
- 0.5 teaspoon Vanilla extract
Instructions
Preparation Steps
- Preheat your oven to 350°F (175°C). Lightly grease baking sheets or use parchment paper.
- In a medium bowl, whisk together the gluten-free flour blend, almond flour, powdered sugar, and salt.
- In a separate large bowl, cream together the softened butter and eggs until light and fluffy. Stir in the vanilla extract.
- Gradually add the dry ingredients to the wet ingredients, mixing until just combined. The batter will be thick.
- Drop rounded tablespoons of batter onto the prepared baking sheets, spacing them about 4 inches apart. Flatten each mound slightly with the back of a spoon or your fingers.
- Bake for 10-12 minutes, or until the edges are golden brown. The centers should still be slightly soft.
- Working quickly while the cookies are still warm and pliable, use a spatula to carefully lift them from the baking sheet. Immediately shape them into cones using a cone mold or by wrapping them around a wooden spoon handle. Hold in place until they cool and set.
- Allow the cones to cool completely on a wire rack before filling with ice cream.