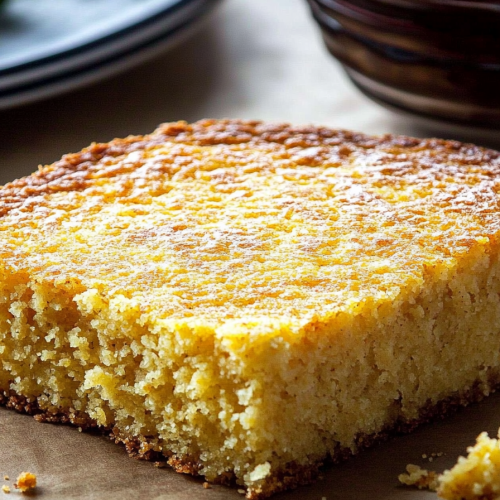
You know those recipes that just feel like a warm hug on a plate? The ones you can whip up without even looking at the instructions anymore because they’re etched into your heart (and your kitchen cabinets)? Well, this gluten-free cornbread is absolutely one of those for me. I’ve been making some version of this for years, but it wasn’t until recently that I finally perfected it to be *truly* gluten-free without sacrificing that quintessential crumbly, slightly sweet, perfectly golden goodness. It’s not just a substitute; it’s a star in its own right. Honestly, the first time I took a bite of this perfected batch, I swear I heard angels sing. If you’ve ever tried gluten-free baked goods and been disappointed by a gummy texture or a dry, crumbly mess, please, let me tell you, this recipe is going to change your mind. It’s the kind of cornbread that disappears in minutes at my house, whether served alongside a hearty chili or just eaten warm with a smear of butter.
What is gluten free cornbread?
So, what exactly *is* this magical gluten-free cornbread? At its heart, it’s your classic, comforting cornbread, but made without any wheat flour. We swap out the traditional all-purpose flour for a blend of gluten-free flours that mimic the texture and structure you’d expect. Think of it as a slightly sweet, corn-forward quick bread that’s wonderfully moist and tender. It’s baked until it’s golden brown on top and delightfully crumbly on the inside, with those lovely little flecks of corn giving it character. The name itself is pretty straightforward – it’s cornbread, and it’s gluten-free! The “quick bread” part just means it doesn’t rely on yeast for rising; we use baking powder and baking soda to get that perfect lift. It’s the kind of thing that just makes your kitchen smell divine while it’s baking.
Why you’ll love this recipe?
There are so many reasons why this gluten-free cornbread has become my go-to. First off, the flavor is just out of this world. It has that distinct, comforting corn taste that you just can’t beat, with a subtle sweetness that’s not overpowering. It’s not too sweet, not too savory – it’s that perfect balance that makes it so versatile. And the texture? Oh, the texture! It’s incredibly moist and tender, with a tender crumb that’s satisfyingly crumbly, not dense or gummy like some gluten-free baked goods can be. I’ve spent ages tweaking flour blends, and this one is a winner. It’s also surprisingly simple to make. Seriously, even if you’re new to gluten-free baking, you can totally nail this. You just whisk the dry ingredients, whisk the wet, combine, and bake. It’s a lifesaver on busy weeknights when you need a comforting side dish. Cost-wise, it’s super budget-friendly too; most of the ingredients are pantry staples. What I love most, though, is its sheer versatility. You can serve it with practically anything – from barbecue and chili to eggs and breakfast sausage. It even makes a surprisingly delicious dessert when served warm with a drizzle of honey or maple syrup. It’s that reliable recipe that just always delivers, no matter the occasion. It’s definitely a step up from those boxed mixes, and honestly, I think it’s better than many traditional cornbreads I’ve had!
How do I make gluten free cornbread?
Quick Overview
Making this gluten-free cornbread is a breeze! You’ll simply whisk together your dry ingredients, then your wet ingredients separately, before gently combining them. The magic happens when we add a touch of sweetness and that essential corn flavor. It bakes up into a beautiful golden loaf that’s perfect for slicing and serving warm. It’s really a one-bowl wonder for the dry ingredients and another for the wet, making cleanup a snap. The whole process from start to finish takes less than an hour, which is why it’s one of my favorites for last-minute meal additions!
Ingredients
For the Main Batter:
This is where we build that classic cornbread flavor and texture. I always try to use a good quality yellow cornmeal – it makes a noticeable difference in both flavor and color. For the gluten-free flour blend, I’ve found that a mix of a good all-purpose gluten-free flour (one that contains xanthan gum is usually best for structure) and a bit of extra corn flour or fine cornmeal gives the best result. It’s about achieving that perfect crumb! You’ll need:
- 1 ½ cups yellow cornmeal (medium grind is nice for texture)
- ¾ cup gluten-free all-purpose flour blend (ensure it contains xanthan gum)
- ½ cup granulated sugar (or a touch more if you like it sweeter)
- 2 teaspoons baking powder
- ½ teaspoon baking soda
- ½ teaspoon salt
For the Filling:
This is optional, but oh-so-good! It adds pockets of extra flavor and moisture. My kids love when I add a bit of this, and it elevates the cornbread from simple side to something a little more special.
- ½ cup shredded cheddar cheese (or a blend of your favorites!)
- ¼ cup fresh or frozen corn kernels (thawed if frozen)
For the Glaze:
This is what takes it over the top for me. It’s simple, but it adds a beautiful sheen and a touch more sweetness.
- 2 tablespoons melted butter
- 1 tablespoon honey or maple syrup
Step-by-Step Instructions
Step 1: Preheat & Prep Pan
First things first, let’s get that oven heated up. We want it nice and hot to get a good crust on our cornbread. Preheat your oven to 400°F (200°C). While the oven is heating, grab an 8×8 inch baking pan or a 9-inch cast-iron skillet. Grease it generously with butter or cooking spray. I always like to let the greased pan sit in the preheating oven for a few minutes while I mix the batter. This helps ensure the cornbread releases beautifully and gets a lovely golden-brown bottom crust. Don’t skip this little step; it makes a difference!
Step 2: Mix Dry Ingredients
In a large mixing bowl, whisk together the cornmeal, gluten-free flour blend, sugar, baking powder, baking soda, and salt. Give it a good whisk for about 30 seconds. This ensures everything is evenly distributed, so you don’t get pockets of baking soda or salt. You’re looking for a uniform, pale yellow mixture. If you’re not using a GF blend with xanthan gum, you might need to add ½ teaspoon separately for structure, but most blends have it nowadays.
Step 3: Mix Wet Ingredients
In a separate medium bowl, whisk together the eggs, milk (or your preferred dairy-free alternative – I’ve had great success with almond milk!), and melted butter (make sure it’s not too hot, or it’ll scramble the eggs). Whisk until everything is well combined and the mixture is a lovely pale yellow. This is your liquid base that will bring everything together.
Step 4: Combine
Now, pour the wet ingredients into the bowl with the dry ingredients. Gently fold them together with a spatula or wooden spoon until *just* combined. It’s really important not to overmix here! A few lumps are perfectly fine; in fact, they’re good! Overmixing can lead to a tougher texture, and we definitely don’t want that, especially with gluten-free baking. Stop mixing as soon as you don’t see any dry flour streaks. The batter should be thick but pourable.
Step 5: Prepare Filling
If you’re adding the cheese and corn, this is the step to get them ready. In a small bowl, gently toss the shredded cheese and corn kernels together. This ensures they’re spread evenly throughout the cornbread when you add them in. If using frozen corn, make sure it’s fully thawed and patted dry.
Step 6: Layer & Swirl
Carefully pour about half of the batter into your prepared hot pan. Sprinkle the cheese and corn mixture evenly over the batter. Then, pour the remaining batter over the top, trying to cover the filling. If you’re feeling fancy, you can take a knife and gently swirl the batter a bit to create pretty patterns, but it’s not necessary for deliciousness! Just ensure the filling is mostly covered.
Step 7: Bake
Pop that pan into your preheated oven. Bake for 20-25 minutes, or until the top is golden brown and a toothpick inserted into the center comes out clean. The exact time can vary depending on your oven, so keep an eye on it. You’re looking for that perfect golden crust that promises deliciousness inside. If the top starts browning too quickly, you can loosely tent it with foil.
Step 8: Cool & Glaze
Once baked, carefully remove the pan from the oven. Let the cornbread cool in the pan for about 10-15 minutes. This is crucial for it to set up properly. While it’s cooling, whisk together the melted butter and honey or maple syrup for the glaze. Drizzle this warm glaze over the slightly cooled cornbread. It’ll soak in a bit and give it a lovely sheen and a hint of extra sweetness.
Step 9: Slice & Serve
Once it’s had a chance to cool a bit more (though I’m usually impatient and cut into it while it’s still warm – it’s just too good!), slice it into squares or wedges. Serve it warm for the absolute best texture and flavor. This is when it’s truly irresistible. Enjoy the fruits of your labor!
What to Serve It With
This gluten-free cornbread is a culinary chameleon, fitting in everywhere. For a truly comforting **Breakfast**, I love serving it warm with a side of scrambled eggs and some crispy bacon. It’s also fantastic with a dollop of butter and a drizzle of local honey. For **Brunch**, it’s a showstopper! Imagine it alongside a frittata or quiche, maybe with some fresh fruit salad. A light dusting of powdered sugar can make it look extra fancy. For a delightful **Dessert**, especially after a casual meal, serve it warm with a scoop of vanilla Ice Cream and a generous drizzle of maple syrup. It’s like a warm, comforting cake. And for those quintessential **Cozy Snacks**, it’s perfect alongside a big bowl of homemade chili or a hearty stew. Honestly, I’ve eaten it plain, standing over the sink, and it was still amazing. My kids ask for it all the time when we have soup, and it’s always a hit. It’s the perfect accompaniment that makes any meal feel a little more special and homey.
Top Tips for Perfecting Your Gluten-Free Cornbread
Over the years, I’ve learned a few tricks to make sure this cornbread turns out perfectly every single time. It’s all about the little details!
Zucchini Prep: (Wait, did I say zucchini? Oops, my brain is on autopilot with my other favorite recipe! For cornbread, it’s all about the cornmeal!)
Cornmeal Quality: Use a good quality yellow cornmeal. The grind matters too – a medium grind gives a nice texture without being too gritty. Freshness is key, so if your cornmeal has been in the pantry for years, it might be time for a refresh!
Mixing Advice: The absolute golden rule for quick breads like this, gluten-free or not, is to avoid overmixing. Mix the wet and dry ingredients until *just* combined. A few lumps are a good thing! You want to develop as little gluten (even in GF baking, there’s structure development) as possible for a tender crumb. I always stop mixing as soon as I can’t see any dry flour.
Filling Flavor: Don’t be afraid to experiment with the filling! Sharp cheddar is my go-to, but Monterey Jack, a spicy pepper jack, or even a mix of cheeses works beautifully. You can also add a pinch of chili powder or some finely diced jalapeños for a kick. Just make sure any additions are finely chopped or minced so they distribute well.
Ingredient Swaps: For the liquid, whole milk makes it rich, but I’ve successfully used buttermilk (for tang!), and dairy-free milks like unsweetened almond milk or soy milk work wonderfully. Just ensure they are unsweetened. If you use a GF flour blend that *doesn’t* contain xanthan gum, you’ll want to add about ½ teaspoon of it to the dry ingredients to help bind everything together.
Baking Tips: Preheat your oven properly! A hot oven is essential for that lovely golden crust. Baking in a preheated, greased cast-iron skillet or pan gives the best results for a crisp exterior. If you notice the top browning too quickly before the inside is cooked, you can loosely tent the pan with foil for the remainder of the baking time. To check for doneness, a wooden skewer or toothpick inserted into the center should come out clean, with no wet batter attached.
Glaze Variations: The butter-honey glaze is divine, but you can adjust it. For a less sweet glaze, use just melted butter. For a more savory cornbread, you can skip the glaze altogether or just add a pinch of salt. If you want a sweeter cornbread, you can add a tablespoon or two more sugar to the batter itself, or increase the honey in the glaze.
Storing and Reheating Tips
This gluten-free cornbread is usually gobbled up pretty quickly in my house, but when I do have leftovers (which is rare!), I’ve got a few tried-and-true methods for keeping it fresh.
Room Temperature: Cooled cornbread can be stored at room temperature in an airtight container for up to 2 days. Make sure it’s completely cooled before sealing it up, otherwise, condensation can make it soggy. I usually just use a bread box or a container with a good lid.
Refrigerator Storage: For longer storage, up to 4-5 days, keep it in an airtight container in the refrigerator. The texture might become a little firmer when cold, but that’s easily fixed!
Freezer Instructions: This cornbread freezes beautifully! Once completely cooled, wrap individual slices or the whole pan tightly in plastic wrap, then in foil or place in a freezer-safe bag. It should last for up to 3 months. Thaw overnight in the refrigerator or at room temperature, or reheat directly.
Glaze Timing Advice: If you plan to store leftovers for more than a day, I recommend adding the glaze *after* reheating, or just serving it with butter. The glaze can sometimes make the cornbread stick to the container or get a bit sticky if stored for too long. For best results, reheat slices in a toaster oven or a conventional oven (about 300°F/150°C for 5-10 minutes) until warmed through. Microwaving is okay in a pinch, but it can sometimes affect the texture.
Frequently Asked Questions
Final Thoughts
I truly hope you give this gluten-free cornbread a try. It’s more than just a recipe for me; it’s a little piece of comfort and joy that I’m so excited to share. It’s proof that gluten-free baking can be absolutely delicious, satisfying, and just as comforting as the traditional versions. The aroma that fills your kitchen while it bakes is pure happiness. Whether you’re gluten-free by necessity or just looking for an amazing cornbread recipe, I think you’ll fall in love with its tender crumb, delightful texture, and perfect balance of flavors. If you enjoy this recipe, you might also love my recipe for fluffy gluten-free biscuits or my easy gluten-free Banana Bread! They’re also staples in my kitchen. I can’t wait to hear what you think of this cornbread – please leave a comment below and let me know how yours turns out, or if you tried any fun variations! Happy baking!
Gluten-Free Cornbread
Ingredients
Main Ingredients
- 1.5 cup Gluten-free all-purpose flour blend
- 1 cup Yellow cornmeal
- 0.33 cup Granulated sugar
- 2 teaspoons Baking powder
- 0.5 teaspoon Salt
- 2 large Eggs
- 1 cup Milk dairy or non-dairy
- 0.33 cup Melted butter unsalted
Instructions
Preparation Steps
- Preheat oven to 400°F (200°C). Grease and flour a 9-inch round cake pan or an 8x8 inch baking dish.
- In a large bowl, whisk together the gluten-free flour blend, cornmeal, sugar, baking powder, and salt.
- In a separate medium bowl, whisk together the eggs, milk, and melted butter.
- Pour the wet ingredients into the dry ingredients and stir until just combined. Do not overmix.
- Pour the batter into the prepared pan and spread evenly.
- Bake for 20-25 minutes, or until a toothpick inserted into the center comes out clean.
- Let cool in the pan for a few minutes before transferring to a wire rack to cool completely. Serve warm.