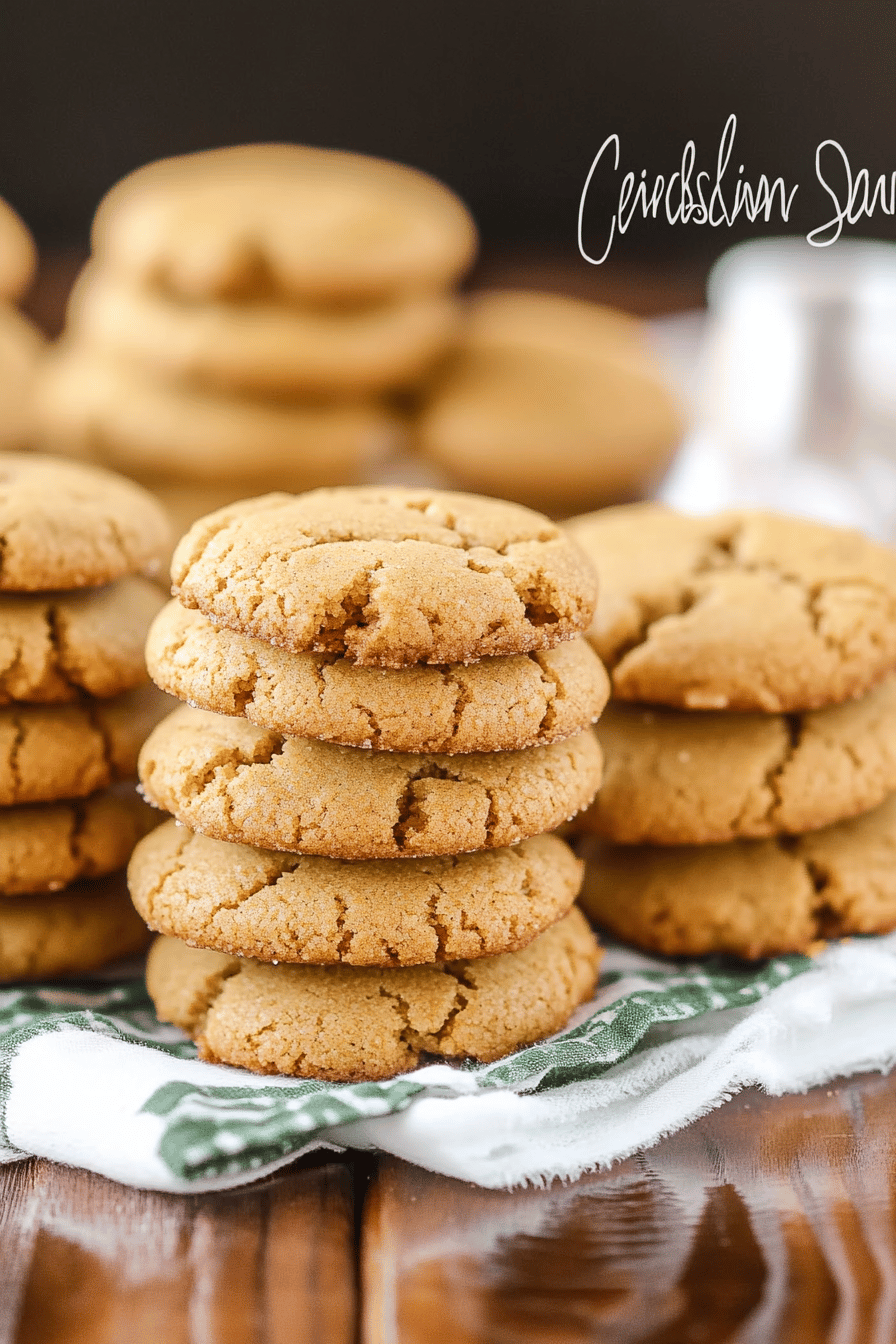
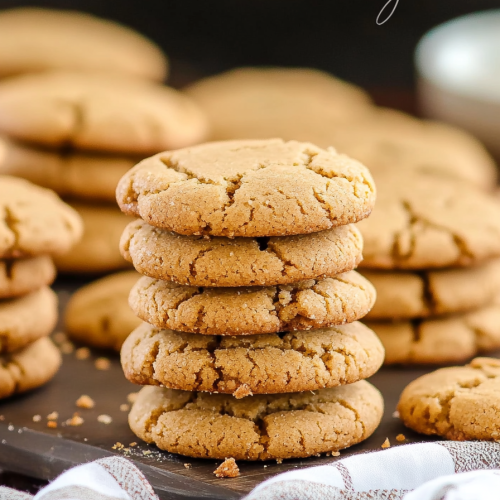
Oh, these gingersnap cookies! Just thinking about them brings back the warmest memories. It’s that perfect time of year, you know? The air gets a little crisper, leaves start to turn those glorious shades of red and gold, and suddenly, all I can think about is baking. And when it comes to holiday baking, or really, any day that needs a little extra cheer, these gingersnap cookies are my absolute go-to. They’re not just cookies; they’re little bites of comfort, packed with that zingy ginger and sweet molasses that just feels like home. I remember my grandma making these every year, the whole house filled with that incredible spice aroma. It’s funny, because people always rave about Chocolate Chip Cookies, and I love those too, but there’s something so uniquely satisfying about a perfectly spiced gingersnap. It’s like a cozy hug in cookie form. These are the kind of gingersnap cookies that have a slight chew in the center and a delightful crunch around the edges, with that signature crackled top that just screams ‘homemade goodness.’ If you’re looking for a truly special cookie that’s both familiar and exciting, you’ve found it. Let’s get baking!
What are Gingersnap Cookies?
So, what exactly *are* gingersnap cookies? Think of them as the sophisticated, spiced cousin to your everyday Sugar Cookie. They’re characterized by their bold flavor profile, dominated by ginger, molasses, and often cinnamon and cloves. The “snap” in their name comes from their tendency to be crisp and brittle when baked properly, though my family prefers them with a little chewiness in the middle, which we achieve with a slightly shorter baking time. The traditional gingersnap cookie recipe usually involves a good amount of molasses, which not only gives them their rich, dark color and deep flavor but also contributes to their chewy texture. They’re rolled in sugar before baking, creating that signature craggy, sparkling exterior. It’s this combination of intense spice, deep sweetness, and satisfying texture that makes gingersnap cookies so iconic and utterly addictive. They’re perfect for dunking, for sharing, or for simply savoring one (or five!) by yourself with a cup of tea or coffee.
Why you’ll love this recipe?
Honestly, there are so many reasons why I’ve kept this gingersnap cookie recipe close to my heart for so long. First and foremost, the flavor is just out of this world. It’s that perfect balance of warm spices – ginger, cinnamon, cloves – with the deep, caramel-like sweetness of molasses. It’s complex and comforting all at once. Unlike some spice cookies that can taste a bit one-dimensional, these gingersnaps have a depth that just keeps you coming back for more. And then there’s the texture! This recipe is designed to give you that ideal contrast: a slightly crisp edge that gives way to a wonderfully soft, chewy center. It’s pure cookie perfection. What I also love is how surprisingly simple they are to make. Even if you’re not an experienced baker, you can absolutely nail these. The dough comes together relatively quickly, and the rolling and baking process is straightforward. Plus, the ingredients are all pantry staples, making these a budget-friendly treat that doesn’t skimp on flavor or quality. They’re also incredibly versatile. While they are phenomenal on their own, they’re also fantastic as a base for ice cream sandwiches or even crushed as a Pie Crust. My kids devour them, my husband sneaks them from the cookie jar constantly, and they’re always the first to go at any potluck or holiday gathering. They just have that universal appeal that makes everyone happy. This recipe is a true lifesaver when I need a batch of impressive cookies without a fuss.
How do you make gingersnap cookies?
Quick Overview
Making these incredible gingersnap cookies is a straightforward process that starts with creaming butter and sugar, adding molasses and eggs, and then combining with our perfectly spiced dry ingredients. We’ll chill the dough briefly to make it easier to handle, roll them into balls, coat them in sugar, and then bake them until they’re beautifully cracked and golden. The key is not to overbake them, ensuring that chewy center we all adore. It’s a simple method that yields spectacular results, perfect for beginners and seasoned bakers alike.
Ingredients
For the Main Cookie Dough: For the Main Cookie Dough: For the
Here’s what you’ll need to get started. I always try to use good quality butter for the best flavor – it really does make a difference! For the molasses, look for unsulphured molasses; it has a richer, less harsh flavor that’s perfect for baking. Don’t skimp on the spices either; fresh spices are key to that vibrant flavor.
- 2 ¼ cups all-purpose flour
- 2 teaspoons ground ginger
- 1 teaspoon ground cinnamon
- ½ teaspoon ground cloves
- ½ teaspoon baking soda
- ¼ teaspoon salt
- 1 cup (2 sticks) unsalted butter, softened
- ¾ cup granulated sugar, plus more for rolling
- ¾ cup unsulphured molasses
- 1 large egg
- 1 teaspoon vanilla extract
Step-by-Step Instructions
Step 1: Preheat & Prep Pan
First things first, let’s get our oven ready. Preheat your oven to 375°F (190°C). While that’s heating up, line your baking sheets with parchment paper. This is a lifesaver for easy cleanup and prevents your cookies from sticking. I always make sure my baking sheets are cool before I put the dough on them, so if you’ve used them recently, give them a quick rinse and dry or just grab a fresh one.
Step 2: Mix Dry Ingredients
In a medium bowl, whisk together the flour, ground ginger, cinnamon, cloves, baking soda, and salt. Give it a good whisk to make sure all those lovely spices are evenly distributed. This step is important for ensuring consistent flavor in every single cookie. You don’t want one bite to be super gingery and another to be bland, right?
Step 3: Mix Wet Ingredients
In a large bowl, cream together the softened butter and granulated sugar until light and fluffy. This usually takes about 3-5 minutes with an electric mixer. Then, beat in the molasses until well combined. It will look a little dark and syrupy, that’s exactly what we want! Next, beat in the egg and vanilla extract until everything is smooth and homogenous. Make sure you scrape down the sides of the bowl a couple of times to get everything incorporated.
Step 4: Combine
Gradually add the dry ingredients to the wet ingredients, mixing on low speed until just combined. Be careful not to overmix! Overmixing can lead to tough cookies, and we definitely don’t want that. Stop mixing as soon as you no longer see streaks of dry flour. The dough will be quite soft and sticky at this point, which is totally normal.
Step 5: Prepare Filling
This recipe doesn’t really have a separate “filling” in the traditional sense, as the flavor comes from the dough itself. However, we’ll be rolling the cookie dough balls in granulated sugar before baking, which creates that beautiful, crackly exterior and adds an extra touch of sweetness and texture. So, make sure you have about ½ cup of granulated sugar in a shallow dish ready to go for this step.
Step 6: Shape & Roll
Now for the fun part! I like to use a cookie scoop for consistent size, but about 1 to 1.5 tablespoons of dough per cookie works perfectly. Roll the dough into balls, then roll each ball generously in the granulated sugar. Place the sugar-coated balls about 2 inches apart on your prepared baking sheets. They will spread quite a bit.
Step 7: Bake
Bake for 9 to 12 minutes, or until the edges are set and the centers look slightly soft. You want them to be slightly underbaked in the middle if you prefer that chewy texture that so many of us love in a gingersnap. Keep a close eye on them, as ovens can vary. They’ll continue to bake a bit on the hot baking sheet after you take them out.
Step 8: Cool & Glaze
Let the cookies cool on the baking sheets for about 5 minutes before transferring them to a wire rack to cool completely. These cookies are best enjoyed at room temperature. If you like, you can drizzle them with a simple vanilla glaze once cooled, though honestly, they’re so flavorful on their own, they don’t really need it!
Step 9: Slice & Serve
Once completely cooled, your delicious gingersnap cookies are ready to be enjoyed! They are perfect for dunking in a glass of cold milk or a warm mug of coffee. The scent alone will have people flocking to the kitchen, so be prepared for them to disappear quickly!
What to Serve It With
These gingersnap cookies are wonderfully versatile and pair beautifully with a range of beverages and occasions. For a cozy breakfast, they’re divine alongside a steaming mug of dark roast coffee or a creamy chai latte. The warmth of the spices complements the morning brew perfectly. For a more leisurely brunch, I love serving them with a platter of fresh fruit and maybe some yogurt parfaits; they add a sophisticated, spiced element to the spread. As a dessert, they are simply unbeatable. Imagine serving them alongside a scoop of vanilla bean ice cream, or as part of a dessert board with some sharp cheddar cheese and apple slices – the sweet and spicy notes are amazing with cheese! And for those late-night cravings or afternoon pick-me-ups, they are the ultimate comfort food. A tall glass of cold milk is a classic pairing, but I also find they’re surprisingly good with a hot toddy or even a mulled wine during the colder months. My personal family tradition is to have them with hot apple cider on a chilly autumn evening. It’s pure bliss!
Top Tips for Perfecting Your Gingersnap Cookies
I’ve made countless batches of these gingersnap cookies over the years, and I’ve picked up a few tricks that I think really elevate them from good to truly spectacular. First, when it comes to the molasses, make sure it’s fresh and not crystallized. Older molasses can sometimes affect the texture and flavor. Also, don’t be tempted to add more flour than the recipe calls for, even if the dough seems a bit soft when you mix it. It’s meant to be a slightly sticky dough. The chilling step (which I sometimes skip if I’m in a rush, but it does help!) makes it much easier to handle, and remember, they spread when they bake. Speaking of chilling, if your dough is very soft, pop it in the fridge for about 15-30 minutes before rolling; it makes all the difference. For that signature crinkled top, don’t overmix the dough, and definitely don’t overbake. Pull them out when the edges are just set and the center still looks a little soft. They’ll firm up as they cool. This is the secret to that chewy center! If you prefer a crunchier cookie, bake them for another minute or two. For spice variations, feel free to play around! Some people add a pinch of cardamom or even a tiny bit of black pepper for an extra kick. I’ve also found that using light brown sugar instead of granulated sugar in the dough can add an extra layer of caramel-like depth. And for rolling, don’t be shy with the sugar! That sugary coating is what gives them their beautiful sparkle and crackle. If your cookies seem to be browning too quickly on the bottom, you can always place a baking sheet on the rack below your main baking sheet to shield the heat. Trust me, these little adjustments make a world of difference!
Storing and Reheating Tips
Keeping these gingersnap cookies fresh is super important because, let’s be honest, you’ll want to enjoy them for as long as possible! At room temperature, they’re best stored in an airtight container. If they’re properly stored, they’ll stay wonderfully chewy and delicious for about 4-5 days. I usually place a piece of parchment paper between layers if I’m stacking them, just to prevent them from sticking together. If you’ve baked a huge batch and know you won’t get through them all in a week, freezing is a fantastic option. You can freeze them baked or unbaked. For baked cookies, let them cool completely, then wrap them tightly in plastic wrap, followed by a layer of aluminum foil or place them in a freezer-safe bag. They’ll keep their quality for up to 3 months. To reheat, just let them thaw at room temperature for about 30 minutes, or pop them in a warm oven (around 300°F or 150°C) for a few minutes to bring back that fresh-baked warmth and texture. If you’re freezing the dough balls before baking, roll them in sugar, place them on a baking sheet lined with parchment paper, freeze until solid, then transfer them to a freezer bag. You can bake them directly from frozen; just add a minute or two to the baking time. For the glaze, it’s best to add it right before serving if you plan on storing the cookies. Glazed cookies don’t tend to keep as long at room temperature and can get a bit sticky in the fridge.
Frequently Asked Questions
Final Thoughts
So there you have it – my beloved family recipe for gingersnap cookies. I truly hope you give these a try. They’re more than just a recipe to me; they’re a connection to my past, a taste of tradition, and a guaranteed way to bring smiles to faces. That perfect blend of spice, the satisfying chew, and the hint of crunch… it’s just magical. If you love warming, comforting flavors, and cookies that pack a punch, these gingersnap cookies are absolutely for you. They’re the kind of treat that makes a rainy afternoon feel cozy and a holiday gathering feel extra special. Don’t be afraid to experiment with the spice levels or to try them with a good quality dark chocolate drizzle – I’d love to hear how you customize them! If you do make them, please let me know how they turn out in the comments below, or share a photo on social media and tag me! Happy baking, and may your homes be filled with the wonderful aroma of these spiced delights!
Gingersnap Cookies
Ingredients
Main Ingredients
- 0.5 cup Unsalted Butter softened
- 0.75 cup Granulated Sugar
- 0.5 cup Molasses
- 1 large Egg
- 2 cups All-Purpose Flour
- 1 teaspoon Baking Soda
- 0.5 teaspoon Ground Ginger
- 0.25 teaspoon Ground Cinnamon
- 0.25 teaspoon Ground Cloves
- 0.125 teaspoon Salt
- 0.125 cup Granulated Sugar for rolling
Instructions
Preparation Steps
- In a large bowl, cream together the softened butter and 0.75 cup of granulated sugar until light and fluffy.
- Beat in the molasses and the egg until well combined.
- In a separate bowl, whisk together the flour, baking soda, ground ginger, cinnamon, cloves, and salt.
- Gradually add the dry ingredients to the wet ingredients, mixing until just combined. The dough will be sticky.
- Cover the dough and refrigerate for at least 2 hours, or until firm enough to roll.
- Preheat your oven to 350°F (175°C). Line baking sheets with parchment paper.
- Place the remaining 0.125 cup of granulated sugar in a shallow dish. Roll spoonfuls of dough into balls and then roll the balls in the sugar.
- Place the sugared dough balls about 2 inches apart on the prepared baking sheets.
- Bake for 9-10 minutes, or until the edges are golden brown and the centers are still slightly soft.
- Let the cookies cool on the baking sheets for a few minutes before transferring them to a wire rack to cool completely.