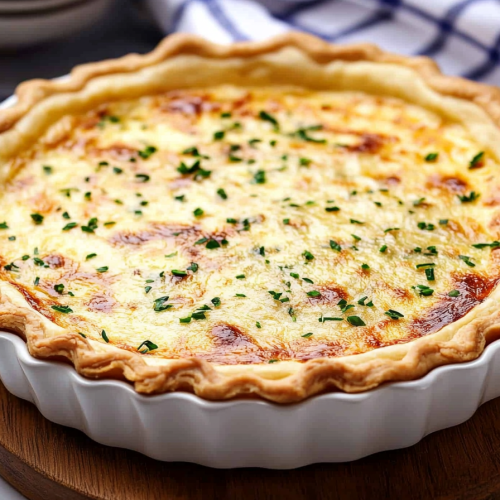
You know, there are some recipes that just feel like home, like a warm hug on a chilly evening. This classic Quiche Recipe is exactly that for me. It’s the one I pull out when I need something comforting yet elegant, something that feels special enough for guests but is surprisingly simple for a busy Tuesday. I remember my grandma making a similar quiche when I was little, and the smell wafting from her kitchen was pure magic. It wasn’t overly complicated, but it had this depth of flavor that just made you close your eyes and savor every bite. If you’ve ever felt intimidated by quiche, thinking it’s some fancy French technique, let me tell you, this is the recipe that will change your mind. It’s so much more approachable than a lot of other delicate pastries, and the results are consistently, unbelievably delicious. It’s my go-to for brunch, a light supper, or even a decadent breakfast. It’s truly the queen of versatile dishes!
What is a classic Quiche?
So, what exactly is this wonderful dish we call classic quiche? At its heart, a quiche is a savory tart. Think of it as a flaky, buttery pastry crust filled with a rich, creamy custard made from eggs and milk or cream, studded with delicious things like cheese, vegetables, and sometimes meat. The “classic” part usually refers to a more traditional combination, often something like ham and cheese, or maybe just a beautiful, simple cheese quiche. It’s not usually loaded down with a million ingredients; instead, it focuses on letting a few quality components shine. The name “quiche” actually comes from the German word “Kuchen,” meaning cake, which is pretty fitting because it’s wonderfully rich and satisfying. It’s essentially a vehicle for pure deliciousness, a canvas for whatever flavorful additions you dream up, all wrapped up in a golden, baked embrace.
Why you’ll love this recipe?
Honestly, there are so many reasons why this classic quiche recipe has earned a permanent spot in my recipe binder. First and foremost, the flavor is just *sublime*. That creamy, eggy custard combined with the savory filling and the buttery crust is a match made in heaven. It’s rich without being heavy, and perfectly seasoned. Then there’s the simplicity. I know, I know, pastry can sound daunting, but the crust for this quiche is remarkably forgiving, and the filling comes together in a flash. It’s a lifesaver on those nights when you’re short on time but still want to serve something impressive. And let’s talk about cost-effectiveness! Eggs, cheese, a few veggies – these are all pretty budget-friendly staples, making this a fantastic way to create a satisfying meal without breaking the bank. Plus, its versatility is just astounding. You can serve this for a leisurely Sunday brunch with fresh fruit, as a light lunch with a side salad, or even as an elegant appetizer. It’s one of those dishes that just makes everyone happy. What I love most about this particular recipe is how perfectly balanced it is; it’s not too eggy, not too dense, and the crust always turns out beautifully golden and flaky. It truly stands out from the crowd.
How do I make a Quiche?
Quick Overview
The process for this classic quiche recipe is wonderfully straightforward. You’ll prepare a simple, no-fuss pastry dough, blind-bake it until it’s golden and crisp, then fill it with your chosen savory additions and a luscious egg-and-cream mixture. Bake it until it’s puffed and set, let it cool slightly, and then slice into pure deliciousness. It’s a methodical process, but each step is designed to build flavor and texture, resulting in a quiche that’s both beautiful and incredibly satisfying. Don’t let the idea of blind-baking scare you; it’s a simple step that guarantees a perfectly cooked crust every time!
Ingredients
For the Pastry Crust: What is the recipe?
You’ll need about 1 ½ cups of all-purpose flour – I always sift mine to ensure it’s light and airy. A pinch of salt, of course, for flavor. Then, about ½ cup of very cold unsalted butter, cut into small cubes. The key here is *cold* butter; it creates those flaky layers we all love. I sometimes even pop my flour and butter into the freezer for about 15 minutes before I start. And finally, about 4-6 tablespoons of ice-cold water. It’s crucial that the water is ice-cold to keep the butter solid.
For the Filling:
This is where you can get creative! For a classic quiche Lorraine-style, I love using about 4 ounces of cooked, crumbled bacon or diced ham. About 1 cup of shredded cheese is perfect – Gruyère is traditional and melts beautifully, but a good sharp cheddar or a blend works wonders too. If you prefer a vegetable-forward quiche, about 1 cup of sautéed vegetables like mushrooms, spinach (well-drained!), or finely diced onions and bell peppers are fantastic. Just make sure any vegetables are cooked and excess moisture is removed.
For the Custard:
This is the creamy heart of the quiche. You’ll need 3 large eggs, plus 1 egg yolk for extra richness. Then, 1 ½ cups of heavy cream. Now, here’s a little tip: I’ve experimented with half-and-half, and while it works, it’s not quite as decadent. For a slightly lighter version, you can use milk, but it might not set as firmly. A pinch of salt and freshly ground Black Pepper to season, and a tiny pinch of nutmeg – it really makes a difference in enhancing the egg flavor without making it taste like nutmeg!
Step-by-Step Instructions
Step 1: Preheat & Prep Pan
First things first, preheat your oven to 375 degrees Fahrenheit (190 degrees Celsius). Get a 9-inch pie plate or tart pan ready. If you’re using a regular pie plate, a good spray of cooking oil or a rub of butter will prevent sticking. I always like to have everything prepped and ready to go before I start mixing the dough, just makes the whole process smoother!
Step 2: Mix Dry Ingredients
In a medium bowl, whisk together the flour and salt. Add the cold butter cubes. Now, using a pastry blender, your fingertips, or a food processor (pulse gently!), cut the butter into the flour until it resembles coarse crumbs with some pea-sized pieces of butter still visible. These little pockets of butter are what make the crust flaky. Don’t overwork it!
Step 3: Mix Wet Ingredients
In a small bowl, whisk together the eggs and egg yolk until well combined. Gradually whisk in the heavy cream, salt, pepper, and nutmeg until everything is incorporated. This custard mixture should look smooth and pale yellow.
Step 4: Combine
Gradually add the ice-cold water, one tablespoon at a time, to the flour-butter mixture, mixing until the dough just starts to come together. Be careful not to add too much water. You want a cohesive dough that holds together when you gently squeeze it. Turn the dough out onto a lightly floured surface and gently bring it together into a disc. Wrap it in plastic wrap and chill in the refrigerator for at least 30 minutes. This resting period is important; it relaxes the gluten and makes the dough easier to roll out.
Step 5: Prepare Filling
While the dough chills, prepare your filling. If you’re using bacon or ham, make sure it’s cooked and drained of excess grease. If using vegetables, sauté them until tender and squeeze out any excess moisture. Shred your cheese. It’s best to have all your filling components ready to go before you start assembling the quiche.
Step 6: Layer & Swirl
Once the dough has chilled, lightly flour your work surface and roll out the dough into a 12-inch circle. Carefully transfer the dough to your pie plate, pressing it gently into the bottom and up the sides. Trim any excess dough, leaving about a ½-inch overhang, then crimp the edges decoratively. Now, here comes the part that makes it look extra special: blind-baking the crust. Line the pastry shell with parchment paper and fill it with pie weights, dried beans, or rice. Bake for about 15-20 minutes, or until the edges are lightly golden. Remove the parchment paper and weights, and bake for another 5-7 minutes until the bottom is dry and lightly golden. This step prevents a soggy bottom! Once blind-baked, spread your prepared filling ingredients evenly over the bottom of the crust. Then, carefully pour the custard mixture over the filling. Gently nudge any ingredients to ensure they are somewhat distributed.
Step 7: Bake
Carefully place the pie plate on a baking sheet (this catches any potential drips and makes it easier to get in and out of the oven). Bake for 35-45 minutes, or until the center is just set and the top is golden brown. You can test for doneness by gently jiggling the pie plate; the center should be mostly firm with just a slight wobble. If the crust edges start to brown too much, you can loosely tent them with foil.
Step 8: Cool & Glaze
This is perhaps the hardest part: letting it cool! Let the quiche cool on a wire rack for at least 10-15 minutes before slicing. This allows the custard to fully set. If you were planning on a glaze (though this recipe doesn’t strictly require one, some people love a drizzle of a balsamic glaze or a light herb crème fraîche), now would be the time to add it. I usually wait until it’s served to add any extra drizzle, just so it doesn’t get soggy.
Step 9: Slice & Serve
Using a sharp knife, slice the quiche into wedges. Serve it warm or at room temperature. The texture should be creamy and tender, with a perfect golden crust. It’s a beautifully balanced dish that’s a joy to eat.
What to Serve It With
This classic quiche recipe is so wonderfully versatile, it truly pairs well with almost anything! For a simple, satisfying breakfast, I love serving it with a steaming cup of my favorite coffee and a small side of fresh berries. The sweetness of the berries is a lovely contrast to the savory quiche. If you’re aiming for a more elaborate brunch, this is the star! I’ll often serve it alongside a fresh green salad tossed with a light vinaigrette, some crusty bread, and maybe a mimosa or a sparkling cider. It looks so elegant on the table. For a lighter supper, a generous portion of quiche alongside a hearty mixed green salad with some roasted vegetables or a creamy tomato soup is absolute perfection. My kids even enjoy it as a substantial snack, especially when it’s still slightly warm from the oven. Sometimes, I’ll whip up a quick side of sautéed asparagus or some crispy roasted potatoes to round out the meal. The possibilities are truly endless, and it’s always a crowd-pleaser!
Top Tips for Perfecting Your Classic Quiche
Over the years, I’ve picked up a few tricks that I think really elevate this classic quiche recipe. When it comes to the pastry, remember that cold is key! If your kitchen is warm, don’t hesitate to pop your butter and flour in the freezer for a bit before you start. This ensures those beautiful flaky layers. And when you’re adding water to the dough, be conservative; you can always add more, but you can’t take it away, and too much water makes a tough crust. For the filling, moisture is the enemy of a good quiche. If you’re using vegetables like spinach or mushrooms, make sure they are thoroughly drained and even patted dry. Soggy vegetables will make your quiche watery. When it comes to the custard, don’t over-whisk it once you’ve added the cream. A gentle whisk is all you need to combine; over-whisking can incorporate too much air, which can lead to a less smooth texture. My absolute favorite tip for preventing a soggy bottom is thorough blind-baking. Really give that crust a good crisp before adding the filling; it’s a game-changer! I’ve learned this the hard way after a few sadly soggy crusts in my younger baking days. Also, don’t be afraid to season your custard well. Salt, pepper, and that hint of nutmeg really do make a difference. For ingredient swaps, if you don’t have heavy cream, a good quality half-and-half works, but it will be a bit less rich. You can also try a blend of whole milk and a little bit of crème fraîche for a lovely tang. And remember, ovens can vary! Keep an eye on your quiche during the last 10-15 minutes of baking. If the center is still too jiggly but the crust is browning too quickly, tenting the edges with foil is your best friend. It’s all about observing and adapting!
Storing and Reheating Tips
This classic quiche recipe is pretty forgiving when it comes to storage, which is another reason I love it so much. Once it has cooled completely, you can store leftover quiche at room temperature for up to two hours. After that, it’s best to get it into the refrigerator. I usually store it in its pie plate, loosely covered with plastic wrap or aluminum foil. It will keep well in the fridge for about 3-4 days. The crust might soften slightly, but it’s still delicious. If you know you’ll have a lot of leftovers, or you want to make it ahead for a special occasion, freezing is a great option. Let the quiche cool completely, then wrap it tightly in plastic wrap, followed by a layer of aluminum foil, or place it in an airtight container. It can be frozen for up to 2-3 months. To reheat, the best method is often in a moderate oven. If it’s refrigerated, warm it in a 300-325 degree Fahrenheit (150-160 degree Celsius) oven for about 15-20 minutes, or until heated through. For a frozen quiche, it’s best to thaw it overnight in the refrigerator first, then reheat as described. You can also reheat individual slices in a toaster oven or even carefully in a microwave on low power, though the crust might lose some of its crispness. For refrigerator storage, I usually add any fresh herbs or a drizzle of crème fraîche *after* reheating, just to keep them vibrant.
Frequently Asked Questions
Final Thoughts
I really hope you give this classic quiche recipe a try. It’s more than just a meal; it’s a little piece of comfort and joy that you can create in your own kitchen. It’s the kind of dish that brings people together, sparking conversation and creating warm memories. Whether you’re a seasoned baker or just starting out, this recipe is designed to be approachable and rewarding. The perfect balance of flaky crust and creamy filling, infused with your favorite savory ingredients, is truly something special. If you love this recipe, you might also enjoy my recipe for [Link to another relevant recipe, e.g., Savory Tart with Caramelized Onions] or my [Link to another relevant recipe, e.g., Easy Broccoli Cheddar Soup] as they complement quiche beautifully. I can’t wait to hear how yours turns out! Please feel free to share your own variations or any questions you might have in the comments below. Happy baking!
Classic Quiche Lorraine Recipe
Ingredients
Crust
- 1.5 cups all-purpose flour
- 0.5 teaspoon salt
- 0.5 cup cold unsalted butter, cubed
- 0.25 cup ice water
Filling
- 6 ounces bacon, cooked and crumbled
- 1 cup shredded Gruyère cheese
- 3 large eggs
- 1.5 cups heavy cream
- 0.5 teaspoon salt
- 0.25 teaspoon black pepper
- 0.125 teaspoon nutmeg, freshly grated
Instructions
Preparation Steps
- For the crust: In a food processor, pulse together flour and salt. Add cold butter and pulse until the mixture resembles coarse meal. Gradually add ice water, pulsing until the dough just comes together. Flatten into a disc, wrap in plastic, and refrigerate for at least 30 minutes.
- Preheat oven to 375°F (190°C). On a lightly floured surface, roll out the dough to fit a 9-inch pie plate. Press the dough into the plate, trim and crimp the edges. Prick the bottom with a fork. Line with parchment paper and fill with pie weights or dried beans.
- Bake the crust for 15 minutes. Remove parchment paper and weights, and bake for another 5 minutes until lightly golden. Set aside.
- For the filling: In a medium bowl, whisk together eggs, heavy cream, salt, pepper, and nutmeg.
- Scatter the cooked bacon and Gruyère cheese evenly over the bottom of the pre-baked crust.
- Pour the egg mixture over the bacon and cheese.
- Bake for 30-35 minutes, or until the center is set and the top is golden brown. Let cool slightly before slicing and serving.