Okay, friend, pull up a chair and let’s chat about something truly special. You know how sometimes you just crave that comforting hug of warm, spiced bread, but you’re either trying to keep it gluten-free or just want something that feels a little decadent without being *too* much work? Well, this Cinnamon Swirl Gluten-Free Bread is my answer to that craving, and honestly, it’s become a staple in my kitchen. I’ve lost count of the times I’ve whipped this up for unexpected guests or just because the scent of cinnamon and sugar started wafting from my oven. It’s got that perfect tender crumb, a delightful sweetness that’s not overwhelming, and that gorgeous cinnamon swirl that just screams comfort. It’s got all the heart of a classic quick bread, but without any of the gluten drama. Seriously, my picky eaters don’t even bat an eye – they just ask for seconds!
What is Cinnamon Swirl gluten free bread?
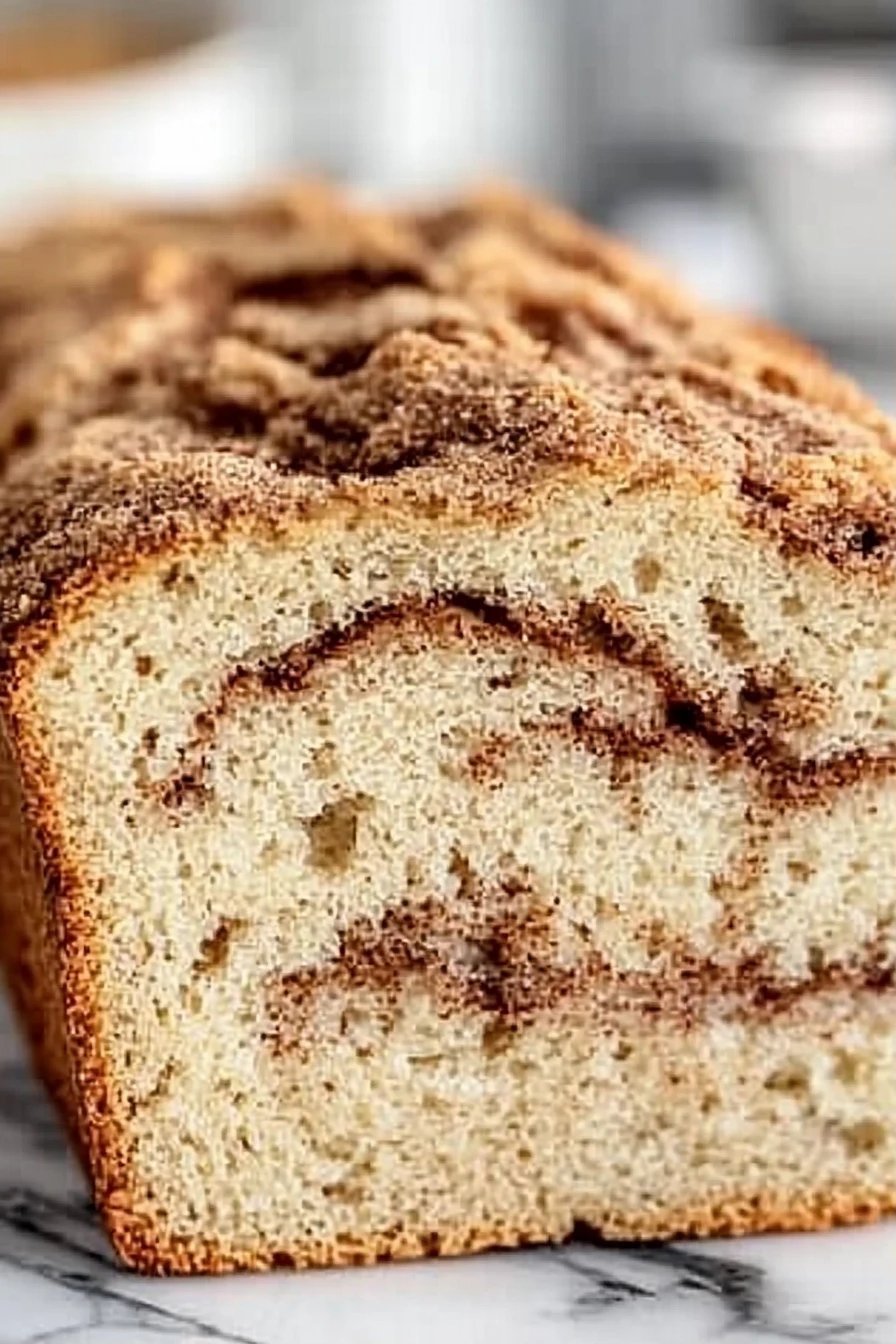
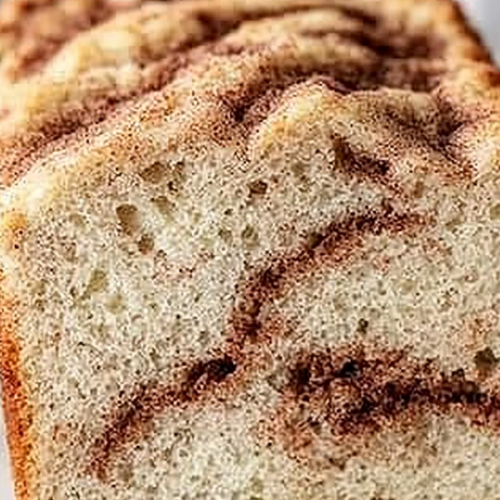
So, what exactly is this magical loaf? Think of it as your favorite cinnamon-swirl quick bread, but meticulously crafted to be completely gluten-free. It’s not a yeasted bread, so no waiting around for dough to rise – that’s a huge win in my book! It’s made with a blend of gluten-free flours that give it a fantastic texture, and the star of the show, of course, is that irresistible ribbon of spiced cinnamon-sugar running all the way through. It’s essentially a hug in bread form, perfect for breakfast, brunch, a snack, or even a light dessert. The name itself says it all: it’s a wonderfully moist and flavorful gluten-free bread, generously swirled with cinnamon, bringing pure joy to every slice.
Why you’ll love this recipe?
Oh, where do I even begin with why you’ll absolutely adore this Cinnamon Swirl Gluten-Free Bread? Let’s break it down. First off, the **flavor** is just out of this world. That warm, spicy cinnamon paired with the tender, slightly sweet bread is pure bliss. It’s the kind of aroma that fills your entire home and makes everyone gather in the kitchen, noses twitching. And the **simplicity**! I know, I know, “gluten-free” can sometimes sound intimidating, but trust me, this is one of the most straightforward quick breads you’ll ever make. No fancy techniques, no hard-to-find ingredients – just simple steps that lead to an incredible result. I’ve had friends who are intimidated by gluten-free baking try this, and they were shocked at how easy it was. It’s also surprisingly **cost-efficient**, especially if you’re already keeping gluten-free flours on hand. Compared to fancy gluten-free store-bought loaves, this homemade version is a fraction of the price and tastes a million times better. And let’s talk **versatility**! This bread is a chameleon. It’s fantastic on its own, toasted with a smear of butter, or even served warm with a dollop of whipped cream. It’s the perfect companion to a cup of coffee in the morning, a delightful addition to a brunch spread, or even a comforting treat with a glass of milk after dinner. What I love most about this is that it truly tastes like “regular” bread. There’s no compromise on texture or flavor, which is something I always strive for when developing gluten-free recipes. It’s a lifesaver for those moments when you need a delicious baked good that everyone can enjoy.
How do I make gluten-free cinnamon swirl bread?
Quick Overview
This recipe is all about creating a wonderfully moist and tender gluten-free bread with a beautiful cinnamon swirl. You’ll simply whisk together your dry ingredients, then your wet ingredients, combine them gently, prepare a simple cinnamon-sugar filling, layer it all into a loaf pan, and bake until golden and fragrant. The magic happens with the swirling technique, which infuses the bread with that classic cinnamon goodness. It’s designed to be foolproof, even if you’re new to gluten-free baking!
Ingredients
For the Main Batter:
You’ll need a good gluten-free all-purpose flour blend. I highly recommend one that contains xanthan gum, as it helps with structure and binding in gluten-free baking. If your blend doesn’t have it, you’ll want to add about 1 teaspoon. Make sure your flours are fresh! Old flour can lead to a dense, sad loaf. You’ll also need granulated sugar for sweetness, baking powder and baking soda for lift, a pinch of salt to enhance all those flavors, and a touch of ground cinnamon in the batter itself to build that cinnamon foundation. For the wet ingredients, we’ll use eggs for richness and binding, melted butter (or a neutral oil like vegetable or canola oil for a slightly lighter result), milk – I’ve tested this with almond milk and it actually made it even creamier! – and a splash of vanilla extract to round out the flavors. A touch of apple cider vinegar or lemon juice also helps activate the baking soda and tenderize the crumb.
For the Filling:
This is where the real magic happens! You’ll need brown sugar (light or dark works great, dark gives a richer molasses flavor), ground cinnamon (don’t be shy here!), and a little bit of melted butter or coconut oil to help it bind and spread. Some people like to add a pinch of nutmeg or even a tiny bit of allspice to the filling for extra warmth, but I usually keep it simple with just cinnamon and brown sugar for that classic taste. The key is to have a paste-like consistency that’s spreadable but not runny.
For the Glaze:
A simple glaze takes this bread over the top. All you need is powdered sugar and a little liquid – milk, a dairy-free alternative, or even a bit of water. You want it thick enough to coat the bread but still pourable. A tiny splash of vanilla extract in the glaze is always a good idea! Some people also like to add a pinch of cinnamon to the glaze, which I totally endorse for extra cinnamon love!
Step-by-Step Instructions
Step 1: Preheat & Prep Pan
First things first, let’s get the oven preheated to 350°F (175°C). This ensures your bread bakes evenly from the get-go. While the oven is heating, grease and flour a standard 9×5 inch loaf pan. I like to use a little extra butter or cooking spray, and then dust it with some of your gluten-free flour blend. You can even line it with parchment paper, leaving some overhang on the sides – this makes lifting the baked loaf out SO much easier. I’ve learned this trick the hard way after struggling to get loaves out of the pan!
Step 2: Mix Dry Ingredients
In a large bowl, whisk together your gluten-free flour blend, granulated sugar, baking powder, baking soda, salt, and the 1/2 teaspoon of cinnamon for the batter. Whisking is key here, not just for combining, but for aerating the flour, which helps create a lighter texture. Make sure there are no lumps, especially from the baking soda and powder.
Step 3: Mix Wet Ingredients
In a separate medium bowl, whisk together the eggs, melted butter (make sure it’s cooled slightly so it doesn’t cook the eggs!), milk, vanilla extract, and apple cider vinegar. Whisk until everything is well combined and smooth.
Step 4: Combine
Pour the wet ingredients into the bowl with the dry ingredients. Now, this is important: mix *just* until combined. Overmixing gluten-free batters can make them tough, so stop as soon as you don’t see any dry streaks of flour. A few small lumps are perfectly fine. The batter will be thick, kind of like a very thick pancake batter.
Step 5: Prepare Filling
In a small bowl, combine the brown sugar and cinnamon for the filling. Add the melted butter or coconut oil, and stir until it forms a thick, spreadable paste. If it’s too dry, add a tiny bit more melted butter; if it’s too wet, a little more brown sugar. You want it to be easy to spread without running everywhere.
Step 6: Layer & Swirl
Pour about half of the batter into your prepared loaf pan and spread it evenly. Dollop about half of the cinnamon filling over the batter. You can gently spread it a little with an offset spatula or the back of a spoon. Now, pour the remaining batter over the filling, and then dollop the rest of the filling on top. Here comes the fun part: take a knife or a skewer and gently swirl the filling through the batter. Don’t over-swirl, or you’ll just mix it all together. You want distinct swirls! Aim for 2-3 passes through the batter. You should see beautiful cinnamon ribbons forming.
Step 7: Bake
Place the loaf pan in the preheated oven. Bake for 50-65 minutes, or until a wooden skewer or toothpick inserted into the center comes out clean. The top should be golden brown and a lovely aroma should fill your kitchen. If the top starts browning too quickly, you can loosely tent it with aluminum foil for the last 15-20 minutes of baking. Ovens can be finicky, so keep an eye on it!
Step 8: Cool & Glaze
Once baked, let the bread cool in the pan for about 10-15 minutes. This is crucial for it to set up properly. Then, carefully invert it onto a wire rack to cool completely. Resist the urge to glaze it while it’s hot – the glaze will melt right off! Once the bread is completely cool, whisk together the powdered sugar and your chosen liquid for the glaze until smooth. If it’s too thick, add a tiny bit more liquid; if it’s too thin, add more powdered sugar. Drizzle or spread the glaze over the top of the cooled bread. Let the glaze set for about 15-30 minutes before slicing.
Step 9: Slice & Serve
Once the glaze has set, use a serrated knife to slice the bread. This makes for clean cuts, especially with a tender loaf. Serve at room temperature for the best texture and flavor. It’s utterly divine on its own!
What to Serve It With
This Cinnamon Swirl Gluten-Free Bread is so versatile, it fits into almost any meal or craving! For **Breakfast**, it’s a dream. Forget boring toast; this is a treat! Serve a thick slice alongside your morning coffee or tea. I love it lightly toasted, maybe with a whisper of butter. For **Brunch**, it adds a touch of elegance without any fuss. Arrange slices on a platter with fresh berries and maybe a small bowl of Greek yogurt for dipping. It pairs beautifully with other brunch favorites like scrambled eggs or a fruit salad. When I’m feeling a bit indulgent and want something for **Dessert**, this bread shines. Serve a warm slice with a scoop of vanilla bean Ice Cream or a drizzle of caramel sauce. It’s surprisingly satisfying and feels like a real treat. And for those **Cozy Snacks** on a rainy afternoon or when you just need a little pick-me-up, a simple slice with a glass of cold milk is pure comfort. My kids ask for this all the time when they get home from school – it’s always a hit and a much healthier alternative to processed snacks!
Top Tips for Perfecting Your Cinnamon Swirl Gluten-Free Bread
I’ve made this recipe more times than I can count, and over the years, I’ve picked up a few tricks that really make a difference. For the **Zucchini Prep** (oops, I mean the bread batter itself!), while this recipe doesn’t call for zucchini, the principle of not overworking ingredients applies. For the gluten-free flour, always measure it correctly! Spoon the flour into your measuring cup and level it off with a straight edge. Scooping directly from the bag can pack it in, leading to a dense loaf. When it comes to **Mixing Advice**, remember what I said about not overmixing. Gluten-free flours don’t develop gluten like wheat flour, so overmixing won’t make it tough in the same way, but it can still result in a dense texture. Mix until *just* combined; those little lumps are your friends! For **Swirl Customization**, don’t be afraid to play! You can add a pinch of nutmeg or cardamom to the cinnamon filling for a different flavor profile. To get those really defined swirls, try not to overwork the knife when you’re swirling. Just a couple of gentle passes should do it. When considering **Ingredient Swaps**, if you don’t have apples cider vinegar, lemon juice works just as well. For the milk, any dairy or non-dairy milk will do the trick, though I found almond milk gave a lovely creamy texture. As for **Baking Tips**, oven temperatures can vary wildly. If you find your bread is browning too quickly on top but still raw inside, tent it loosely with foil. And always, always do the toothpick test! It’s the most reliable way to know when it’s done. For **Glaze Variations**, if you’re not a fan of powdered sugar glaze, you can dust the cooled loaf with a little extra cinnamon and sugar, or even a light dusting of powdered sugar. Another favorite is a CREAM CHEESE glaze – just whip some cream cheese with a little powdered sugar and milk until smooth.
Storing and Reheating Tips
Proper storage is key to keeping this delicious bread tasting its best. At **Room Temperature**, it’s best to store the bread in an airtight container or well-wrapped in plastic wrap. It should stay fresh for about 2-3 days. If you live in a very humid climate, you might want to refrigerate it sooner. For **Refrigerator Storage**, wrap the loaf tightly in plastic wrap, then place it in an airtight container or a resealable bag. It will keep well for up to a week. When you’re ready to enjoy it, I always recommend letting it come back to room temperature before slicing, or giving it a quick warm-up. **Freezer Instructions** are a lifesaver! You can freeze the whole loaf or individual slices. Wrap the cooled loaf (without the glaze, if possible, or glaze it after thawing) tightly in plastic wrap, then in a layer of aluminum foil, and finally place it in a freezer-safe bag or container. It will keep for up to 2-3 months. To thaw, simply unwrap and let it come to room temperature, or gently warm slices in a toaster oven or microwave. For **Glaze Timing Advice**, if you plan to freeze the bread, it’s best to glaze it *after* thawing. The glaze can sometimes become sticky or weep in the freezer, so it’s worth the wait!
Frequently Asked Questions
Final Thoughts
So there you have it, my friends – my absolute favorite Cinnamon Swirl Gluten-Free Bread. I truly hope you give this recipe a try. It’s the kind of bread that brings smiles, warms the soul, and proves that gluten-free baking can be just as delicious, if not more so, than the traditional version. It’s a testament to how simple ingredients and a little bit of love can create something truly special. If you’re a fan of this recipe, you might also enjoy my [link to another recipe, e.g., Gluten-Free Banana Bread] or my [link to another recipe, e.g., Classic Chocolate Chip Cookies]. Happy baking, and I can’t wait to hear how your Cinnamon Swirl Gluten-Free Bread turns out! Don’t forget to leave a comment and share your own little twists!
Cinnamon Swirl Gluten-Free Bread
Ingredients
Dough Ingredients
- 3.5 cups gluten-free all-purpose flour blend with xanthan gum
- 0.5 cup sugar
- 2 teaspoons baking powder
- 0.5 teaspoon salt
- 1 teaspoon instant yeast
- 1.5 cups warm milk about 105-115°F
- 0.25 cup unsalted butter melted
- 2 large eggs at room temperature
Cinnamon Swirl Filling
- 0.5 cup packed brown sugar
- 2 tablespoons ground cinnamon
- 0.25 cup unsalted butter softened
Instructions
Preparation Steps
- In a large bowl, whisk together the gluten-free flour, sugar, baking powder, salt, and yeast. Make sure the yeast is evenly distributed.
- In a separate bowl, whisk together the warm milk, melted butter, and eggs until well combined.
- Pour the wet ingredients into the dry ingredients and mix with a wooden spoon or stand mixer with a dough hook until a smooth, slightly sticky dough forms. It will be wetter than traditional wheat dough.
- Grease a 9x5 inch loaf pan and set aside. Cover the bowl with plastic wrap and let the dough rise in a warm place for about 1 hour, or until doubled in size.
- While the dough is rising, prepare the cinnamon swirl filling by creaming together the softened butter, brown sugar, and cinnamon until a paste forms.
- Once the dough has risen, punch it down gently. Turn the dough out onto a lightly floured surface and roll it into a rectangle approximately 10x15 inches.
- Spread the cinnamon swirl filling evenly over the rolled-out dough, leaving a small border.
- Starting from one of the long sides, tightly roll up the dough into a log. Pinch the seam to seal.
- Carefully transfer the rolled dough seam-side down into the prepared loaf pan.
- Cover the loaf pan loosely with plastic wrap and let it rise in a warm place for another 30-45 minutes, or until it has risen slightly above the rim of the pan.
- Preheat your oven to 375°F (190°C).
- Bake for 40-50 minutes, or until the bread is golden brown and sounds hollow when tapped on the bottom. If it starts to brown too quickly, loosely tent with foil.
- Let the bread cool in the pan for 10-15 minutes before transferring it to a wire rack to cool completely.