Oh, these Chocolate Peanut Butter bars! If there’s one recipe that gets requested more than any other in my house, it’s this one. Seriously, my kids have a sixth sense for when I’m even thinking about making them, and suddenly the whole family appears in the kitchen, noses twitching. There’s just something so utterly comforting and decadent about the combination of rich, fudgy chocolate and creamy, salty peanut butter, all baked into one perfect bar. It reminds me of my grandmother’s kitchen, where the air always smelled like something delicious was baking. These bars aren’t quite like a brownie, and they’re definitely not like a cookie, but they hit that sweet spot that makes you feel utterly indulged without being overly complicated. They’re truly my secret weapon for when that sweet craving hits hard after dinner, but I don’t have time for a whole production. If you love a good no-bake treat or a simple blondie, you are going to fall head over heels for these chocolate peanut butter bars!
What is chocolate peanut butter?
So, what exactly are these magical chocolate Peanut Butter Bars? Think of them as a delightful hybrid between a rich, moist chocolate cake and a chewy cookie, all swirled with a generous, creamy peanut butter layer. The name itself, “Chocolate Peanut Butter Bars,” is pretty straightforward, but it doesn’t quite capture the sheer joy they bring. The base is a tender, chocolatey cake that’s sturdy enough to hold its shape, but still incredibly soft and slightly fudgy. Then, we have that dreamy, luscious peanut butter swirl that adds a wonderful tang and a salty counterpoint to the sweet chocolate. It’s all topped off with a simple, yet addictive, chocolate glaze. It’s the kind of dessert that feels both nostalgic and completely current, a crowd-pleaser that rarely disappoints. It’s the perfect grab-and-go treat, but sophisticated enough for company, too!
Why you’ll love this recipe?
Honestly, the reasons to love these chocolate Peanut Butter bars are endless, but let me count a few of my favorites! First and foremost, the FLAVOR. Oh my goodness, the flavor! It’s that classic, irresistible pairing of deep chocolate and nutty peanut butter. The base is intensely chocolatey, but not overly sweet, allowing the peanut butter swirl to really shine. And that swirl? It’s practically divine. The TEXTURE is another huge win. You get the soft, almost brownie-like bottom and then the smooth, creamy peanut butter layer, all topped with a delicate chocolate glaze. It’s a symphony of deliciousness in every bite. What I love most, though, is the SIMPLICITY. These bars come together so quickly, and you probably have most of the ingredients in your pantry already. It’s a lifesaver on busy weeknights when you need a treat but have zero energy for complicated baking. Plus, they are incredibly COST-EFFECTIVE. Unlike some fancy desserts, these rely on simple, everyday ingredients, making them super budget-friendly. And let’s talk VERSATILITY! You can easily customize them – add chocolate chips to the base, sprinkle nuts on top of the glaze, or even use different nut butters. They’re perfect for school lunches, potlucks, holidays, or just a Tuesday afternoon pick-me-up. They’re so much easier than making separate chocolate cookies and peanut butter cookies, and you get both flavors in one go!
How do I make chocolate peanut butter bars?
Quick Overview
Making these chocolate peanut butter bars is surprisingly easy. You’ll start by mixing up a simple chocolate Cake Batter, then prepare a creamy peanut butter filling. You’ll layer these two components in your pan, swirl them together for that beautiful marbled effect, and bake until a tester comes out clean. Once cooled, a quick chocolate glaze goes on top, and that’s it! It’s a streamlined process that guarantees delicious results without any fuss. Trust me, it’s far less intimidating than it sounds!
Ingredients
For the Main Batter:
All-Purpose Flour: About 1 and 3/4 cups. I usually just scoop it out of the bag, but for perfect accuracy, spoon it into your measuring cup and level it off with a knife. It prevents the bars from getting too dense.
Granulated Sugar: 1 and 1/2 cups. This gives us that lovely sweetness. You can slightly reduce it if you prefer things less sweet, but I find this amount perfect with the dark chocolate and Peanut Butter.
Unsweetened Cocoa Powder: 1/2 cup. This is where the deep chocolate flavor comes from! I always go for a good quality unsweetened cocoa powder, like Dutch-processed, for the richest color and taste.
Baking Soda: 1 teaspoon. This helps the bars rise and become wonderfully tender.
Salt: 1/2 teaspoon. Don’t skip this! It balances the sweetness and enhances all the other flavors.
Eggs: 2 large. Make sure they’re at room temperature; they incorporate better into the batter.
Vegetable Oil: 1/2 cup. Any neutral-flavored oil works beautifully here, like canola or even melted coconut oil. It keeps the bars incredibly moist.
Buttermilk: 1 cup. This is my secret for extra tenderness! If you don’t have buttermilk, you can easily make your own by adding 1 tablespoon of white vinegar or lemon juice to regular milk and letting it sit for 5 minutes.
Vanilla Extract: 2 teaspoons. Pure vanilla extract adds that classic warmth and depth of flavor.
Hot Water or Hot Coffee: 1/2 cup. This is a fun little trick that blooms the cocoa powder, intensifying the chocolate flavor. Coffee makes it even richer, but hot water works perfectly fine too!
For the Filling:
Creamy Peanut Butter: 1 cup. You can use smooth or crunchy, whatever you prefer! I usually go with smooth because it’s easier to swirl, but crunchy adds a nice texture if you like that. Natural peanut butter can sometimes separate, so give it a good stir before measuring.
Powdered Sugar: 1/2 cup. This sweetens the peanut butter layer and helps give it a lovely, smooth consistency.
Milk or Cream: 2-3 tablespoons. Just enough to make the peanut butter mixture smooth and spreadable. You can use regular milk, almond milk, or even a splash of heavy cream for extra richness.
For the Glaze:
Powdered Sugar: 1 and 1/2 cups. This is the base for our simple glaze.
Unsweetened Cocoa Powder: 1/4 cup. For that delicious chocolatey finish.
Milk or Cream: 3-4 tablespoons. Add just a little at a time until you reach your desired drizzling consistency.
Vanilla Extract: 1 teaspoon. A touch of vanilla adds a lovely aroma and flavor to the glaze.
Step-by-Step Instructions
Step 1: Preheat & Prep Pan
First things first, let’s get our oven ready and our pan prepared. Preheat your oven to 350°F (175°C). Grab a 9×13 inch baking pan. I always like to lightly grease it with butter or cooking spray, and then line it with parchment paper, leaving some overhang on the sides. This makes lifting the bars out so much easier later, preventing any sticky situations! Some people like to lightly flour it after greasing, but parchment paper is my go-to method for guaranteed easy removal.
Step 2: Mix Dry Ingredients
In a large mixing bowl, whisk together the flour, granulated sugar, cocoa powder, baking soda, and salt. Give it a really good whisking – you want everything to be evenly distributed. This ensures no pockets of baking soda or salt, and a uniform texture throughout your bars. It also helps aerate the dry ingredients a bit, which is always a good thing!
Step 3: Mix Wet Ingredients
In a separate medium bowl, whisk together the eggs, vegetable oil, buttermilk, and vanilla extract until they are well combined. Don’t worry if it looks a little lumpy; we’ll get to that.
Step 4: Combine
Now, pour the wet ingredients into the bowl with the dry ingredients. Mix on low speed with an electric mixer (or by hand with a whisk) until just combined. Be careful not to overmix! Overmixing can develop the gluten too much, leading to tougher bars. Once it’s *almost* combined, carefully pour in the hot water or coffee. The batter will be quite thin at this point – don’t panic! This is exactly what you want. Continue mixing on low speed until the batter is smooth. It should be a beautiful, rich chocolate batter. Scrape down the sides of the bowl to make sure everything is incorporated.
Step 5: Prepare Filling
While your batter is resting for a moment, let’s get the peanut butter swirl ready. In a small bowl, combine the creamy peanut butter and the powdered sugar. Add 2 tablespoons of milk or cream. Stir it all together until it forms a thick, smooth paste. If it seems too thick to spread, add another tablespoon of milk or cream, one teaspoon at a time, until it reaches a consistency that’s easy to dollop and swirl. You want it thick enough to hold its shape a bit, but not so stiff that it’s hard to spread.
Step 6: Layer & Swirl
Pour about half of the chocolate batter into your prepared 9×13 inch pan and spread it evenly. Now, dollop spoonfuls of the peanut butter mixture over the chocolate batter. Don’t be shy – use most of it! Then, pour the remaining chocolate batter over the peanut butter layer. Now comes the fun part: the swirl! Take a knife or a skewer and gently swirl the peanut butter and chocolate together. Don’t over-swirl, or you’ll lose the distinct layers. Just a few gentle passes will create a beautiful marbled effect. Aim for figure-eights or sweeping motions. I always do this part with a bit of flair, trying to create a pretty pattern!
Step 7: Bake
Pop the pan into your preheated oven. Bake for 30-35 minutes, or until a wooden skewer or toothpick inserted into the center comes out clean or with a few moist crumbs attached (but no wet batter!). Oven temperatures can vary, so keep an eye on them. If you notice the edges getting too dark before the center is done, you can loosely tent the pan with foil for the last few minutes of baking.
Step 8: Cool & Glaze
Once baked, remove the pan from the oven and let the bars cool completely in the pan on a wire rack. This is crucial! If you try to glaze them while they’re hot, the glaze will just melt and disappear. While they’re cooling, prepare the glaze. In a medium bowl, whisk together the powdered sugar, cocoa powder, and 3 tablespoons of milk or cream. Add the vanilla extract. Stir until smooth. Add more milk, a teaspoon at a time, until you reach a thick but pourable consistency. Once the bars are completely cool, pour the glaze over the top and spread it evenly with an offset spatula or the back of a spoon. Let the glaze set for about 30 minutes before slicing.
Step 9: Slice & Serve
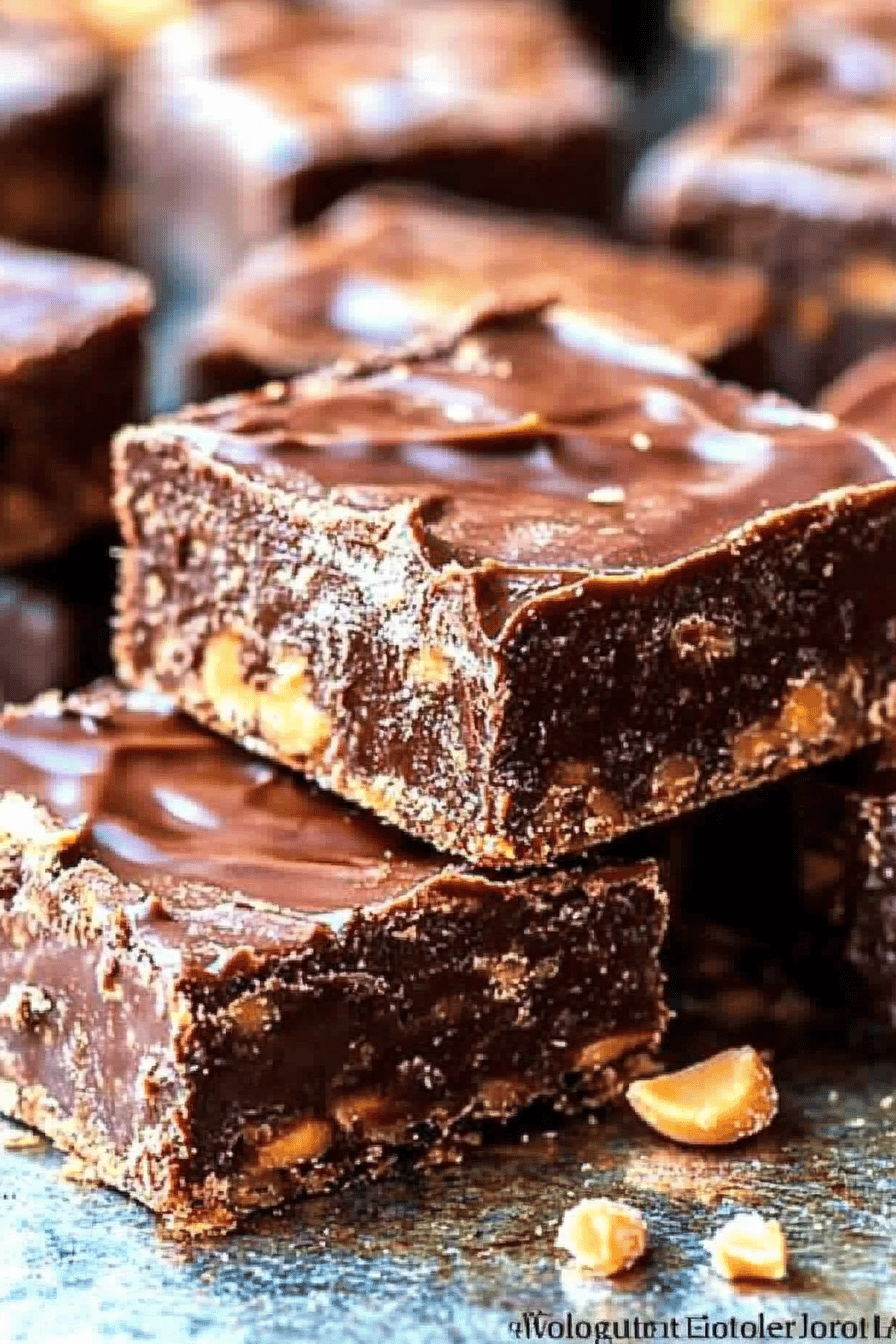
Once the glaze has set, it’s time for the best part! Use the parchment paper overhang to lift the whole slab out of the pan. Place it on a cutting board. For nice, clean slices, I recommend using a sharp knife. Wipe the knife clean between each cut if needed. You can cut them into squares, rectangles – whatever shape your heart desires! Serve them at room temperature for the perfect chewy texture. These are wonderful on their own, or maybe with a cold glass of milk.
What to Serve It With
These chocolate peanut butter bars are so wonderfully versatile, they fit into almost any occasion! For a simple BREAKFAST, they’re a decadent treat alongside a steaming mug of coffee. I sometimes cut them into smaller, bite-sized pieces and serve them with a fruit salad. For a more elegant BRUNCH spread, I’ll arrange them on a tiered stand with other pastries and fresh berries. They also make a fantastic dessert, and I love serving them with a scoop of vanilla bean ice cream or a dollop of whipped cream for an extra layer of indulgence. When I’m just in the mood for a COZY SNACK, they’re perfect on their own with a glass of cold milk, especially on a rainy afternoon. My family tradition is to have one after our Sunday dinner, often with a cup of tea. They also disappear in minutes at kids’ birthday parties, usually served alongside cupcakes and other finger foods. You really can’t go wrong!
Top Tips for Perfecting Your Chocolate Peanut Butter Bars
I’ve made these chocolate peanut butter bars countless times, and over the years, I’ve picked up a few tricks that really help elevate them from good to absolutely phenomenal. First, about the wet ingredients – make sure your eggs and buttermilk are at room temperature. It makes for a smoother, more consistent batter. When mixing the batter, the key is *not* to overmix. Mix just until the ingredients are combined, especially after adding the flour. Overmixing develops the gluten, which can lead to tough bars instead of the wonderfully tender ones we’re after. For the peanut butter swirl, using a good quality, creamy peanut butter makes all the difference. If you’re using natural peanut butter, give it a really good stir before you measure it to ensure the oil is well incorporated. When swirling, don’t go crazy trying to make perfect patterns. Gentle, artistic swipes are all you need to create that beautiful marbled effect. You want distinct ribbons of peanut butter and chocolate, not one muddy mess. Regarding baking, every oven is different, so keep an eye on your bars. A toothpick should come out with moist crumbs, not wet batter. It’s better to slightly underbake than overbake, as they will continue to cook a bit as they cool in the pan. For the glaze, the consistency is everything. If it’s too thick, it will be hard to spread; too thin, and it will run off. Aim for something that coats the back of a spoon nicely. Finally, and this is a big one for me, let them cool completely before glazing and slicing. Patience is key here! Trying to rush it will lead to a messy, crumbly disaster. I learned that the hard way early on!
Storing and Reheating Tips
These chocolate peanut butter bars are quite forgiving when it comes to storage, which is another reason I love them so much. If you’ve got leftovers (a rare occurrence in my house!), you can store them at ROOM TEMPERATURE for about 2-3 days. Make sure they are covered tightly with plastic wrap or in an airtight container. This keeps them from drying out. If you want them to last a bit longer, or if your kitchen is particularly warm, the REFRIGERATOR is your best friend. Store them in an airtight container, and they should stay fresh for about a week. I find they actually get a little chewier and fudgier in the fridge, which is a nice bonus! If you’re looking for long-term storage, these bars freeze beautifully. Wrap individual bars or slices tightly in plastic wrap, then place them in a freezer-safe bag or container. They’ll keep well in the freezer for up to 3 months. To thaw, simply remove them from the freezer and let them come to room temperature. If you’ve glazed them before freezing, the glaze will hold up nicely. If you prefer to glaze them after freezing, that works too – just thaw the bars, then prepare and apply the glaze. For reheating, if you want them warm, you can microwave a slice for about 10-15 seconds, but honestly, they’re usually best enjoyed at room temperature or slightly chilled from the fridge.
Frequently Asked Questions
Final Thoughts
So there you have it – my absolute favorite chocolate peanut butter bars! I truly believe this recipe is a winner because it perfectly balances rich, decadent flavor with incredible ease of preparation. It’s the kind of dessert that makes everyone feel special, whether it’s a casual weeknight treat or part of a festive gathering. The combination of the fudgy chocolate base and the creamy peanut butter swirl is just pure bliss. If you’re a chocolate and peanut butter lover, you simply have to give these a try. They’re proof that you don’t need complicated techniques or fancy ingredients to create something truly delicious and memorable. I hope you enjoy making them as much as my family and I love eating them! I can’t wait to hear what you think, so please leave a comment below and let me know how yours turned out, or if you tried any fun variations. Happy baking!
Chocolate Peanut Butter Bars
Ingredients
Base Layer
- 0.5 cup unsalted butter, melted
- 2 cups graham cracker crumbs
- 1 cup granulated sugar
- 0.5 cup creamy peanut butter
Chocolate Topping
- 1 cup semi-sweet chocolate chips
- 0.5 cup creamy peanut butter
Instructions
Preparation Steps
- Line an 8x8 inch baking pan with parchment paper, leaving an overhang on the sides.
- In a medium bowl, combine melted butter, graham cracker crumbs, granulated sugar, and 0.5 cup peanut butter. Mix until well combined and crumbly.
- Press the mixture evenly into the prepared baking pan to form the base layer.
- In a microwave-safe bowl, combine chocolate chips and 0.5 cup peanut butter. Microwave in 30-second intervals, stirring between each, until smooth and melted.
- Pour the chocolate peanut butter mixture over the base layer and spread evenly.
- Refrigerate for at least 2 hours, or until firm.
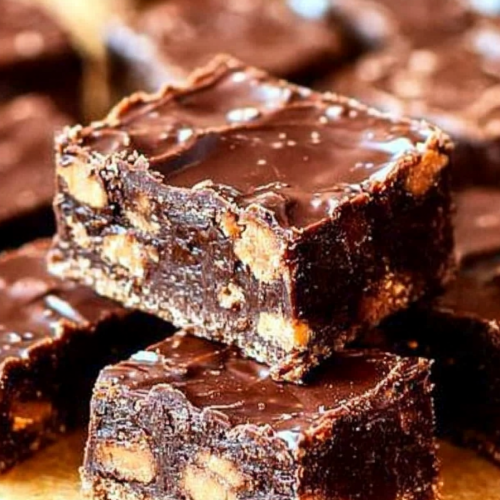
- Lift the bars out of the pan using the parchment paper overhang. Cut into squares and serve.