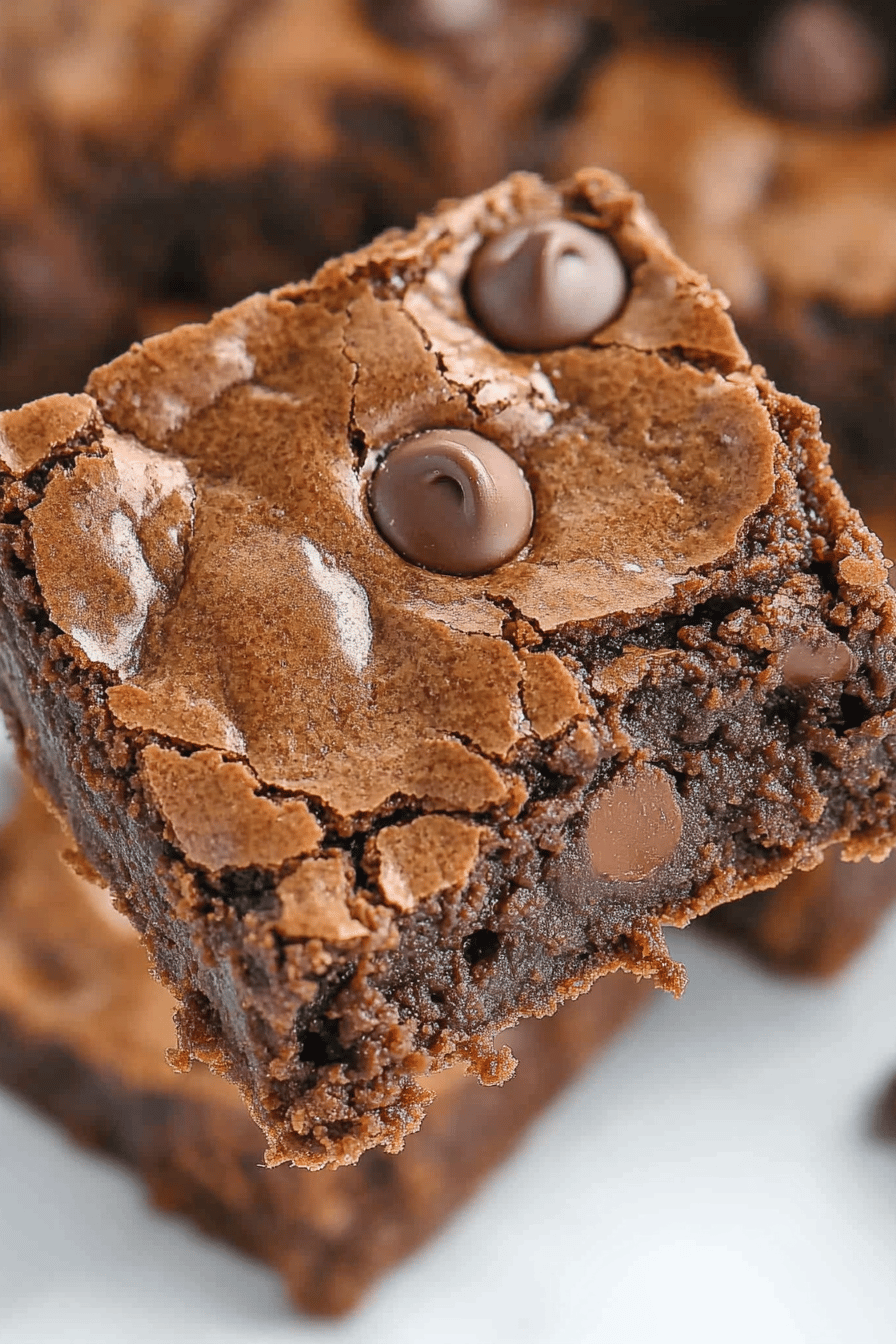
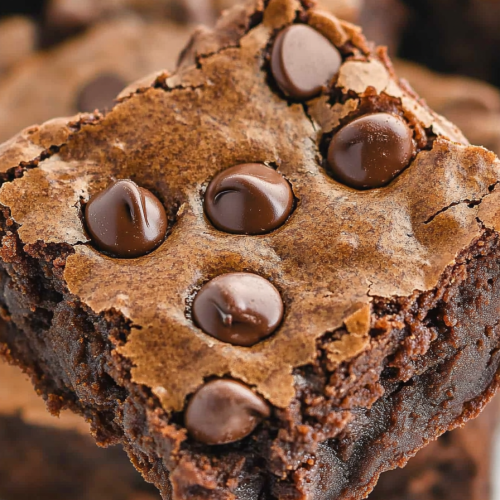
Oh, where do I even begin with these Chocolate Chip brownies? Honestly, if you’re looking for that one recipe that’s going to make your kitchen smell absolutely divine and have everyone begging for more, this is it. It’s the kind of brownie that’s deeply fudgy, intensely chocolatey, and has those perfect little pockets of melted chocolate chips that just ooze goodness. I’ve tried so many brownie recipes over the years – some are cakey, some are too dry, some require a degree in pastry to get right. But this one? This is my tried-and-true, my secret weapon. It’s the recipe I whip out when I need a serious comfort food fix, when friends are coming over unexpectedly, or, let’s be real, when I just need a little sweet something to get me through a tough afternoon. It’s like a warm hug in dessert form, and it always, always hits the spot. Forget those boxed mixes; these homemade chocolate chip brownies are a game-changer!
What is chocolate chip brownie?
So, what exactly makes these Chocolate Chip brownies so special? Think of them as the ultimate evolution of a classic. We’re talking about a brownie that’s rich and dense, with that satisfying chewiness that you just can’t get enough of. The “chocolate chip” part? That’s non-negotiable for me. Those little nuggets of semi-sweet chocolate scattered throughout and melded into the batter are what elevate it from just a good brownie to an extraordinary one. They melt and create these gooey, delightful surprises in every bite. It’s essentially a love letter to chocolate, baked into a perfectly portable, utterly irresistible square. It’s not a cakey brownie, and it’s definitely not dry. It’s fudgy, moist, and packed with pure chocolate bliss. This is the kind of treat that makes you close your eyes with the first bite and just savor the moment.
Why you’ll love this recipe?
What are some of the reasons why this chocolate chip brownie recipe has earned a spot in my heart (and my recipe binder)?flavor is just out of this world. We’re talking deep, dark chocolate notes that aren’t too sweet, perfectly balanced by the slightly bitter quality of good cocoa powder and the sweet bursts from the chocolate chips. When they come out of the oven, the aroma alone is enough to make your day. Then there’s the simplicity. Honestly, you don’t need any fancy equipment or complicated techniques. Most of the ingredients are probably already in your pantry, and you can have these mixed up and in the oven in less than 15 minutes. It’s a lifesaver on busy nights when you need a dessert in a pinch but still want something homemade and truly special. And speaking of ingredients, this recipe is wonderfully cost-effectiveWhat are some good pantry staples to make a batch without breaking the bank?versatility is amazing. While they’re perfect on their own, they’re also incredible served warm with a scoop of vanilla Ice Cream, a drizzle of caramel sauce, or even just a dusting of powdered sugar. My kids love them straight from the pan, and my husband always sneaks one (or two!) with his afternoon coffee. What I love most about these chocolate chip brownies is that they deliver on all fronts: incredible taste, ease of preparation, and pure, unadulterated chocolatey joy. They’re the definition of a crowd-pleaser, but they also feel like a special treat just for you.
How to Make Chocolate Chip Brownies
Quick Overview
Making these chocolate chip brownies is surprisingly straightforward. You’ll melt some butter and chocolate together, whisk in sugar, eggs, and vanilla, then fold in your dry ingredients and, of course, plenty of chocolate chips. The magic is in not overmixing and getting that fudgy texture just right. The whole process from start to finish, including baking time, is super manageable, making it perfect for when a chocolate craving strikes and you need something delicious, fast. You’ll be amazed at how quickly you can go from pantry staples to warm, gooey brownies.
Ingredients
For the Main Batter:
1 cup (2 sticks or 227g) unsalted butter, melted – I like to use good quality butter because you can really taste the difference. Melt it slowly so it doesn’t get too hot.
6 ounces (170g) good quality semi-sweet chocolate, chopped – Using a mix of chopped chocolate and chocolate chips works wonderfully for maximum meltiness and texture.
2 cups (400g) granulated sugar – Don’t skimp here; it contributes to the fudgy texture and sweetness.
4 large eggs, room temperature – Room temperature eggs incorporate much better into the batter.
2 teaspoons pure vanilla extract – This really enhances the chocolate flavor.
1 ½ cups (190g) all-purpose flour – Just regular all-purpose flour is perfect.
⅔ cup (55g) unsweetened cocoa powder – I prefer Dutch-processed cocoa for its deeper, richer color and flavor, but natural will work too!
½ teaspoon baking powder – Just a touch to give them a little lift, but not too much, we want fudgy!
½ teaspoon salt – Balances the sweetness and brings out the chocolate flavor.
For the Chocolate Chips:
1 ½ cups (255g) semi-sweet chocolate chips – Or a mix of semi-sweet and milk chocolate chips for extra sweetness. I always add a little extra just because I can’t resist!
Step-by-Step Instructions
Step 1: Preheat & Prep Pan
First things first, get your oven preheated to 350°F (175°C). For this recipe, I love to use a 9×13 inch baking pan. You want to make sure your brownies don’t stick, so grease it really well with butter or cooking spray, and then line it with parchment paper, leaving some overhang on the sides. This makes lifting the whole pan of brownies out so much easier later! Trust me, this step is a lifesaver when it comes to clean-up.
Step 2: Mix Dry Ingredients
In a medium bowl, whisk together the all-purpose flour, unsweetened cocoa powder, baking powder, and salt. Whisking them together well ensures that everything is evenly distributed, so you don’t get any pockets of unsweetened flour or baking powder. This simple step helps create a uniform texture throughout your brownies.
Step 3: Mix Wet Ingredients
In a large heatproof bowl set over a saucepan of simmering water (or carefully in the microwave, in short bursts), melt the butter and the chopped semi-sweet chocolate together. Stir occasionally until smooth and fully combined. Remove the bowl from the heat. Whisk in the granulated sugar until it’s well incorporated into the chocolate mixture. Then, one at a time, whisk in the eggs until each one is fully blended. Stir in the vanilla extract. The mixture should be glossy and rich.
Step 4: Combine
Now, it’s time to bring it all together. Gradually add the dry ingredients to the wet ingredients. Use a spatula or wooden spoon to gently fold them together until just combined. It’s really important not to overmix here! Stop mixing as soon as you no longer see streaks of dry flour. A few lumps are okay; overmixing will develop the gluten in the flour and can make your brownies tough instead of fudgy.
Step 5: Prepare Filling
This step is super simple: just have your extra chocolate chips ready to go! You’ll be folding most of them into the batter, and sprinkling some on top for that extra visual appeal and delightful texture. I like to use a mix of chip sizes if I have them, but standard semi-sweet chips are absolutely perfect.
Step 6: Layer & Swirl
Pour about two-thirds of the brownie batter into your prepared pan and spread it evenly. Now, sprinkle about two-thirds of your extra chocolate chips over the top of this first layer. Dollop the remaining brownie batter over the chocolate chips and spread it as best you can to cover them. Don’t worry if it’s not perfectly smooth; it will bake that way. Finally, sprinkle the remaining chocolate chips over the top. This layering technique ensures chocolatey goodness throughout!
Step 7: Bake
Bake in your preheated oven for 25-30 minutes. The edges should look set, and the center should still be a little soft. To test for doneness, insert a toothpick into the center. It should come out with moist crumbs attached, not completely clean (that means they’re overbaked!), and definitely not wet batter. Every oven is different, so keep an eye on them during the last 10 minutes.
Step 8: Cool & Glaze
This is perhaps the hardest part: letting them cool! Once they’re out of the oven, let them cool in the pan on a wire rack for at least 30 minutes, preferably longer. This allows them to set properly. If you want a glaze, you can melt some extra chocolate chips with a tablespoon of butter or coconut oil until smooth and drizzle it over the top once the brownies are mostly cool but still a little warm. This adds an extra layer of decadence.
Step 9: Slice & Serve
Once the brownies are completely cool (or at least mostly cool!), use the parchment paper overhang to lift the entire slab out of the pan. Place it on a cutting board and slice into squares. For the cleanest cuts, I find a sharp knife dipped in hot water and wiped dry between each cut works wonders, especially if you’ve added a glaze. Serve them warm or at room temperature. Honestly, I’m never patient enough to wait for them to be fully cool!
What to Serve It With
These chocolate chip brownies are pretty much a standalone star, but they can also be the perfect companion to a variety of occasions and pairings.
For Breakfast: Hear me out! A small, warm brownie with your morning coffee is pure indulgence. It’s not something I do every day, of course, but on a weekend morning when you want to feel a bit special, it’s divine. The bitterness of the coffee cuts through the sweetness beautifully.
For Brunch: For a more elegant brunch spread, cut them into smaller, bite-sized squares and arrange them on a platter with fresh berries like raspberries or strawberries. A glass of milk or a light, fruity iced tea complements them wonderfully.
As Dessert: This is where they truly shine. Serve a warm brownie with a scoop of high-quality vanilla bean ice cream. A drizzle of salted caramel sauce or a dollop of freshly whipped cream takes it to the next level. For a richer experience, a dark roast coffee or a rich espresso is a fantastic after-dinner pairing.
For Cozy Snacks: This is my most frequent use case! After a long day, a brownie and a glass of cold milk is my go-to comfort snack. They’re also perfect for packing in a lunchbox or taking to a potluck. My kids ask for these all the time when they come home from school!
I’ve also found that pairing them with a sprinkle of sea salt on top, especially if you add a chocolate glaze, really makes the chocolate flavors pop. Don’t be afraid to get creative!
Top Tips for Perfecting Your Chocolate Chip Brownies
I’ve learned a few tricks over the years of making countless batches of these chocolate chip brownies, and I’m happy to share them so yours turn out absolutely perfect!
Mixing Advice: The absolute golden rule with brownies is to avoid overmixing the batter once you add the flour. Overmixing develops gluten, which leads to tough, cakey brownies. Mix until *just* combined. Seriously, stop as soon as you don’t see any dry flour streaks. A few little lumps are your friends here!
Chocolate Chip Distribution: For that ultimate gooey chocolate experience, I always reserve about a third of the chocolate chips to sprinkle on top right before baking. This ensures you get those gorgeous pools of melted chocolate and also some that retain their chip shape. Mixing some into the batter as well gives you chocolate in every single bite.
Baking Doneness: This is crucial for fudgy brownies. Don’t bake them until a toothpick comes out completely clean. You want moist crumbs clinging to it! A clean toothpick means they’re already past their prime and will likely be dry. Err on the side of underbaking slightly for that perfect, dense, fudgy center.
Ingredient Swaps: If you don’t have semi-sweet chocolate chips, you can absolutely use milk chocolate, dark chocolate, or even White Chocolate chips. A mix is always fun! For the cocoa powder, Dutch-processed gives a richer, darker hue and a smoother flavor, but natural cocoa powder works fine too. You might just need to adjust sweetness slightly depending on your preference.
Cooling Patience: I know, I know, it’s the hardest part! But letting the brownies cool in the pan for at least 30 minutes, or even an hour, is essential. This allows them to set properly. If you try to cut them too soon, they’ll be a melty mess. Trust me, the wait is worth it for those clean slices and perfect texture.
Enhancing Flavor: A pinch of espresso powder added to the dry ingredients can deepen the chocolate flavor without making the brownies taste like coffee. Also, finishing with a sprinkle of flaky sea salt on top, especially if you add a glaze, is a game-changer. It balances the sweetness and makes the chocolate flavor sing!
Storing and Reheating Tips
These chocolate chip brownies are incredibly forgiving when it comes to storage, and they actually tend to get even fudgier the day after baking!
Room Temperature: Once completely cooled, you can store them in an airtight container at room temperature for up to 3 days. I usually just leave them in the baking pan, covered tightly with plastic wrap or foil. They remain wonderfully moist and delicious.
Refrigerator Storage: If you want them to last a bit longer or prefer a firmer brownie, you can store them in an airtight container in the refrigerator for up to a week. Just be aware that they will firm up considerably. To enjoy them, you might want to let them sit out at room temperature for about 15-20 minutes before serving, or gently reheat them.
Freezer Instructions: These freeze like a dream! Let them cool completely, then cut them into squares. Wrap each square individually in plastic wrap, then place them in a freezer-safe bag or container. They’ll keep their quality for up to 3 months. To thaw, simply remove from the freezer and let them come to room temperature, or microwave them for a few seconds if you’re impatient for that warm, gooey goodness.
Glaze Timing Advice: If you’ve added a glaze, it’s best to store the brownies at room temperature. The glaze can become sticky or melt in the fridge. If you must refrigerate, ensure the glaze is fully set before covering.
Frequently Asked Questions
Final Thoughts
So there you have it – my go-to recipe for the most incredible chocolate chip brownies! I truly believe this recipe strikes the perfect balance between rich, fudgy goodness and that delightful chewiness we all crave in a brownie. It’s incredibly satisfying to whip up something so delicious from scratch, and the joy it brings to my family and friends makes it all worthwhile. Whether you’re a seasoned baker or just starting out, I really hope you give these a try. They’re perfect for any occasion, from a simple Tuesday treat to a show-stopping dessert for a party. If you love these, you might also enjoy my Double Chocolate Cookies or my Fudgy Chocolate Cake recipes, which offer similar levels of chocolatey indulgence! Happy baking, and please, let me know how yours turn out in the comments below – I can’t wait to hear about your brownie adventures!
Chocolate Chip Brownies
Ingredients
Main Ingredients
- 0.5 cup unsalted butter, melted
- 1 cup granulated sugar
- 0.5 cup packed light brown sugar
- 2 large eggs
- 1 teaspoon vanilla extract
- 0.5 cup all-purpose flour
- 0.25 cup unsweetened cocoa powder
- 0.5 teaspoon salt
- 0.5 teaspoon baking powder
- 1 cup chocolate chips semi-sweet or milk chocolate
Instructions
Preparation Steps
- Preheat your oven to 350°F (175°C). Grease and flour an 8x8 inch baking pan, or line it with parchment paper.
- In a large bowl, whisk together the melted butter, granulated sugar, and brown sugar until well combined.
- Beat in the eggs one at a time, then stir in the vanilla extract.
- In a separate medium bowl, whisk together the flour, cocoa powder, salt, and baking powder.
- Gradually add the dry ingredients to the wet ingredients, mixing until just combined. Do not overmix.
- Fold in the chocolate chips.
- Pour the batter into the prepared baking pan and spread evenly.
- Bake for 25-30 minutes, or until a toothpick inserted into the center comes out with moist crumbs attached (not wet batter).
- Let the brownies cool completely in the pan on a wire rack before cutting into squares.