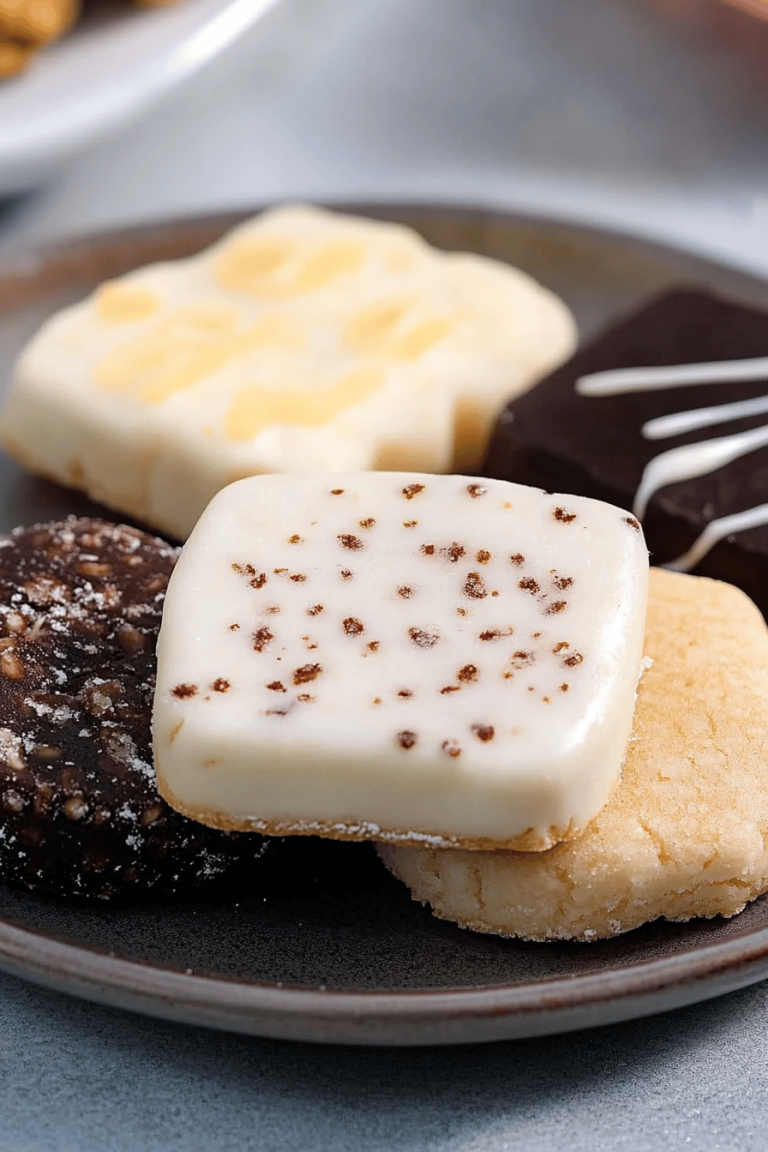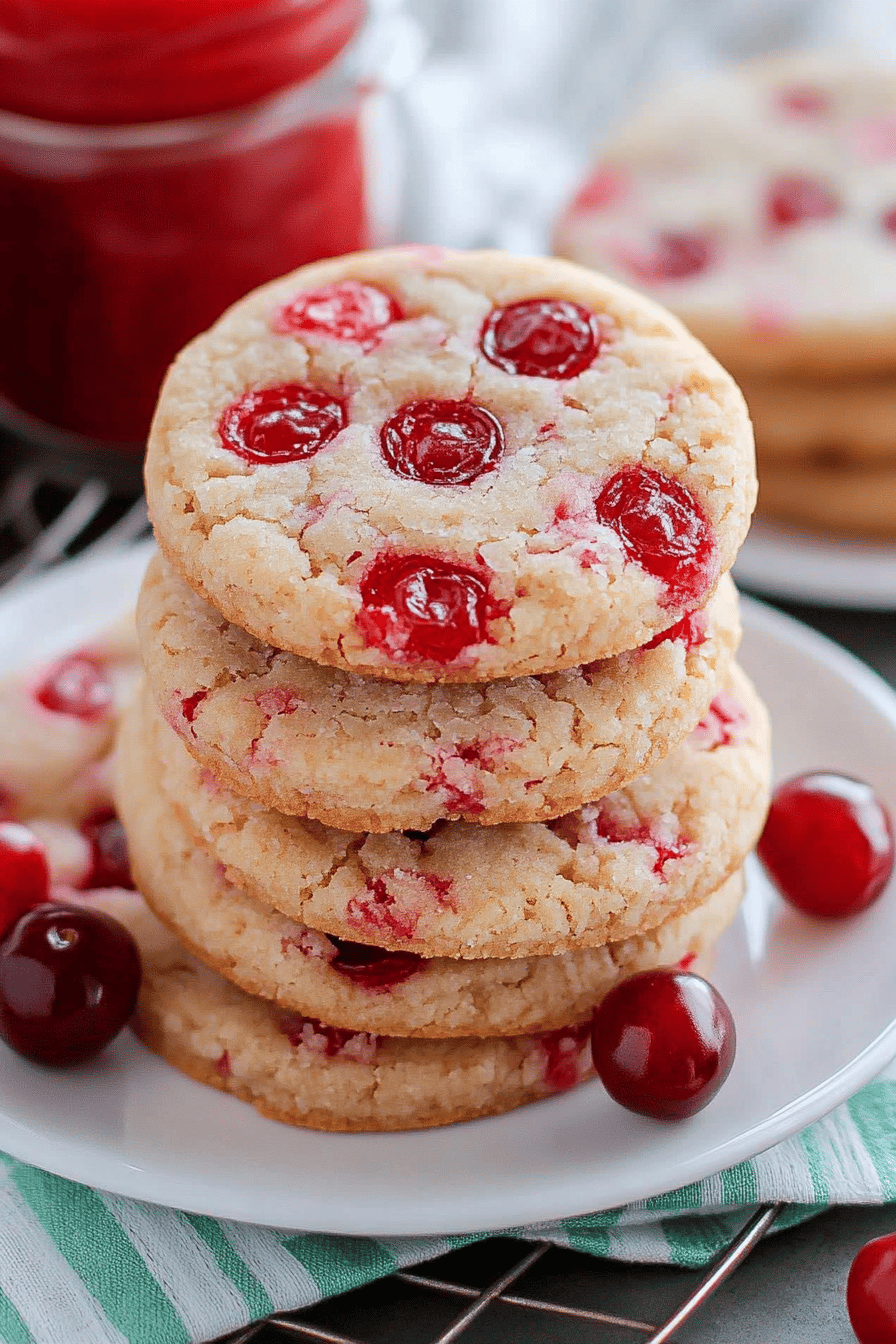
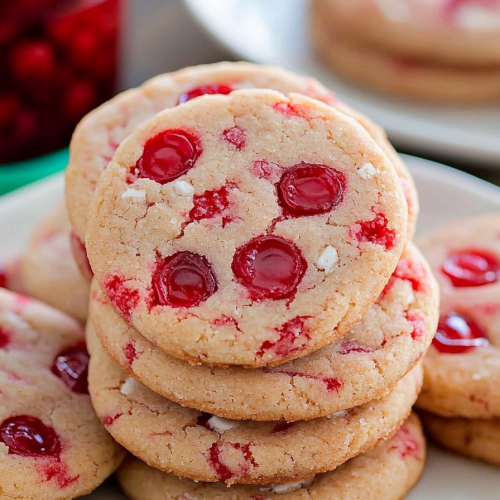
Oh, where do I even begin with these cherry shortbread cookies? They’re more than just a treat; they’re a little slice of pure joy baked into every bite. I remember the first time I made them, years ago, when I was trying to impress some friends who were coming over unexpectedly. I rummaged through my pantry, found some dried cherries, and a vague idea in my head, and hoped for the best. What came out of the oven was pure magic. The crumbly, buttery shortbread with those little bursts of tart-sweet cherry? It was an instant hit. Honestly, they’re so good, they make even my most finicky eater (you know who I’m talking about!) ask for seconds. If you’ve ever loved a good classic shortbread but craved something a little more… exciting, then these cherry shortbread cookies are your answer. They’re like the sophisticated cousin of your basic cookie, but just as welcoming and ridiculously easy to make. They’re perfect for a cozy afternoon tea, a delightful addition to a cookie platter, or even just a little pick-me-up when you need a moment of sweet escape.
What is a cherry shortbread cookie?
So, what exactly are these delightful little morsels? Think of them as your beloved, buttery shortbread, but with a delightful twist. Instead of being plain and perfect on their own (which they are, don’t get me wrong!), we’re folding in finely chopped dried cherries. These aren’t just any dried cherries; they’re the kind that retain a bit of chewiness and a vibrant, tart-sweet flavor that cuts beautifully through the rich, melt-in-your-mouth shortbread. The name “shortbread” itself comes from the high fat content (butter, in this case!) which gives it that characteristic crumbly texture. It’s a simple dough, really, focused on quality ingredients singing together. These cherry shortbread cookies aren’t overly complicated, but that simplicity is their superpower. They let the buttery goodness and the natural tartness of the cherries shine through. It’s a comforting, nostalgic cookie that feels both classic and wonderfully unique. I’ve tried adding other dried fruits, but the cherry always wins for me; it’s just the perfect balance of sweet and tart.
Why you’ll love this recipe?
What are some of the best reasons to make a cherry shortbread cookie?flavor is just out of this world. You get that rich, buttery shortbread base that practically melts on your tongue, and then BAM! you hit a pocket of sweet, slightly tart cherry. It’s not an overpowering sweetness; it’s more of a delightful surprise that keeps you coming back for just one more. It’s like little jewels scattered throughout the cookie. Then there’s the simplicity. Honestly, this recipe is a lifesaver on busy afternoons. It uses basic pantry staples, and the dough comes together in a flash. There’s no complicated creaming or chilling for hours (though a little chill never hurts!). You can literally have dough mixed and ready to bake in under 20 minutes. And let’s talk about Cost-efficiency: What is the best way to measure cost-efficiency?. Butter, flour, sugar, and dried cherries – these are all pretty budget-friendly ingredients, especially when you consider how many cookies you get from a single batch. It feels like a real indulgence without breaking the bank, which is always a win in my book. Plus, the versatility! While I adore them just as they are, you can also dip them in chocolate, drizzle them with a simple icing, or even add a tiny pinch of almond extract to the dough for a different nutty note. They’re perfect for holiday cookie boxes, bake sales, or just when you need something a little special to accompany your afternoon tea or coffee. They honestly stand up so well against fancier, more time-consuming cookies. I’ve made them for potlucks where they’re always the first to disappear, and I’ve also just whipped up a batch for my family on a Tuesday, and it made the whole day feel a little brighter. What I love most about these cherry shortbread cookies is that they feel both elegant and wonderfully comforting. They’re a hug in cookie form, really.
How to Make Cherry Shortbread Cookies
Quick Overview
This recipe is all about simplicity and deliciousness. We’ll start by creaming butter and sugar until light and fluffy, then mix in flour and your chopped dried cherries until just combined. The dough is then shaped into logs, chilled briefly, sliced, and baked until golden around the edges. Once cooled, a simple glaze or a dusting of powdered sugar is the perfect finishing touch. It’s a straightforward process that yields incredibly rewarding results, perfect for both beginner bakers and seasoned pros looking for a reliable, crowd-pleasing cookie.
Ingredients
For the Main Batter:
This is where the magic really begins! The quality of your butter makes a big difference here, so I always opt for good quality unsalted butter. It’s the backbone of that amazing shortbread texture and flavor. Make sure it’s softened to room temperature – not melted, but soft enough to easily indent with your finger. This helps it cream beautifully with the sugar, creating that light, airy texture that’s key to perfect shortbread.
* 2 cups (4 sticks or 454g) unsalted butter, softened
* 1 cup (200g) granulated sugar
* 1 teaspoon vanilla extract
* 3 cups (375g) all-purpose flour, plus more for dusting
* 1/2 teaspoon salt
For the Cherry Inclusion:
I like to use dried tart cherries for this recipe. They have a lovely tang that cuts through the richness of the shortbread. If you can only find sweetened dried cherries, you might want to slightly reduce the sugar in the main batter, but honestly, the balance is usually just right. Make sure to chop them fairly finely; you don’t want huge chunks, but rather little pops of cherry flavor throughout. If they seem a bit hard, a quick soak in a tablespoon of warm water or cherry juice for 5 minutes can help soften them up before chopping.
* 1 cup (about 150g) dried tart cherries, finely chopped
For the Optional Glaze:
This is totally optional, but I think it adds a lovely finishing touch! It’s super simple and just jazzes them up a bit. You can also just dust them with powdered sugar, which is equally delightful. The key here is getting the consistency right – you want it thick enough to coat but thin enough to drizzle easily.
* 1 cup (120g) powdered sugar
* 2-3 tablespoons milk (or almond milk for a subtle nutty flavor)
* 1/2 teaspoon vanilla extract (optional)
Step-by-Step Instructions
Step 1: Preheat & Prep Pan
Before we even think about mixing, let’s get our oven prepped. Preheat it to 350°F (175°C). While the oven is heating up, I like to line my baking sheets with parchment paper. This is a game-changer, trust me. It prevents sticking, makes cleanup a breeze, and ensures your cookies bake evenly without getting crispy bottoms. Just cut out pieces of parchment to fit your baking sheets.
Step 2: Mix Dry Ingredients
In a medium bowl, whisk together the all-purpose flour and salt. Just a quick whisk is all it takes to combine them. Setting this aside for now. This ensures the salt is evenly distributed throughout the flour, so you don’t get any salty pockets in your cookies. I usually do this step first to have everything ready when I need it.
Step 3: Mix Wet Ingredients
In a large bowl (or the bowl of your stand mixer fitted with the paddle attachment), cream together the softened butter and granulated sugar. Beat them on medium speed until the mixture is pale yellow and fluffy, about 3-4 minutes. This is a crucial step for achieving that light, tender shortbread texture. Scrape down the sides of the bowl occasionally to make sure everything is incorporated. Then, beat in the vanilla extract until just combined.
Step 4: Combine
Gradually add the dry ingredients to the wet ingredients, mixing on low speed until just combined. Be careful not to overmix here! Overmixing develops the gluten in the flour, which can make your shortbread tough instead of tender and crumbly. Once the flour is mostly incorporated, add your finely chopped dried cherries. Mix on low speed for just a few more seconds until the cherries are evenly distributed. The dough will be a little soft and shaggy at this point, but should hold together when squeezed.
Step 5: Prepare Filling
This step is technically about the cherries, which we’ve already chopped and added to the dough! But if you were making a separate filling, this is where you’d prepare it. For these cookies, the “filling” is the lovely pockets of cherry throughout the Cookie Dough itself. So, just ensure your cherries are chopped finely enough that they’ll distribute evenly without making the dough difficult to handle.
Step 6: Layer & Swirl
This recipe doesn’t really involve layering or swirling in the traditional sense, as the cherries are mixed directly into the dough. However, to ensure even distribution, you can gently fold the dough a couple of times after adding the cherries. Then, turn the dough out onto a lightly floured surface. I like to shape it into two uniform logs, about 1.5 to 2 inches in diameter. Gently roll the dough to create a smooth, even log. This makes slicing much easier and more consistent. Wrap each log tightly in plastic wrap. At this point, you can either bake them right away if you’re short on time, or chill them for about 30 minutes in the refrigerator. Chilling makes them easier to slice cleanly and can help them hold their shape a bit better during baking.
Step 7: Bake
Once your dough logs are chilled (or if you’re baking them immediately), unwrap them. Using a sharp knife, slice the logs into rounds about 1/2 inch thick. Arrange the cookie slices on your prepared baking sheets, leaving about 1 inch between them. Bake for 15-20 minutes, or until the edges are lightly golden brown and the centers are set. Keep a close eye on them, as shortbread can go from perfectly baked to overdone very quickly. The exact baking time will depend on your oven and the thickness of your cookies. They should look slightly pale on top with golden edges. I often find that rotating the pans halfway through baking helps ensure even browning.
Step 8: Cool & Glaze
Let the cookies cool on the baking sheets for about 5 minutes before carefully transferring them to a wire rack to cool completely. This is important because they’re fragile when hot. Once the cookies are completely cool, you can prepare the glaze if you’re using it. Whisk together the powdered sugar, milk, and vanilla extract (if using) until smooth. You want a drizzly consistency, so add more milk a teaspoon at a time if it’s too thick, or more powdered sugar if it’s too thin. Drizzle the glaze over the cooled cookies using a spoon or a piping bag with a small tip. Let the glaze set completely before stacking or storing.
Step 9: Slice & Serve
Once the glaze has set, your cherry shortbread cookies are ready to be enjoyed! I usually slice them with a sharp knife, but you can also use a cookie cutter if you prefer a different shape. They are absolutely divine on their own, perfect with a cup of tea, coffee, or a cold glass of milk. Serve them at room temperature for the best texture. They look so pretty on a platter, especially with that drizzle of glaze or a light dusting of powdered sugar. They’re a guaranteed hit for any occasion!
What to Serve It With
These cherry shortbread cookies are so versatile, they fit into pretty much any gathering or craving you might have! For breakfast, they’re a little unexpected but oh-so-delicious with a strong cup of coffee. Imagine waking up, pouring yourself a mug, and having one of these tender, buttery cookies with that hint of cherry – it’s a morning treat that feels just a little bit fancy without any extra effort. For brunch, they really shine. Arrange them on a tiered stand alongside muffins, scones, and fruit salad. They add a touch of elegance and a delightful chewiness to the spread. A glass of sparkling rosé or a mimosa pairs beautifully. When serving them as a formal dessert, I love to place one or two on a small plate with a scoop of vanilla bean Ice Cream or a dollop of lightly sweetened whipped cream. The contrast of the warm (if you dare to briefly warm them) or cool cookie with the creamy accompaniment is just divine. And for those cozy snacks, well, these are the ultimate comfort food. I’ll often just grab one or two with a glass of milk while I’m curled up with a good book or catching up on my favorite shows. My kids absolutely adore them as an after-school snack, and I honestly can’t blame them! They’re perfect for sharing with friends who pop over unexpectedly, and they make a thoughtful, homemade gift for neighbors or teachers. I’ve also found they are fantastic alongside a cheese board – the sweet and tart elements complement certain cheeses surprisingly well.
Top Tips for Perfecting Your Cherry Shortbread Cookies
I’ve made these cherry shortbread cookies more times than I can count, and over the years, I’ve picked up a few tricks that really make them sing. First, when it comes to the cherries: Zucchini Prep isn’t a thing here, but cherry prep is! Make sure you’re using dried cherries, and chop them relatively finely. If you get giant chunks, they can make slicing difficult, and you might end up with an uneven bake. If your dried cherries are a bit stiff, a quick soak in a tablespoon of warm water or even a splash of cherry liqueur for about 5 minutes can really help them soften up. Just pat them dry before chopping. For Mixing Advice, I can’t stress enough: do NOT overmix the dough once the flour is added. This is the golden rule of shortbread. Mix until just combined. You want a tender, crumbly cookie, not a tough, chewy one. A shaggy dough is perfectly fine! When you’re shaping the logs, be gentle but firm enough to create a smooth surface. This helps with slicing and presentation. For Swirl Customization, while this recipe mixes the cherries in, if you wanted to get fancy, you could reserve a tablespoon of dough, mix it with a tiny bit of red food coloring, and swirl that into the main dough for visual appeal, but honestly, the natural color of the cherries is beautiful enough. For Ingredient Swaps, if you can’t find tart cherries, dried cranberries are a good substitute, though they tend to be sweeter. You could also try dried blueberries or even finely chopped dried apricots for a different flavor profile. Just be mindful of the sweetness level. For Baking Tips, remember that ovens can vary wildly. My oven often runs a little hot, so I tend to bake these on the lower end of the time range and keep a very close eye on them. They’re done when the edges are just starting to turn a light golden brown, and the centers look set but not browned. You can always bake them for another minute or two if you’re unsure, but it’s harder to fix an overbaked cookie. Also, make sure your baking sheets aren’t too crowded; giving them space allows for even air circulation and baking. Finally, for Glaze Variations, if you want a stronger cherry flavor, add a drop of cherry extract to your glaze, or even use a bit of cherry juice instead of milk for thinning. A simple dusting of powdered sugar is my go-to when I want something super quick, but if you’re feeling adventurous, a thin dark chocolate drizzle over the top is heavenly, especially after the glaze has set.
Storing and Reheating Tips
Proper storage is key to keeping these cherry shortbread cookies tasting as delicious as they did on day one. For Room Temperature storage, I usually keep them in an airtight container at room temperature for up to 5-7 days. If you’ve glazed them, make sure the glaze is completely set before stacking them or putting them in the container, otherwise, they might stick. I like to line the container with a piece of parchment paper too, just to be safe. They hold up beautifully this way. For Refrigerator Storage, honestly, I rarely need to refrigerate them because they disappear so fast! But if you live in a very warm or humid climate, or if they have a particularly soft glaze that might melt, you can refrigerate them in an airtight container for up to 10 days. They’ll be a bit firmer when cold, so letting them come back to room temperature for about 15-20 minutes before enjoying is best. For Freezer Instructions, these cookies freeze exceptionally well, which is great for making ahead of time for holidays or special occasions. Wrap the cooled, unglazed cookies tightly in a layer of plastic wrap, then a layer of aluminum foil, and place them in a freezer-safe bag or container. They’ll keep for up to 3 months. To thaw, simply remove them from the freezer and let them come to room temperature on the counter for a few hours. If you want to add glaze after freezing, wait until they’re fully thawed. For Glaze Timing Advice, I always recommend glazing cookies *after* they have completely cooled. If you glaze warm cookies, the glaze will melt and slide right off. If you’re freezing the cookies, it’s best to freeze them *unglazed* and then glaze them after thawing. This ensures the glaze stays fresh and doesn’t get frosty or weird in the freezer. If you’ve already glazed them and need to freeze, ensure the glaze is rock solid before wrapping.
Frequently Asked Questions
Final Thoughts
Honestly, if you’re looking for a cookie that’s simple to make, incredibly delicious, and just screams homemade goodness, then you absolutely have to try these cherry shortbread cookies. They’re the perfect balance of buttery richness and sweet-tart cherry bursts, and that crumbly texture is just divine. They’re the kind of cookie that disappears way too quickly at my house, and I’m always asked to make them again. They feel special enough for guests but are simple enough for a weeknight treat. If you love this recipe, you might also enjoy my classic butter shortbread cookies or my chewy ginger molasses cookies – they’re also easy, crowd-pleasing favorites! I can’t wait to hear how your cherry shortbread cookies turn out. Let me know in the comments below if you tried them, and how you liked them, or if you discovered any fun variations!
Cherry Shortbread Cookies
Ingredients
Main Ingredients
- 1 cup unsalted butter, softened
- 0.5 cup granulated sugar
- 2 teaspoon vanilla extract
- 2.5 cup all-purpose flour
- 0.5 teaspoon salt
- 0.75 cup chopped dried cherries
Instructions
Preparation Steps
- In a large bowl, cream together the softened butter and granulated sugar until light and fluffy.
- Beat in the vanilla extract.
- In a separate medium bowl, whisk together the all-purpose flour and salt.
- Gradually add the dry ingredients to the wet ingredients, mixing until just combined.
- Stir in the chopped dried cherries.
- Divide the dough in half. Shape each half into a log about 2 inches in diameter.
- Wrap the logs in plastic wrap and refrigerate for at least 30 minutes, or until firm.
- Preheat your oven to 325°F (160°C). Line baking sheets with parchment paper.
- Unwrap the chilled dough logs and slice them into 0.25-inch thick rounds.
- Place the cookies on the prepared baking sheets, about 1 inch apart.
- Bake for 12-15 minutes, or until the edges are lightly golden.
- Let the cookies cool on the baking sheets for a few minutes before transferring them to a wire rack to cool completely.